Spring FrameworkでWebアプリ作りたい #02 リクエストパラメータ(その1)
はじめ
前回
「Hello, World!」をブラウザに出力する。
今回
- Modelインターフェースを使いコントローラから画面に値を渡す。
- Thymeleaf(タイムリーフ)テンプレートエンジンで値を受け取り、画面に表示する。
- フォーム送信を受け取る。
1. 環境とプロジェクト作成
環境
- Windows 10 pro
- eclipse 2022-12
- MySQL 8.0.33
プロジェクト作成
前回(#01)の続き。
2. Modelを使い画面に値を渡す(コントローラ側)
src/main/java
    └ com.example.demo
        └ test1
	    └ TestCtrl.java
org.springframework.ui.Modelをインポートします。
リクエストハンドラメソッド(ここではhello())の引数にModel型を指定します。
.addAttribute("名前", "値")で画面に値を渡し、Thymeleafテンプレートを使って受け取ります。ここで指定する「名前」は値を格納する変数名のようなものです。「値」には変数で渡すことも出来ます。
package com.example.demo.test1;

import org.springframework.stereotype.Controller;
import org.springframework.ui.Model;
import org.springframework.web.bind.annotation.GetMapping;

@Controller
public class TestCtrl {
	@GetMapping("/hello")
	public String hello(Model m) {
		String hello = "Hello, World!";
		m.addAttribute("msg", hello);
		return "hello";
	}
}
3. Thymeleafで値を受け取る(ビュー側)
src/main/resources
    └ templates
        └ hello.html
<html>タグの属性を次のように変更します。
<html xmlns:th="http://www.thymeleaf.org">
ひとまず渡された値は[[${名前}]]のようにModelで指定した「名前」を「インライン処理」で記述します。
<!DOCTYPE html>
<html xmlns:th="http://www.thymeleaf.org">
<head>
<meta charset="UTF-8">
<title>Insert title here</title>
</head>
<body>

[[${msg}]]

</body>
</html>
実行結果
http://localhost:8080/helloにアクセス。

4. 画面から値を受け取る
ビュー側
hello.htmlを次のように変更します。
th:action=@{"URL"}で送信先のURLを指定します。
URLの記法は「スタンダード構文」または「リンクURL」を参照。
action属性は「特定の属性に値を設定」を参照。
<!DOCTYPE html>
<html xmlns:th="http://www.thymeleaf.org">
<head>
<meta charset="UTF-8">
<title>Insert title here</title>
</head>
<body>
	[[${msg}]]
	<form th:action="@{/send}" method="post">
		<input type="text" name="text1">
		<input type="submit" value="送信">
	</form>
</body>
</html>

コントローラ側
フォーム送信を受けるコントローラ側TestCtrl.javaを編集していきます。
今回、フォームの送信方法はPOST送信なので、これを受け取る側のメソッドには@PostMappingアノテーションを使用します。
使用するにはorg.springframework.web.bind.annotation.PostMappingをインポートします。
フォーム側で送信先URLをsendとしているため@PostMapping("/send")と指定します。
リクエストパラメータは、リクエストハンドラメソッドの引数に@RequestParamアノテーションを付与します。
使用するにはorg.springframework.web.bind.annotation.RequestParamをインポートします。
引数名は<input>ダグのname属性で名付けた名前と同じにすると自動的に判断して値を渡してくれます。
もし、name属性の値と引数名を別名にしたいときは@RequestParam("text1")のようにアノテーションでname属性を指定します(ソースコードのコメントアウト部分)。
package com.example.demo.test1;

import org.springframework.stereotype.Controller;
import org.springframework.ui.Model;
import org.springframework.web.bind.annotation.GetMapping;
import org.springframework.web.bind.annotation.PostMapping;
import org.springframework.web.bind.annotation.RequestParam;

@Controller
public class TestCtrl {

	@GetMapping("/hello")
	public String hello(Model m) {
		String hello = "Hello, World!";
		m.addAttribute("msg", hello);
		return "hello";
	}

	@PostMapping("/send")
	public String getForm(Model m, @RequestParam String text1) {
	//public String getForm(Model m, @RequestParam("text1") String f) {
		System.out.println(text1);
		//System.out.println(f);
		m.addAttribute("msg", "");
		return "hello";
	}
}
実行結果
http://localhost:8080/helloにアクセス。
フォームに値を入れて送信をクリックします。
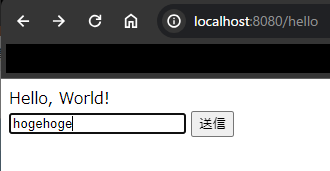
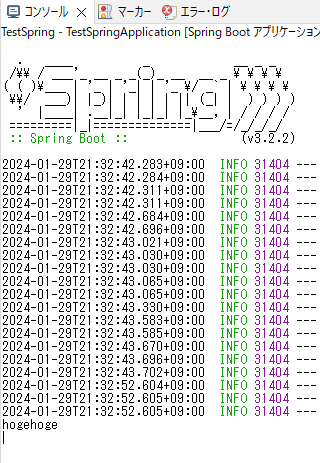
コンソールに入力値「hogehoge」が出力され、リクエストパラメータを受け取ることができました。
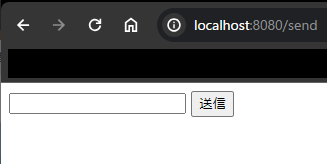
ちなみに、フォーム送信先ページhttp://localhost:8080/sendに対応するビューはhello.htmlで、このとき変数msgを空にしているため次のような画面になります。
おわり
今回のまとめとか
- 画面に値を渡す。
- 画面から値を受け取る。
- @アノテーションの使い方とThymeleafの記法も勉強しないいけない。
- 次回は複数のリクエストパラメータをまとめて受け取る方法に挑戦。
Discussion