AWS Amplify x Amplify Studio x Figma で開発効率UP
本記事では、以下のフレームワークやツール等を利用した例で、AWS Amplifyを使った開発の流れを「amplify-sample」というサンプルアプリケーションの開発に沿って紹介します。
- AWS Amplify
- React
- Redux
- TypeScript
- Figma
- Amplify Studio
React x Redux x TypeScript のアプリケーション作成とデプロイ
アプリケーションのテンプレートを出力
「amplify-sample」というアプリケーションを作成します。
npxは、npmの5.2.0以降から同封されているコマンドです。コマンドがインストールされていない場合は事前にnpmをインストールしてください。
create-react-app と --template redux-typescript を付与することにより、React・Redux・TypeScriptの3つを利用したアプリケーションのテンプレートを作成できます。
$ npx create-react-app amplify-sample --template redux-typescript

Creating a new React app in /XXXXXX/amplify-sample.

Installing packages. This might take a couple of minutes.
Installing react, react-dom, and react-scripts with cra-template-redux-typescript...

略

Success! Created amplify-sample at /XXXXXX/amplify-sample
Inside that directory, you can run several commands:

  npm start
    Starts the development server.

  npm run build
    Bundles the app into static files for production.

  npm test
    Starts the test runner.

  npm run eject
    Removes this tool and copies build dependencies, configuration files
    and scripts into the app directory. If you do this, you can’t go back!

We suggest that you begin by typing:

  cd amplify-sample
  npm start

Happy hacking!
動作確認
作成されたアプリケーションのルートディレクトリに移動し、npm start でアプリケーションを起動します。
$ cd amplify-sample
$ npm start

> amplify-sample@0.1.0 start
> react-scripts start

Compiled successfully!

You can now view amplify-sample in the browser.

  Local:            http://localhost:3000
  On Your Network:  http://192.168.0.228:3000

Note that the development build is not optimized.
To create a production build, use npm run build.

webpack compiled successfully
No issues found.
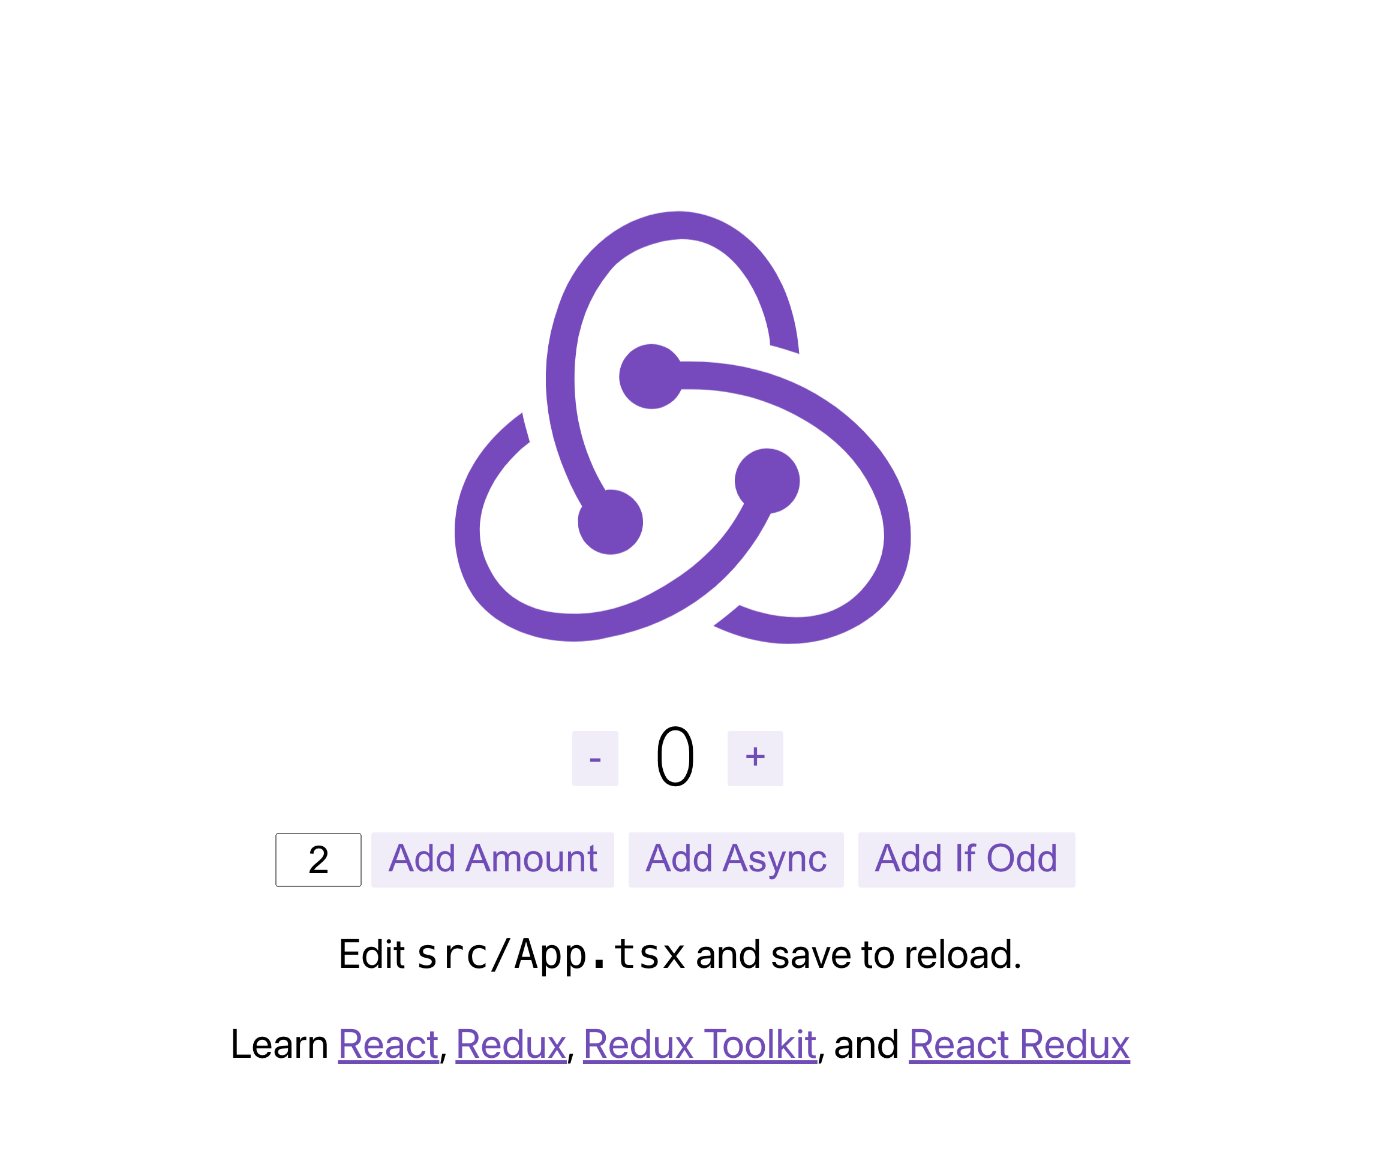
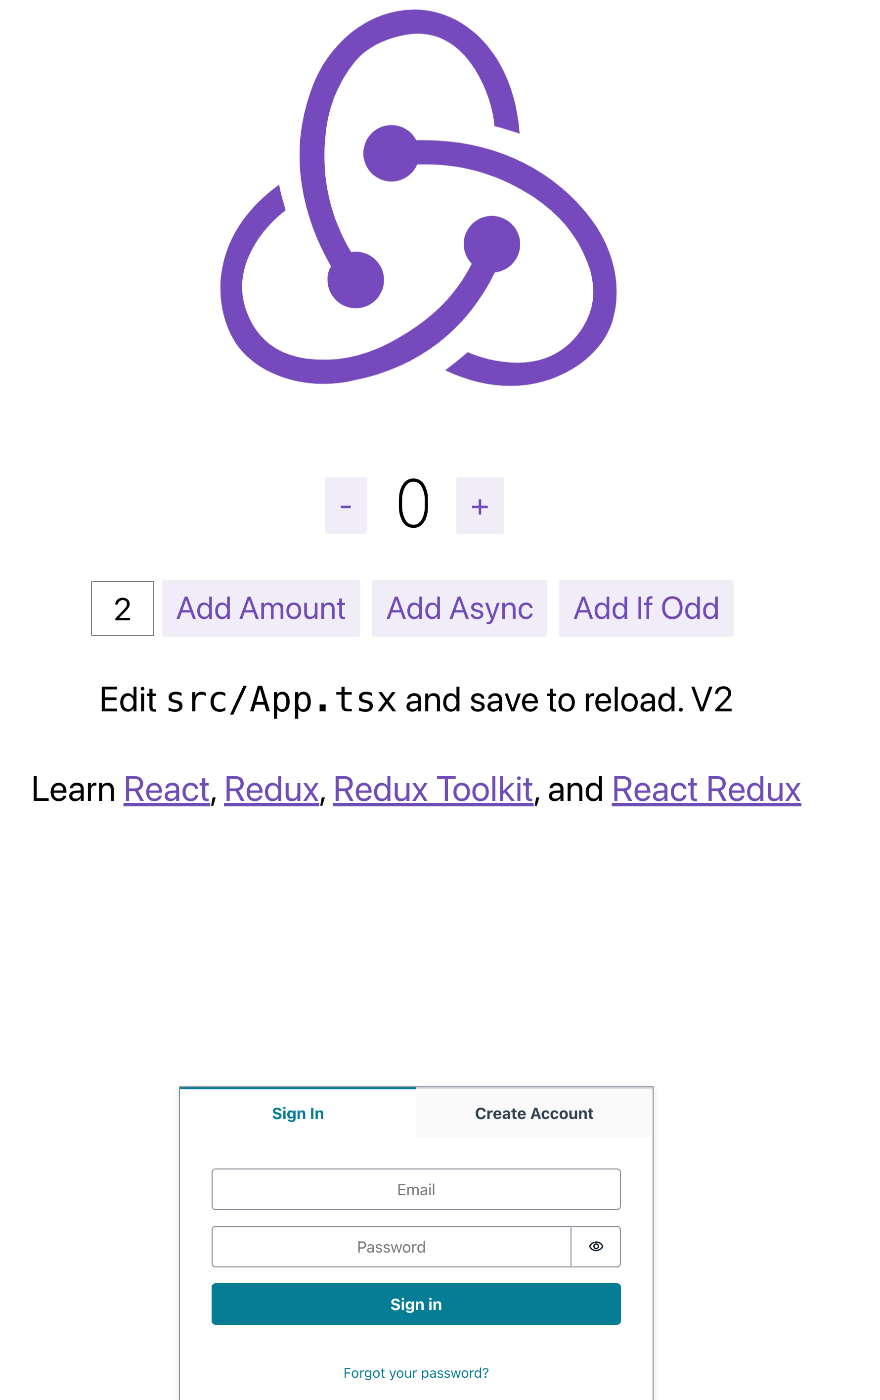
すると、ブラウザで http://localhost:3000 にアクセスすると、下図のようなテンプレートのアプリケーションが動作していることを確認できます。

GitHubに追加
アプリケーションをGitHubに追加します。この後の手順で、GitHubと連携したデプロイ環境を構築していきます。あらかじめ、GitHub上にリポジトリを準備しておいてください。
$ git init
Reinitialized existing Git repository in /XXXXXX/amplify-sample/.git/
$ git remote add origin git@github.com:<your-github-org>/amplify-sample.git
$ git add .
$ git commit -m "initial commit"
On branch main
nothing to commit, working tree clean
$ git push origin main
Enumerating objects: 34, done.
Counting objects: 100% (34/34), done.
Delta compression using up to 8 threads
Compressing objects: 100% (32/32), done.
Writing objects: 100% (34/34), 303.83 KiB | 2.39 MiB/s, done.
Total 34 (delta 0), reused 0 (delta 0), pack-reused 0
To github.com:<your-github-org>/amplify-sample.git
 * [new branch]      main -> main
AWS Amplifyにデプロイ
AWSアカウントを別途用意し、AWS Management Consoleにログインし、「AWS Amplify」のサービスコンソールを開きます。
新規の「ウェブアプリケーションをホスト」から、先程のアプリケーションを追加していきます。

「GitHub」を選択し、「続行」。
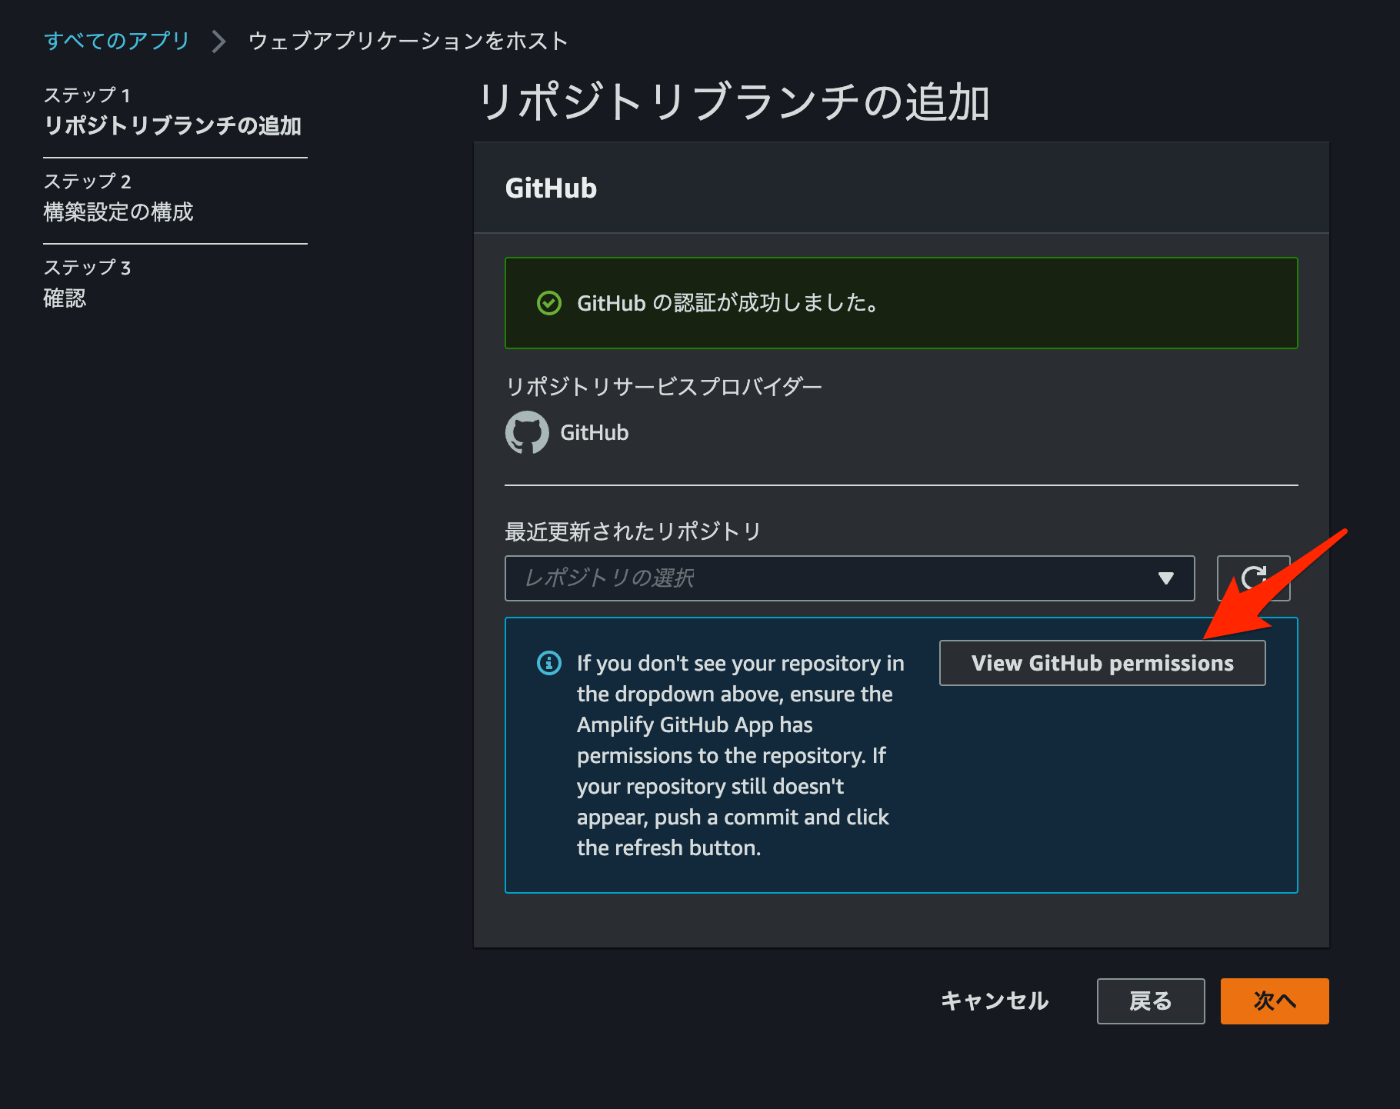
GitHubの認証を実施し、リポジトリの権限設定がされてない場合は「View GitHub permissions」を選択。

先程のアプリケーションを管理しているリポジトリのOrgを選択。
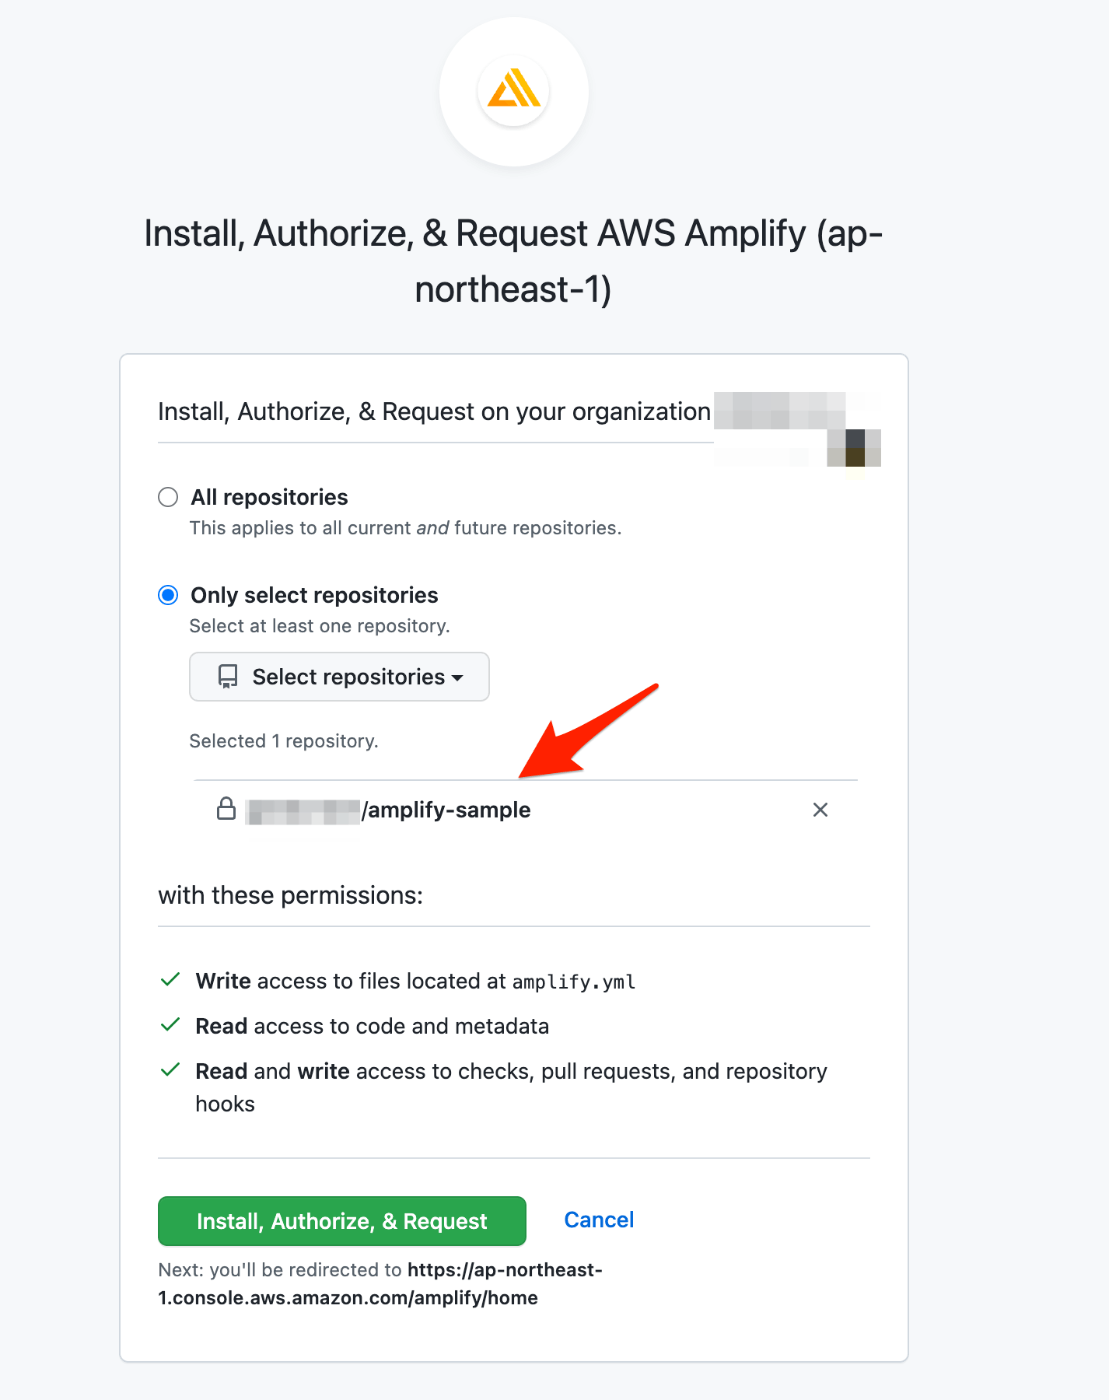
権限設定後、「Install, Authorize, & Request」を選択。
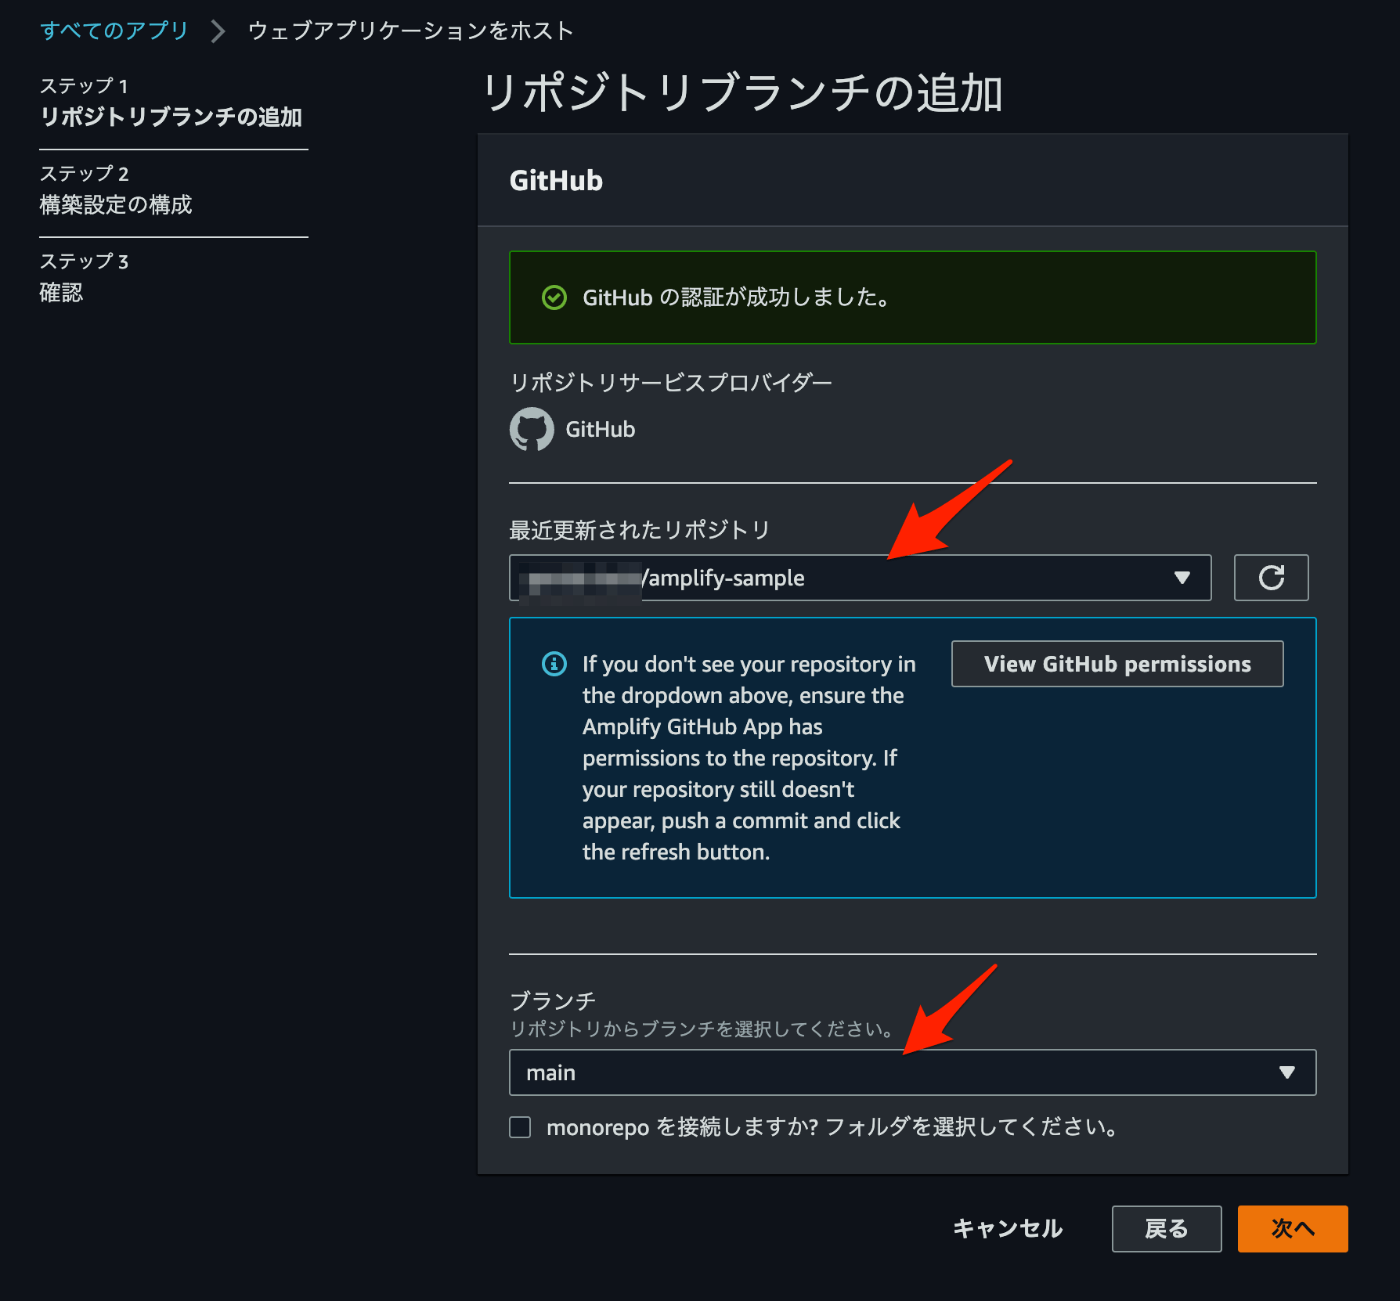
元のコンソール画面に戻るので、リポジトリとブランチを選択し、「次へ」。
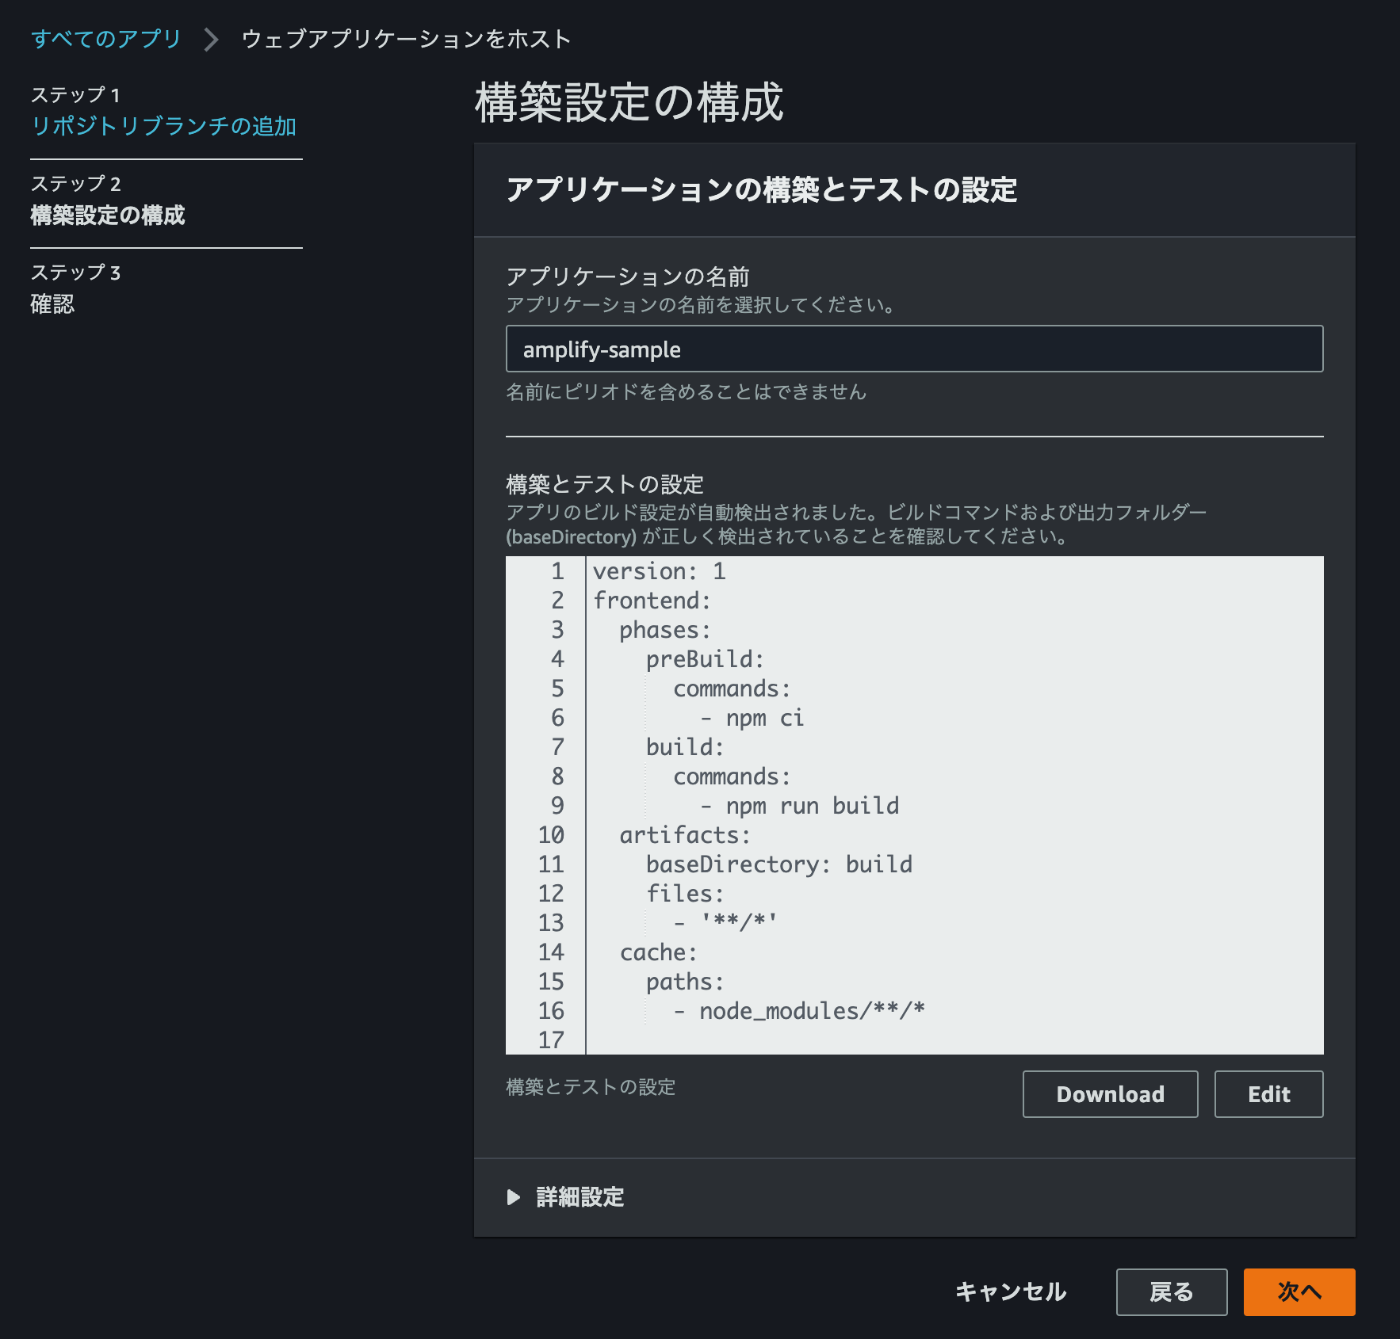
変更したい項目がなければ、そのまま「次へ」。

内容を確認し、「保存してデプロイ」。
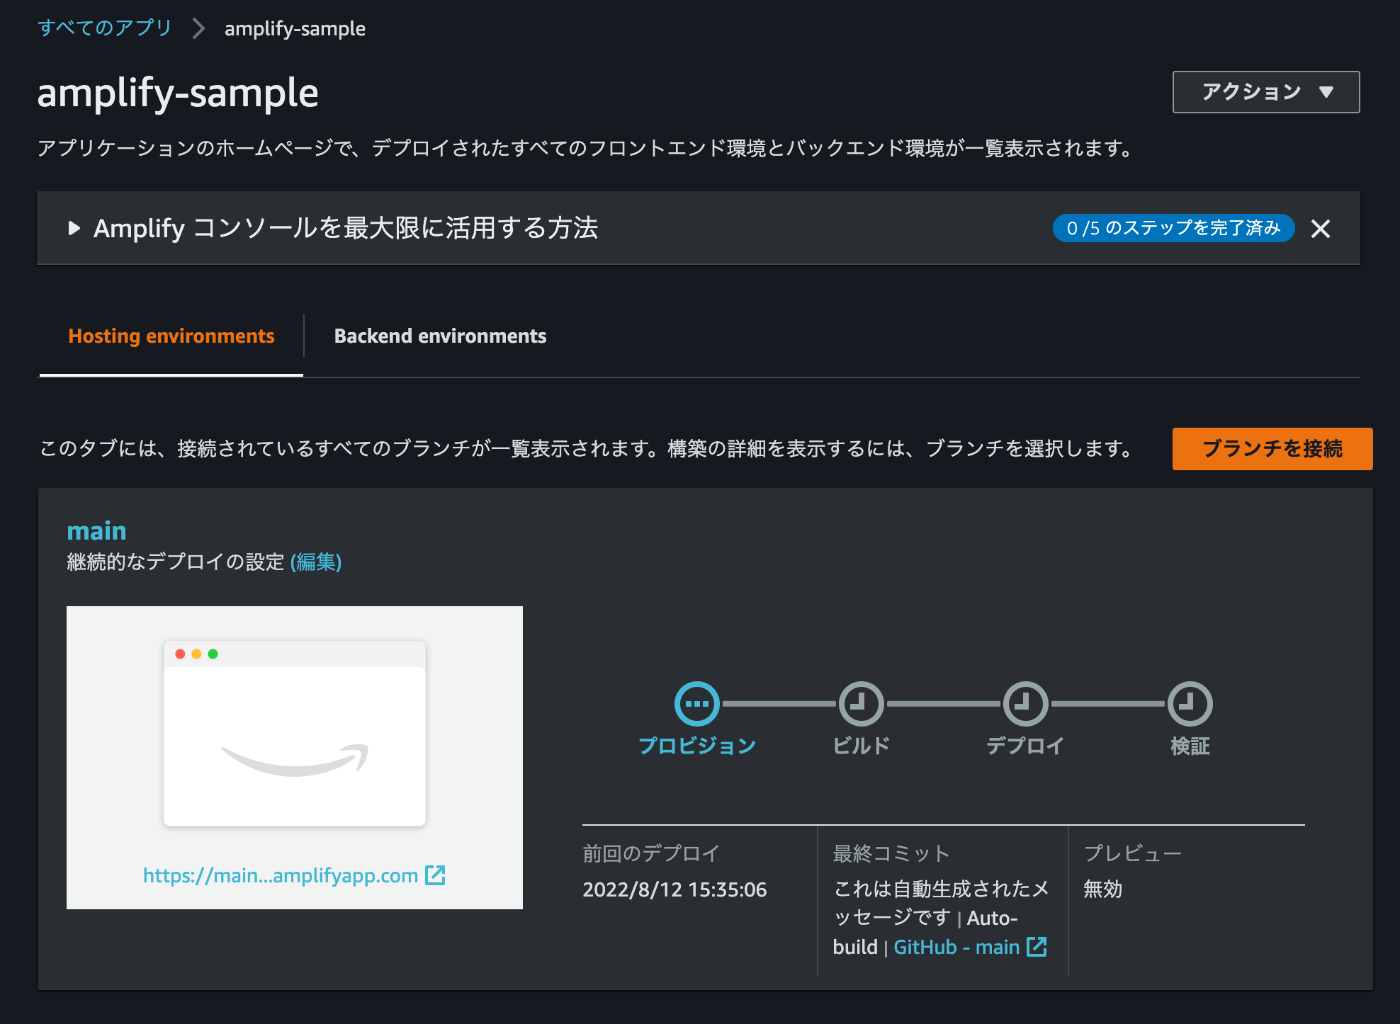
デプロイが実行されるので、完了するまで待ちます。
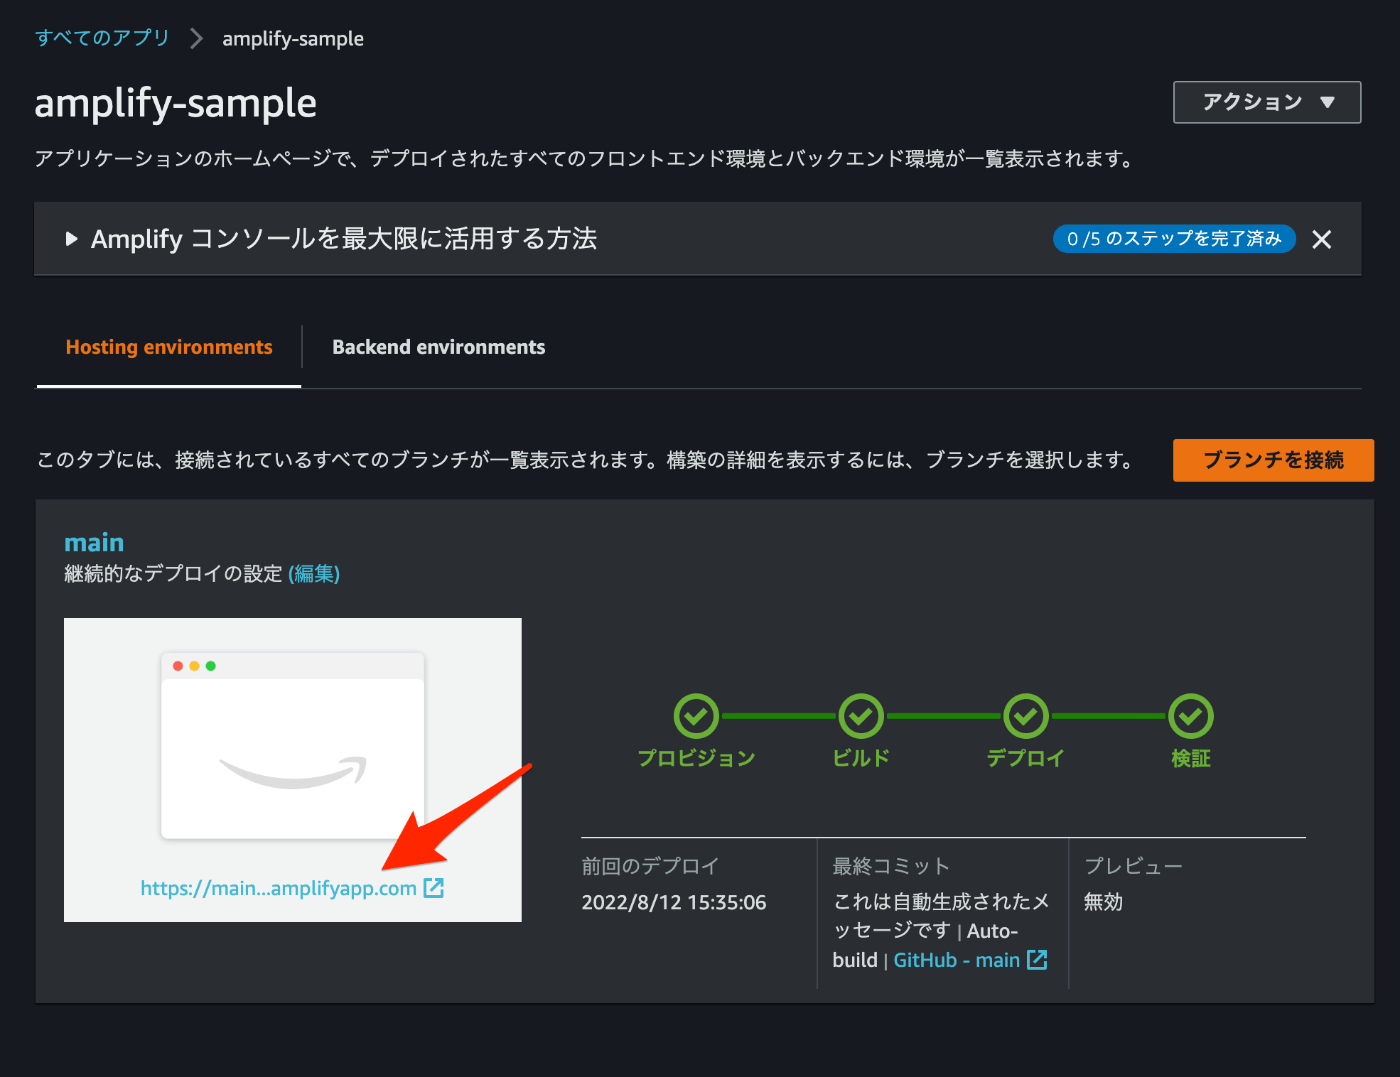
プロビジョン、ビルド、デプロイ、検証の4つにチェックが入ればデプロイ完了です。記載のURLにアクセスすると、デプロイされた環境を確認できます。
ローカル環境で動作確認したものと同じアプリケーションがデプロイされています。
自動デプロイの確認
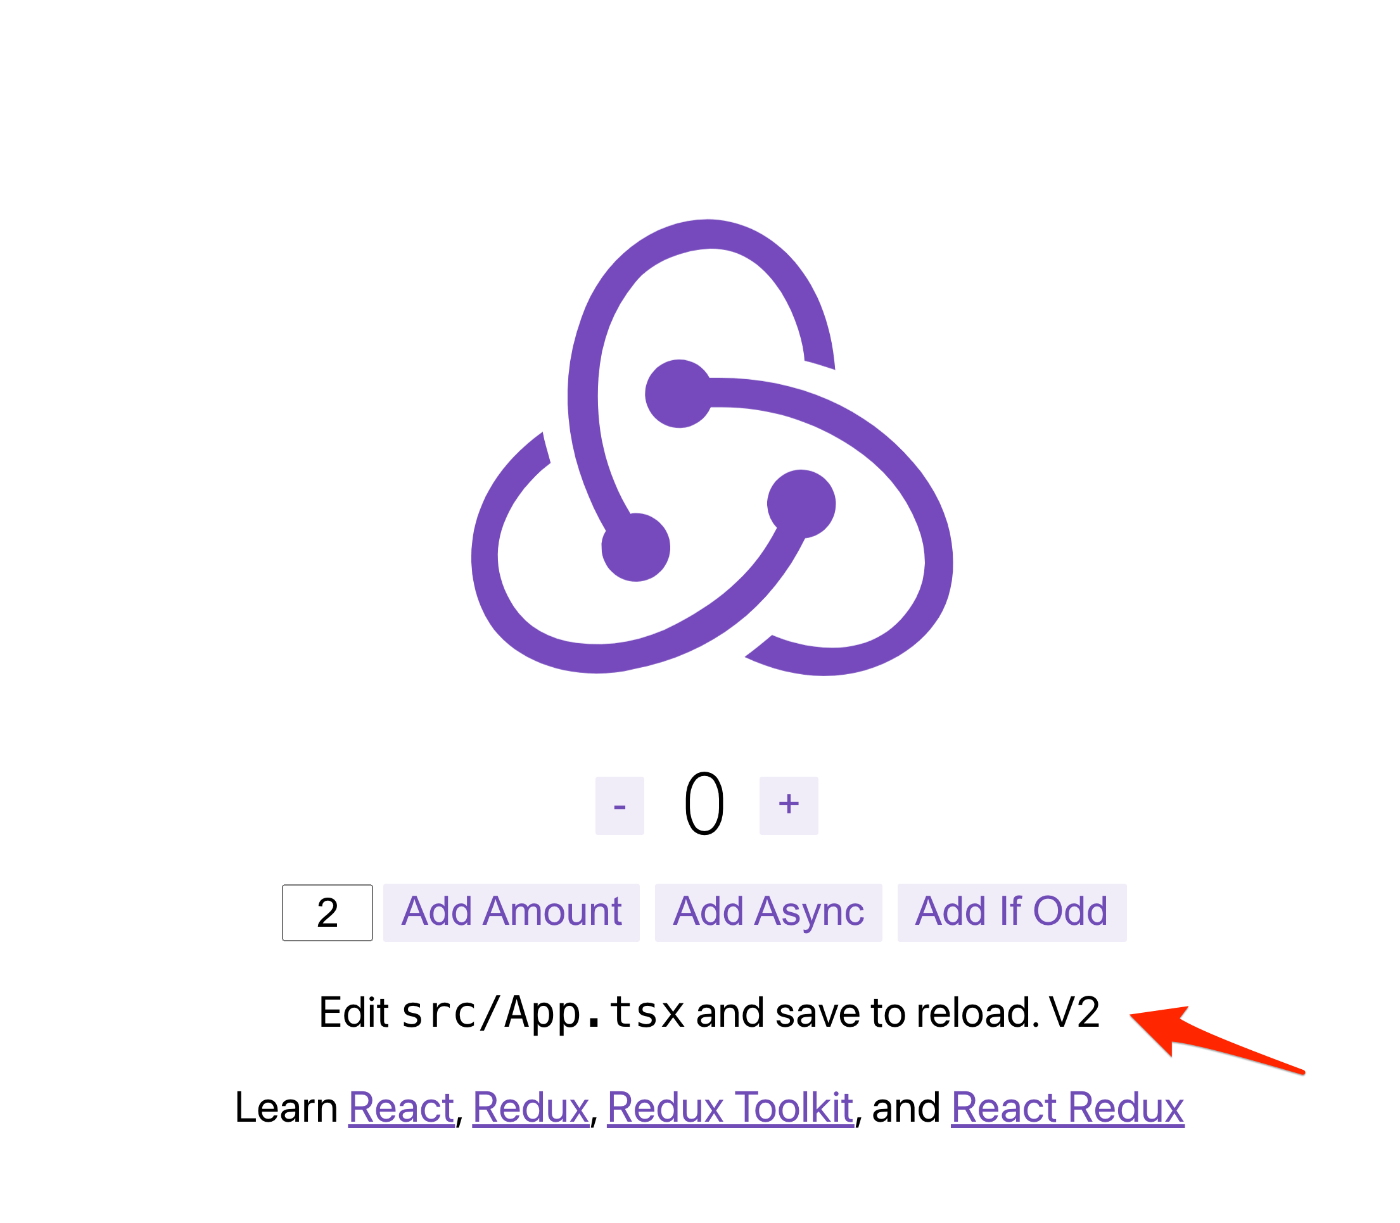
ローカル環境にて、アプリケーションの表示文言を変更してみます。
$ git diff src/App.tsx
diff --git a/src/App.tsx b/src/App.tsx
index e8da502..5f8c381 100644
--- a/src/App.tsx
+++ b/src/App.tsx
@@ -10,7 +10,7 @@ function App() {
         <img src={logo} className="App-logo" alt="logo" />
         <Counter />
         <p>
-          Edit <code>src/App.tsx</code> and save to reload.
+          Edit <code>src/App.tsx</code> and save to reload. V2
         </p>
         <span>
           <span>Learn </span>
GitHubに変更内容をプッシュします。
$ git add .
$ git commit -m "changes for v2"
[main 2da10e7] changes for v2
 1 file changed, 1 insertion(+), 1 deletion(-)
$ git push origin main
Enumerating objects: 7, done.
Counting objects: 100% (7/7), done.
Delta compression using up to 8 threads
Compressing objects: 100% (4/4), done.
Writing objects: 100% (4/4), 356 bytes | 356.00 KiB/s, done.
Total 4 (delta 3), reused 0 (delta 0), pack-reused 0
remote: Resolving deltas: 100% (3/3), completed with 3 local objects.
To github.com:<your-github-org>/amplify-sample.git
   ee29146..2da10e7  main -> main
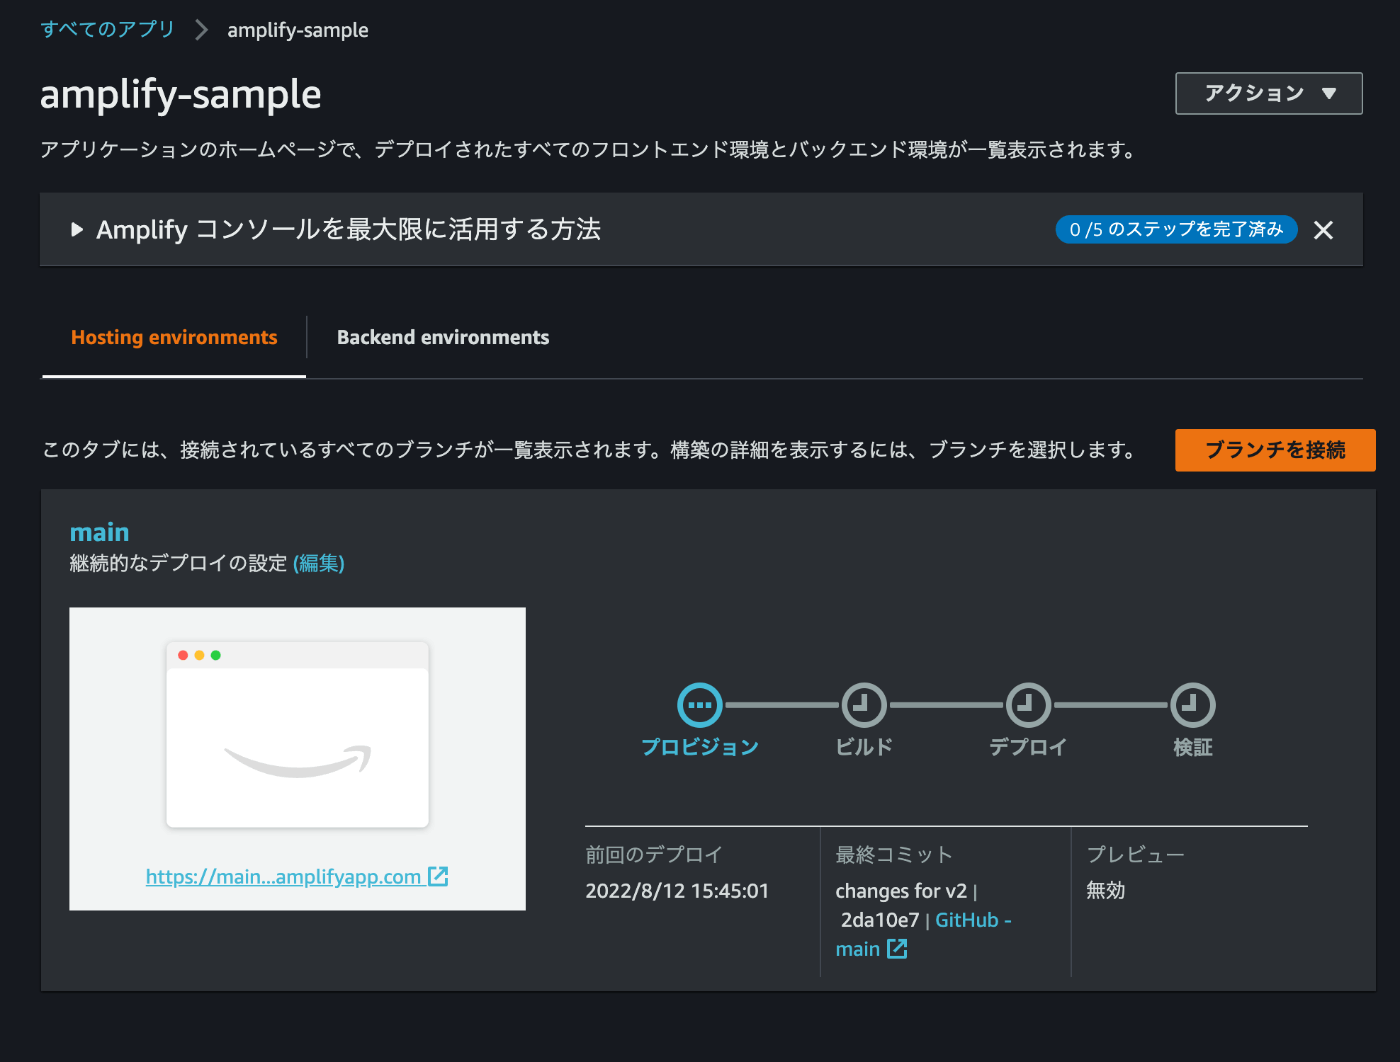
すると、GitHubと連携しているためAmplify上でデプロイが実行されます。「最終コミット」を見ると、先程コミットした内容がデプロイされていることが確認できます。
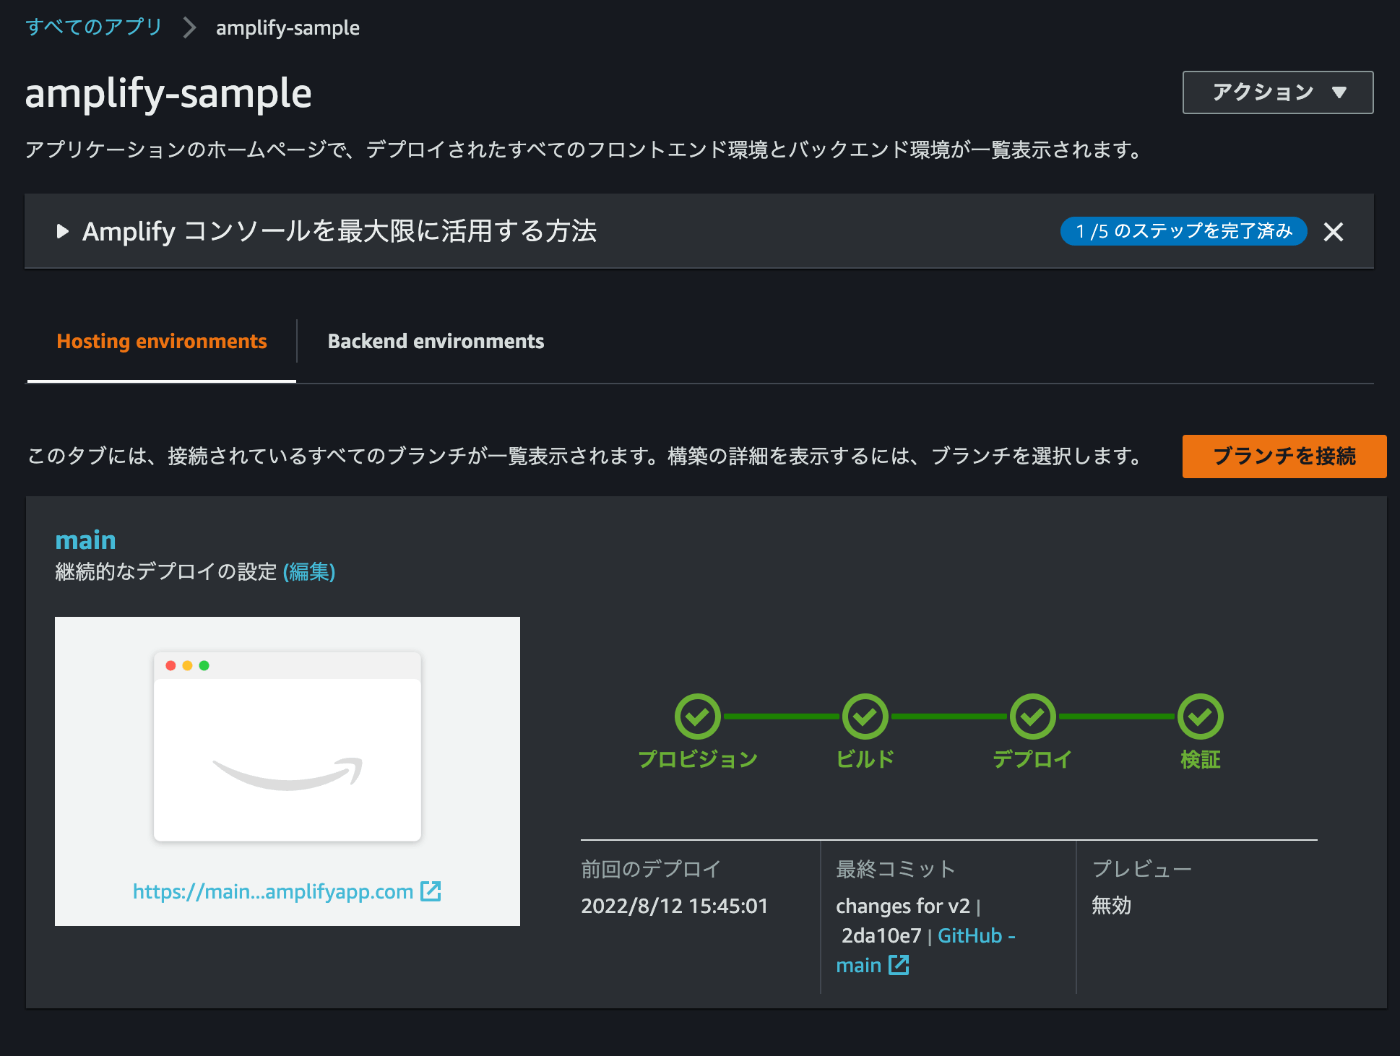
しばらく待つとデプロイが完了します。
デプロイ環境も表示が変わっています。
デプロイ環境にアクセスコントロールを追加
このままでは、デプロイ環境に誰でもアクセスできてしまいます。開発を開始する前に認証を追加しましょう。
なお、この認証追加はデプロイ環境を追加する度に設定します。「グローバルパスワード」での一括の認証追加も可能ですが、本番環境では認証を外さないといけない場合は、環境毎に設定します。
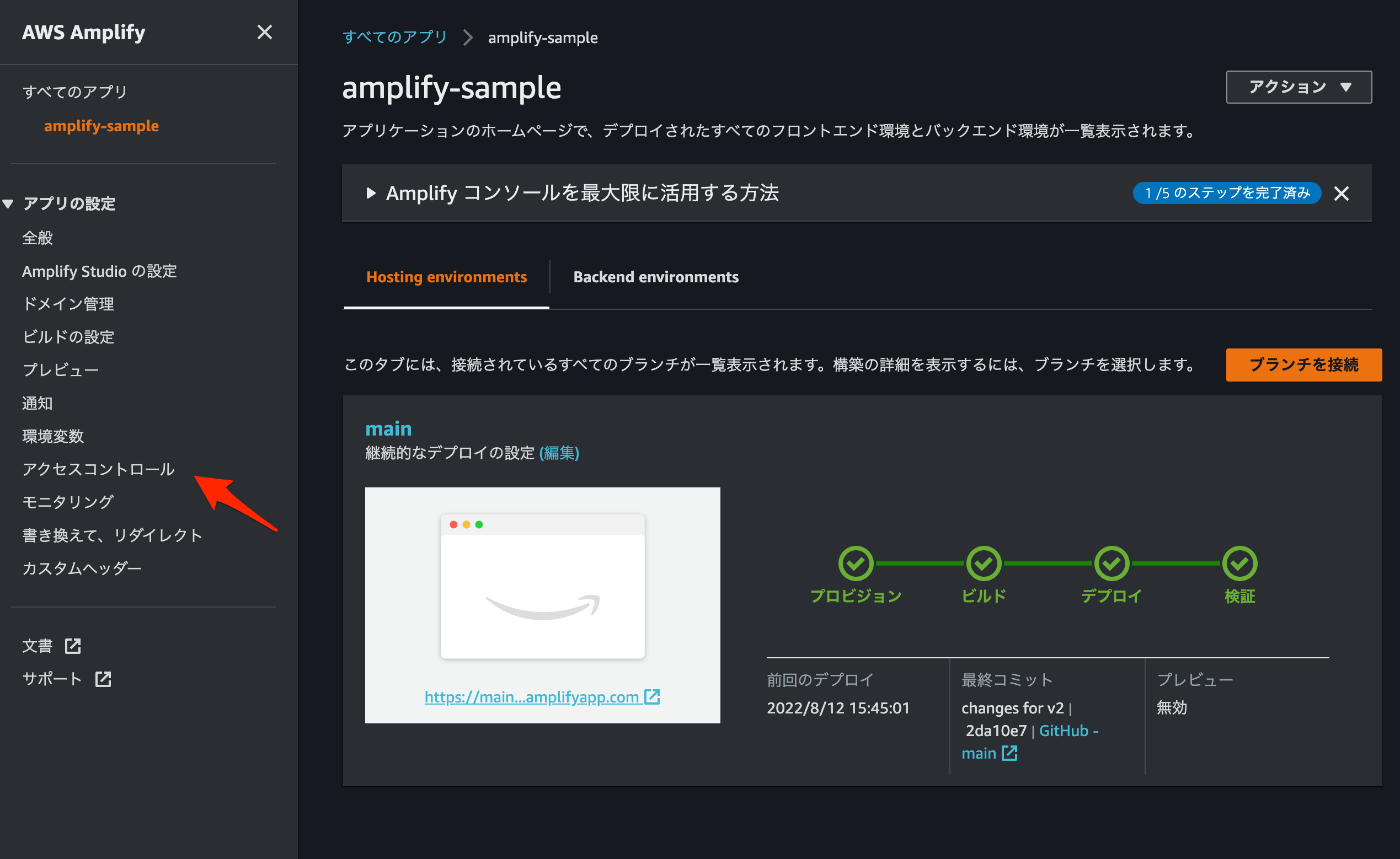
左メニューから「アクセスコントロール」を選択。
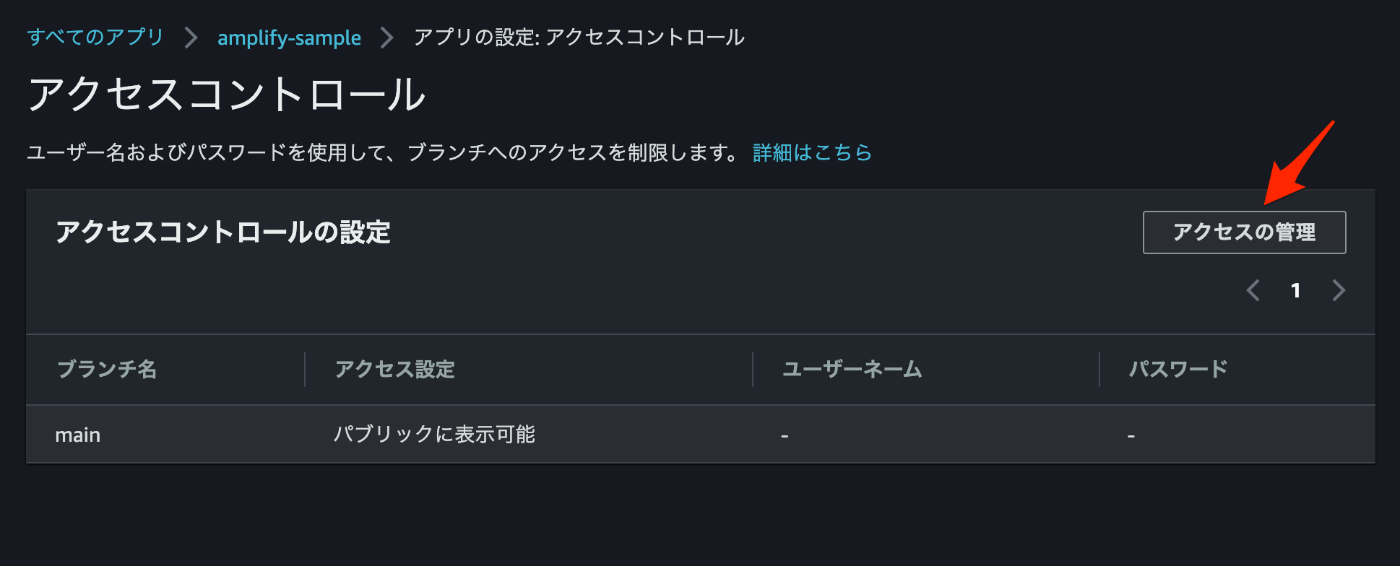
「アクセスの管理」を選択。
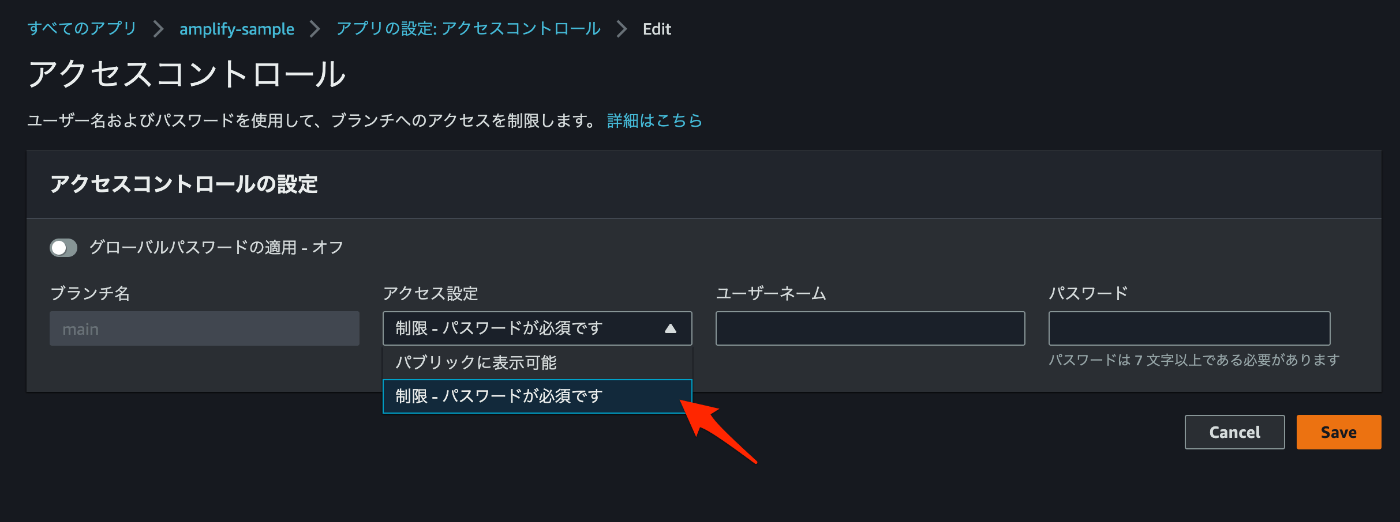
設定したいブランチの「アクセス設定」を「制限 - パスワードが必須です」にし、認証に使うユーザーネームとパスワードを設定し、「Save」。

この状態になれば、該当の環境の閲覧には認証が必須の状態です。
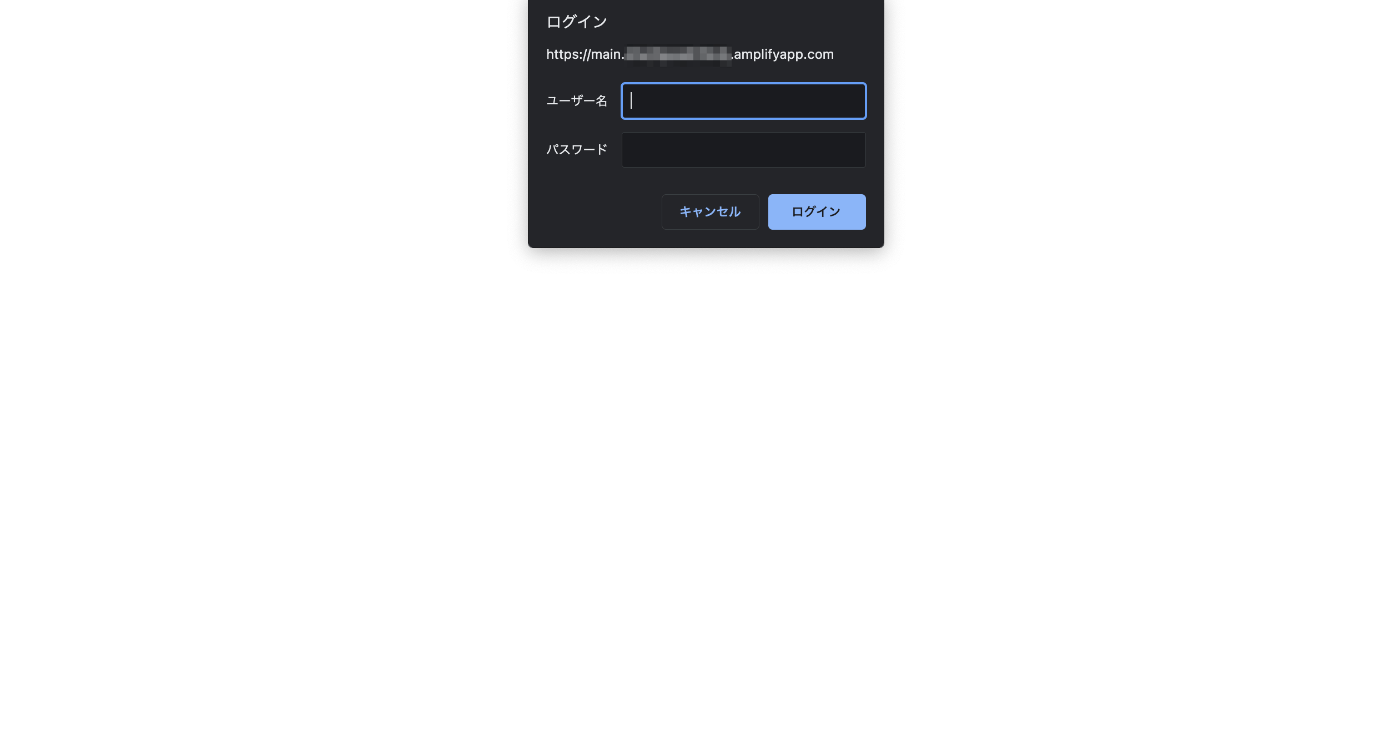
先程のページを確認すると、認証が追加されていることが確認できます。
ローカル環境のAmplify開発準備
Amplify CLIのインストール
$ npm install -g @aws-amplify/cli

changed 26 packages, and audited 27 packages in 16s

7 packages are looking for funding
  run `npm fund` for details

found 0 vulnerabilities
Amplify CLIの設定
amplify configure を実行していくと、途中でブラウザが立ち上がり、認証情報が利用されます。
各設定項目が聞かれるので、随時回答していきます。
$ amplify configure
Follow these steps to set up access to your AWS account:
Sign in to your AWS administrator account:
https://console.aws.amazon.com/
Press Enter to continue
Specify the AWS Region
? region: ap-northeast-1
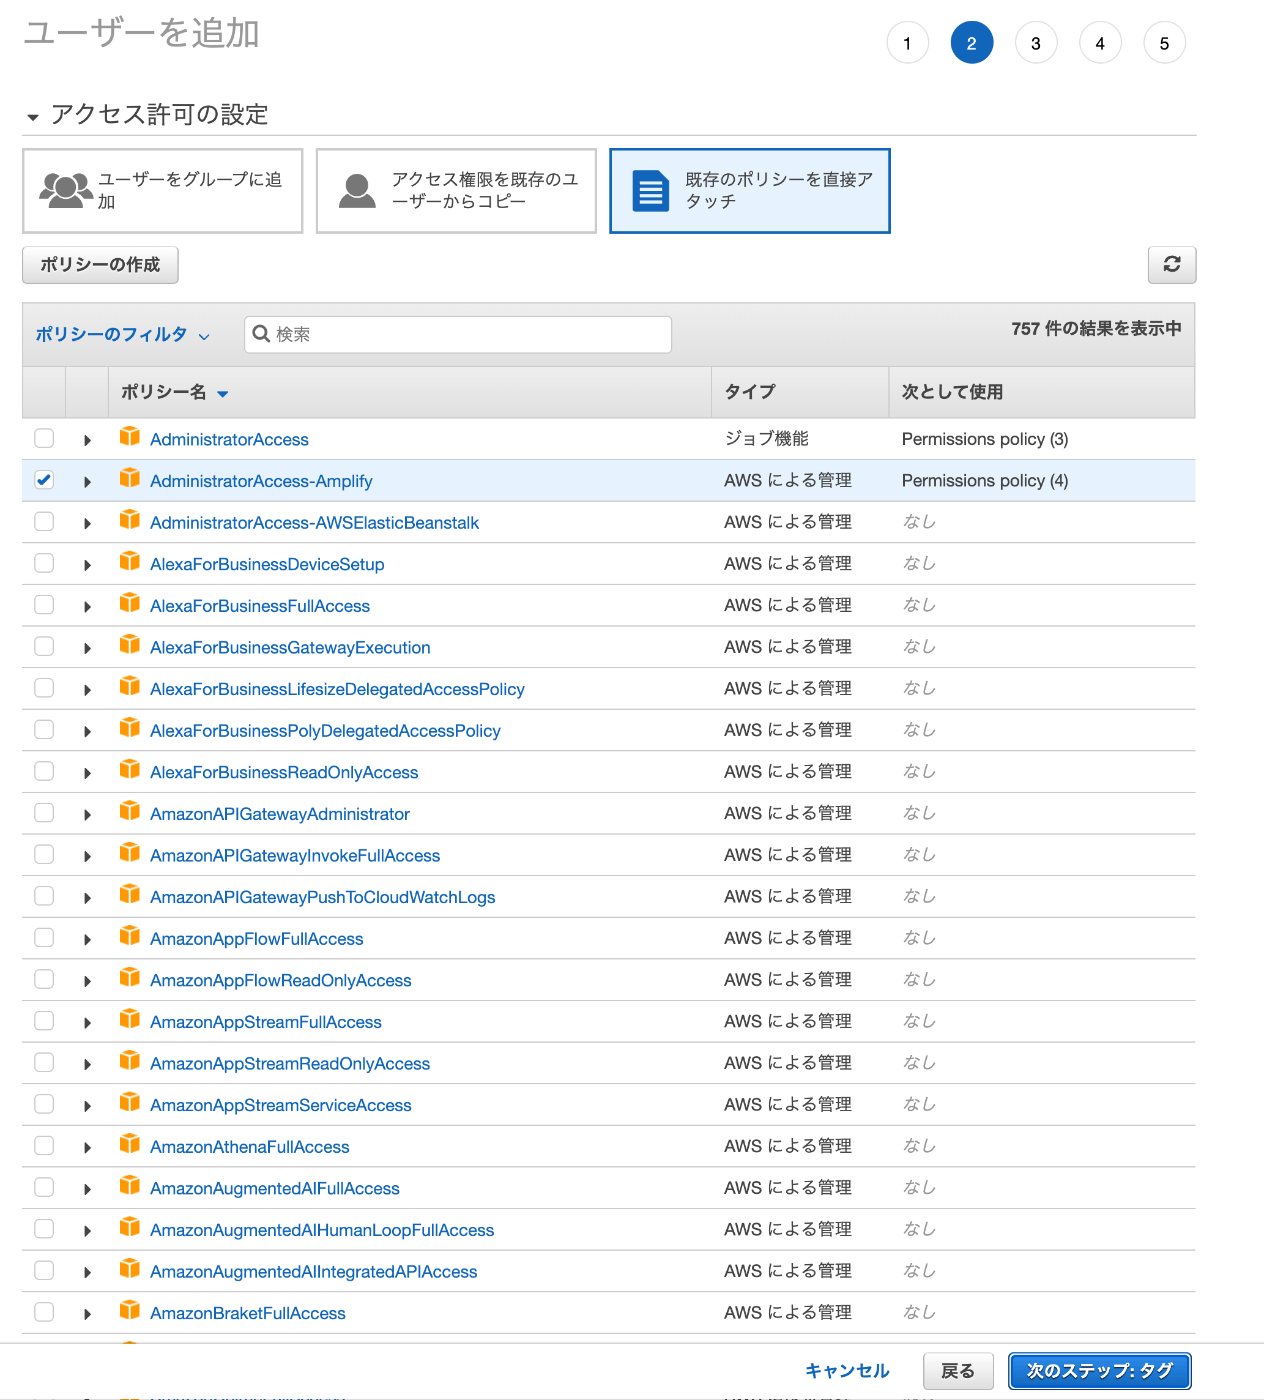
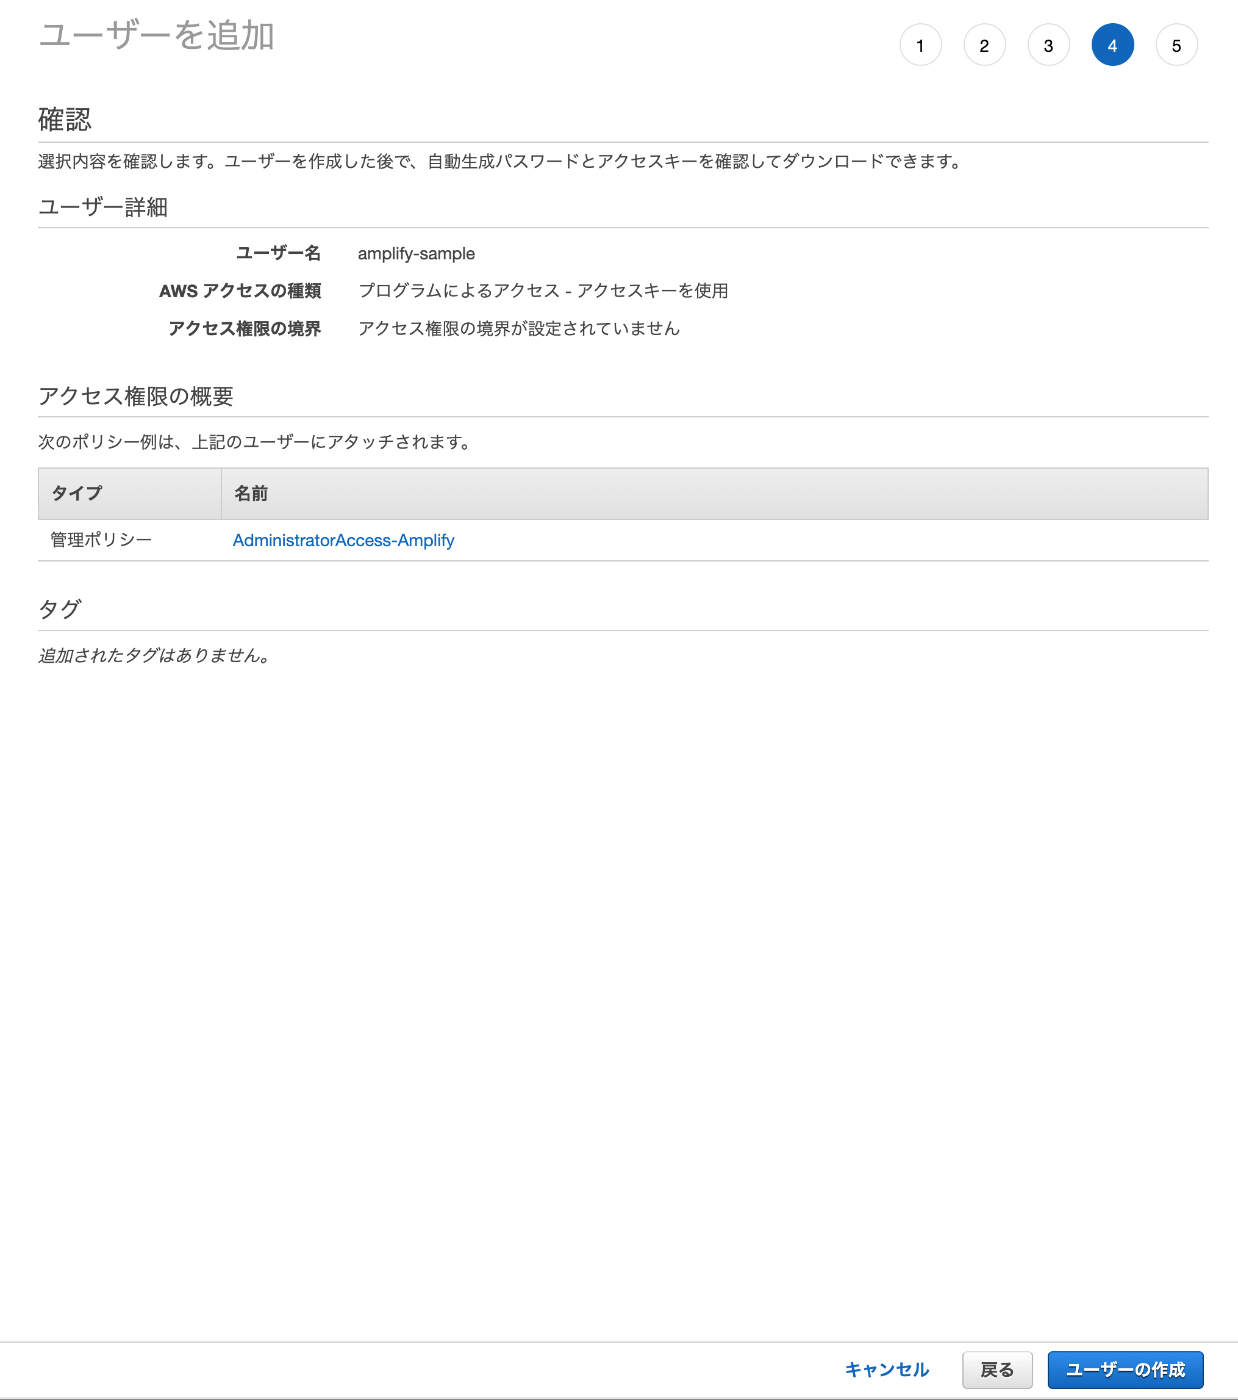
Specify the username of the new IAM user:
? user name: amplify-sample
Complete the user creation using the AWS console
https://console.aws.amazon.com/iam/home?region=ap-northeast-1#/users$new?step=final&accessKey&userNames=amplify-sample&permissionType=policies&policies=arn:aws:iam::aws:policy%2FAdministratorAccess-Amplify
Press Enter to continue
Enter the access key of the newly created user:
? accessKeyId: ********************
? secretAccessKey: ****************************************
This would update/create the AWS Profile in your local machine
? Profile Name: default
Successfully set up the new user.

Amplifyのアプリケーション管理のためのアカウントを作成していきます。
特に変更の必要がなければそのまま作成します。

タグも設定可能です。
作成します。
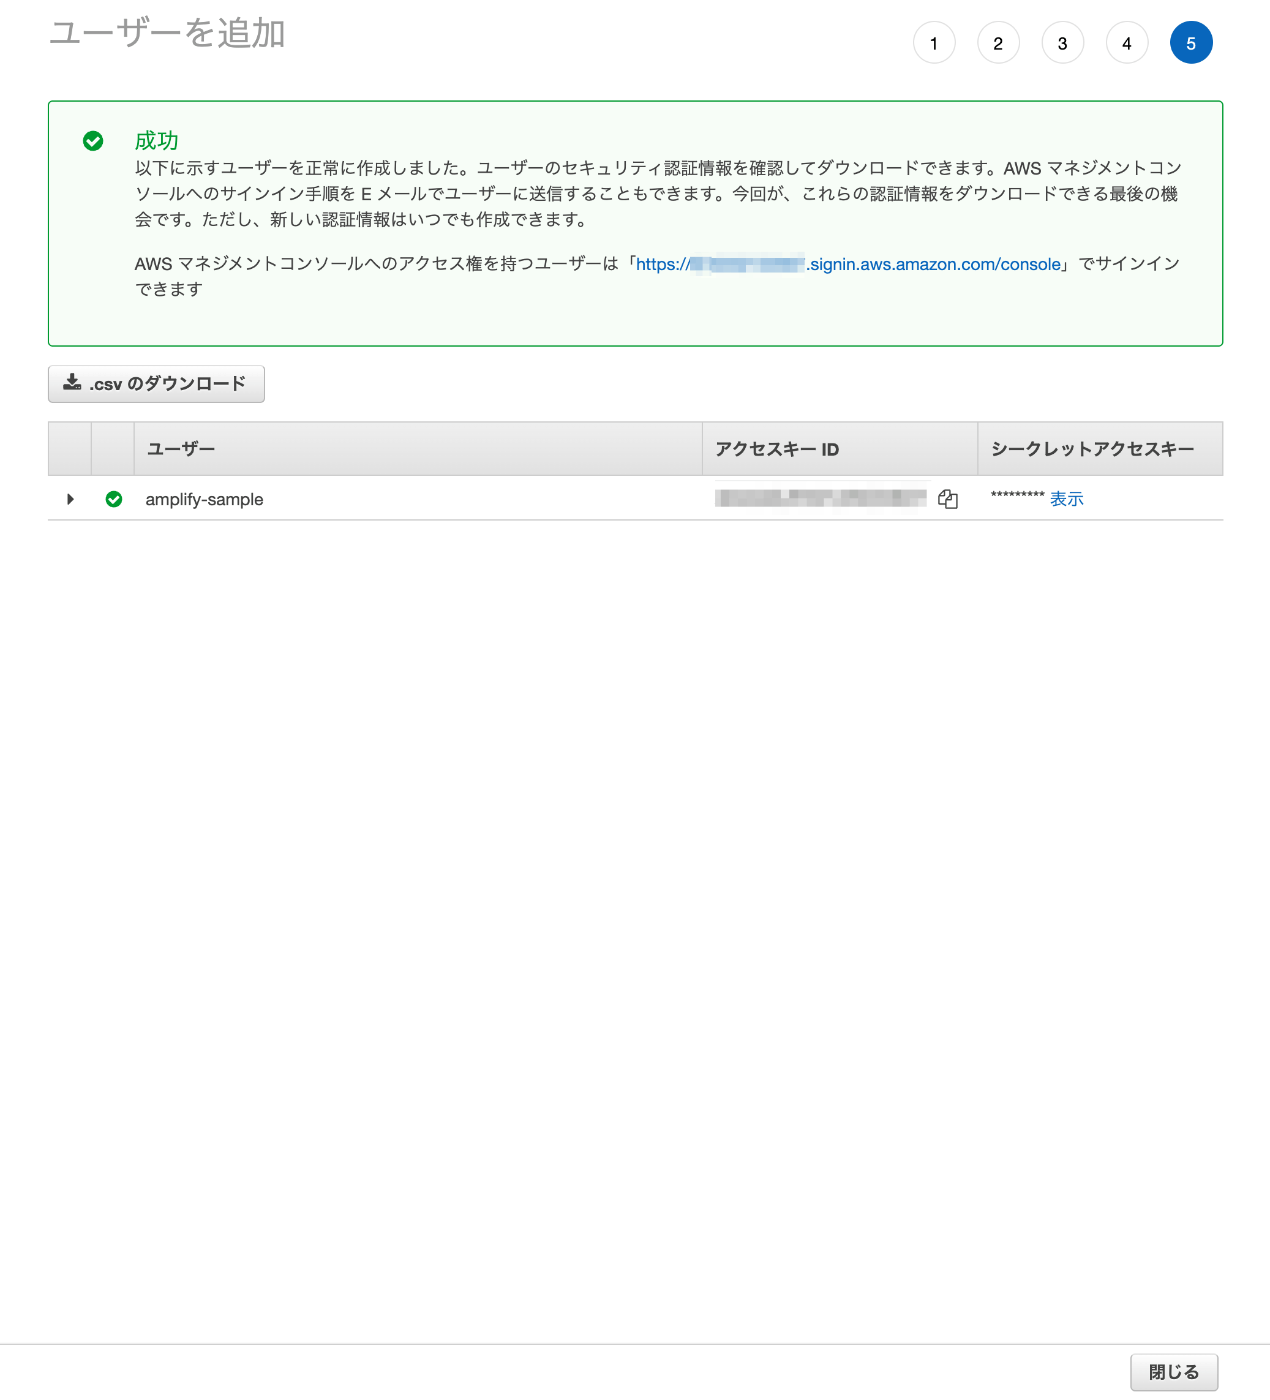
ここで表示される「アクセスキーID」と「シークレットアクセスキー」を必ず控えておきます。表示されているCSVファイルをダウンロードしておきましょう。ダウンロードを終えたら「閉じる」で終了し、コンソールに戻って「Enter」を入力。すると、先程作成した「アクセスキーID」と「シークレットアクセスキー」の入力が求められます。
ローカル上のアプリを初期化
バックエンドを「Amplify Studio」から操作できるようにします。
「Backend environments」を開き、「Get started」を選択。
「Amplify Studio」を使えるよう、バックエンドの設定が実行されます。
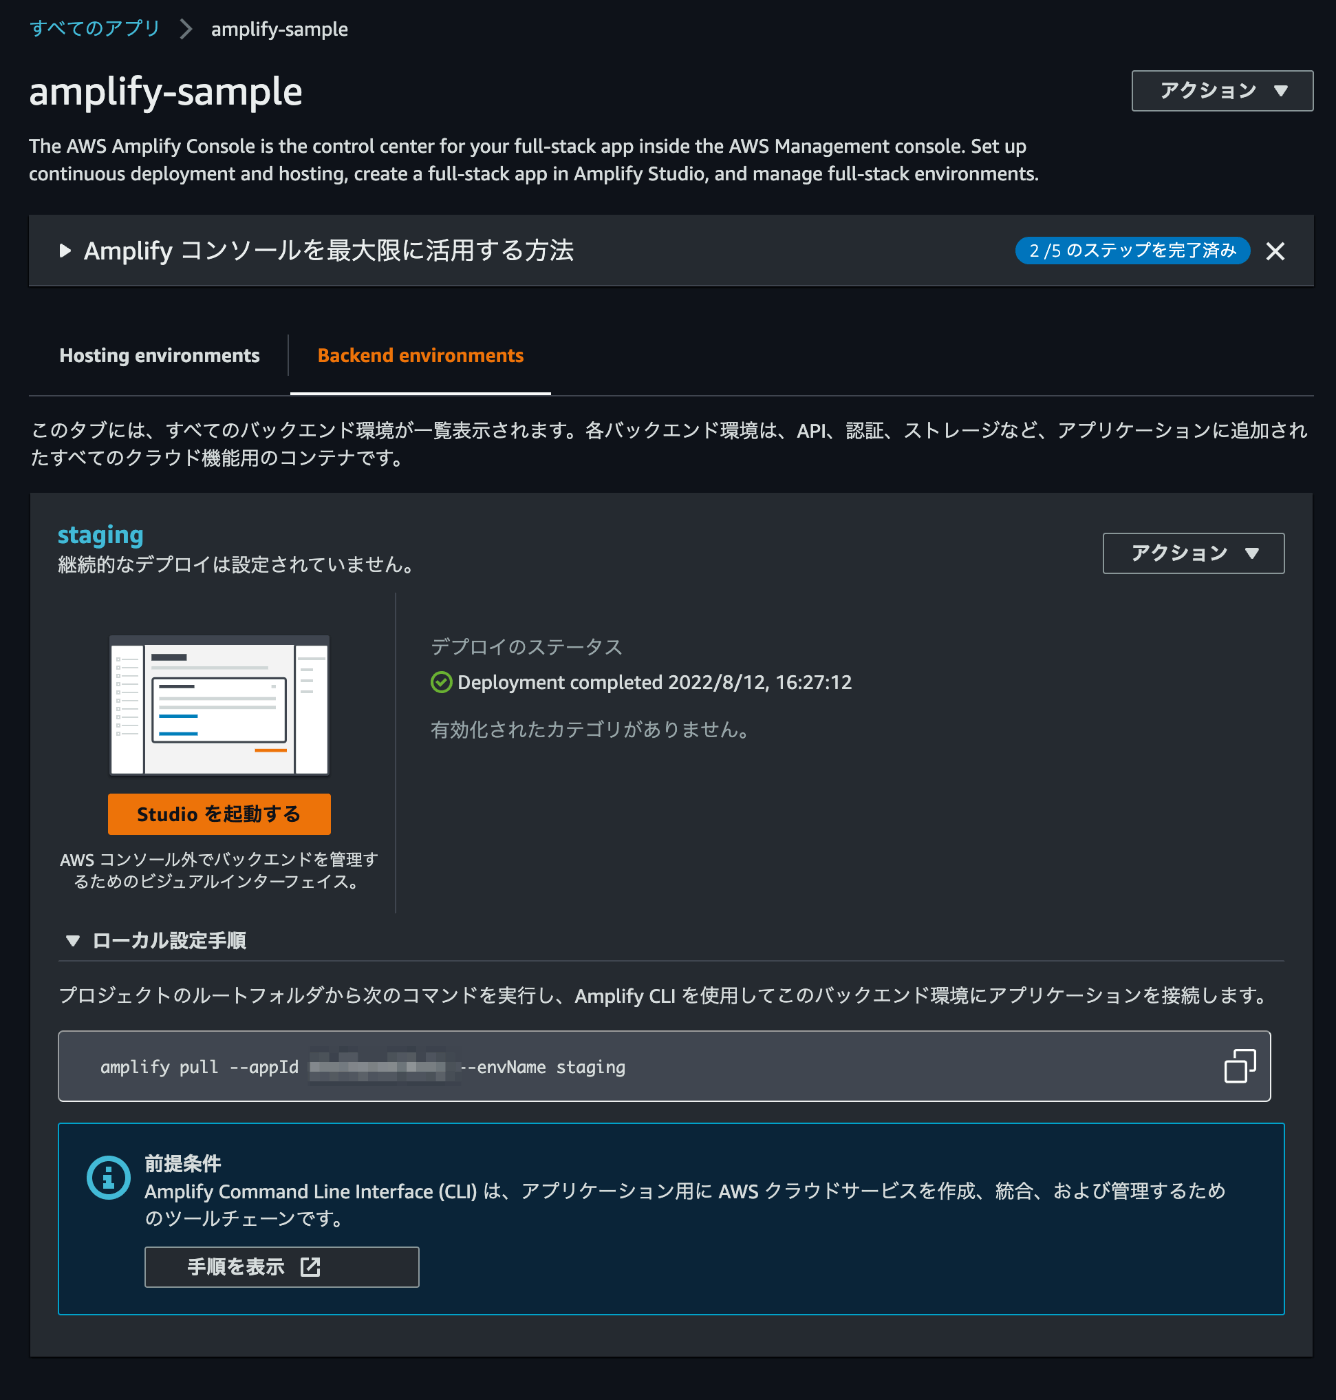
設定が完了し、再度「Backend environments」を確認すると、staging環境が構築されているので、「ローカル設定手順」に従い、ローカル環境のバックエンドを初期化します。途中でブラウザが立ち上がるので、AWSアカウントでログインします。利用するエディタや言語が聞かれるので適宜選択します。
$ amplify pull --appId XXXXXX --envName staging
Opening link: https://ap-northeast-1.admin.amplifyapp.com/admin/XXXXXX/staging/verify/?loginVersion=1
⠧ Confirm login in the browser or manually paste in your CLI login key:
✔ Successfully received Amplify Studio tokens.
Amplify AppID found: XXXXXX. Amplify App name is: amplify-sample
Backend environment staging found in Amplify Console app: amplify-sample
? Choose your default editor: Visual Studio Code
? Choose the type of app that you're building javascript
Please tell us about your project
? What javascript framework are you using react
? Source Directory Path:  src
? Distribution Directory Path: build
? Build Command:  npm run-script build
? Start Command: npm run-script start
? Do you plan on modifying this backend? Yes
✔ Successfully pulled backend environment staging from the cloud.
✅

Successfully pulled backend environment staging from the cloud.
Run 'amplify pull' to sync future upstream changes.

ブラウザ上で、Amplify CLIでログインする確認があるので「Yes」を選択。
Amplify環境の確認
amplify pull を利用し、環境を確認します。
$ amplify pull

Pre-pull status:

    Current Environment: staging

┌──────────┬───────────────┬───────────┬─────────────────┐
│ Category │ Resource name │ Operation │ Provider plugin │
└──────────┴───────────────┴───────────┴─────────────────┘

✔ Successfully pulled backend environment staging from the cloud.
✅
Post-pull status:

    Current Environment: staging

┌──────────┬───────────────┬───────────┬─────────────────┐
│ Category │ Resource name │ Operation │ Provider plugin │
└──────────┴───────────────┴───────────┴─────────────────┘
Amplifyを利用した開発
Amplifyのライブラリをインストール
AmplifyでReactのアプリケーションを開発するために必要なライブラリをインストールします。
$ npm install aws-amplify @aws-amplify/ui-react
略
認証機能を追加
アプリケーションに、Amplifyが用意している認証機能を追加し、メールアドレスによるアカウント管理をできるようにします。
$ amplify add auth
Using service: Cognito, provided by: awscloudformation

 The current configured provider is Amazon Cognito.

 Do you want to use the default authentication and security configuration? Default configuration
 Warning: you will not be able to edit these selections.
 How do you want users to be able to sign in? Email
 Do you want to configure advanced settings? No, I am done.
✅ Successfully added auth resource XXXXXX locally

✅ Some next steps:
"amplify push" will build all your local backend resources and provision it in the cloud
"amplify publish" will build all your local backend and frontend resources (if you have hosting category added) and provision it in the cloud
次に、この認証機能をデプロイします。これにより、ローカルに追加した「Auth」をクラウド上のデプロイ環境にも追加します。
$ amplify push
✔ Successfully pulled backend environment staging from the cloud.

    Current Environment: staging

┌──────────┬───────────────────────┬───────────┬───────────────────┐
│ Category │ Resource name         │ Operation │ Provider plugin   │
├──────────┼───────────────────────┼───────────┼───────────────────┤
│ Auth     │ XXXXXX                │ Create    │ awscloudformation │
└──────────┴───────────────────────┴───────────┴───────────────────┘
? Are you sure you want to continue? Yes
⠇ Updating resources in the cloud. This may take a few minutes...

UPDATE_IN_PROGRESS amplify-XXXXXX
AWS::CloudFormation::Stack Fri Aug 12 2022 17:02:13 GMT+0900 (GMT+09:00) User Initiated
UPDATE_IN_PROGRESS DeploymentBucket                           AWS::S3::Bucket            Fri Aug 12 2022 17:02:17 GMT+0900 (GMT+09:00)
UPDATE_IN_PROGRESS UnauthRole                                 AWS::IAM::Role             Fri Aug 12 2022 17:02:17 GMT+0900 (GMT+09:00)
UPDATE_IN_PROGRESS AuthRole                                   AWS::IAM::Role             Fri Aug 12 2022 17:02:18 GMT+0900 (GMT+09:00)
⠼ Updating resources in the cloud. This may take a few minutes...

略

✔ All resources are updated in the cloud
ReactプロジェクトにAWSリソースを設定
AWSリソースは aws-exports.js に記載されていきます。それをReactのアプリケーションから使えるよう、src/index.tsx にAWSリソースの設定を3行追加します。
$ git diff src/index.tsx
diff --git a/src/index.tsx b/src/index.tsx
index 0e6466f..9297a7b 100644
--- a/src/index.tsx
+++ b/src/index.tsx
@@ -5,6 +5,9 @@ import { store } from './app/store';
 import App from './App';
 import reportWebVitals from './reportWebVitals';
 import './index.css';
+import { Amplify } from 'aws-amplify';
+import config from './aws-exports';
+Amplify.configure(config);

 const container = document.getElementById('root')!;
 const root = createRoot(container);
アプリケーションに認証モジュールを追加
この部分は AWSのチュートリアル 通りでは動かないので、修正しています。
$ git diff src/App.tsx
diff --git a/src/App.tsx b/src/App.tsx
index 5f8c381..ba5838b 100644
--- a/src/App.tsx
+++ b/src/App.tsx
@@ -2,6 +2,8 @@ import React from 'react';
 import logo from './logo.svg';
 import { Counter } from './features/counter/Counter';
 import './App.css';
+import { Authenticator } from '@aws-amplify/ui-react';
+import '@aws-amplify/ui-react/styles.css';

 function App() {
   return (
@@ -51,6 +53,14 @@ function App() {
           </a>
         </span>
       </header>
+      <Authenticator>
+        {({ signOut, user }) => (
+          <main>
+            <h1>Hello {user.username}</h1>
+            <button onClick={signOut}>Sign out</button>
+          </main>
+        )}
+      </Authenticator>
     </div>
   );
 }
なお、上記のままだと {user.username} の部分でTypeScriptで TS2532: Object is possibly 'undefined'. となるため、ひとまずサンプルなのでstrictモードをfalseにしています。
$ git diff tsconfig.json
diff --git a/tsconfig.json b/tsconfig.json
index a273b0c..4a501cc 100644
--- a/tsconfig.json
+++ b/tsconfig.json
@@ -10,7 +10,7 @@
     "skipLibCheck": true,
     "esModuleInterop": true,
     "allowSyntheticDefaultImports": true,
-    "strict": true,
+    "strict": false,
     "forceConsistentCasingInFileNames": true,
     "noFallthroughCasesInSwitch": true,
     "module": "esnext",
ローカル環境で動作確認
$ npm start

> amplify-sample@0.1.0 start
> react-scripts start
ローカル環境でアプリケーションを実行すると、認証モジュールが追加されています。
デプロイ環境で動作確認
このままだとビルドでエラーになるので、バックエンドの紐付けと AWS AmplifyでのフルスタックアプリケーションのCI/CDパイプラインの構築 | Amazon Web Services ブログ にある aws-exports.js の設定手順を実施します。
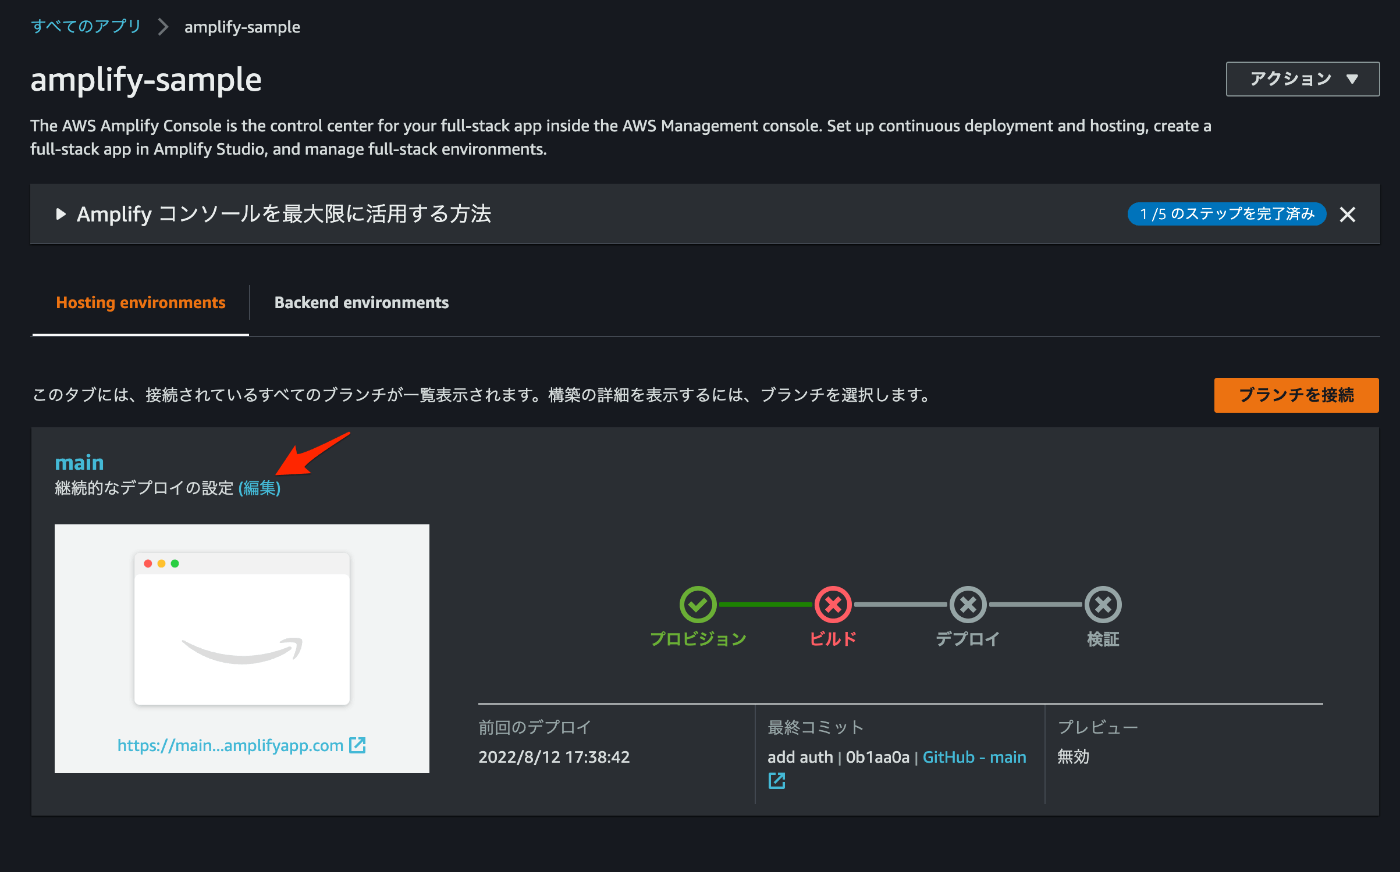
「Hosting environments」の「継続的なデプロイの設定」の「編集」を選択。

バックエンド環境の選択ができるので、「Environment」で「staging」を選択して「保存」。
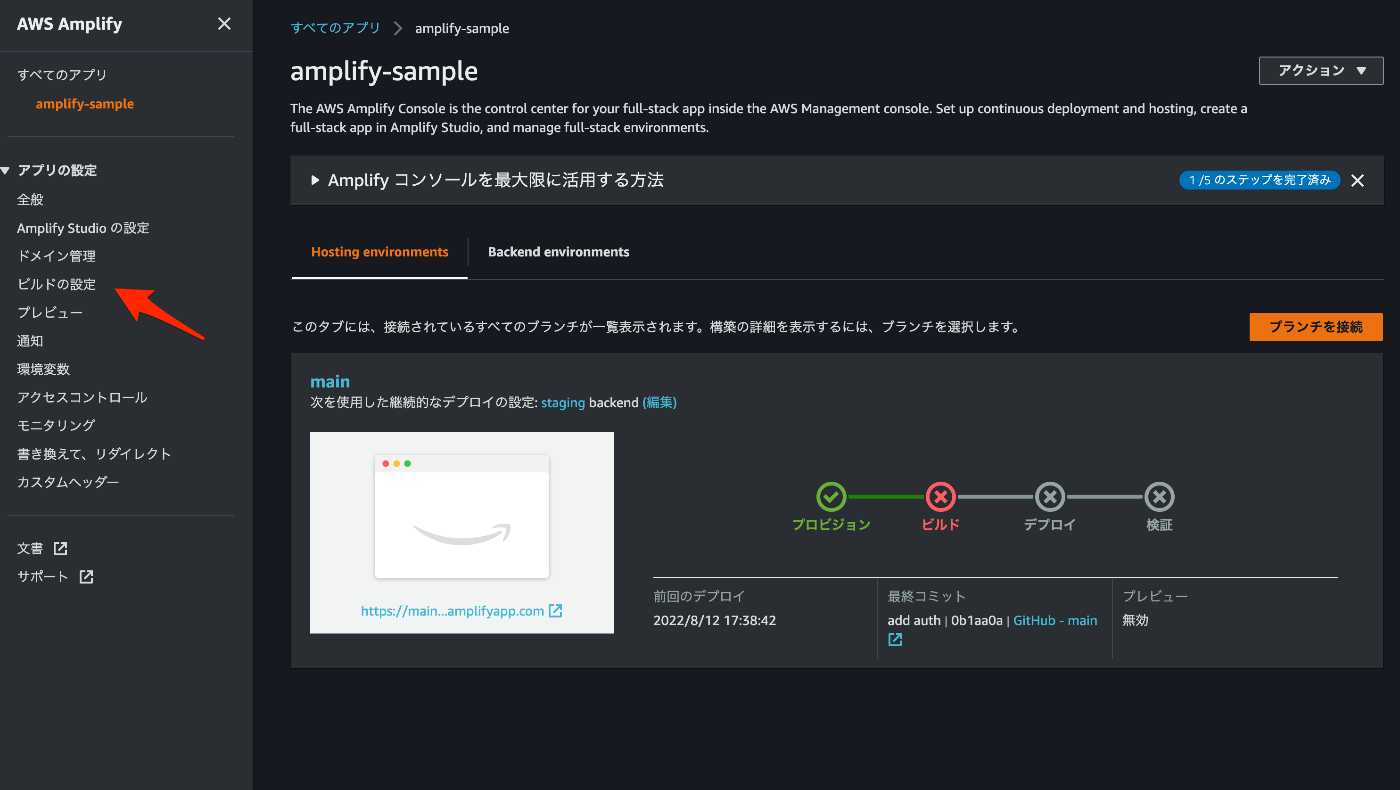
左メニューの「ビルドの設定」を選択。

「Build image settings」の「Edit」を選択。
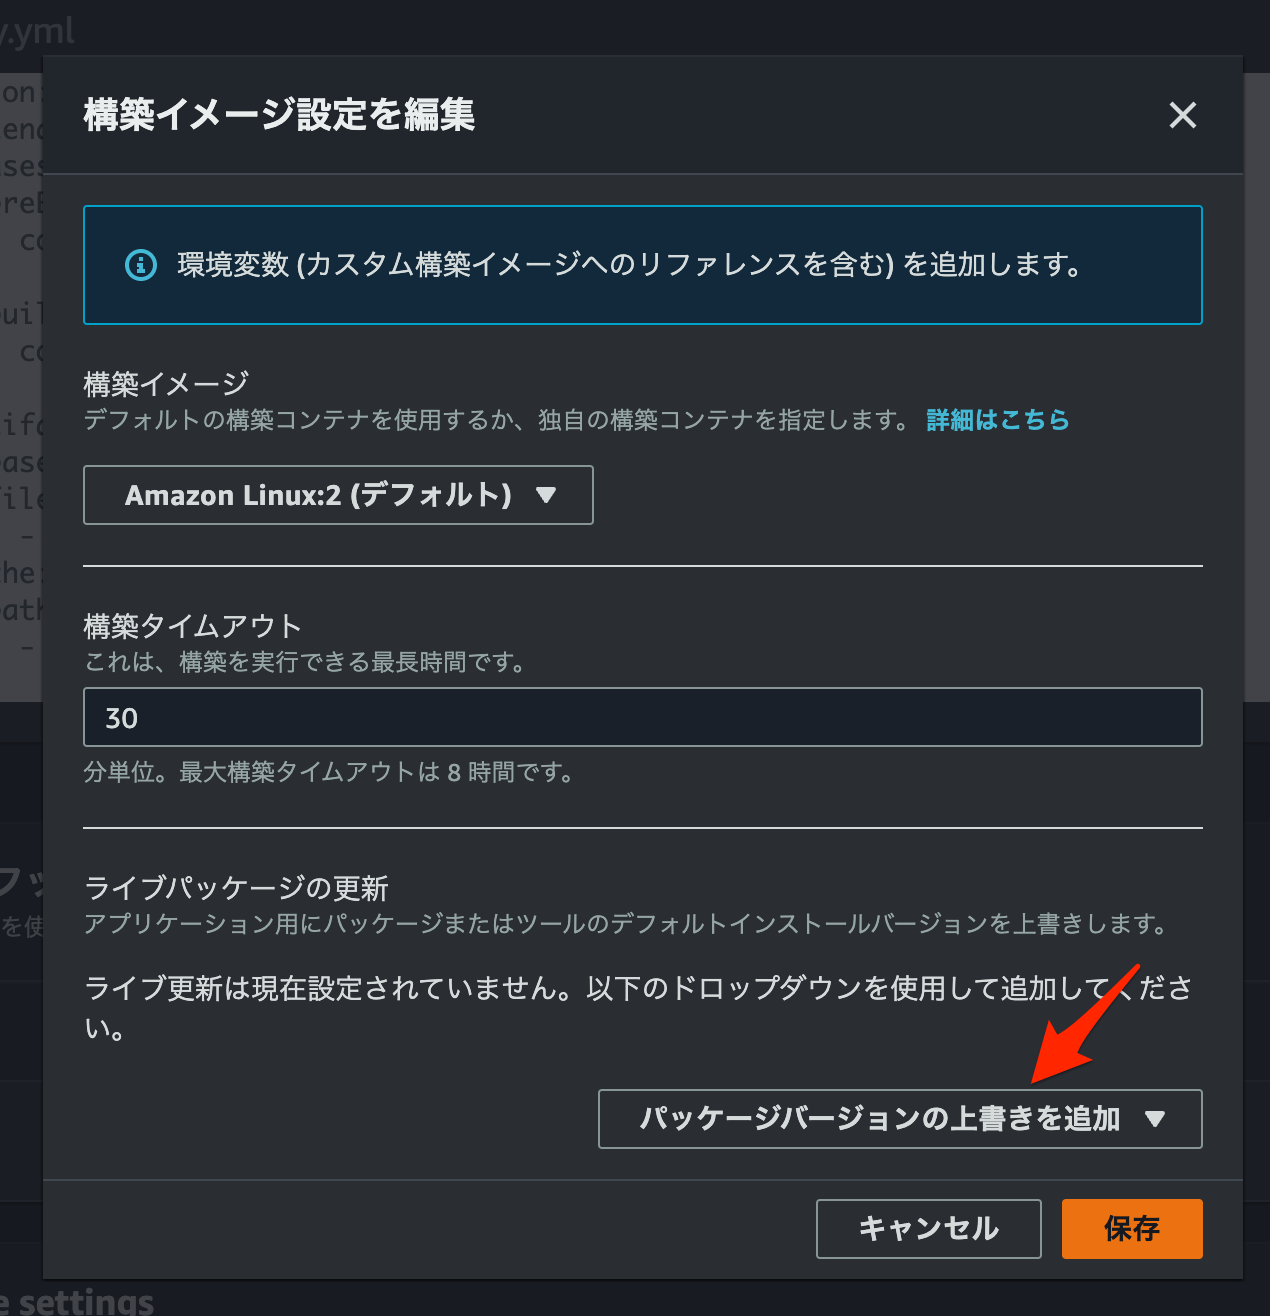
「パッケージバージョンの上書きを追加」を選択。
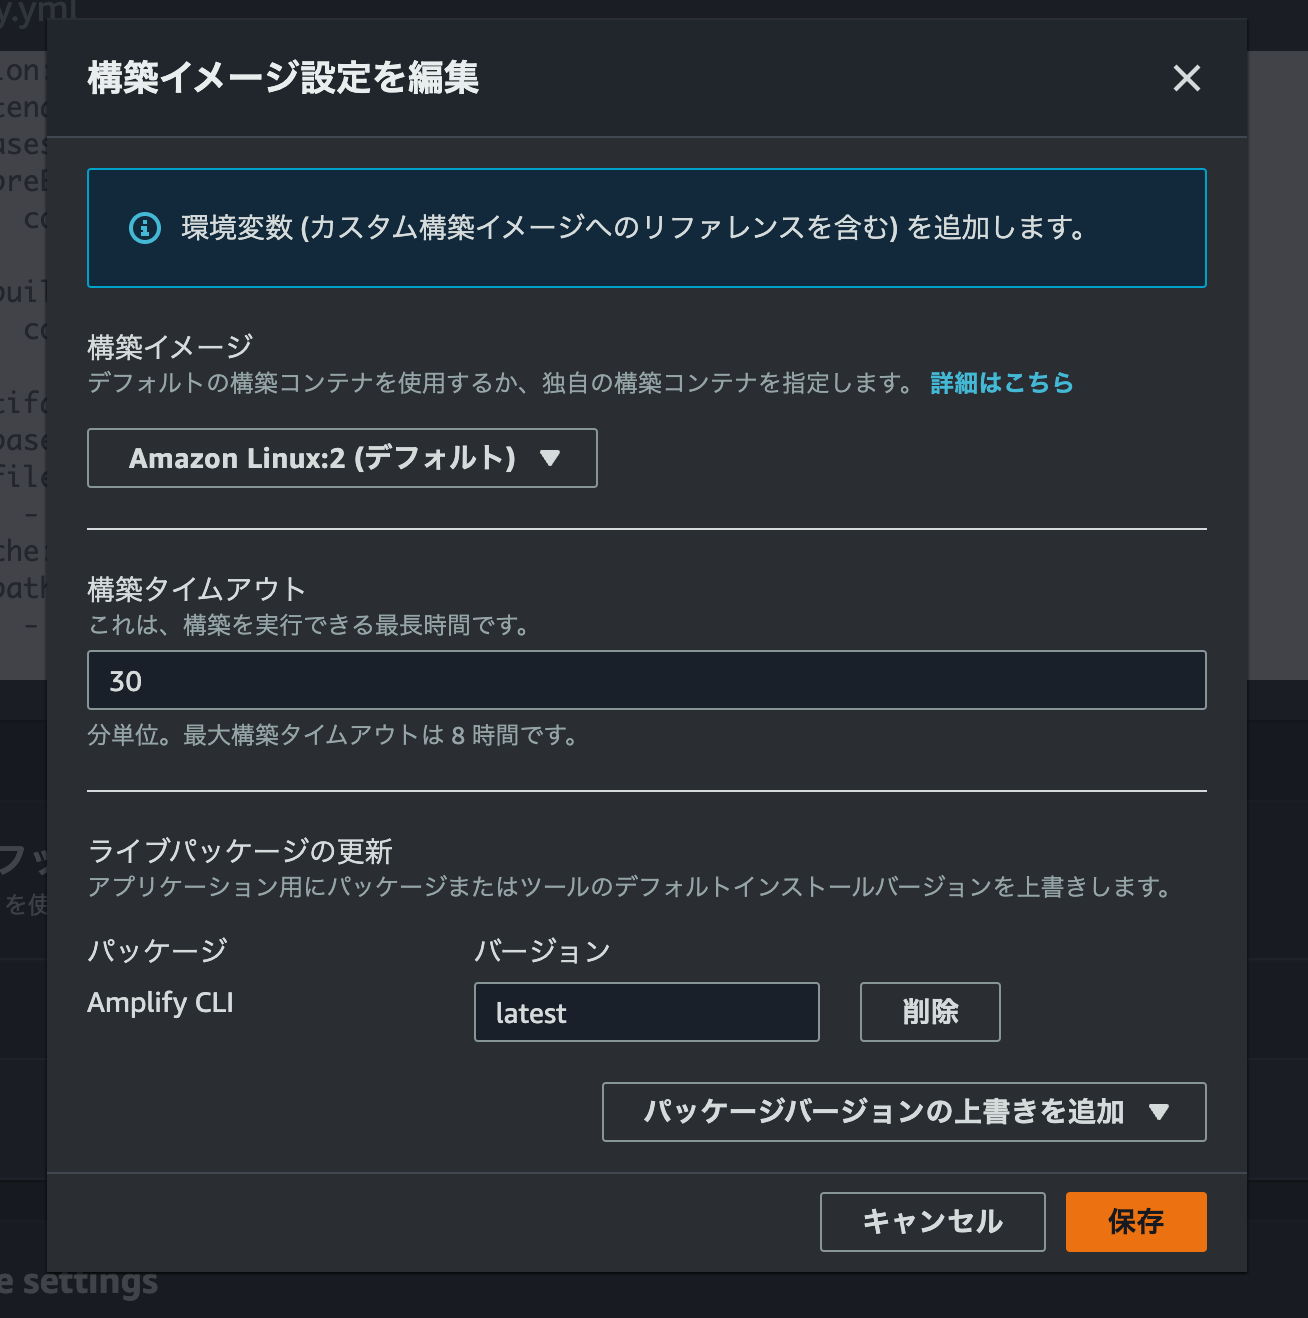
「Amplify CLI」を選択し、バージョンは「latest」のまま「保存」。
この状態になったら、GitHubを更新してデプロイ。
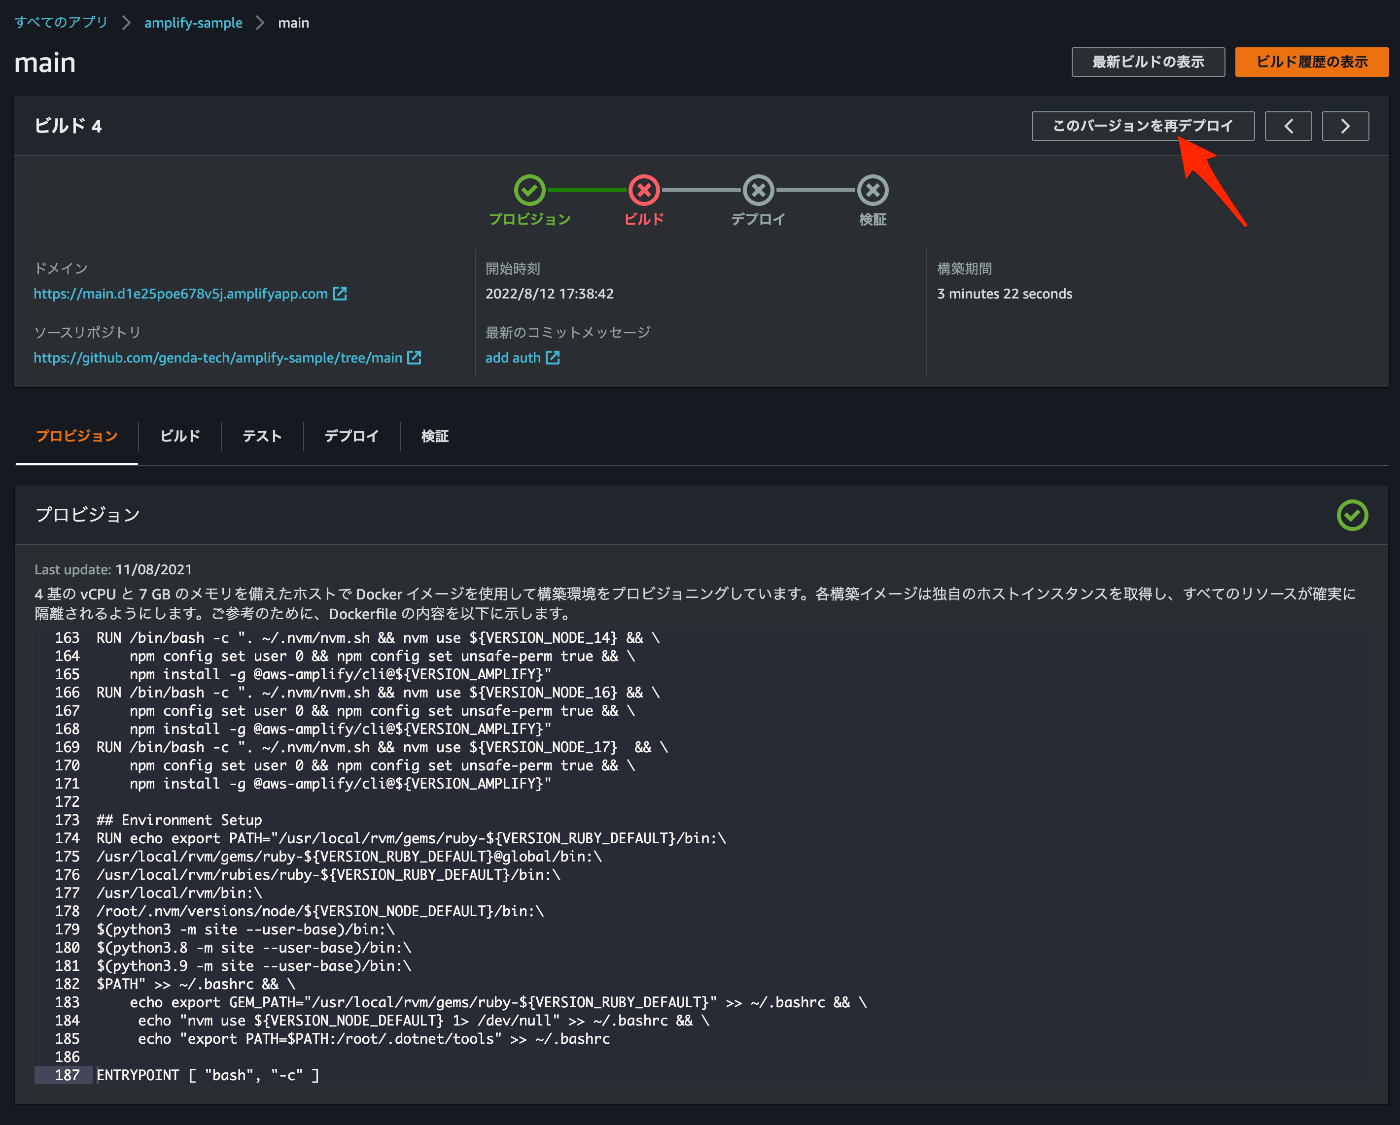
なお、失敗したデプロイは「このバージョンを再デプロイ」ボタンから再デプロイ可能です。
$ git add .
$ git commit -m "add auth"
[main 52ecd9d] add auth
 8 files changed, 209 insertions(+)
 create mode 100644 .vscode/settings.json
 create mode 100644 amplify/.config/project-config.json
 create mode 100644 amplify/backend/auth/XXXXXX/cli-inputs.json
 create mode 100644 amplify/backend/backend-config.json
 create mode 100644 amplify/backend/tags.json
 create mode 100644 amplify/backend/types/amplify-dependent-resources-ref.d.ts
 create mode 100644 amplify/cli.json
 create mode 100644 amplify/team-provider-info.json
$ git push origin main
Enumerating objects: 18, done.
Counting objects: 100% (18/18), done.
Delta compression using up to 8 threads
Compressing objects: 100% (13/13), done.
Writing objects: 100% (17/17), 3.20 KiB | 820.00 KiB/s, done.
Total 17 (delta 1), reused 0 (delta 0), pack-reused 0
remote: Resolving deltas: 100% (1/1), completed with 1 local object.
To github.com:<your-github-org>/amplify-sample.git
   2da10e7..52ecd9d  main -> main
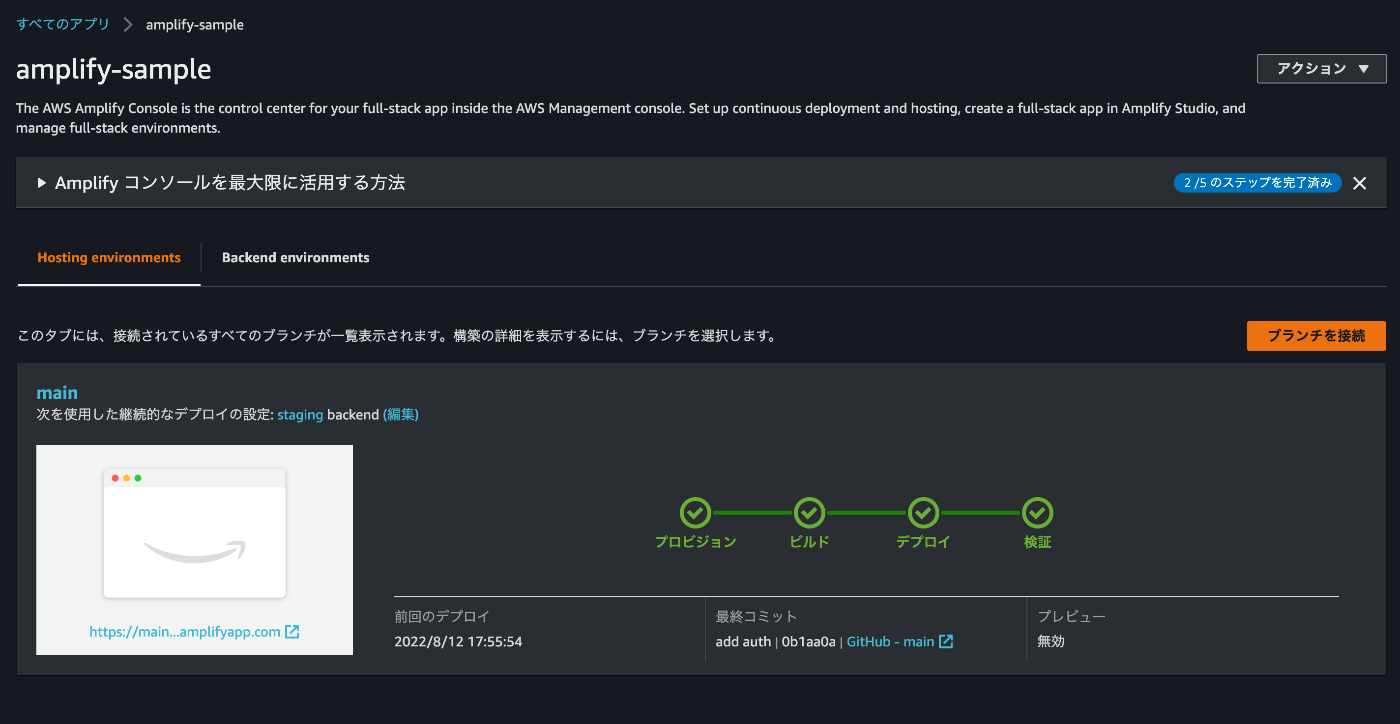
デプロイが完了したら、デプロイ環境を確認してみます。
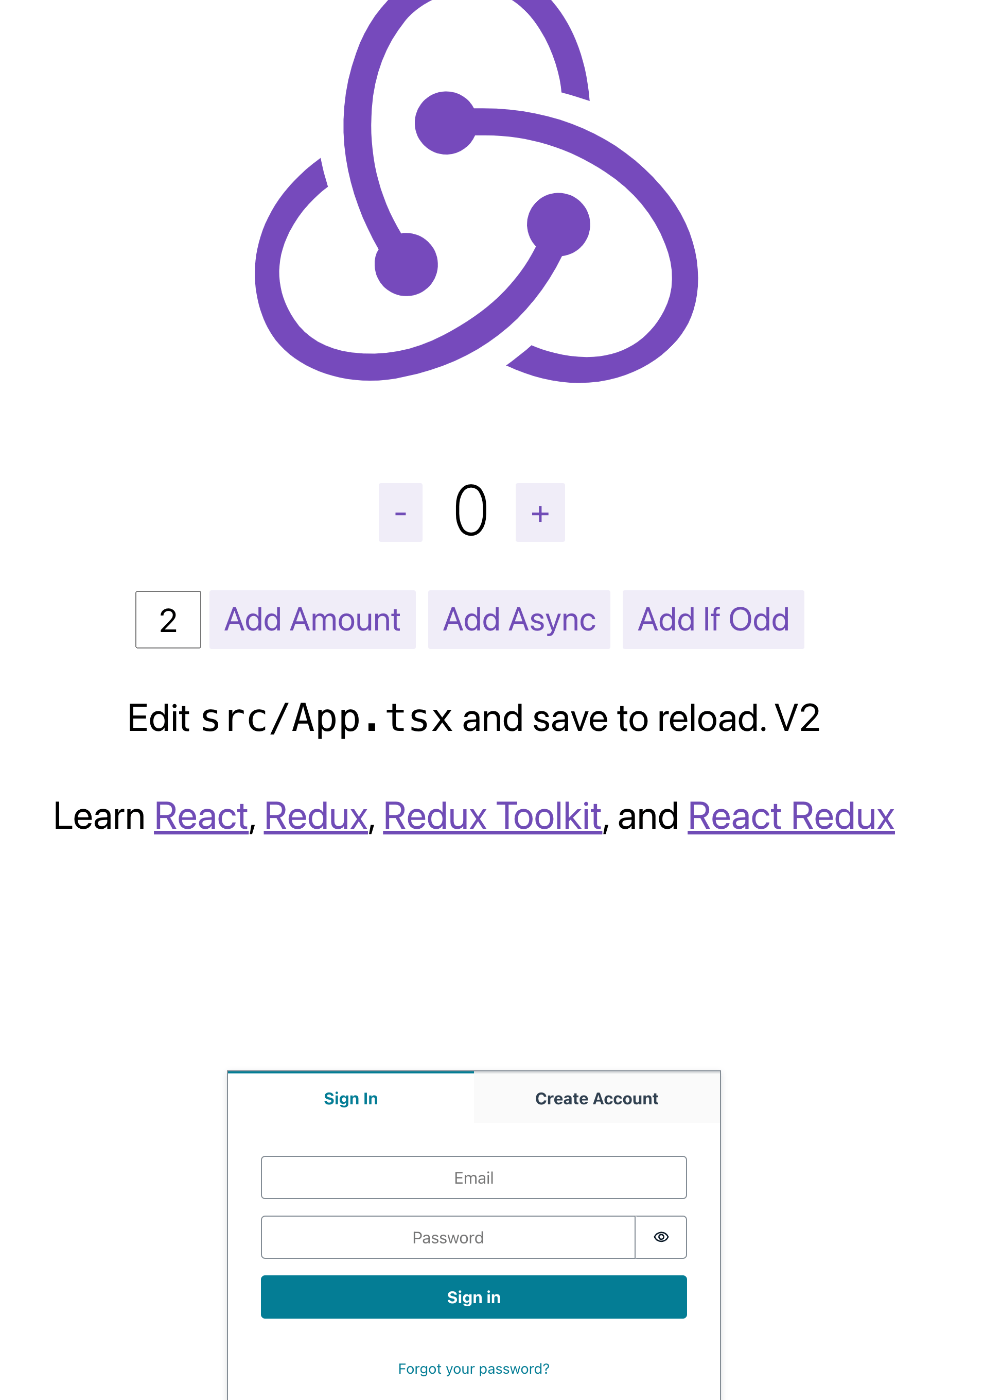
ローカル環境と同様に、認証モジュールが追加されています。
Amplify Studioでデータを扱う
Amplify Studioを使ったモデル作成
Amplify Studioを使うと、データベースやAPI、デザインまでもを簡単に扱えるようになります。

「Backend environments」から「Studio を起動する」を選択。
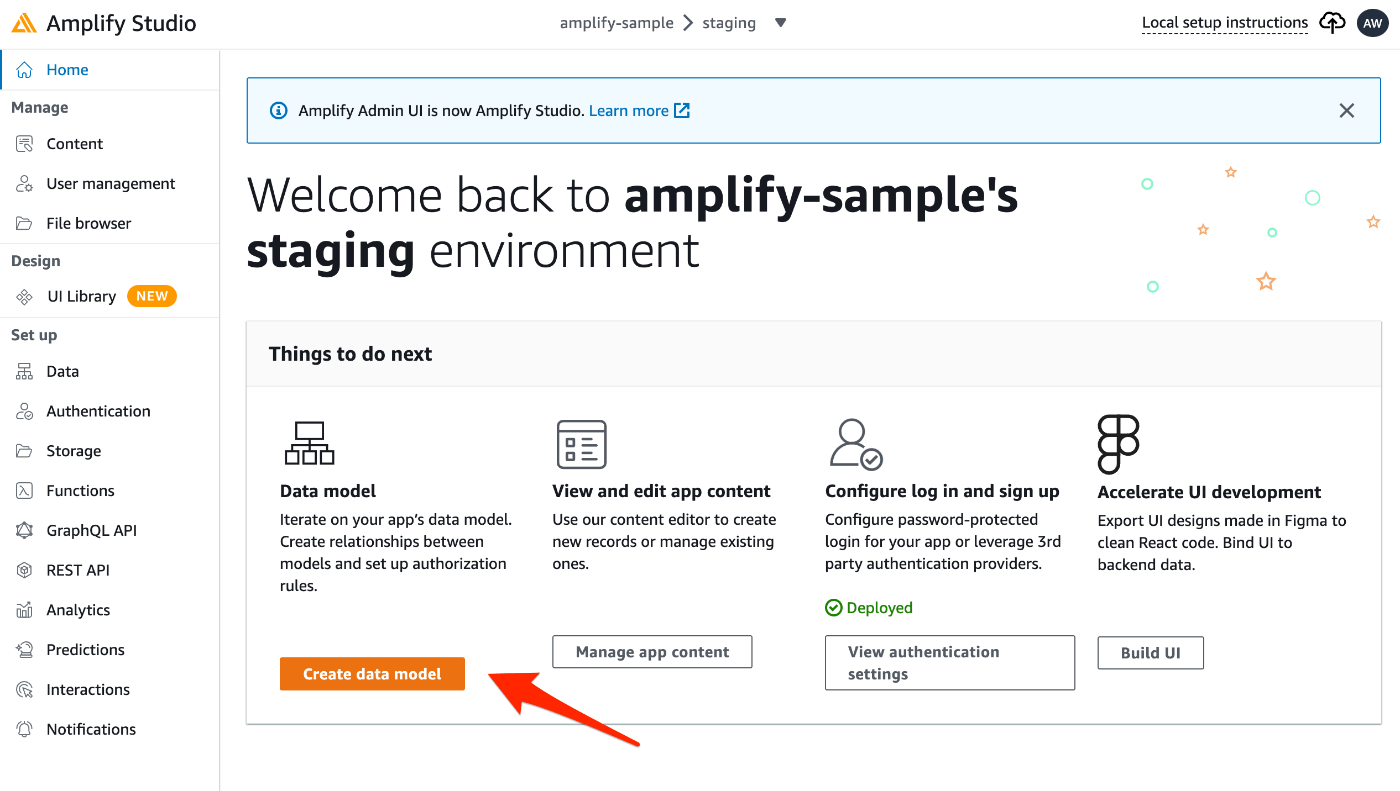
「Create data model」を選択。
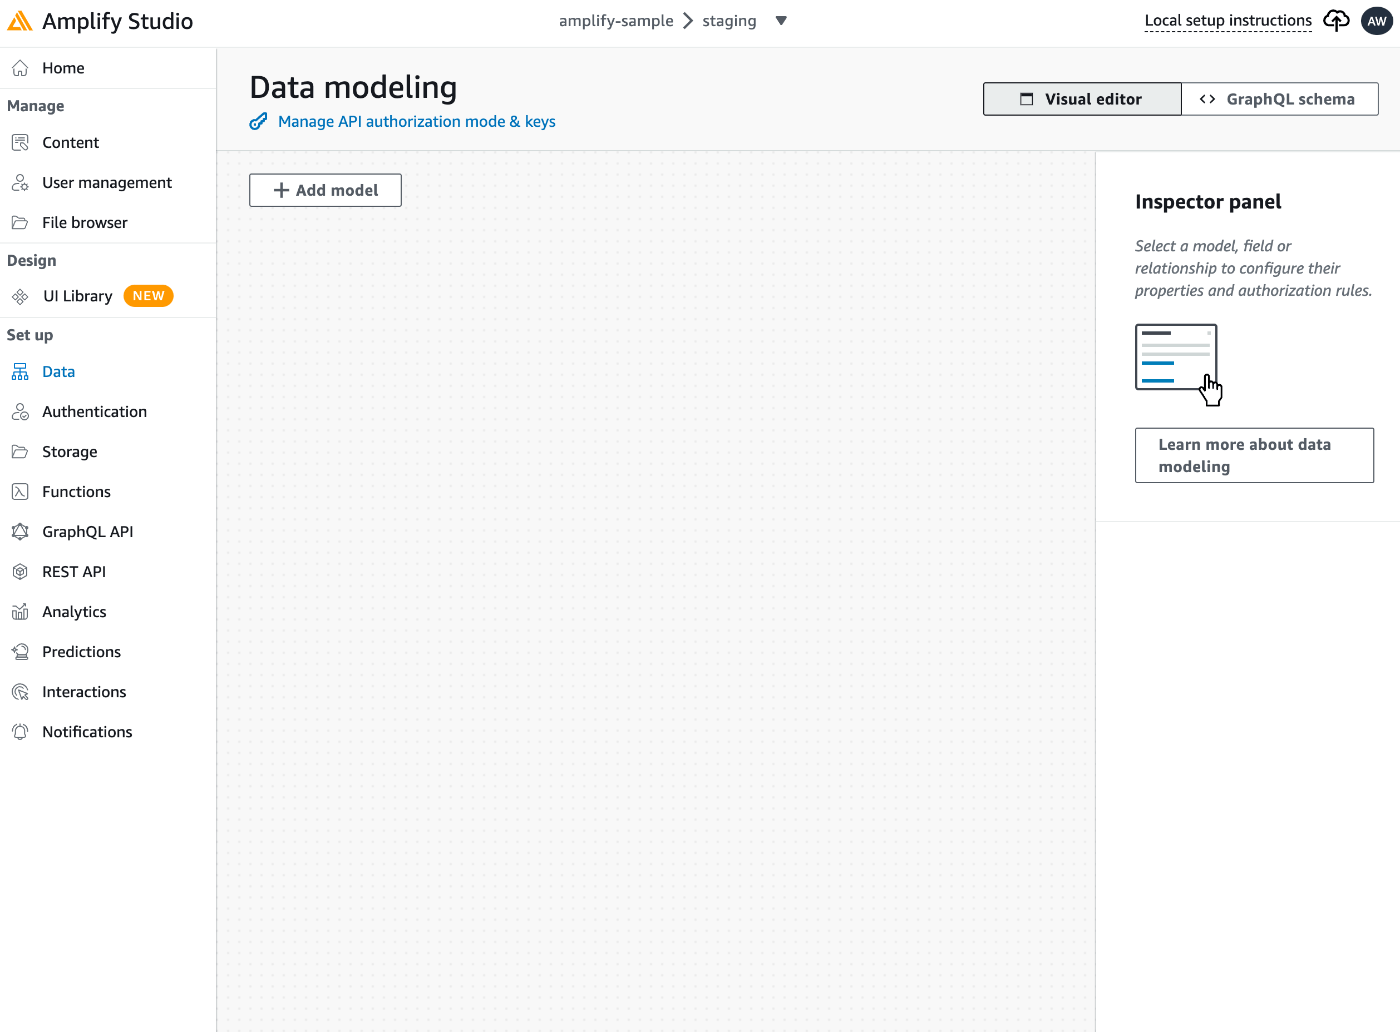
この画面でデータのモデルを作成していきます。ここでモデルを作成すると、DBやAPIも自動的に構築されます。

例えば、「Item」として商品情報を格納するモデルを作成します。
| フィールド名 | 型 | 必須 | 備考 |
|---|---|---|---|
| id | ID! | Yes | 自動的に生成されるIDを格納 |
| name | String! | Yes | 商品名 |
| price | Int | 料金 | |
| isDraft | Boolean | 下書きをフィルタリングするために利用 | |
| description | String | 商品説明 |

「Save and Deploy」を選択し、「Deploy」。
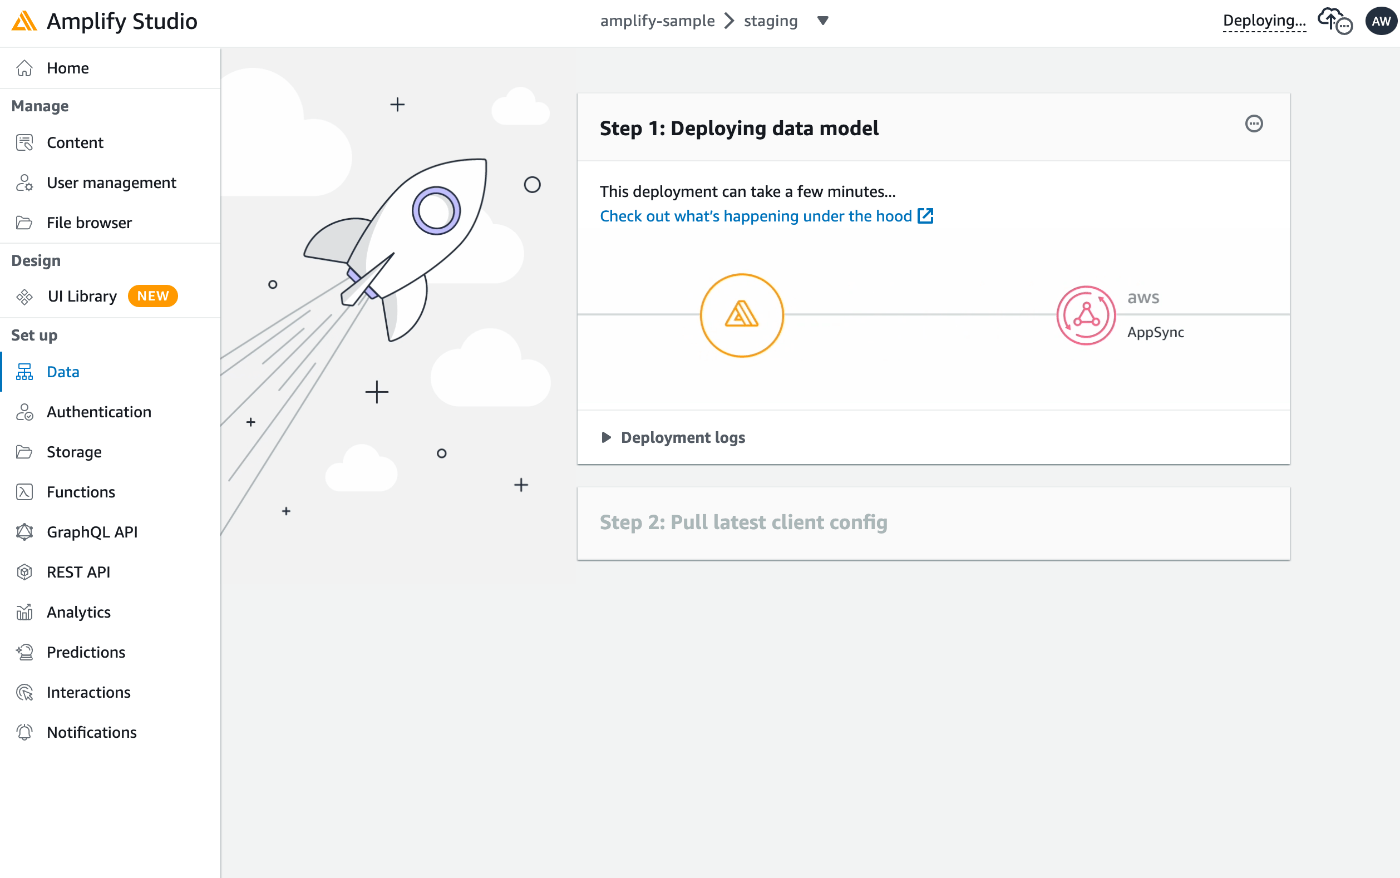
デプロイが実行されるのでしばらく待ちます。
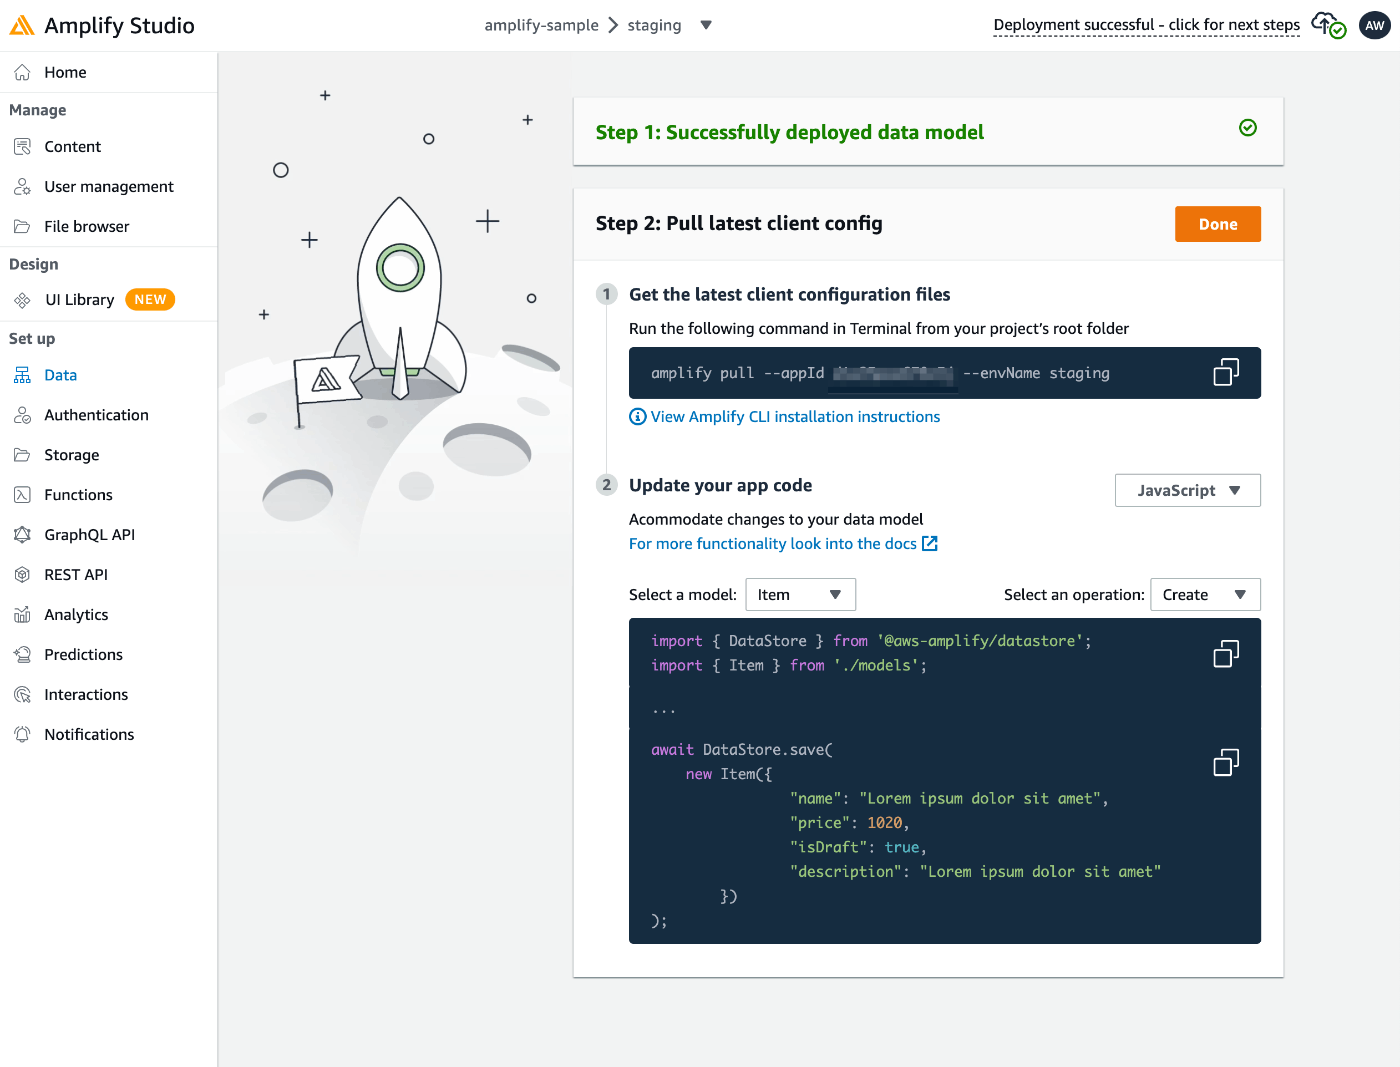
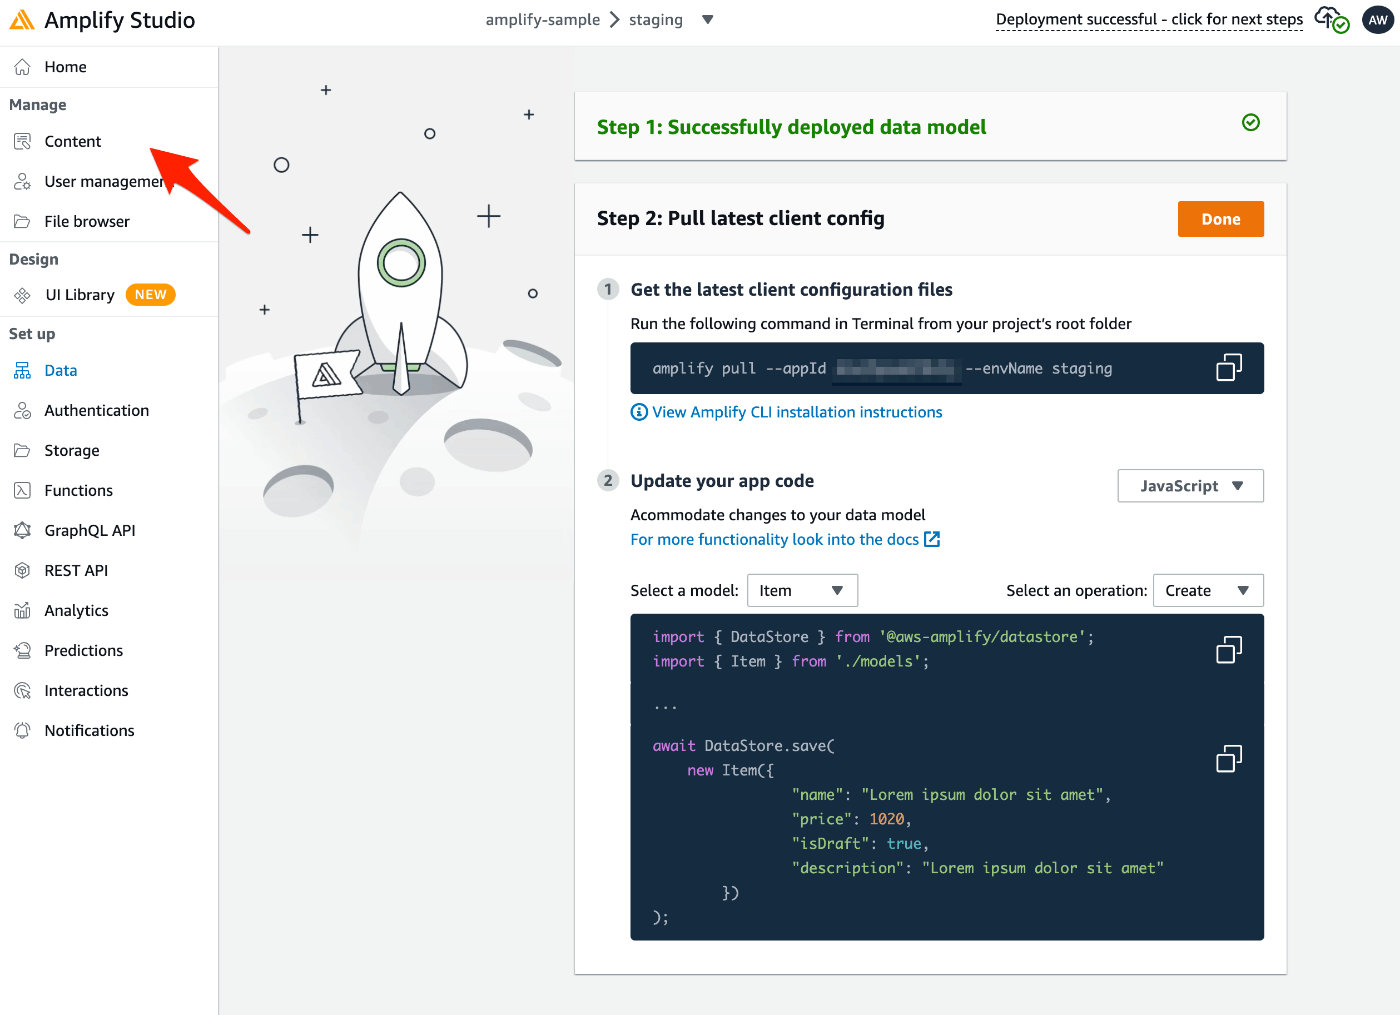
デプロイが完了すると、ソースコードへの適用方法の案内が表示されます。
これに従い、ローカル環境に生成されたAPIを適用します。
$ amplify pull --appId XXXXXX --envName staging

Pre-pull status:

    Current Environment: staging

┌──────────┬───────────────────────┬───────────┬───────────────────┐
│ Category │ Resource name         │ Operation │ Provider plugin   │
├──────────┼───────────────────────┼───────────┼───────────────────┤
│ Auth     │ XXXXXX                │ No Change │ awscloudformation │
└──────────┴───────────────────────┴───────────┴───────────────────┘

⠸ Fetching updates to backend environment: staging from the cloud.✅ GraphQL schema compiled successfully.

Edit your schema at /XXXXXX/amplify-sample/amplify/backend/api/amplifysample/schema.graphql or place .graphql files in a directory at /XXXXXX/amplify-sample/amplify/backend/api/amplifysample/schema
✔ Successfully pulled backend environment staging from the cloud.
✅
✅ GraphQL schema compiled successfully.

Edit your schema at /XXXXXX/amplify-sample/amplify/backend/api/amplifysample/schema.graphql or place .graphql files in a directory at /XXXXXX/amplify-sample/amplify/backend/api/amplifysample/schema
Successfully generated models. Generated models can be found in /XXXXXX/amplify-sample/src
Post-pull status:

    Current Environment: staging

┌──────────┬───────────────────────┬───────────┬───────────────────┐
│ Category │ Resource name         │ Operation │ Provider plugin   │
├──────────┼───────────────────────┼───────────┼───────────────────┤
│ Auth     │ XXXXXX                │ No Change │ awscloudformation │
├──────────┼───────────────────────┼───────────┼───────────────────┤
│ Api      │ XXXXXX                │ No Change │ awscloudformation │
└──────────┴───────────────────────┴───────────┴───────────────────┘
この状態になると、手動でAPIを作成する際に編集するスキーマにも、Amplify Studioで作成したモデルが自動的に追加されていることを確認できます。
$ cat amplify/backend/api/amplifysample/schema.graphql
type Item @model @auth(rules: [{allow: public}]) {
  id: ID!
  name: String!
  price: Int
  isDraft: Boolean
  description: String
}
Amplify Studioを使ったデータ追加
「Content」からデータを追加します。
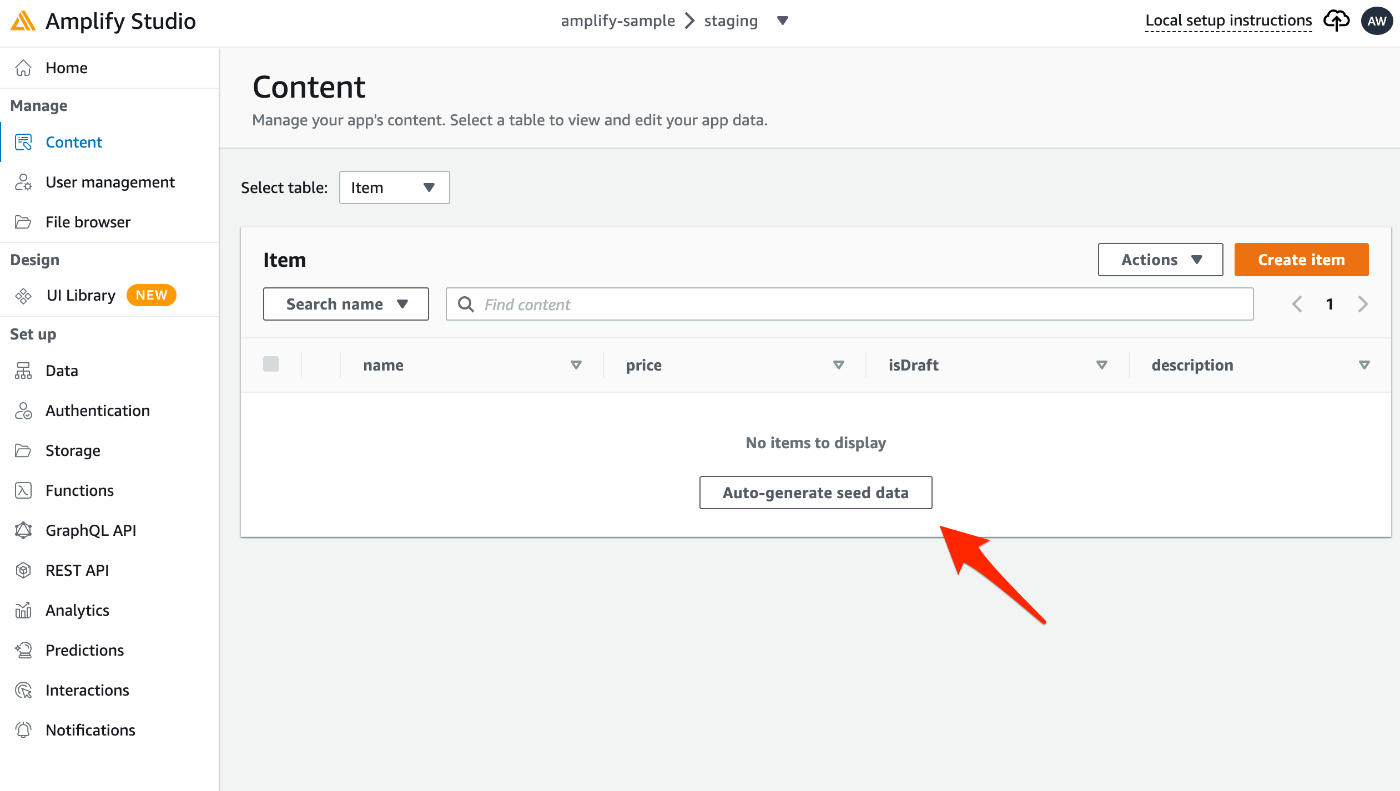
「Create item」から1件ずつデータの追加もできますが、複数のテストデータを自動生成するには「Auto-generate seed data」を選択。
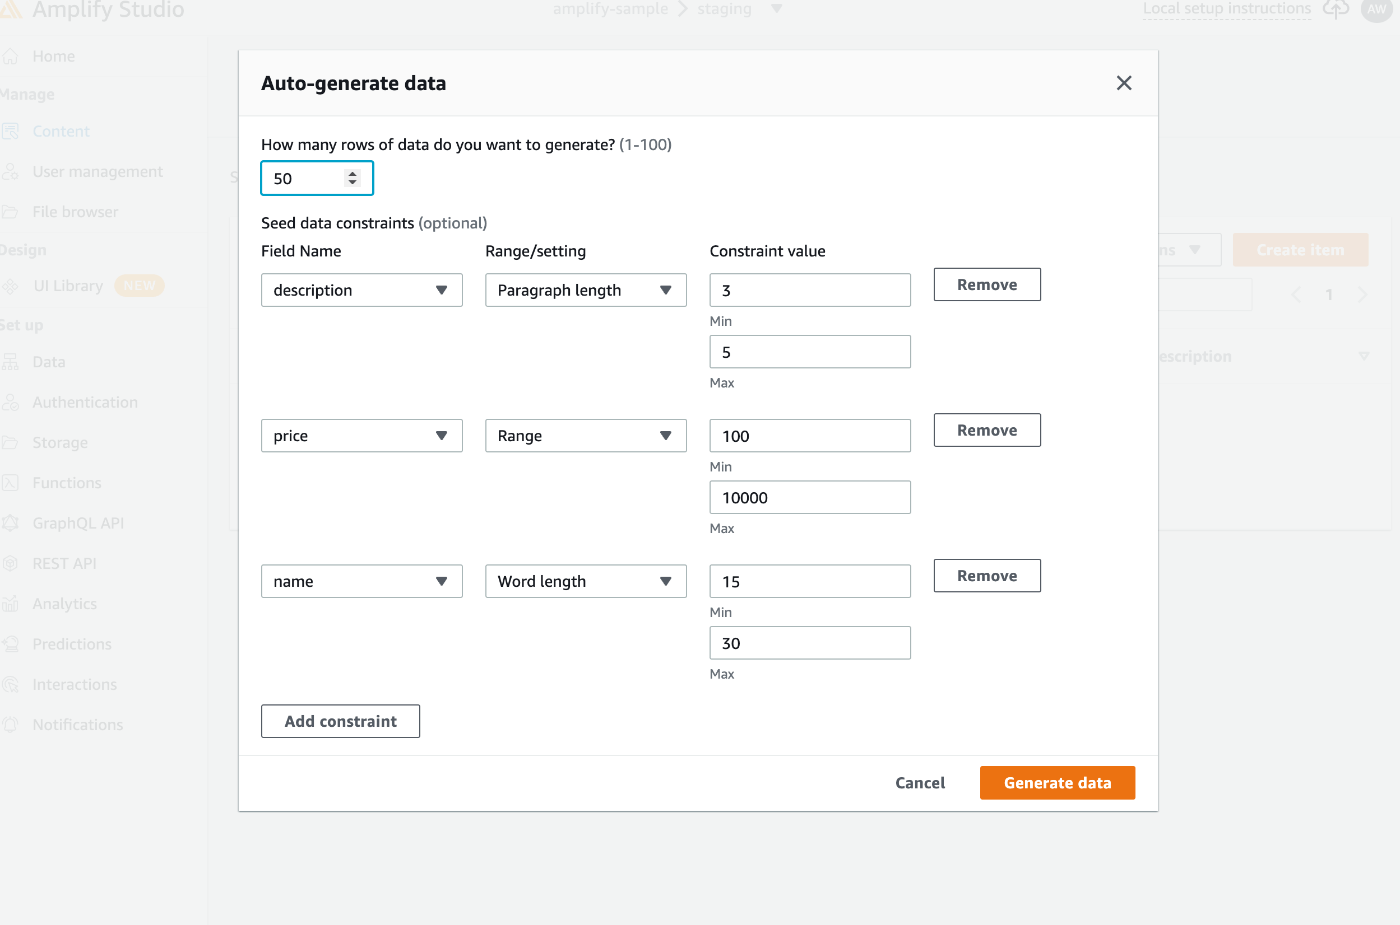
生成するデータの件数と、各フィールドの生成条件を調整し、「Generate data」を選択。

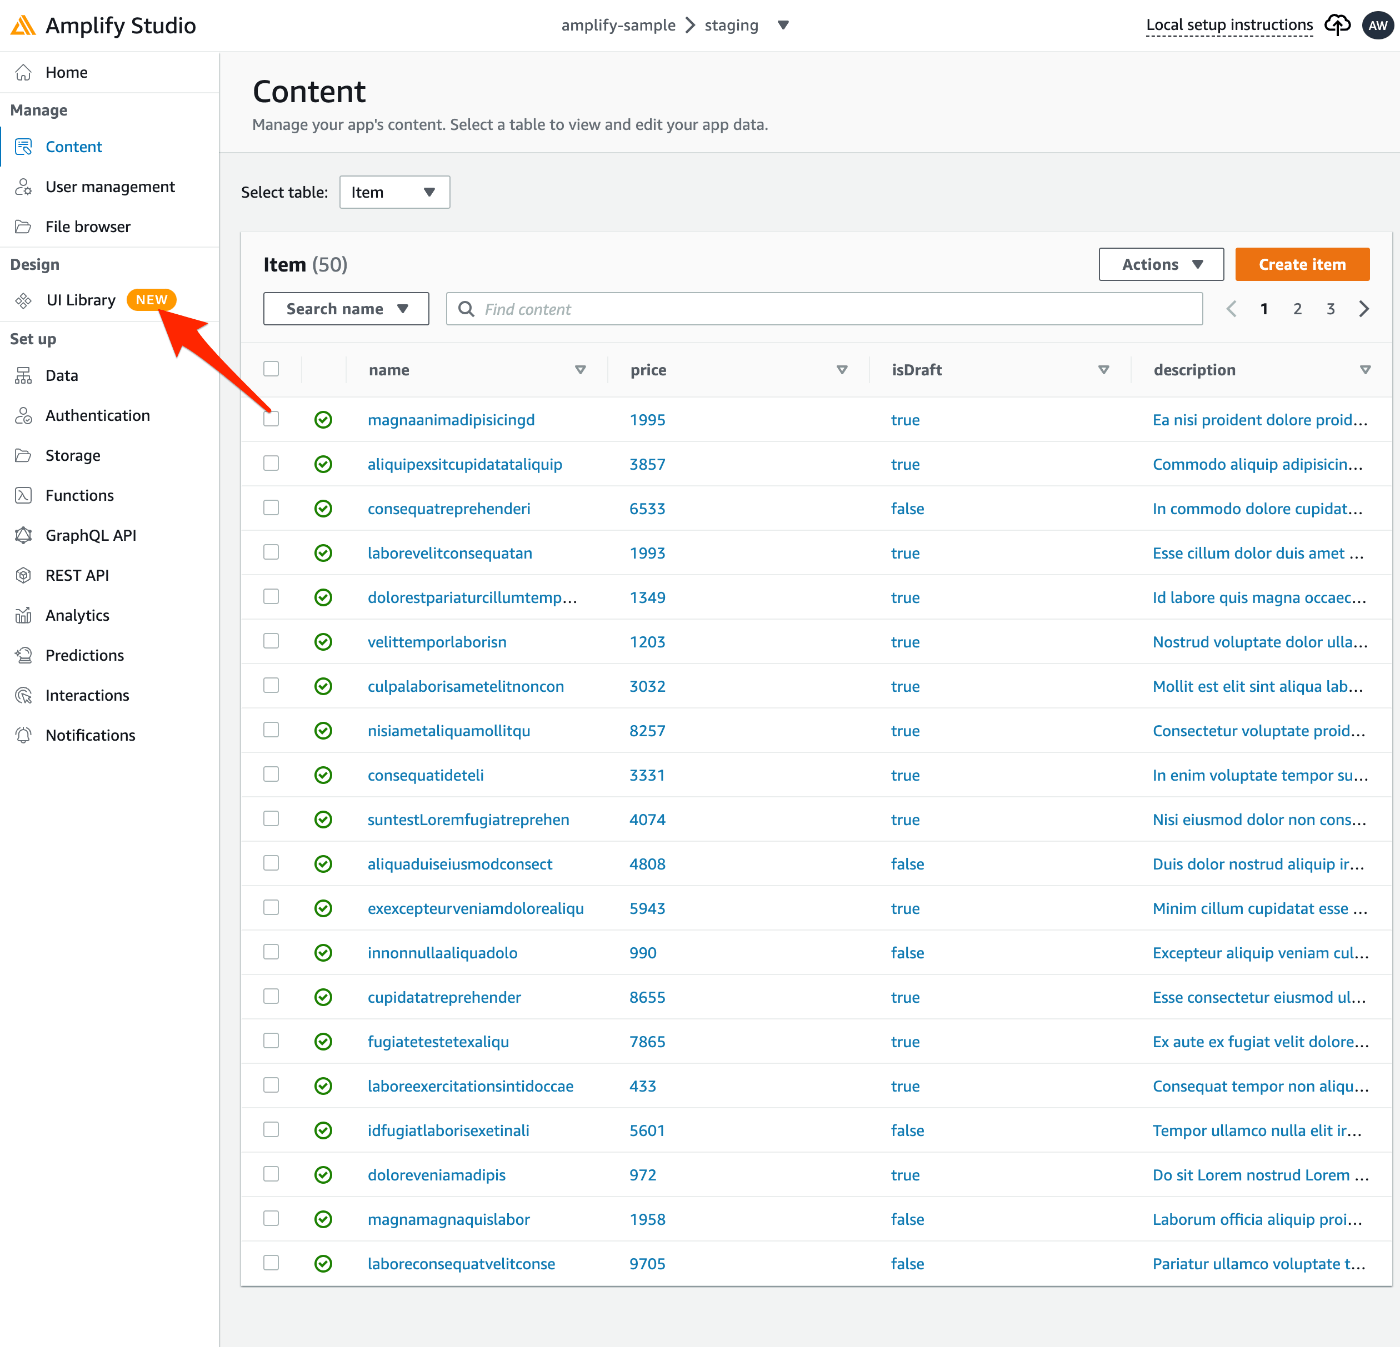
指定した条件に沿ってデータが生成されます。
なお、id はAmplify StudioのUI上には表示されないので、CSVをダウンロードするか、DynamoDBで確認する必要があります。また、Amplify Studioからデータを削除した場合、DynamoDBのレコードからは削除されず、_deleted が true になる論理削除される仕様です。
Amplify Studioの「UI Library」とFigmaを使ったデザイン開発
次に、ここまでに作成したデータを「簡単にいい感じに」表示するために、Amplify Studioの「UI Library」とFigmaを連携させます。
事前準備として、Figmaのアカウントを作成しておきます。なお、ここではFigmaの言語設定を日本語にしています。
「UI Library」を選択。

「Get started」を選択。
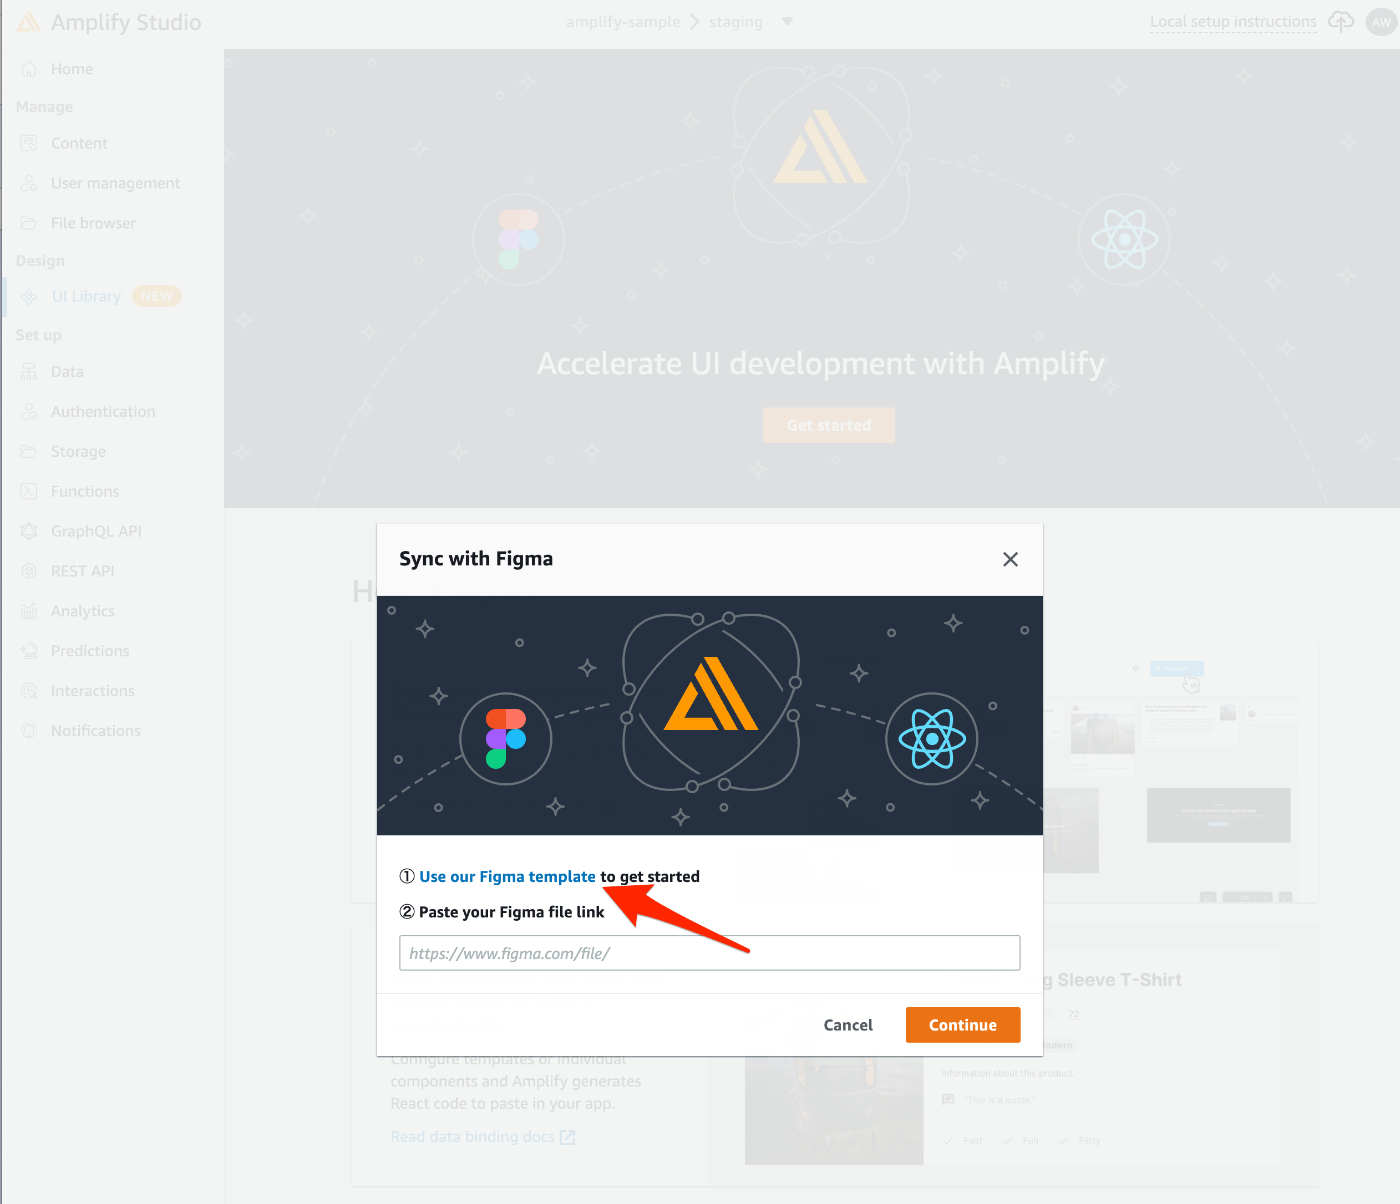
「Use our Figma template」を選択し、Figmaの「AWS Amplify UI Kit」へ遷移。
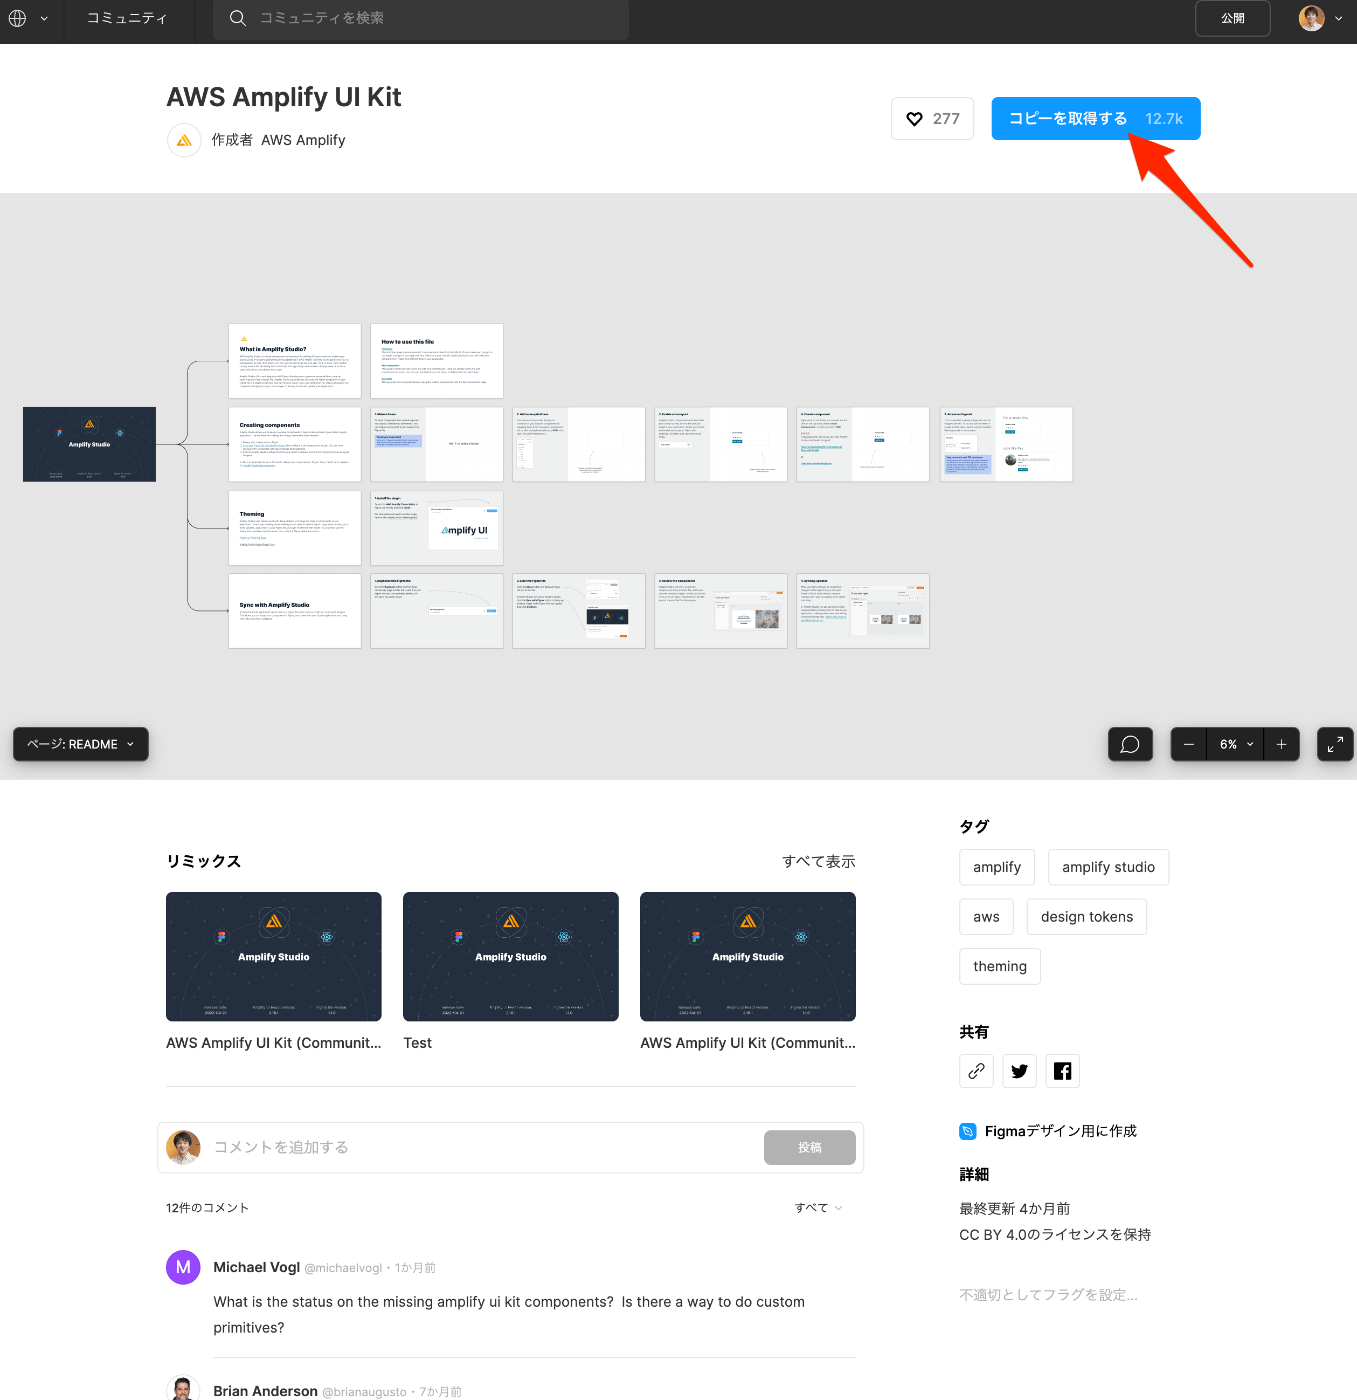
「コピーを取得する」でコピー。
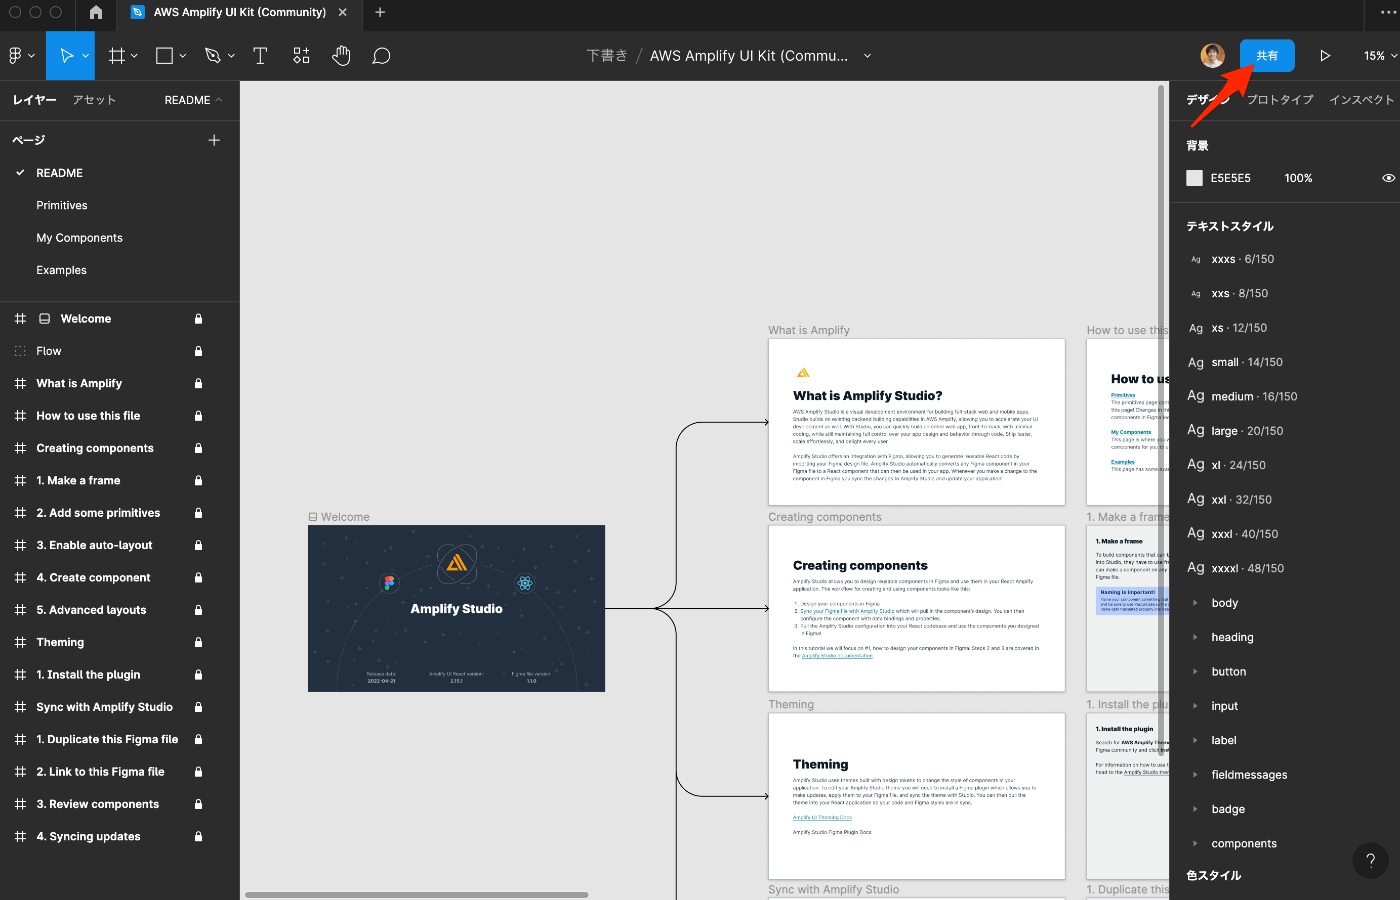
コピーされた下書きを開き「共有」を選択。
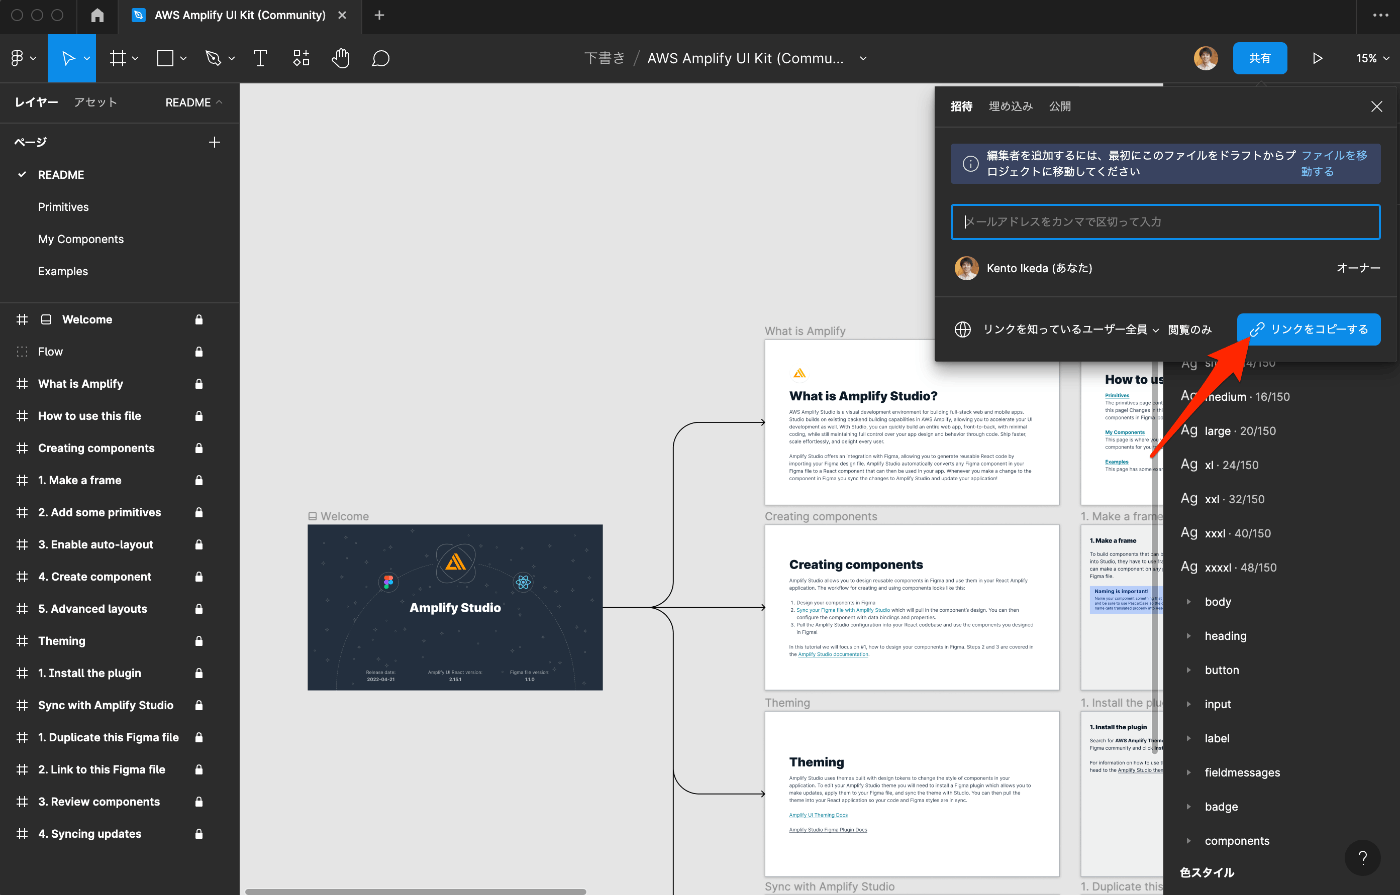
「リンクをコピーする」を選択。
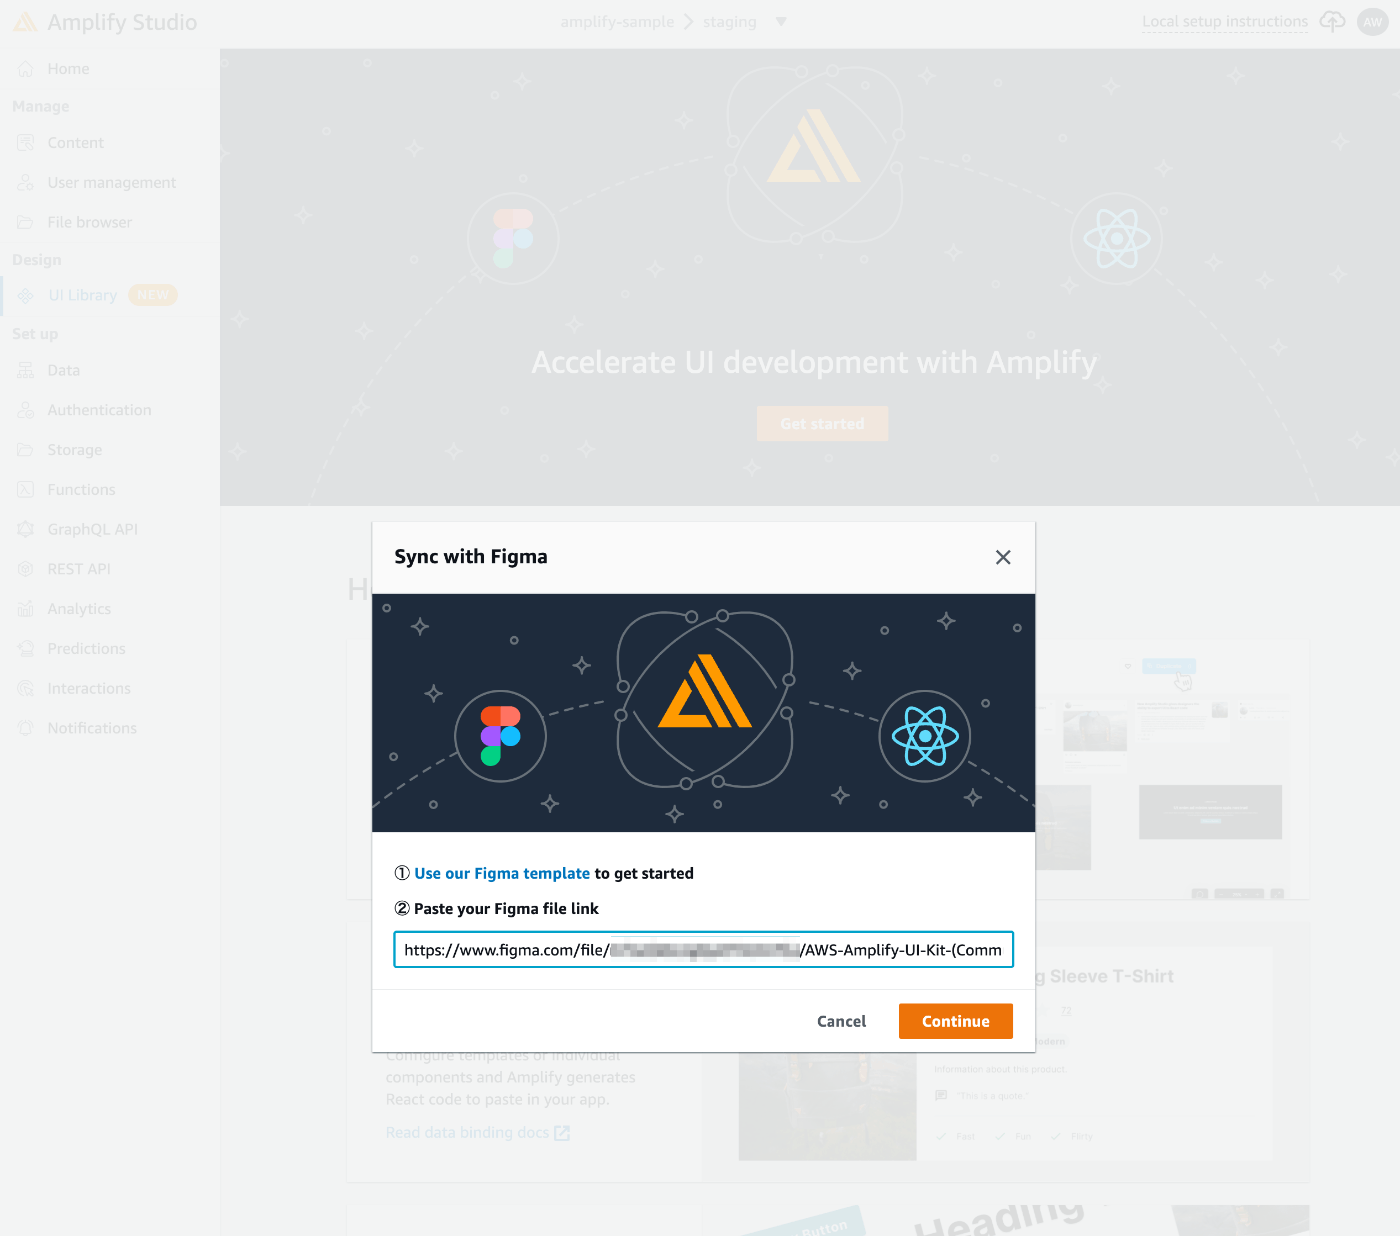
Amplify Studioに戻り、コピーされたURLを貼り付けて「Continue」。
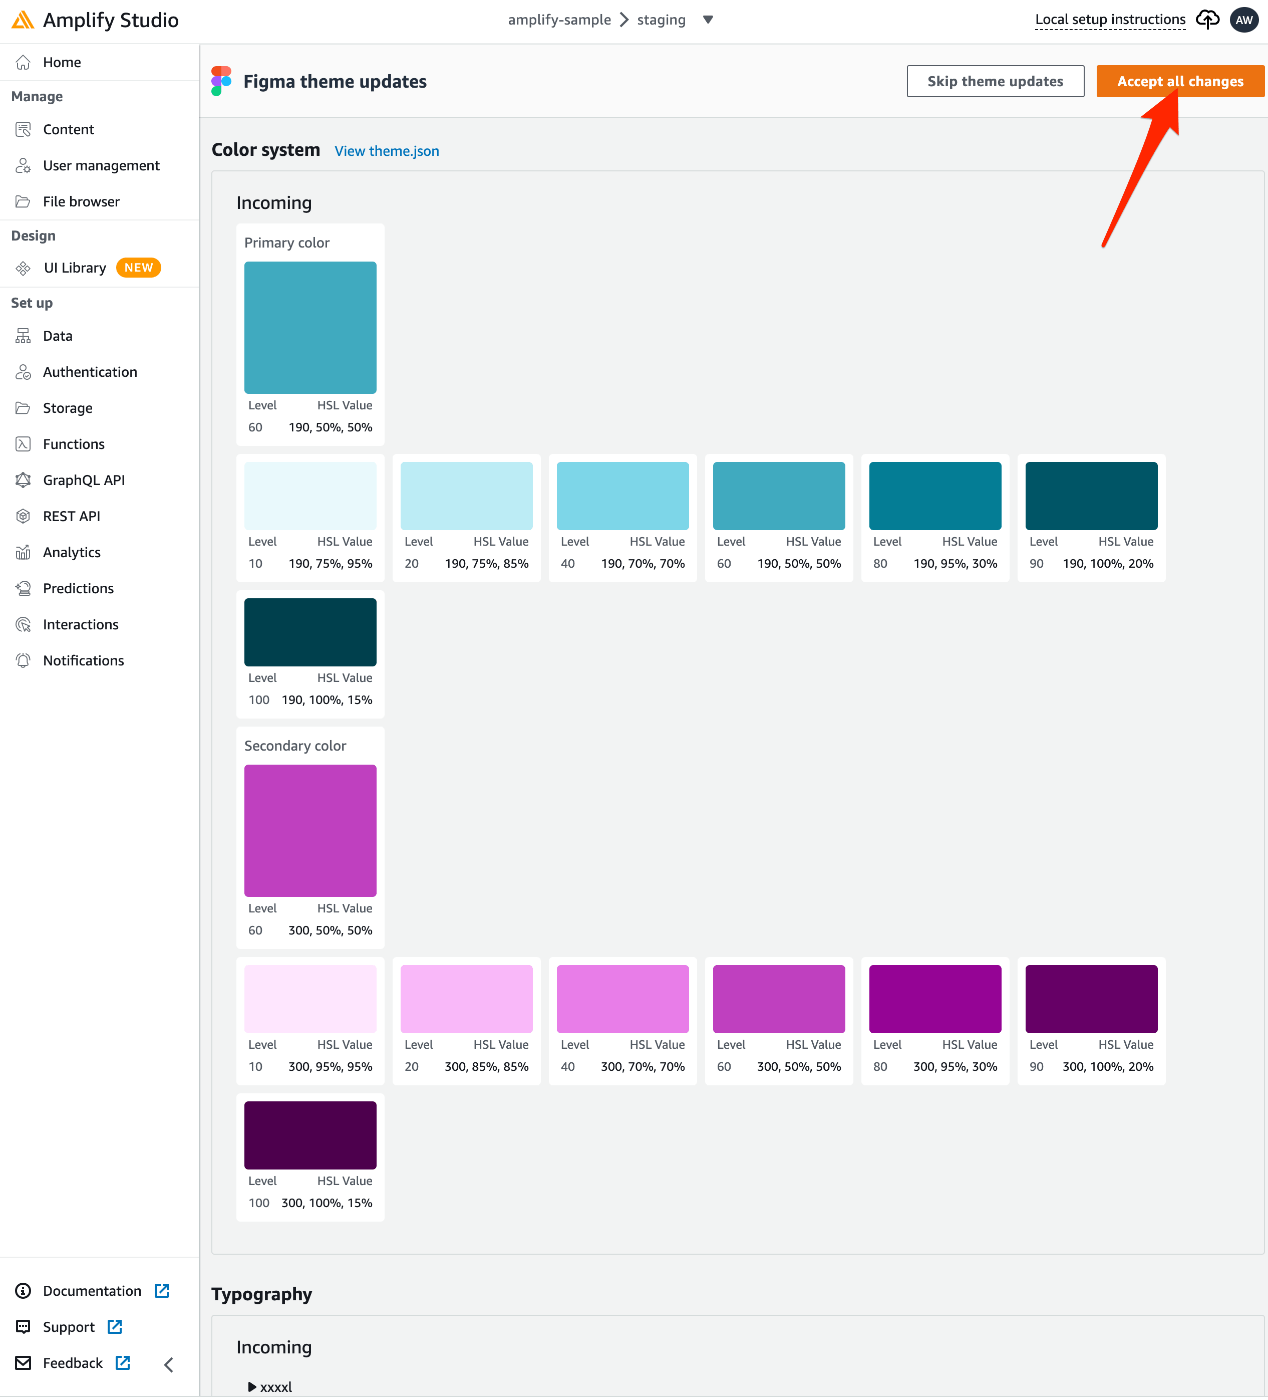
Figmaのテンプレートの内容が読み込まれるので、「Accept all changes」でAmplifyに適用。
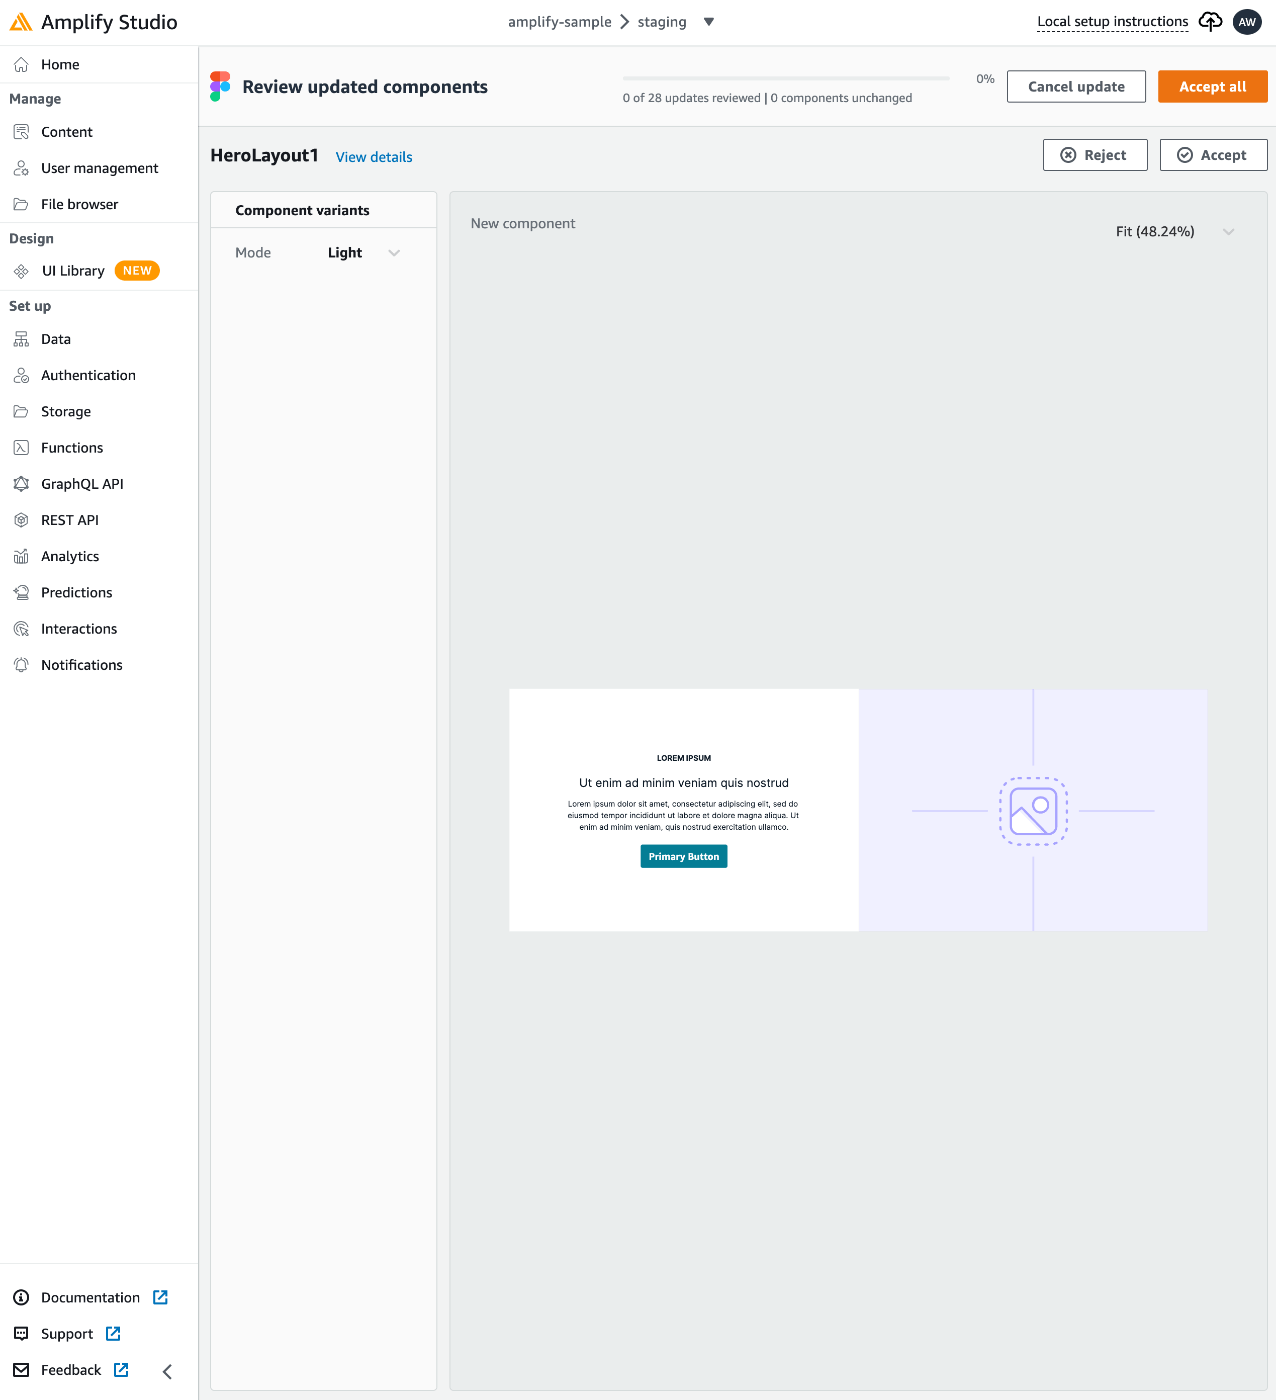
コンポーネントの差分も確認しながら適用するか選択可能ですが、ここでは「Accept all」。
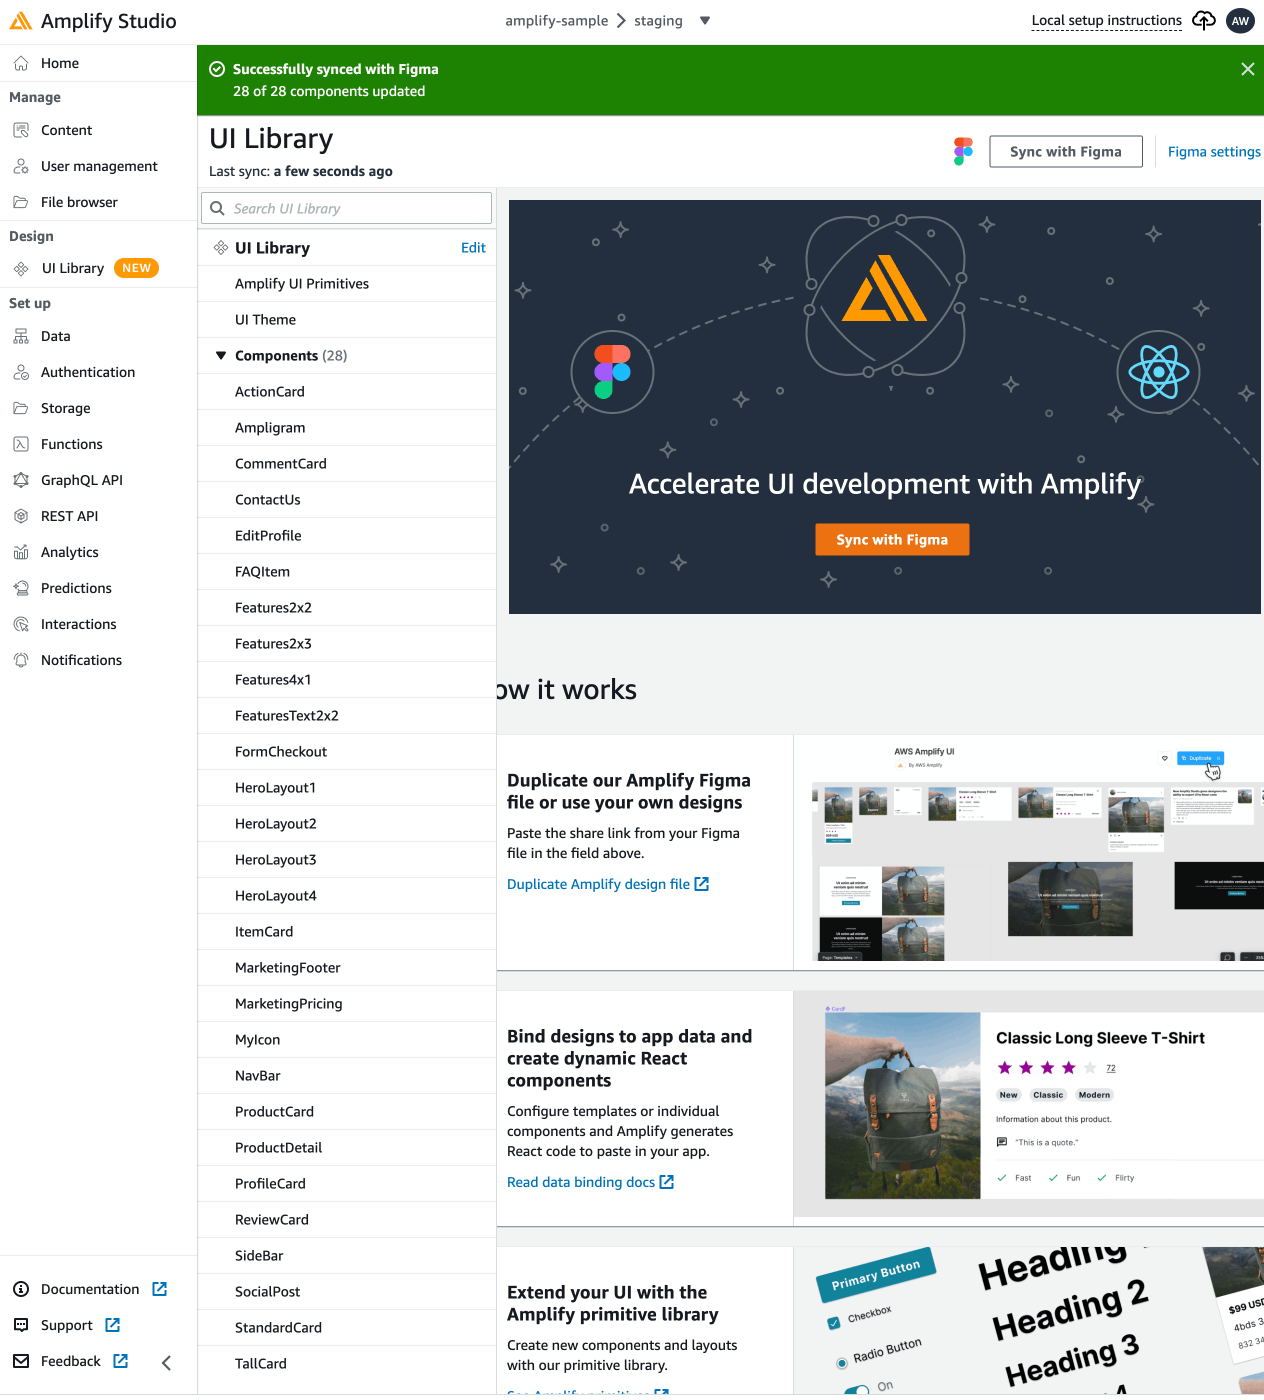
すると、FigmaのテーマやコンポーネントがAmplifyに適用されます。
商品リストの作成
既存のデザインの中に、「ItemCard」という商品情報を表示するコンポーネントがあるので、それを利用してUIを作成します。

「UI Library」にある、「Components」から「ItemCard」を選択。
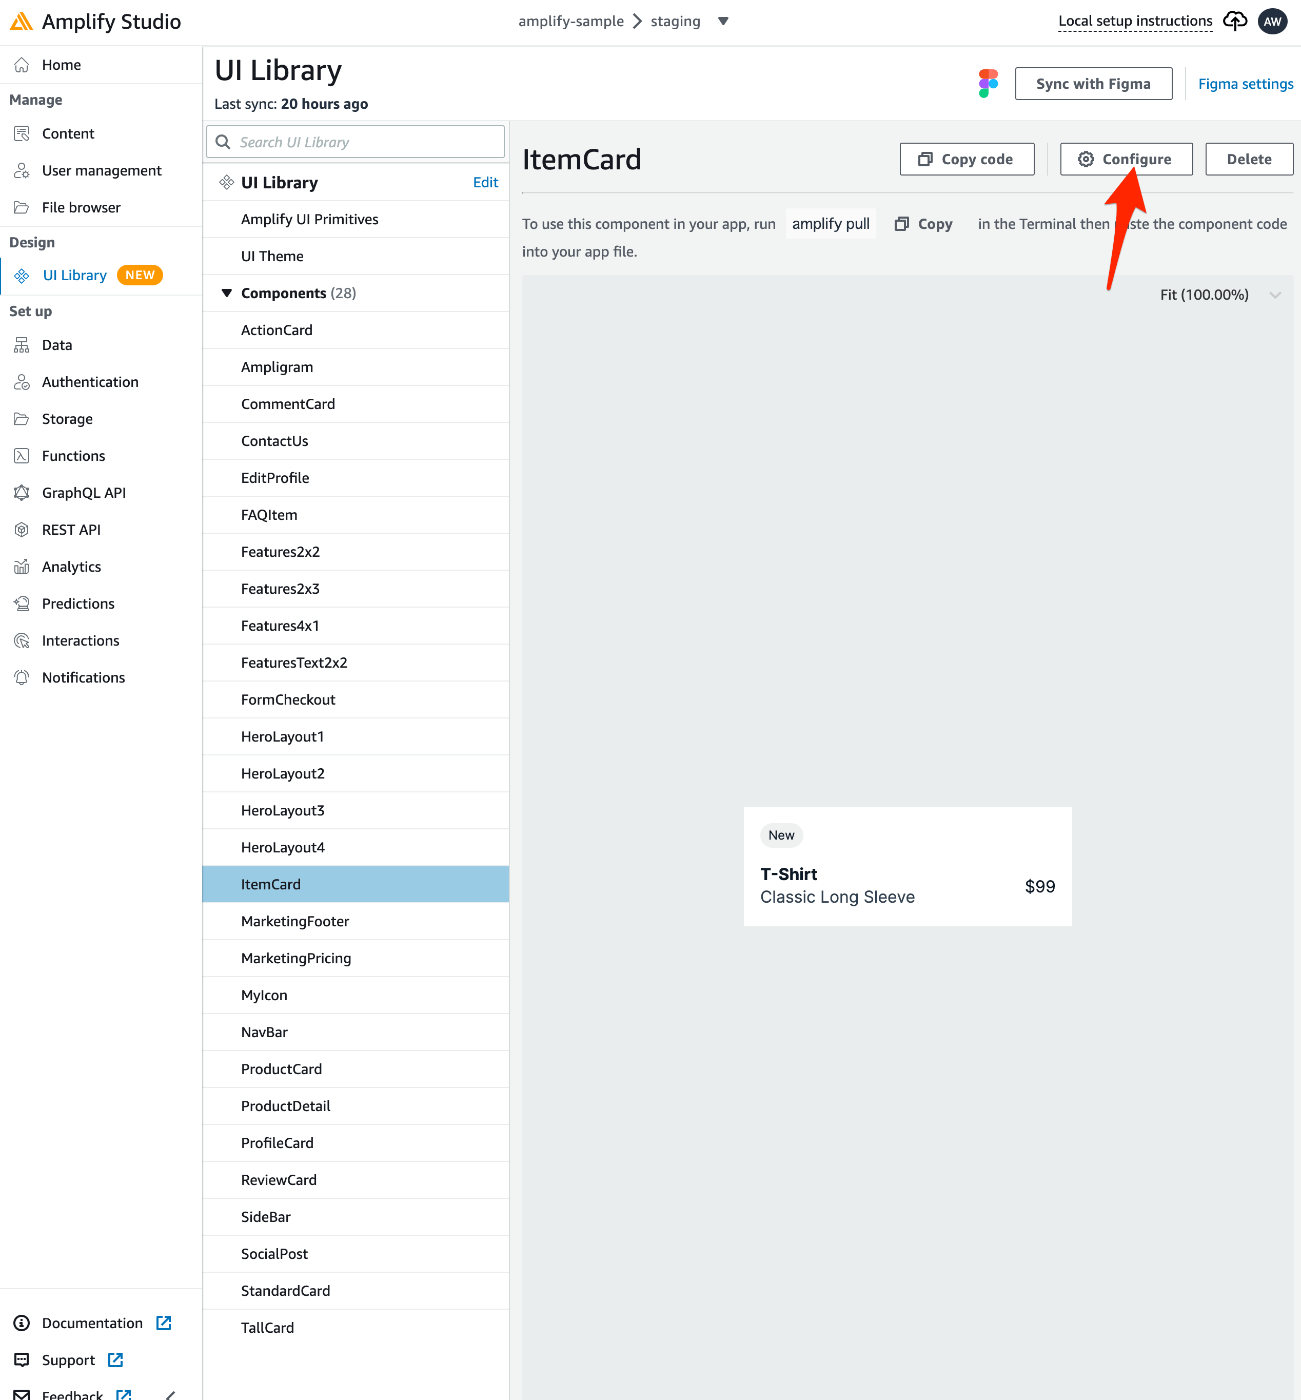
「Configure」を選択。
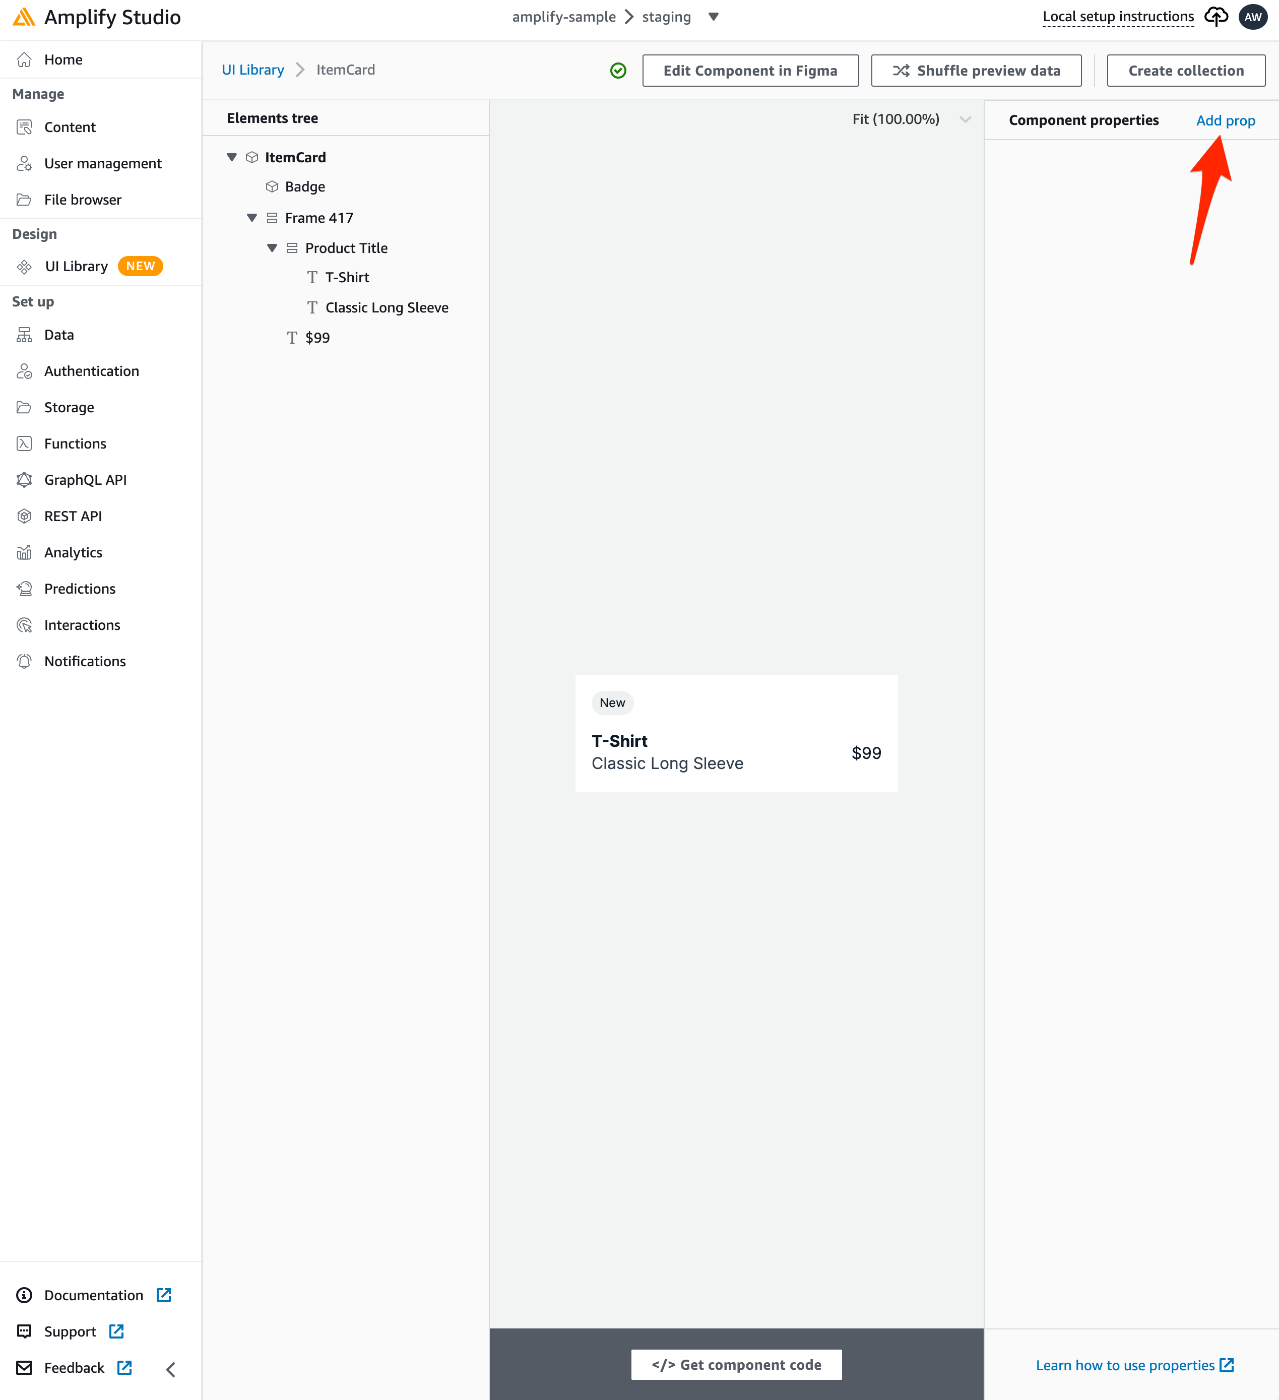
作成したモデルと紐付けをするために、「Component properties」の「Add prop」を選択。
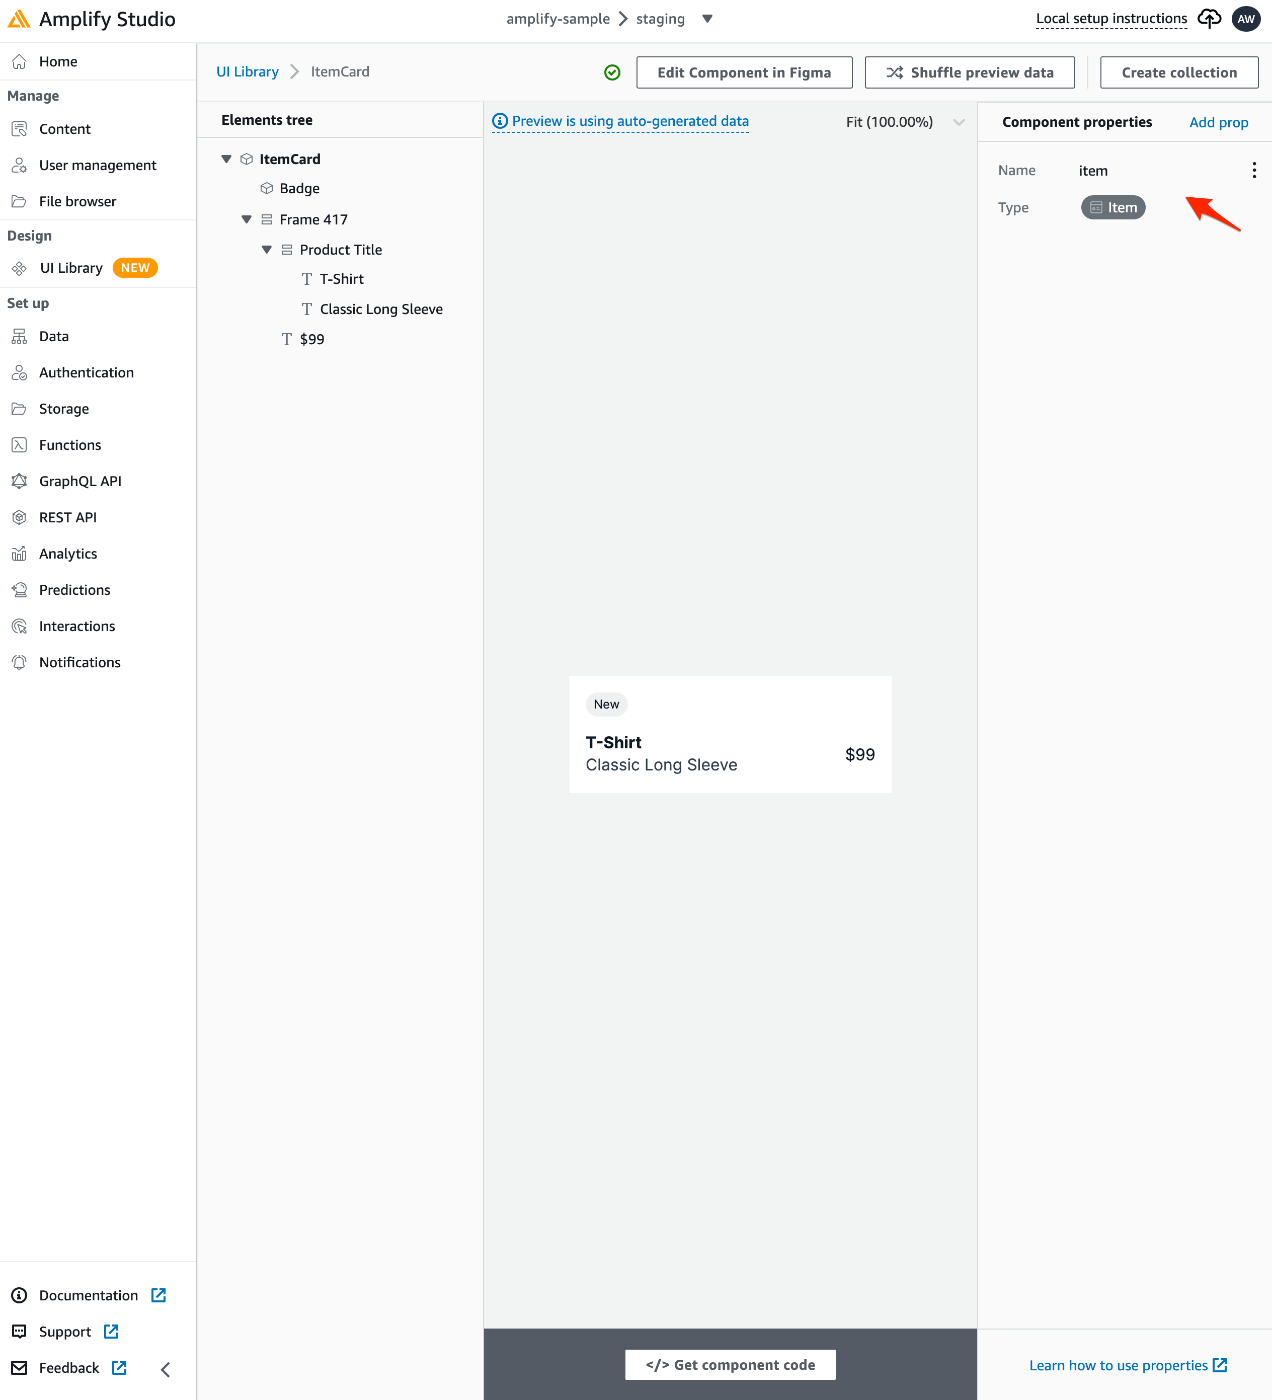
紐付けたいモデルの「Name」と「Type」を指定。
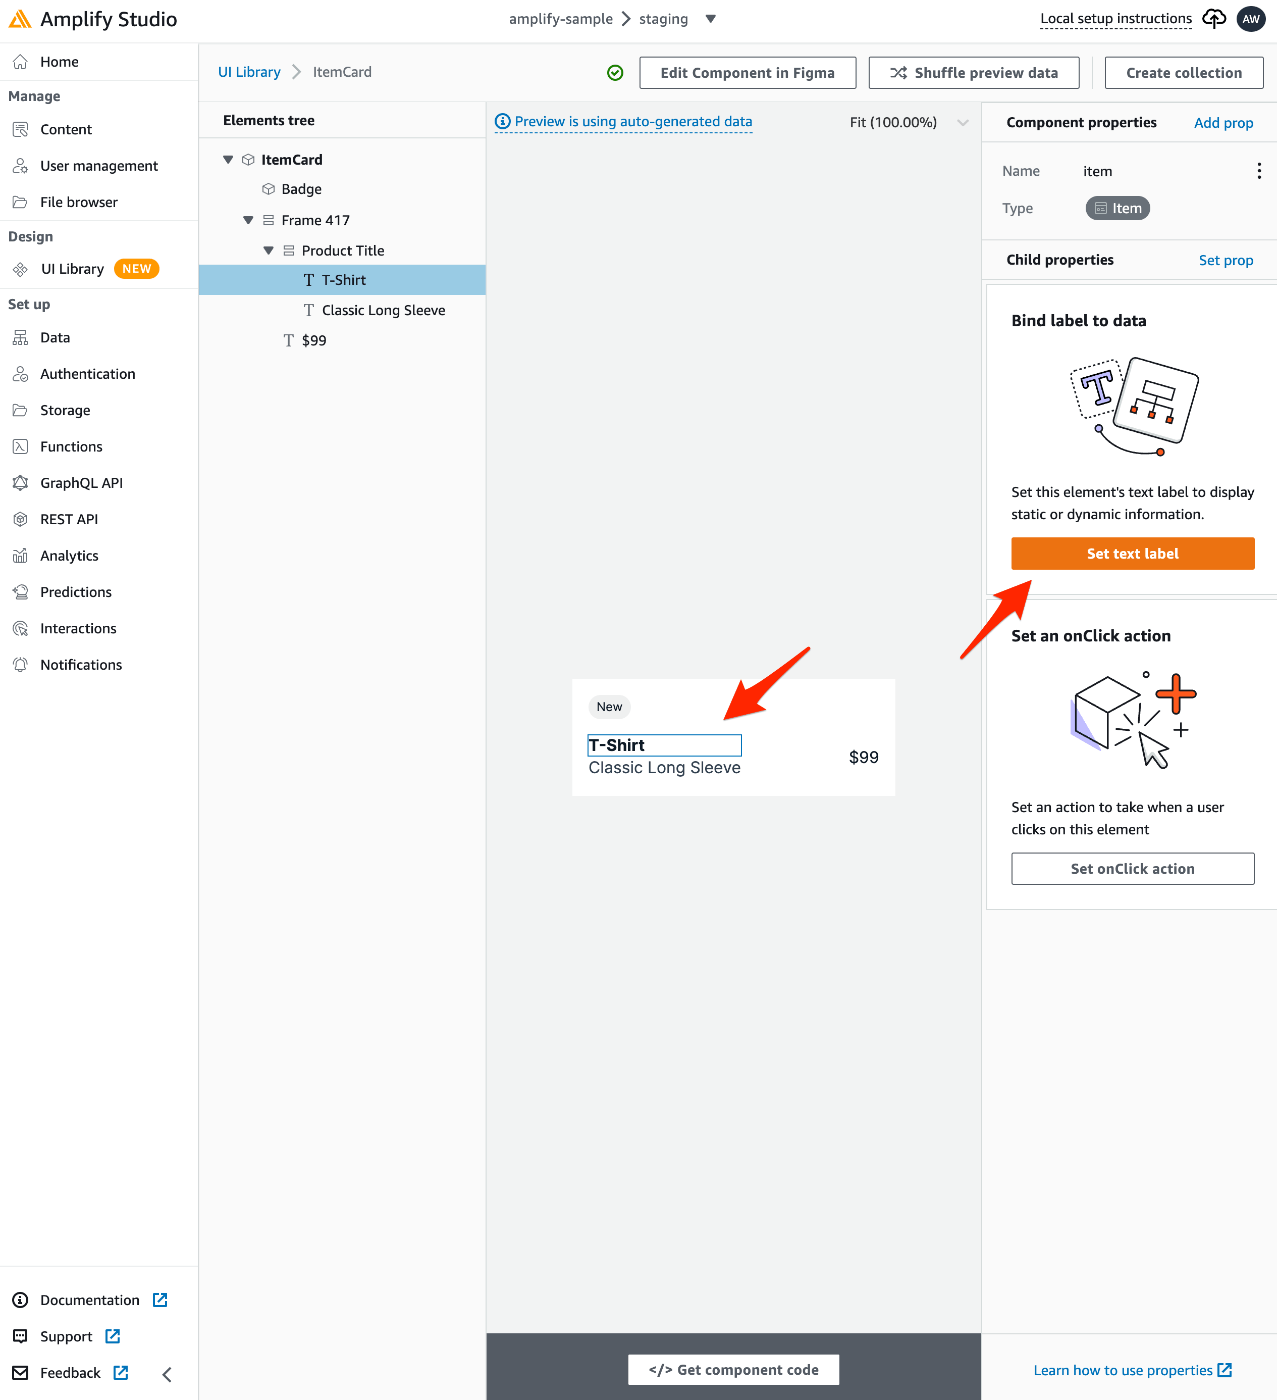
モデルの商品名を紐付けるために、プレビューの商品名の領域を選択し、「Set text label」を選択。
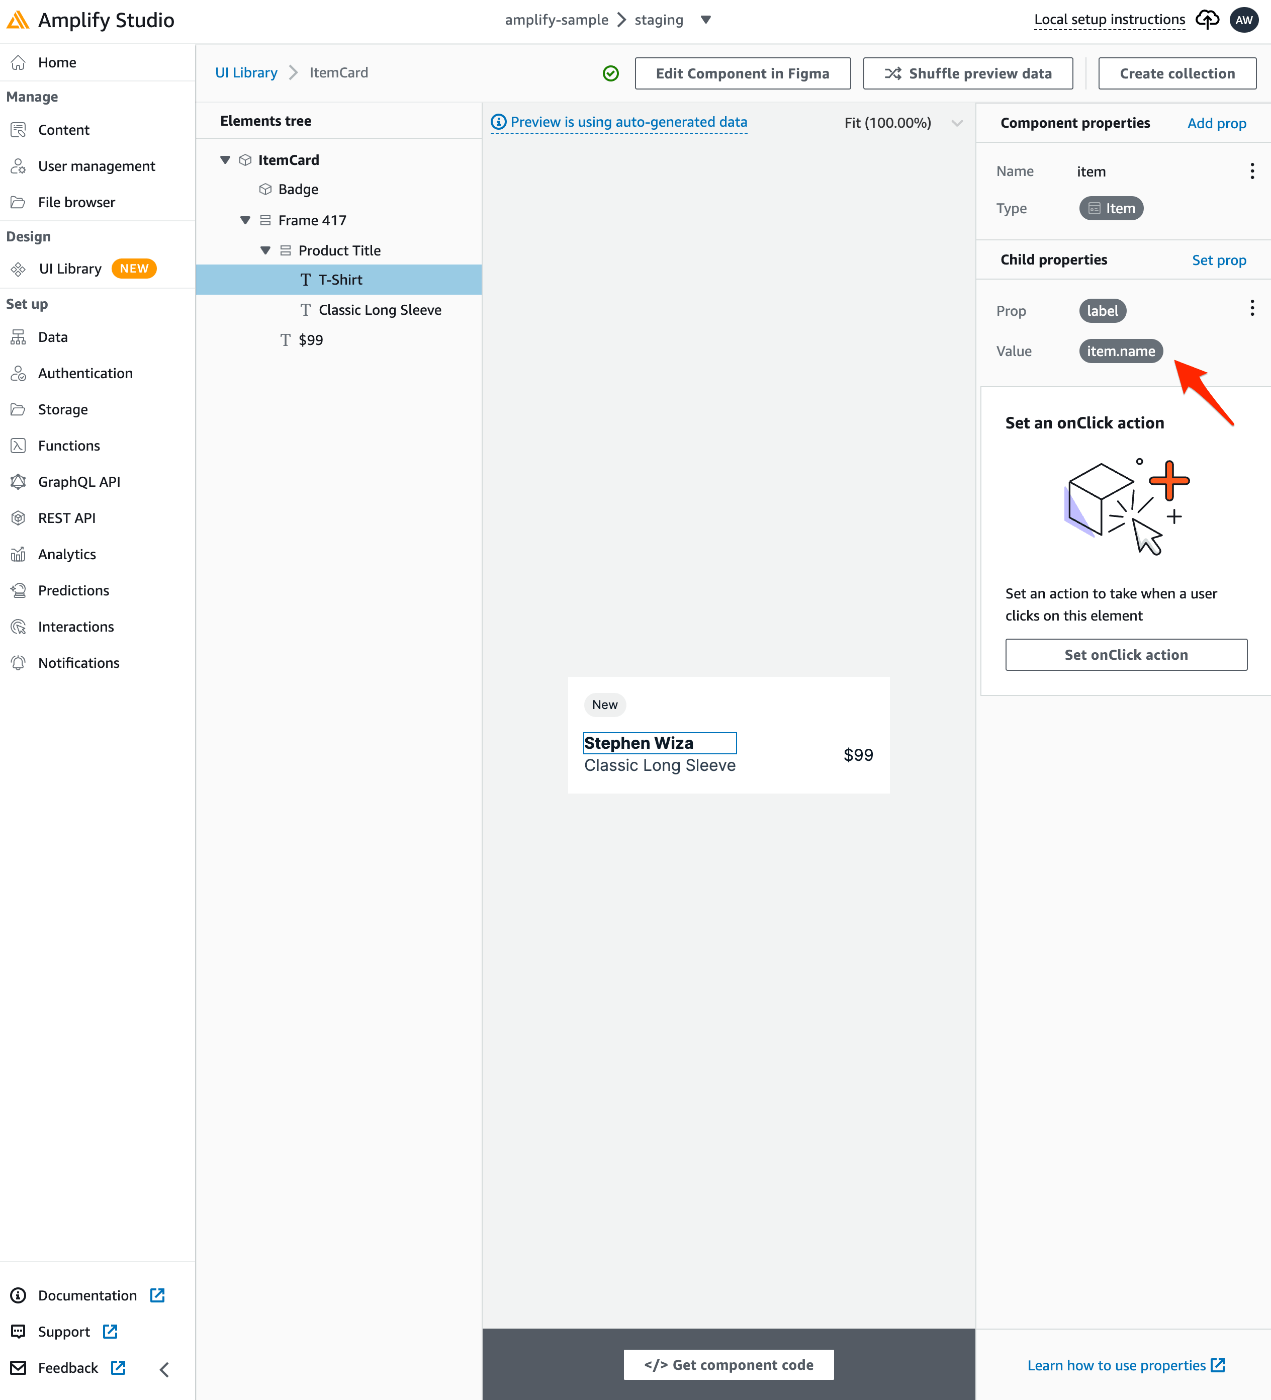
「item.name」がモデルの商品名なので、「label」に「item.name」を指定。すると、プレビューとして自動生成したデータが表示されます。
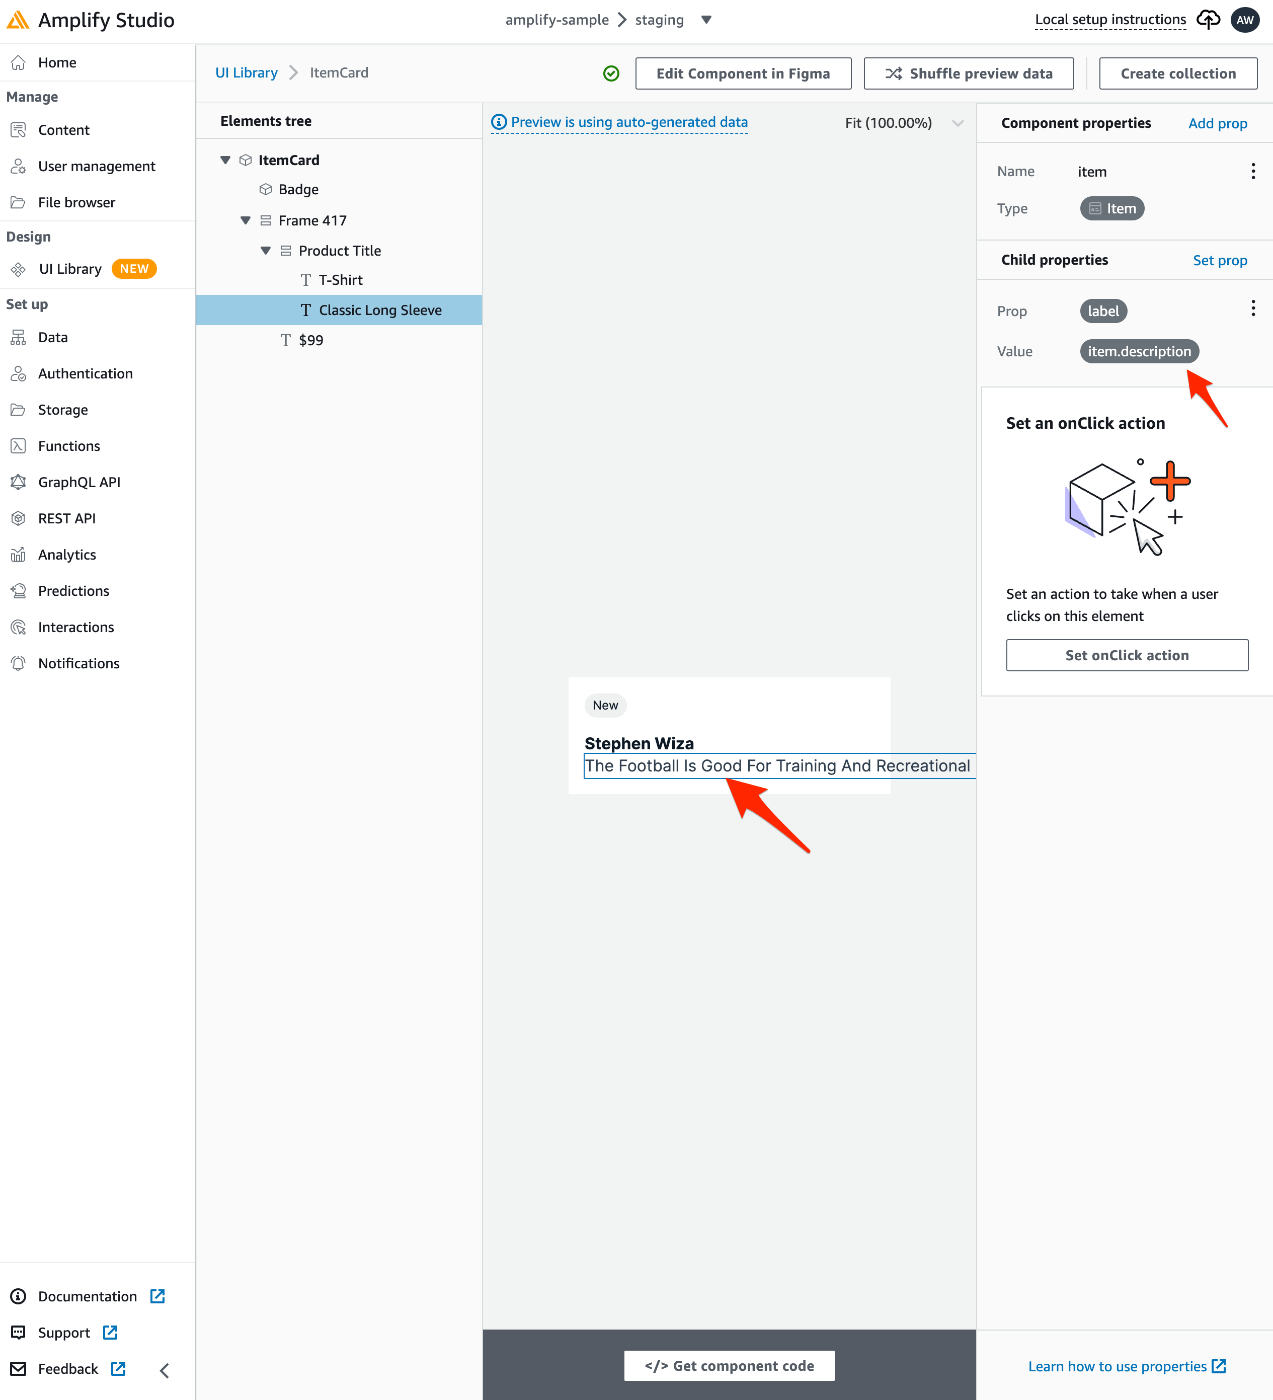
同様に、descriptionを指定。
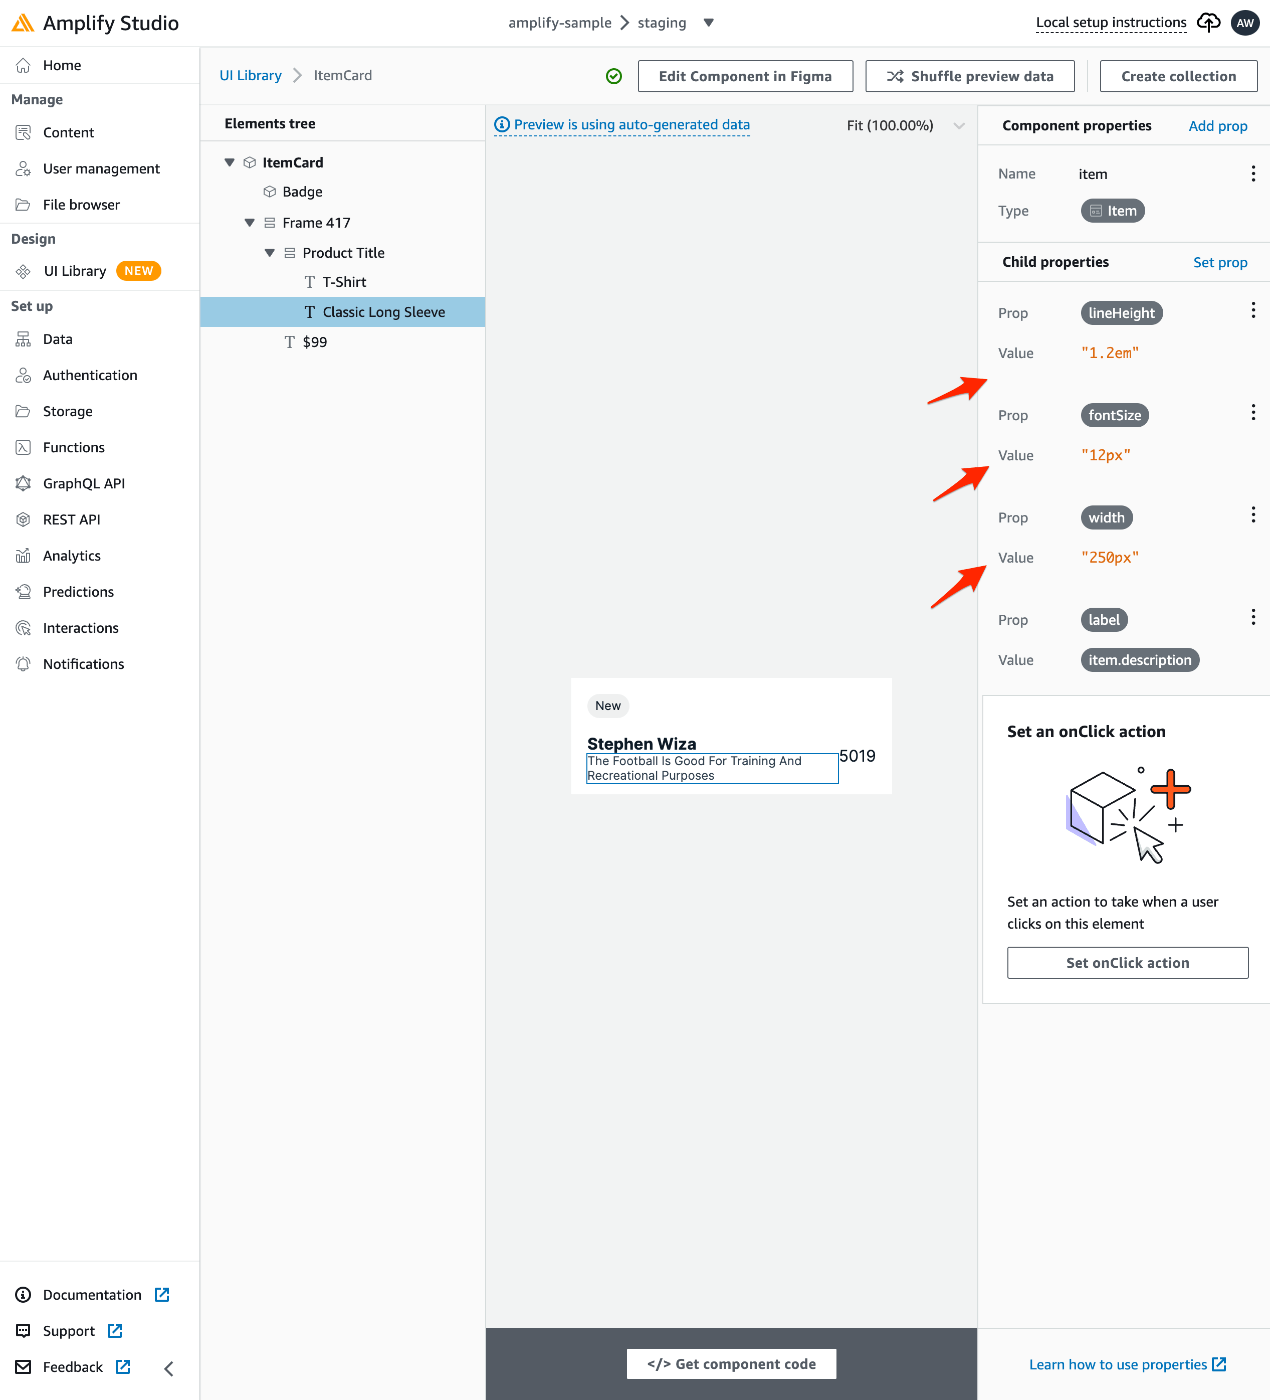
descriptionの文字がはみだすので、プロパティを追加して調整。
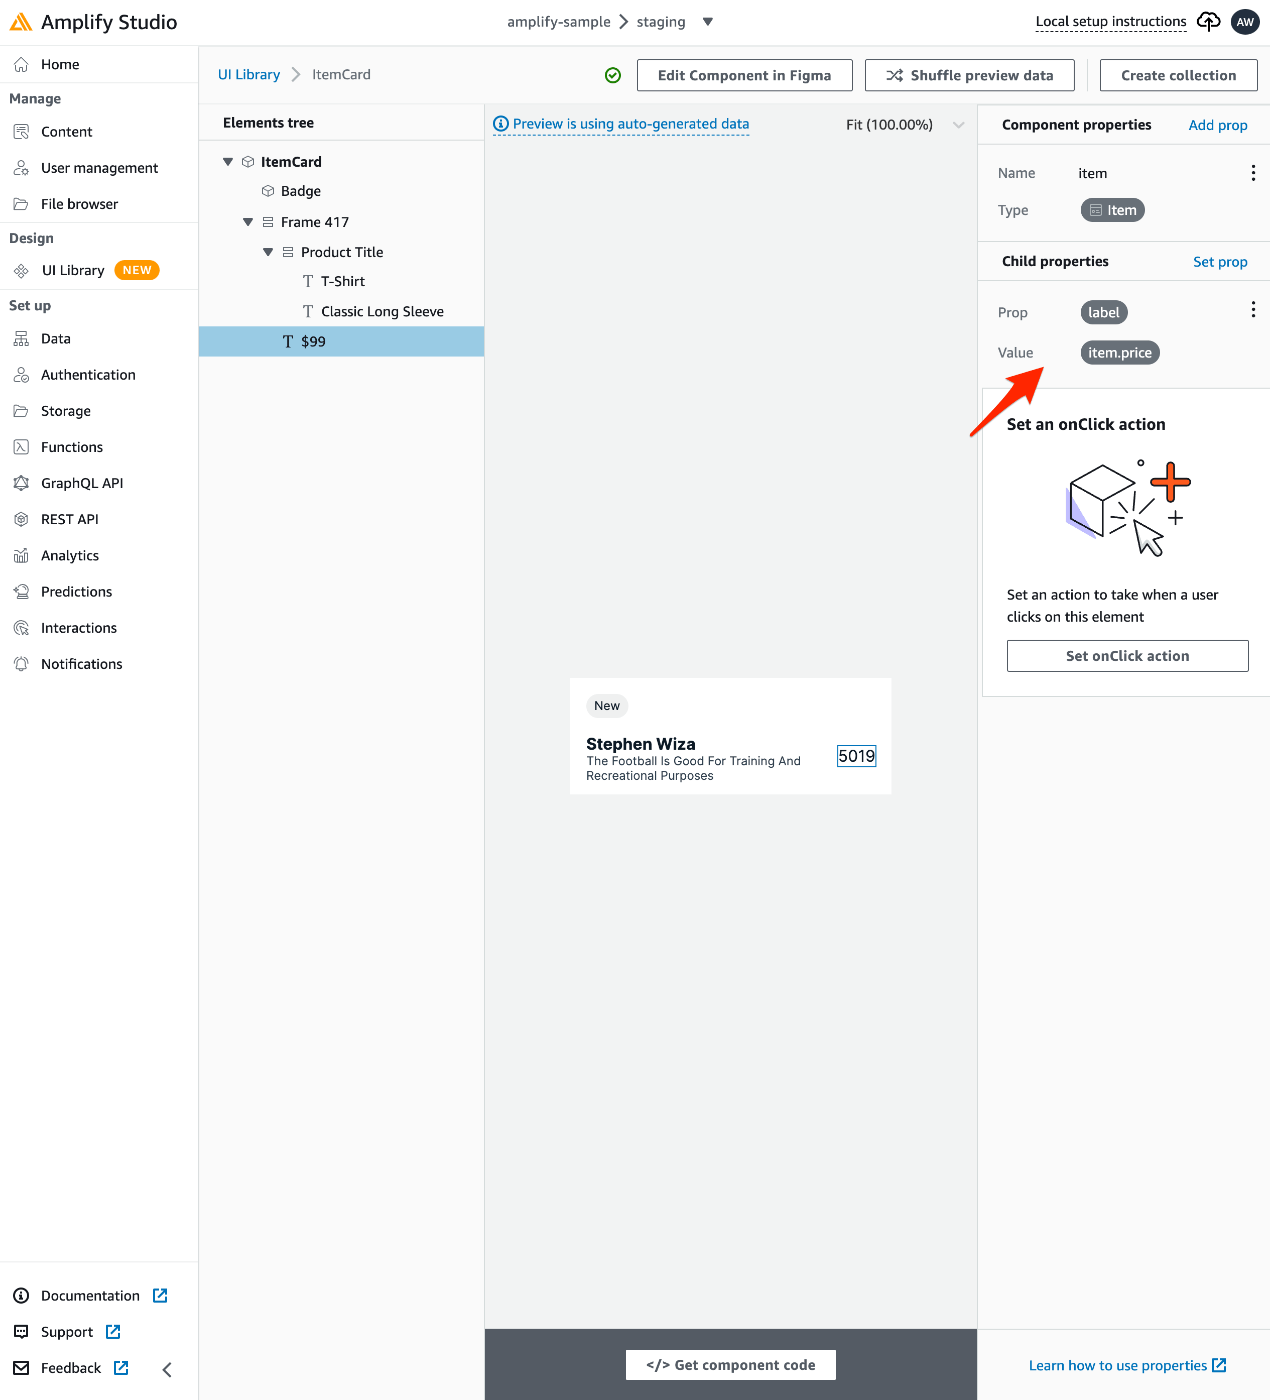
料金のpriceも指定。
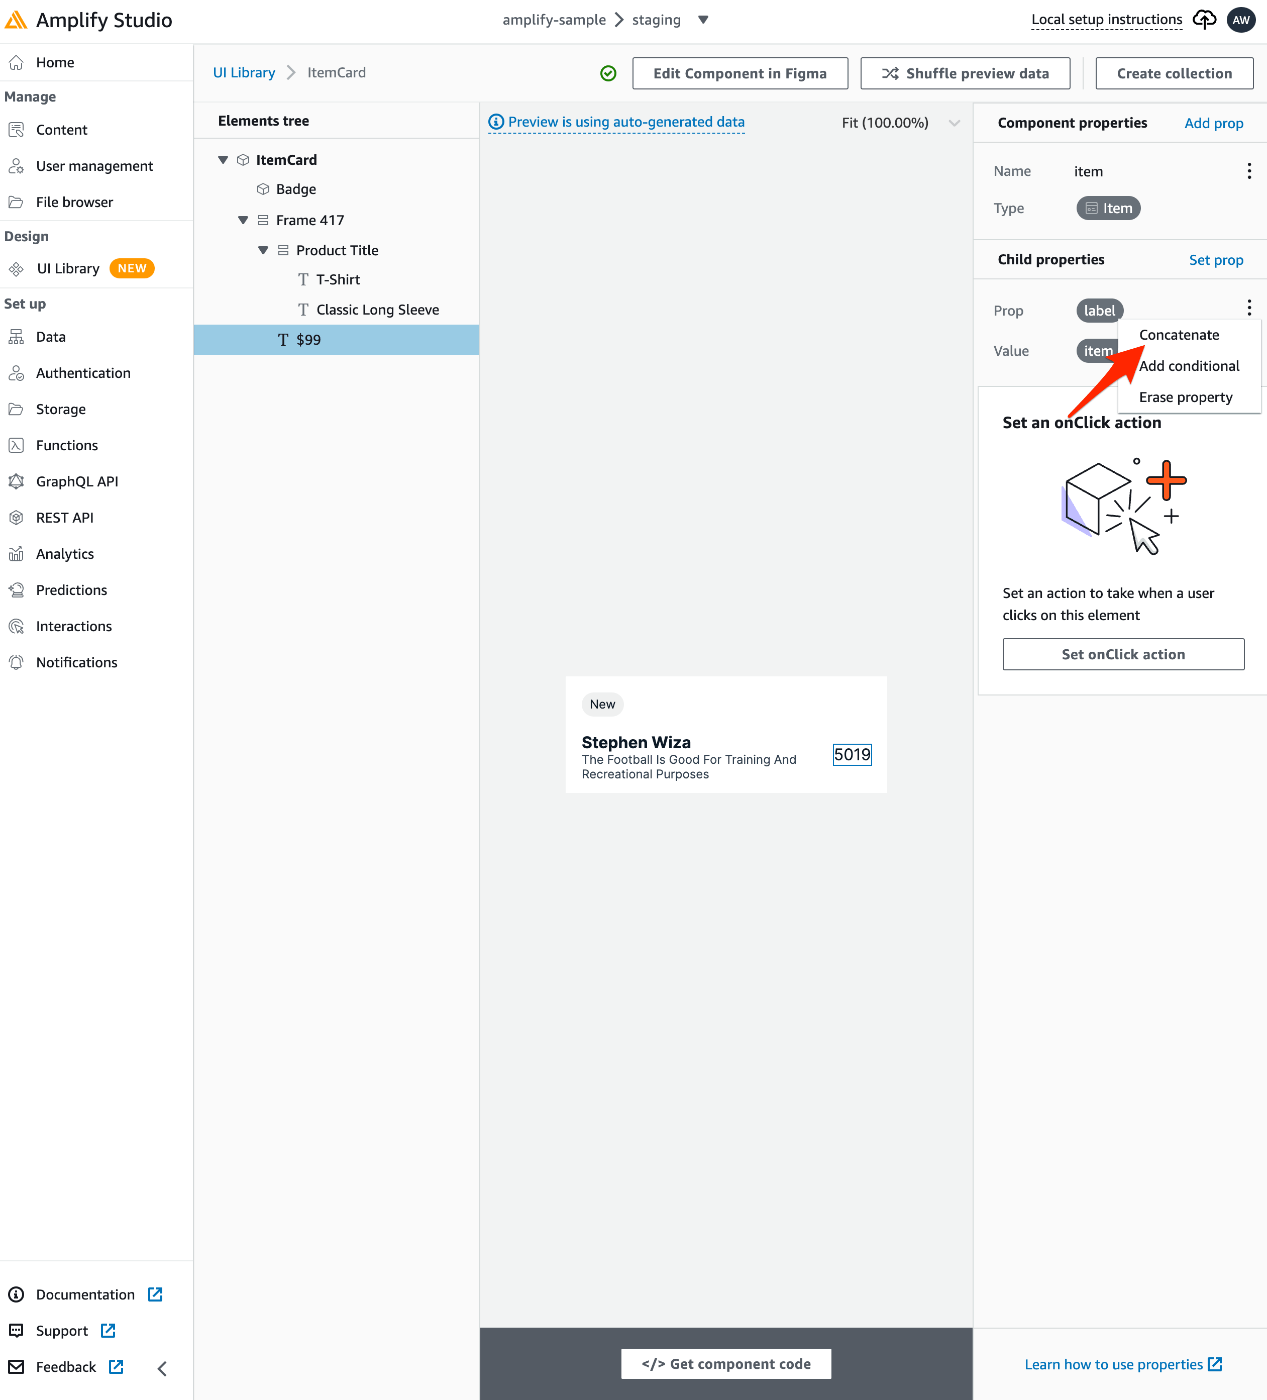
通貨単位を表示したいので「Concatenate」を選択。
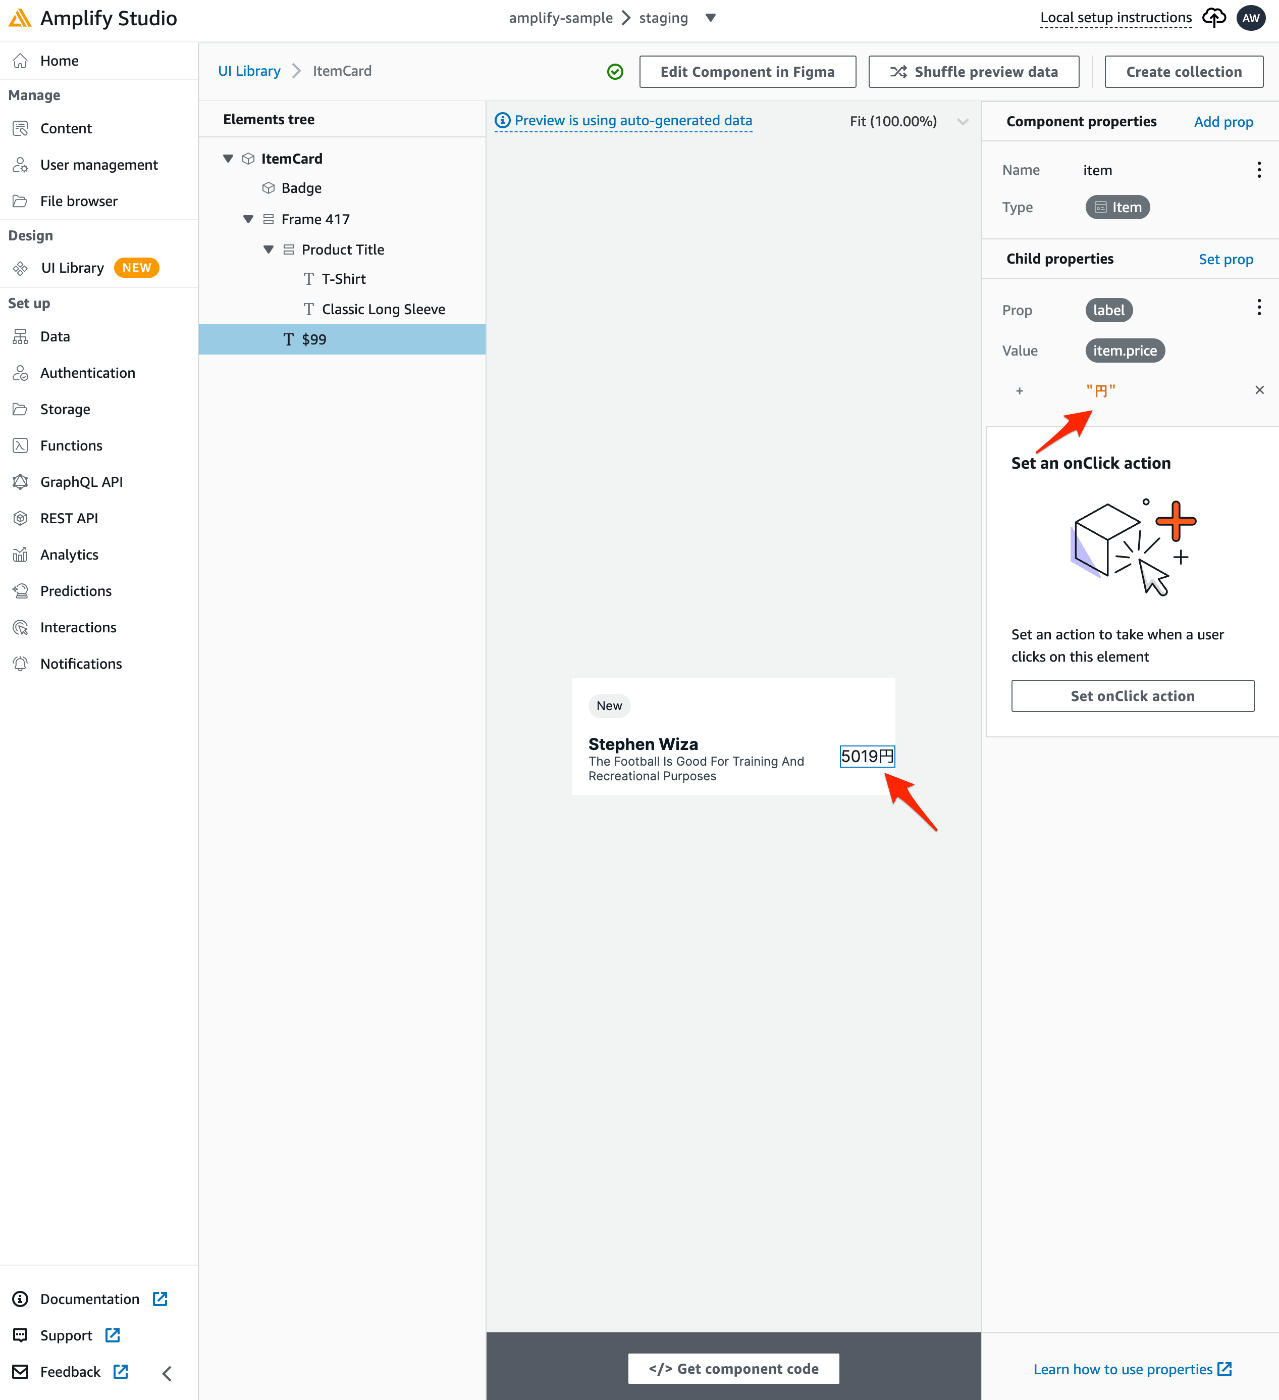
「円」と直接入力すると、プレビュー表示にも金額の数字に「円」が追加されます。

次に、「ItemCard」のコレクションを作成してリスト表示させます。「Create collection」を選択。

コレクション名を指定して「Create」。
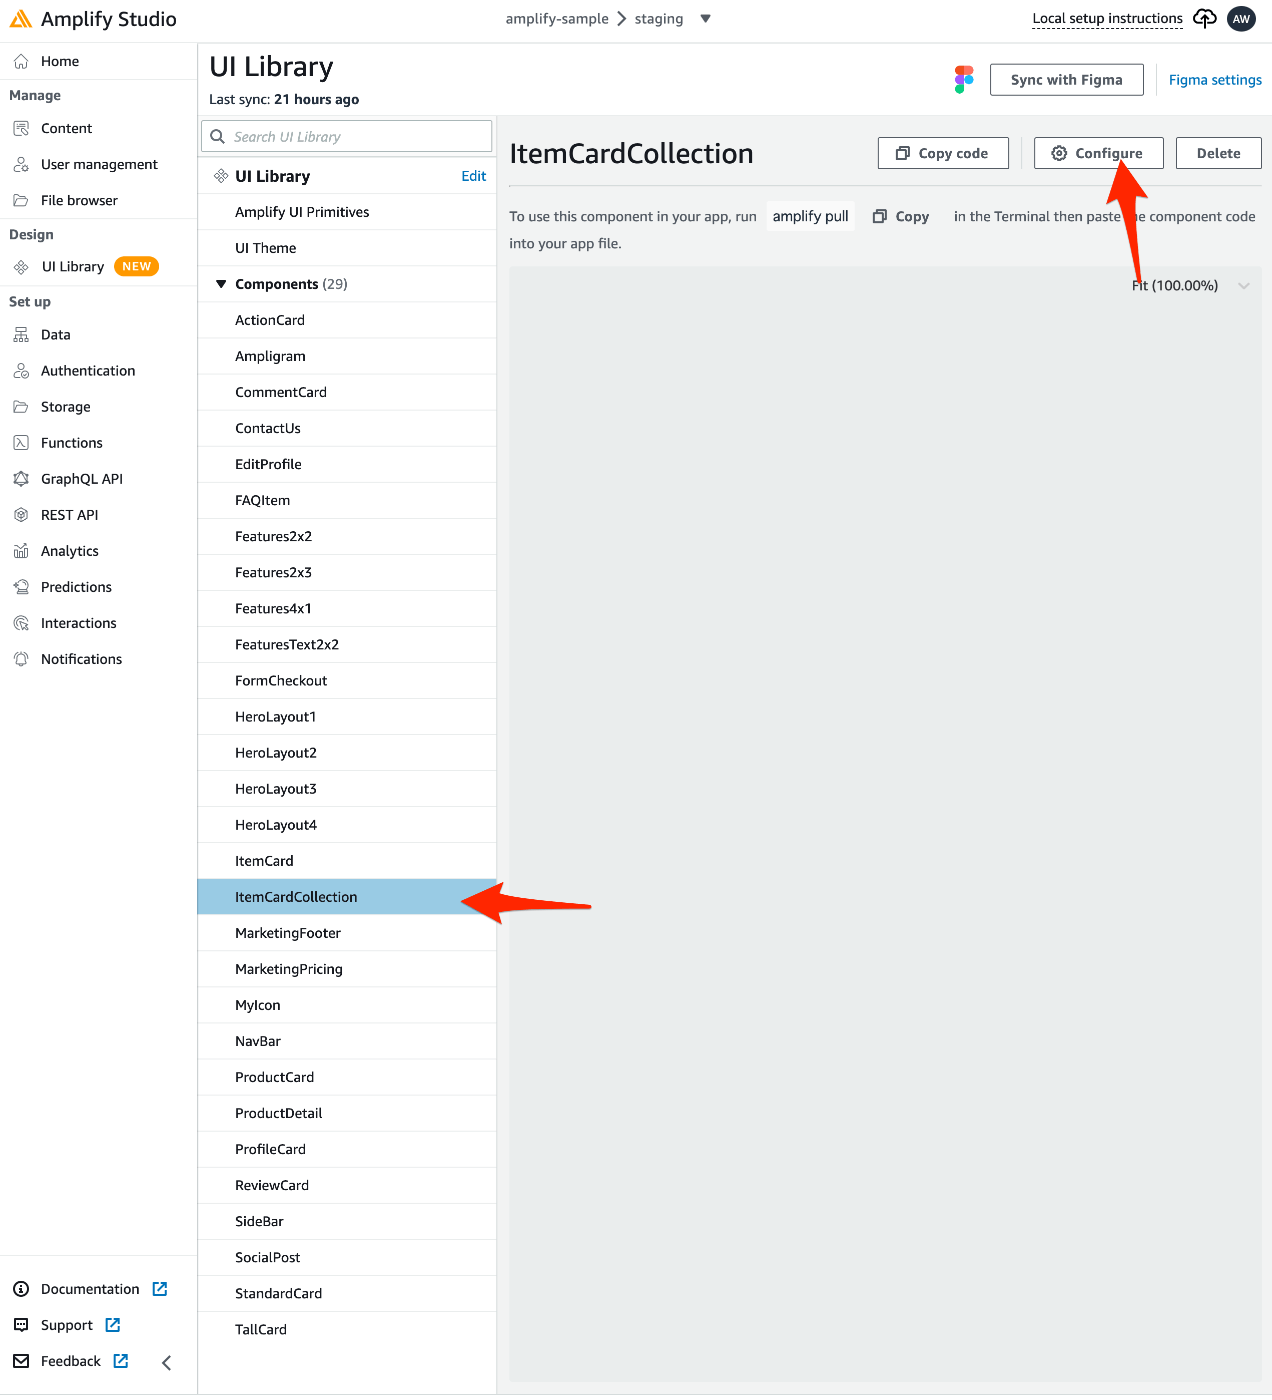
「Components」に「ItemCardCollection」が追加されるので、それを選択し、「Configure」。
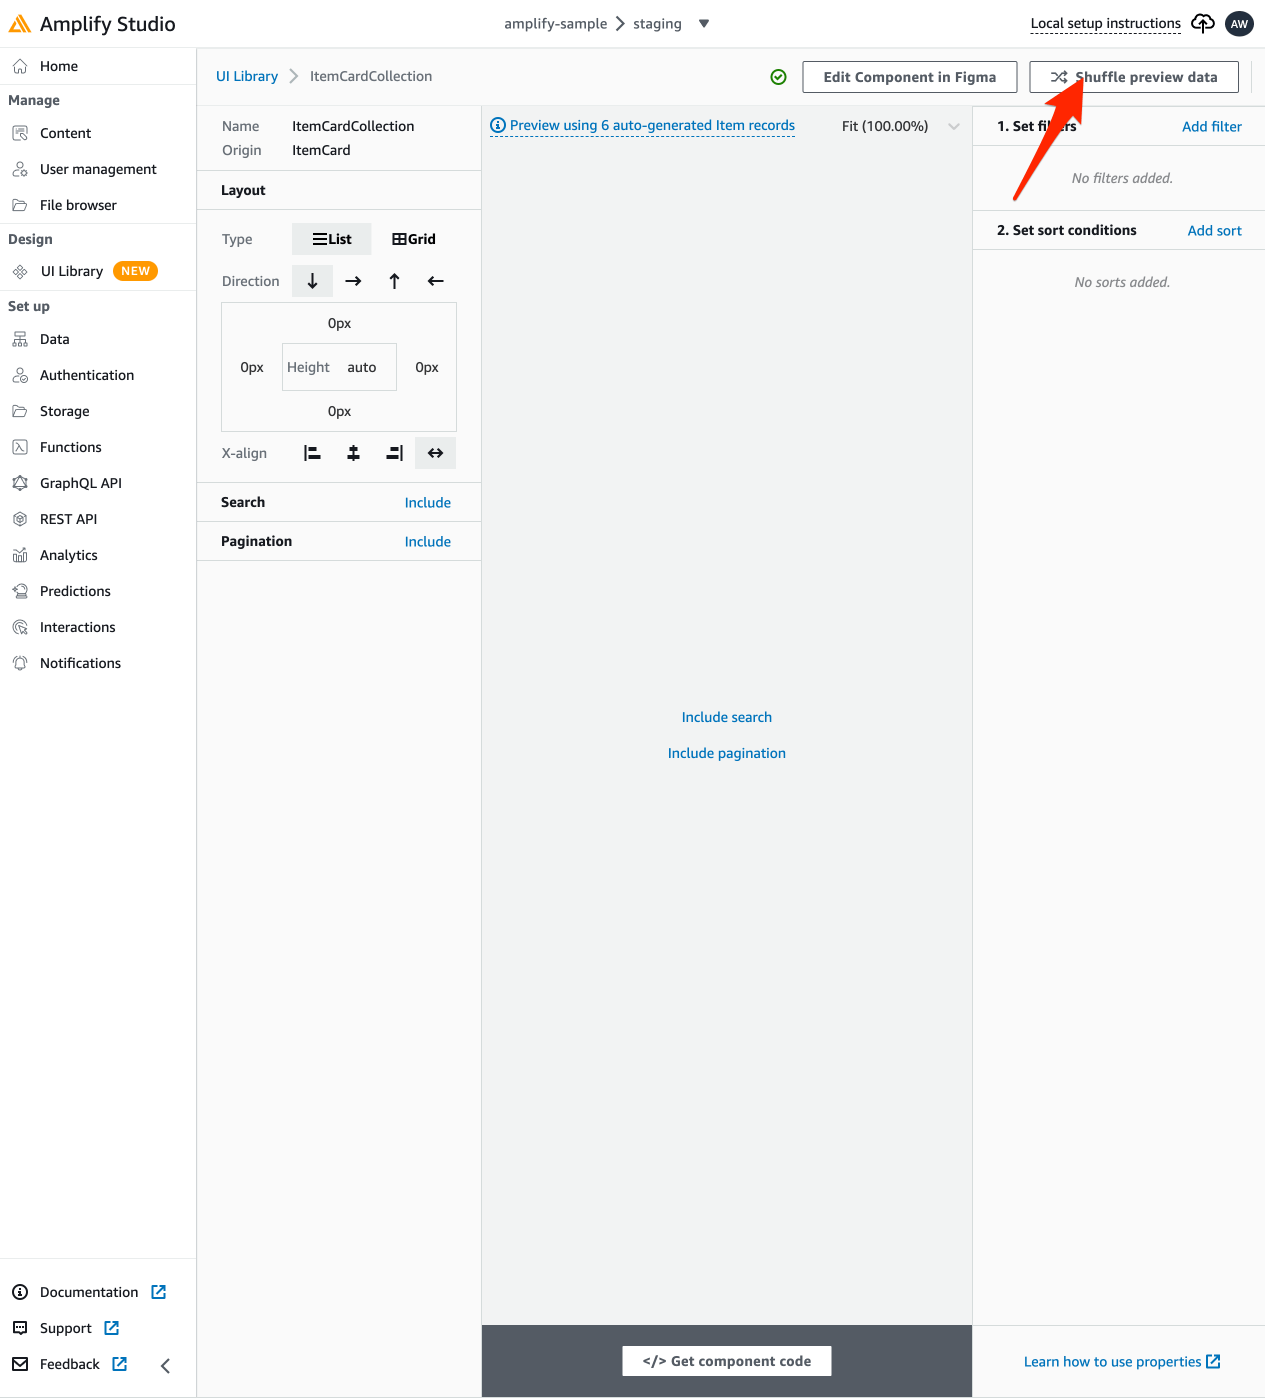
この状態でリストUIが生成されているので「Shuffle preview data」を選択。

プレビューデータが表示されています。
ソースコードへ反映
ここまでの状態をソースコードに反映させます。

「</> Get component code」を選択。

この手順に沿って実装します。
amplify pull することで、ここまでに作成したUI Componentをローカル環境に取得できます。
$ amplify pull --appId XXXXXX --envName staging

Pre-pull status:

    Current Environment: staging

┌──────────┬───────────────────────┬───────────┬───────────────────┐
│ Category │ Resource name         │ Operation │ Provider plugin   │
├──────────┼───────────────────────┼───────────┼───────────────────┤
│ Auth     │ XXXXXX                │ No Change │ awscloudformation │
├──────────┼───────────────────────┼───────────┼───────────────────┤
│ Api      │ XXXXXX                │ No Change │ awscloudformation │
└──────────┴───────────────────────┴───────────┴───────────────────┘

⠏ Building resource api/amplifysample✅ GraphQL schema compiled successfully.

Edit your schema at /XXXXXX/amplify-sample/amplify/backend/api/amplifysample/schema.graphql or place .graphql files in a directory at /XXXXXX/amplify-sample/amplify/backend/api/amplifysample/schema
✔ Successfully pulled backend environment staging from the cloud.
✅
✔ Synced UI components.
✅ GraphQL schema compiled successfully.

Edit your schema at /XXXXXX/amplify-sample/amplify/backend/api/amplifysample/schema.graphql or place .graphql files in a directory at /XXXXXX/amplify-sample/amplify/backend/api/amplifysample/schema
Successfully generated models. Generated models can be found in /XXXXXX/amplify-sample/src
Post-pull status:

    Current Environment: staging

┌──────────┬───────────────────────┬───────────┬───────────────────┐
│ Category │ Resource name         │ Operation │ Provider plugin   │
├──────────┼───────────────────────┼───────────┼───────────────────┤
│ Auth     │ XXXXXX                │ No Change │ awscloudformation │
├──────────┼───────────────────────┼───────────┼───────────────────┤
│ Api      │ XXXXXX                │ No Change │ awscloudformation │
└──────────┴───────────────────────┴───────────┴───────────────────┘
アプリケーションに組み込みます。
$ git diff src/App.tsx
diff --git a/src/App.tsx b/src/App.tsx
index ba5838b..8470aa5 100644
--- a/src/App.tsx
+++ b/src/App.tsx
@@ -2,6 +2,8 @@ import React from 'react';
 import logo from './logo.svg';
 import { Counter } from './features/counter/Counter';
 import './App.css';
+import { AmplifyProvider } from "@aws-amplify/ui-react";
+import { ItemCardCollection } from './ui-components';
 import { Authenticator } from '@aws-amplify/ui-react';
 import '@aws-amplify/ui-react/styles.css';

@@ -53,6 +55,9 @@ function App() {
           </a>
         </span>
       </header>
+      <AmplifyProvider>
+        <ItemCardCollection />
+      </AmplifyProvider>
       <Authenticator>
         {({ signOut, user }) => (
           <main>

すると、自動生成していたデータがリスト形式で表示されます。

UI Libraryに戻り、「Layout」「Search」「Pagination」を設定してみましょう。
設定が保存されたら、再度 amplify pull し、動作を確認してみます。
$ amplify pull --appId XXXXXX --envName staging

Pre-pull status:

    Current Environment: staging

┌──────────┬───────────────────────┬───────────┬───────────────────┐
│ Category │ Resource name         │ Operation │ Provider plugin   │
├──────────┼───────────────────────┼───────────┼───────────────────┤
│ Auth     │ XXXXXX                │ No Change │ awscloudformation │
├──────────┼───────────────────────┼───────────┼───────────────────┤
│ Api      │ XXXXXX                │ No Change │ awscloudformation │
└──────────┴───────────────────────┴───────────┴───────────────────┘

⠦ Building resource api/amplifysample✅ GraphQL schema compiled successfully.

Edit your schema at /XXXXXX/amplify-sample/amplify/backend/api/amplifysample/schema.graphql or place .graphql files in a directory at /XXXXXX/amplify-sample/amplify/backend/api/amplifysample/schema
✔ Successfully pulled backend environment staging from the cloud.
✅
✔ Synced UI components.
✅ GraphQL schema compiled successfully.

Edit your schema at /XXXXXX/amplify-sample/amplify/backend/api/amplifysample/schema.graphql or place .graphql files in a directory at /XXXXXX/amplify-sample/amplify/backend/api/amplifysample/schema
Successfully generated models. Generated models can be found in /XXXXXX/amplify-sample/src
Post-pull status:

    Current Environment: staging

┌──────────┬───────────────────────┬───────────┬───────────────────┐
│ Category │ Resource name         │ Operation │ Provider plugin   │
├──────────┼───────────────────────┼───────────┼───────────────────┤
│ Auth     │ XXXXXX                │ No Change │ awscloudformation │
├──────────┼───────────────────────┼───────────┼───────────────────┤
│ Api      │ XXXXXX                │ No Change │ awscloudformation │
└──────────┴───────────────────────┴───────────┴───────────────────┘
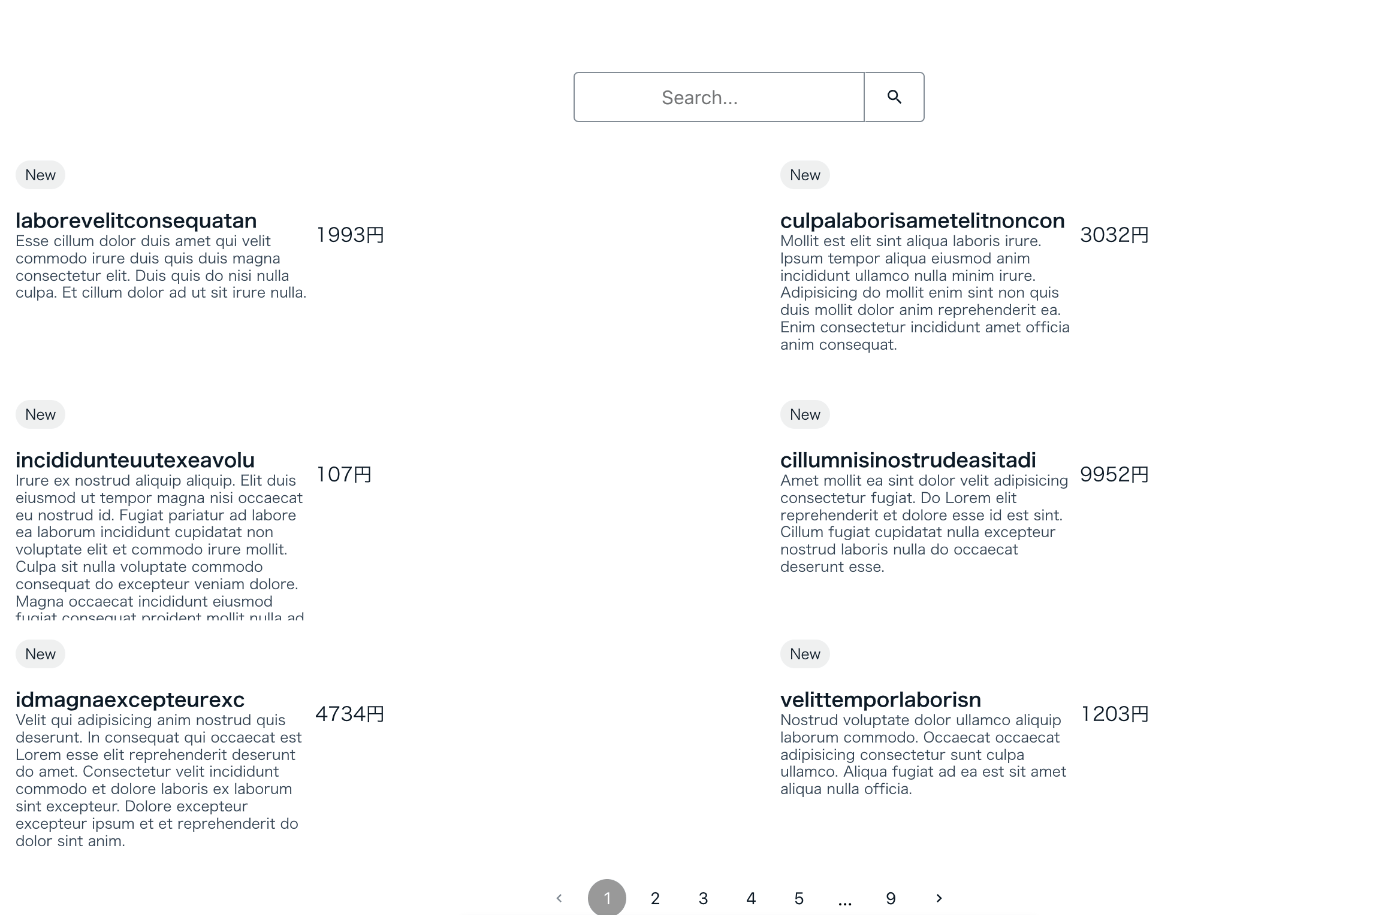
Amplify Studioで行ったUIの調整が反映されています。
フィルタリングの追加
次に、下書き状態のデータをフィルタリングするために用意した「isDraft」を利用してリスト表示を制御します。

「Set filters」で、このように Item.isDraft == false としてみます。

すると、リストの表示が0件になってしまいます。
これは、src/ui-components/ItemCardCollection.jsx を確認すると、以下のように false が文字列として扱われてしまうためです。
const itemsFilterObj = { field: "isDraft", operand: "false", operator: "eq" };
src/ui-components/ のtsファイルとjsxファイルを複製し、src/ui-components/index.js に追加して独自でフィルタを書き変えることも可能ですが、Figmaとの連携は続けたいので、Amplify Studioの設定で工夫してみます。
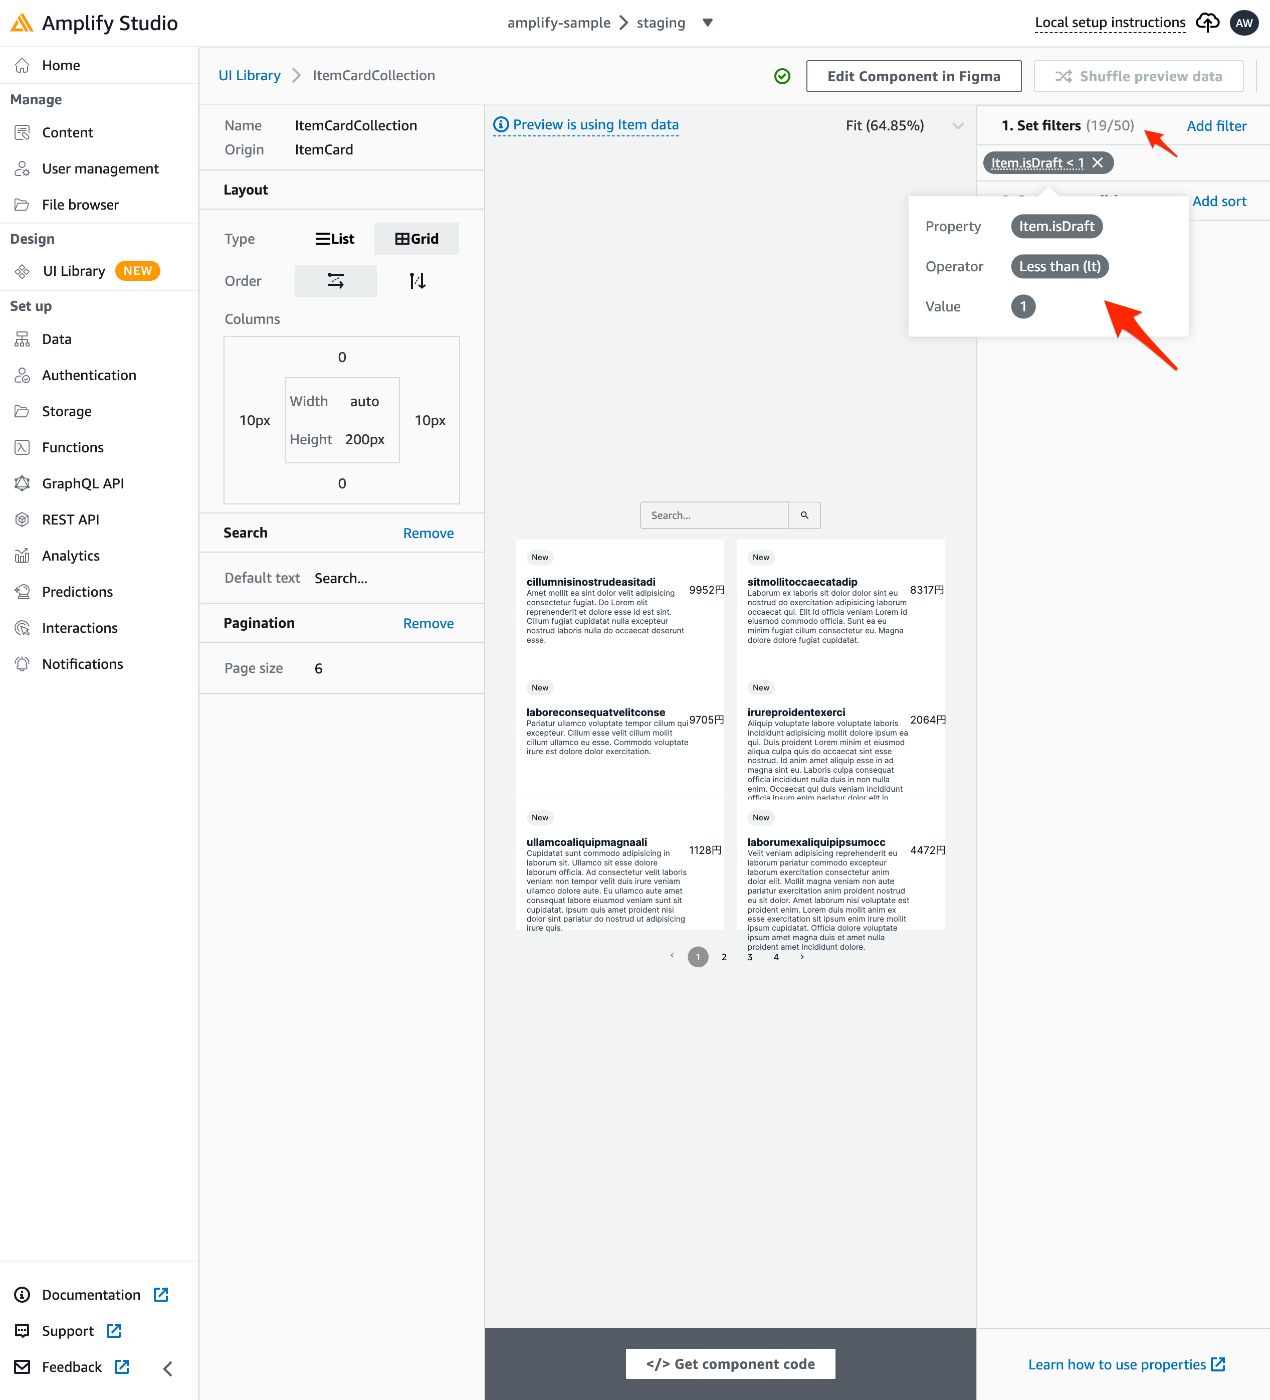
このように、isDraftがtrueではない という条件を、Item.isDraft < 1 と表現させています。すると、「1. Set filters」のラベル横にあるフィルタにマッチするデータ件数も0から19件に変わります。この件数は実際にDynamoDBでデータを確認した、isDraftがfalseのデータ件数とも一致します。
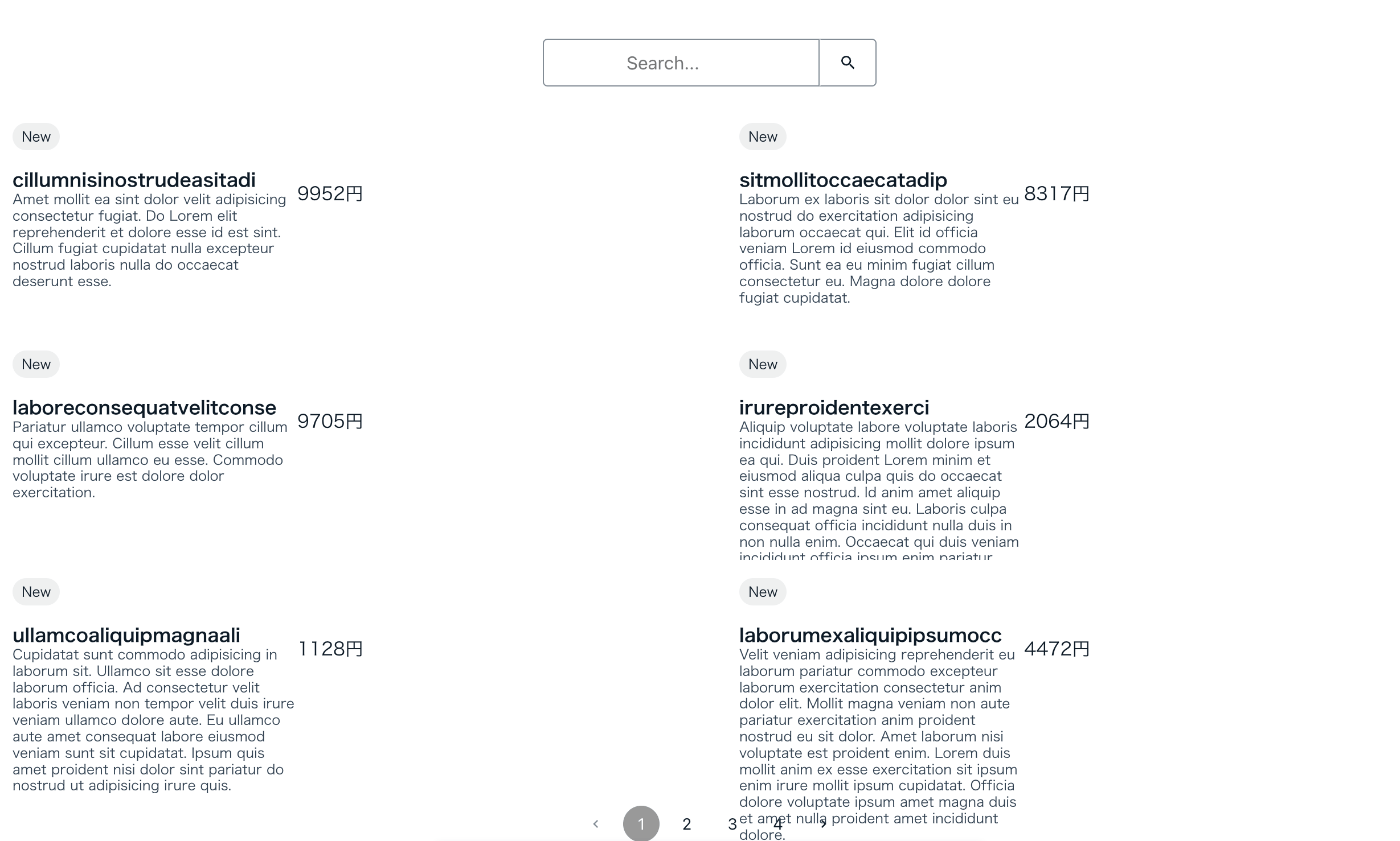
この状態で amplify pull して動作させると、想定通りのフィルタリングがされています。
Figmaでデザイン調整
次に、Figmaでデザインを調整する流れを見ていきます。
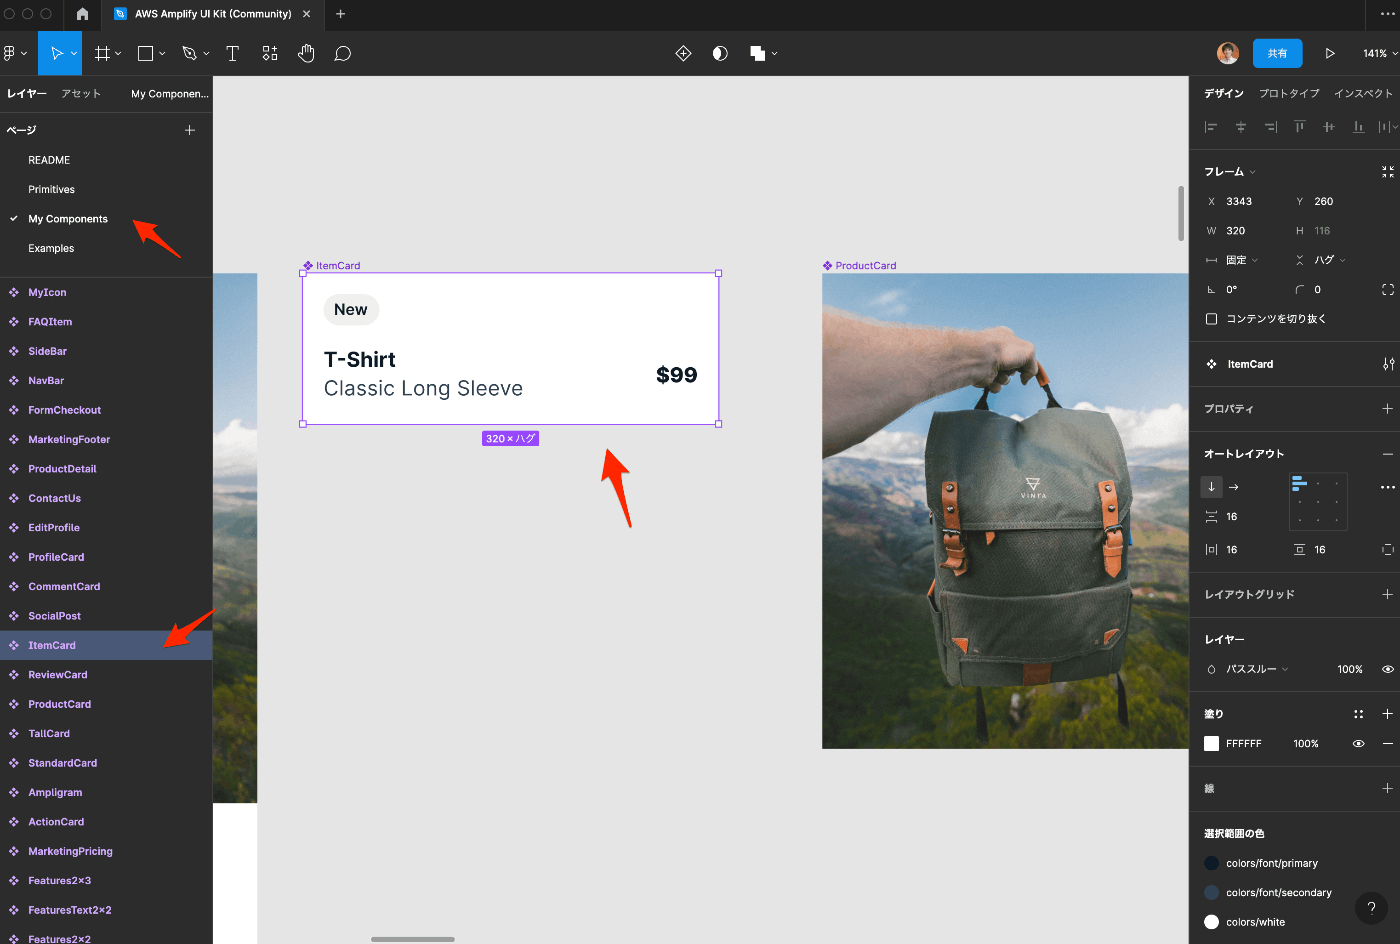
Figmaを開き、ItemCardを選択。
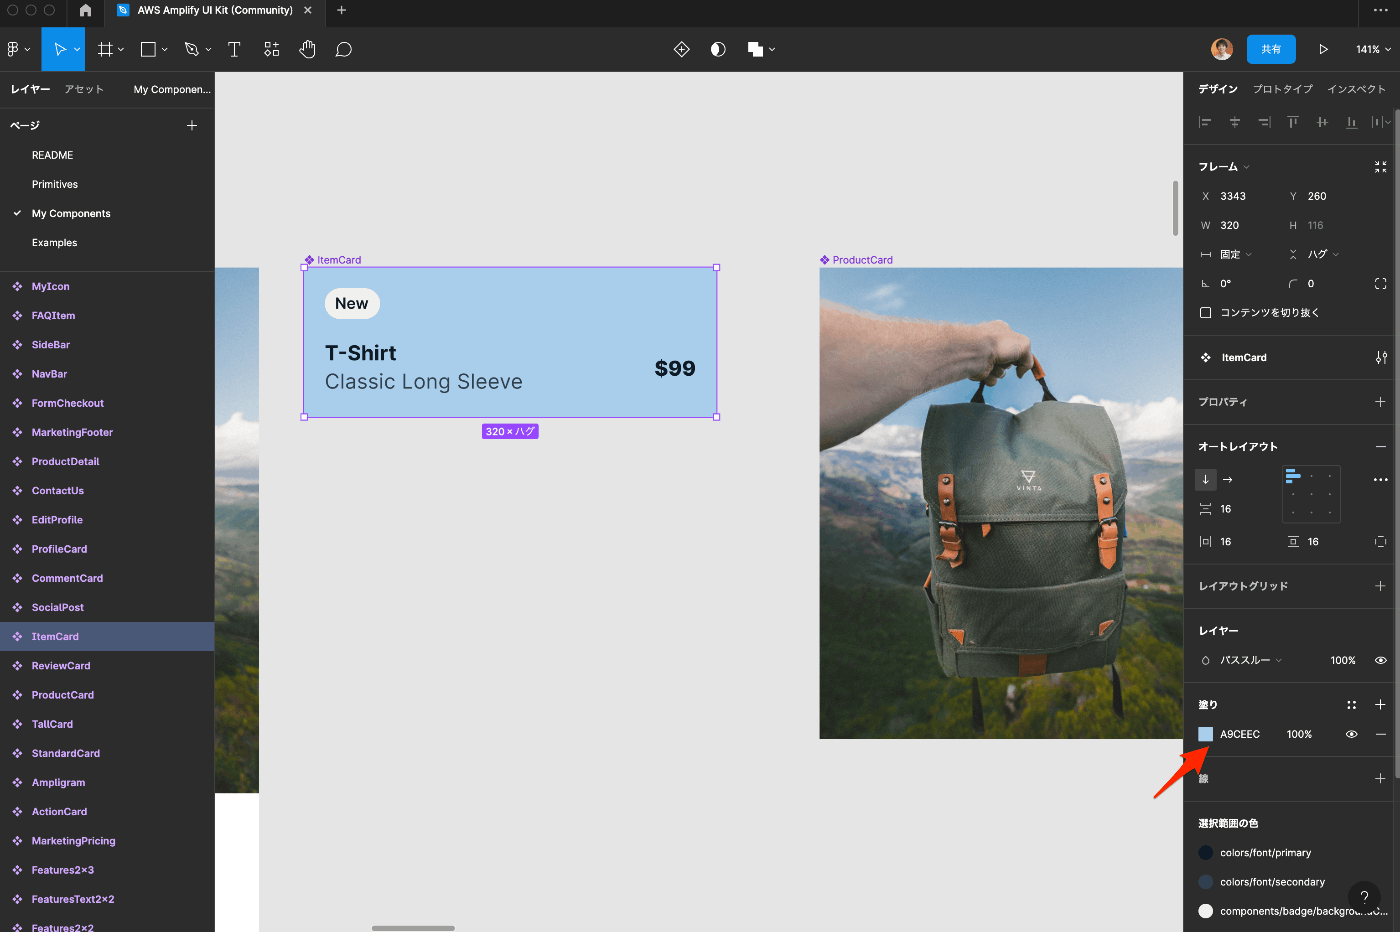
今回は、変更が分かりやすいよう、背景色を水色にしてみます。
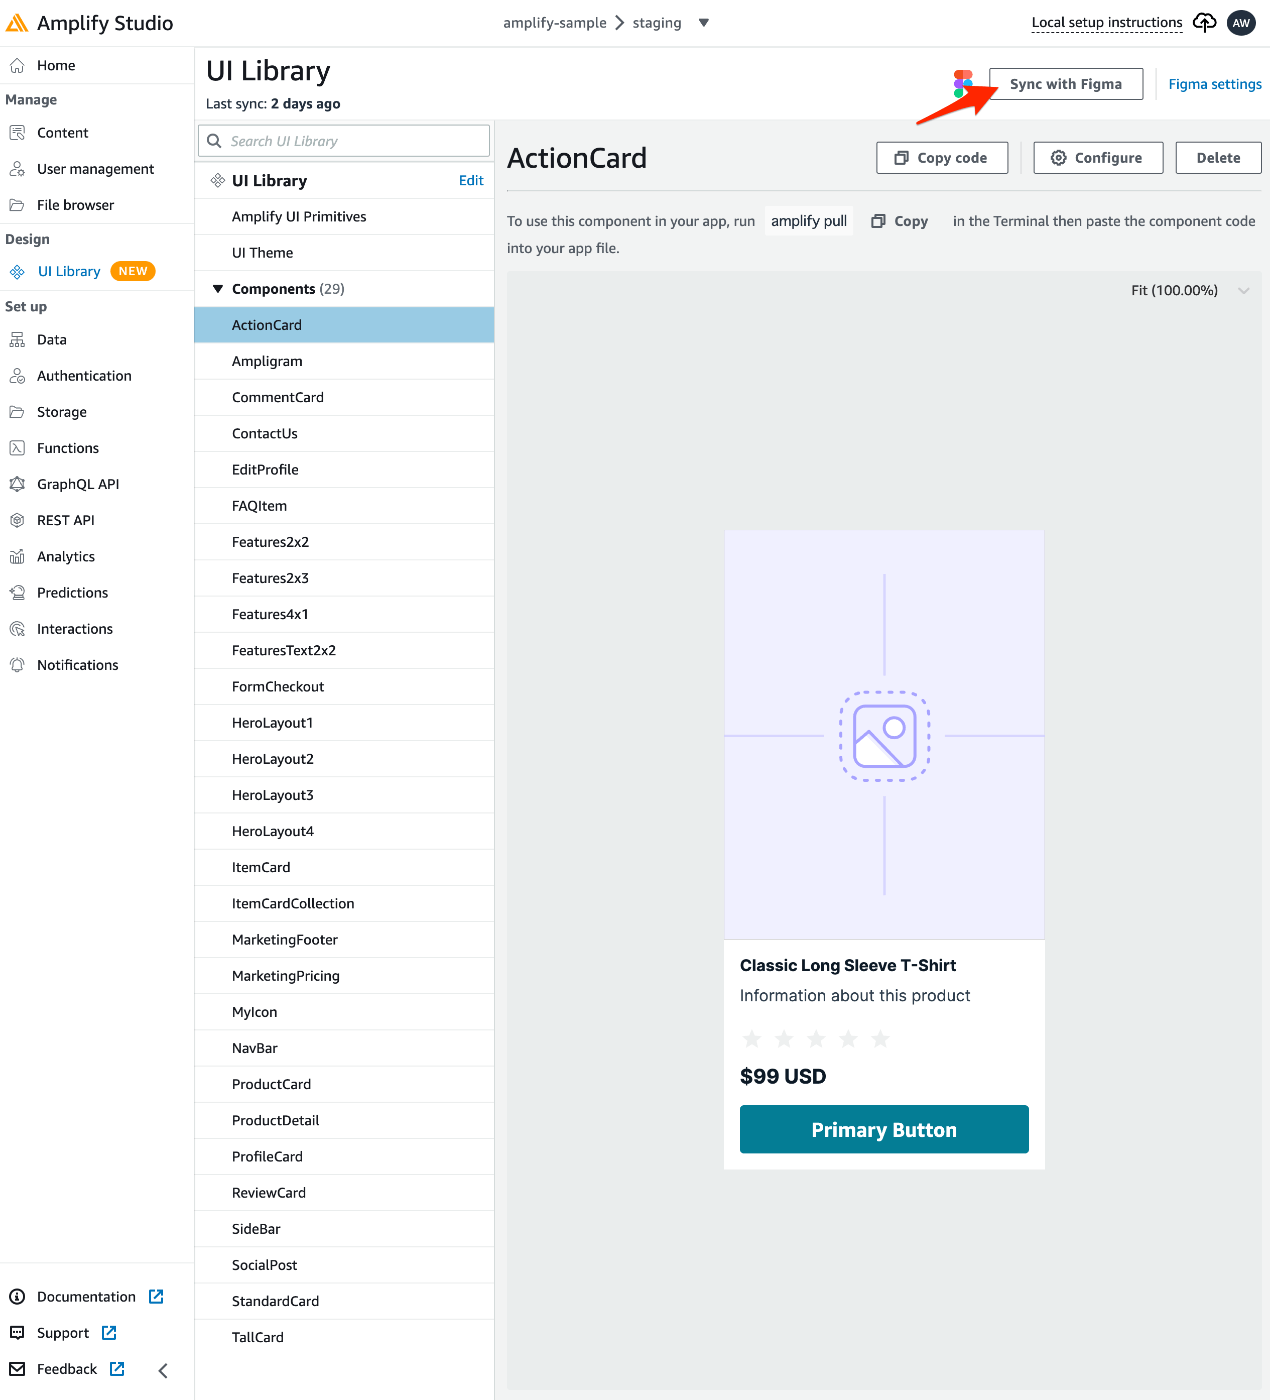
Figmaのデータが保存されたら、Amplify StudioのUI Libraryのトップ画面にある「Sync with Figma」を選択。
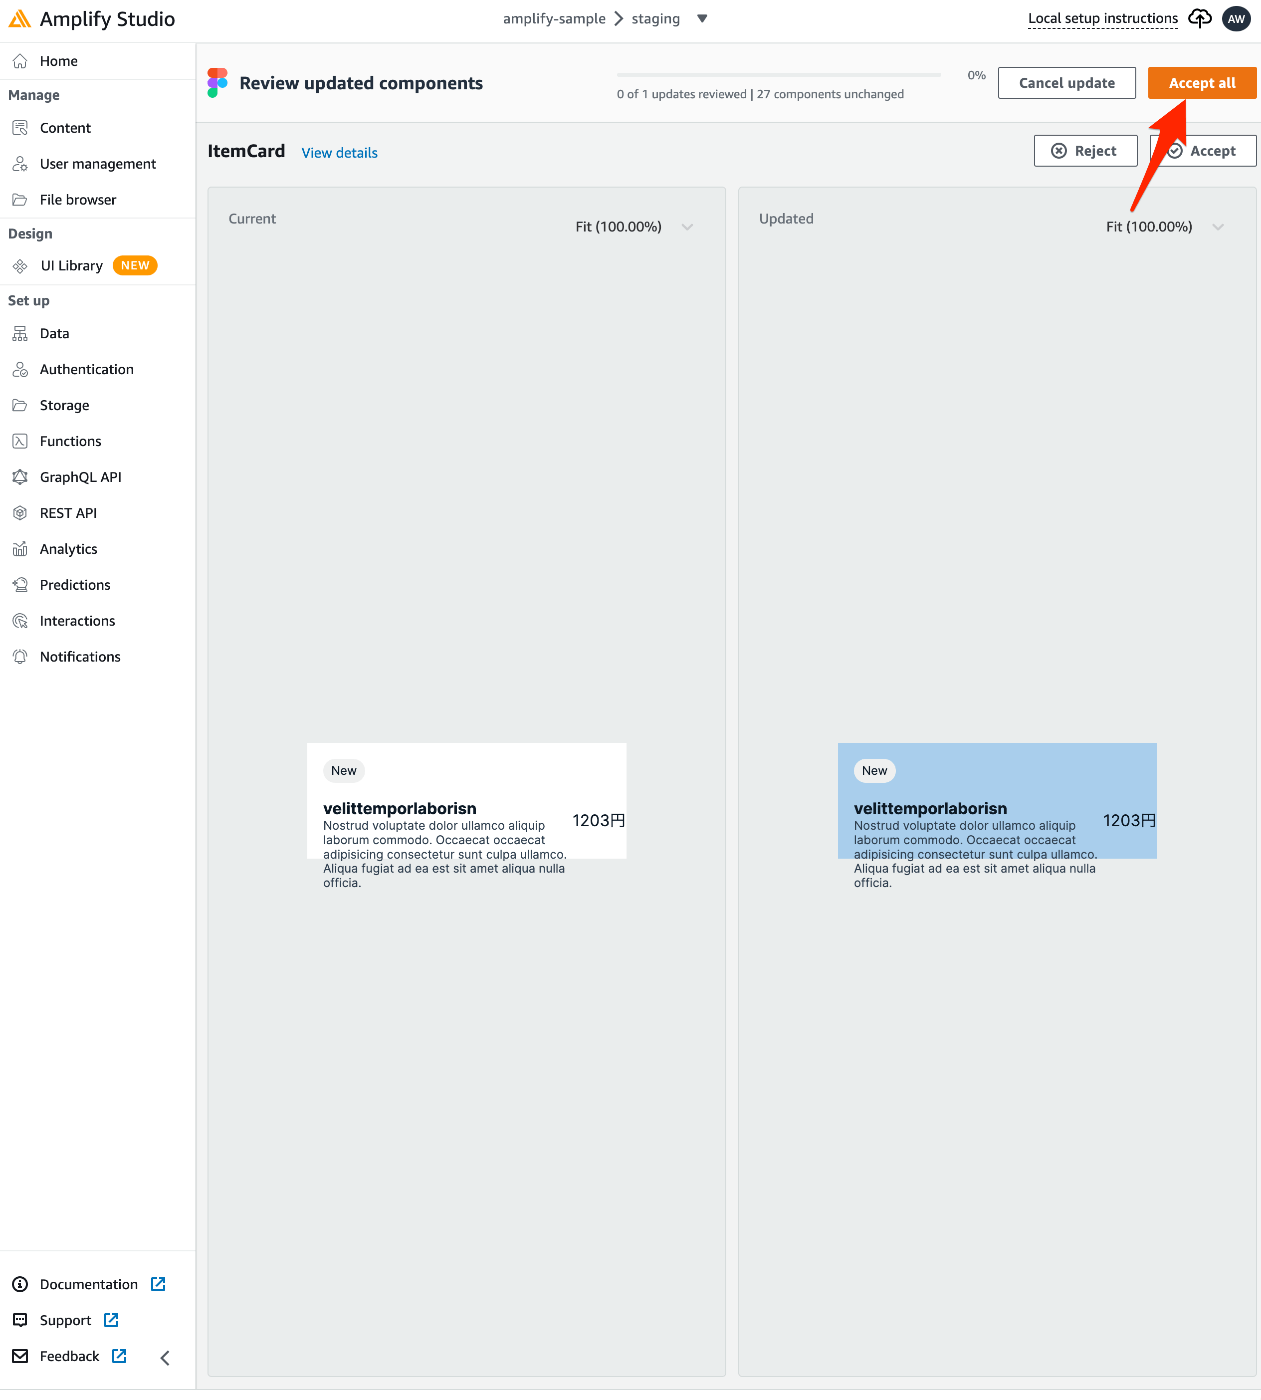
すると、Figmaのデータが読み込まれ、差分表示されます。問題なければ「Accept」もしくは「Accept all」を選択。

UI Libraryのコンポーネントにも反映されています。
再び amplify pull し、動作確認をしてみます。
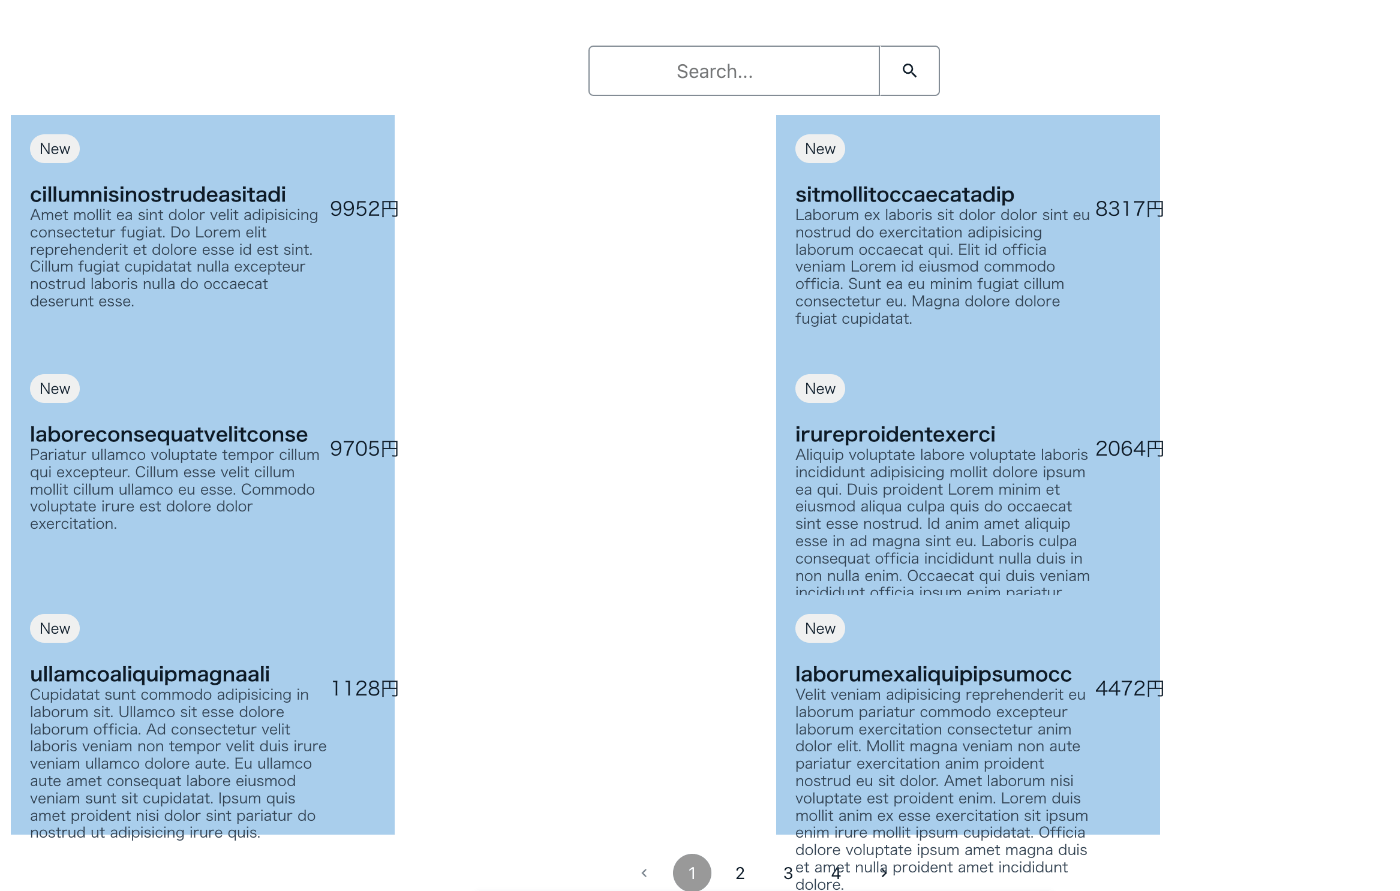
デザインとしては問題がありますが、Figmaの変更を取り込む流れの確認はできました。
まとめ
以上のように、AWS Amplify自体でも生産性の向上が見込まれますが、Amplify Studioも駆使することで開発効率をさらに高められます。
なお、AWS Amplifyは現在でも新しい機能が開発され続けています。そのような環境で、ノウハウの共有や相談をできる場として「Amplify Japan User Group」を運営しています。是非ご参加ください。
Discussion