node.js(express)&MySQLアプリとGoogle Driveとの連携に手間取ったので忘備録として書いておきます
WEBアプリでのファイルの管理
node.js(express)&MySQLを用いてWEBアプリを作成しているのですが、開発環境ではアプリ内でアップロードした画像ファイルの保存先をpublic/uploadsにしていました
が、本番環境ではアップデートしたコードをpushするとuploadsも変更されてしまい、アップロードしたファイルが使えなくなるという現象がおきました
.gitignore[1]でpublic/uploadsを変更できないようにするといいかなと思い試してみましたが、今度はアップロードした画像ファイルの保存ができなくなりました
ここで初めて、画像や動画などのファイル自体を保存する際には外部ストレージとの連携が必要だと気づきました
外部ストレージについていろいろと調べてみて、(途中からの)導入のハードルであったり、料金などを考慮し、今回はGoogle Driveと連携させ、そこでファイルの管理をすることにしました
具体的な連携の仕方を調べてみると、Google先生が丁寧にまとめてくださっていた[2][3][4][5]ので、参考にしながらやってみました
Google Driveとの連携
連携の流れ(イメージ)としては、Google Drive側でWEBアプリと連携できるよう準備し、Googleアカウントの認証を通じてそのアカウントのGoogle Driveを操作できるようにするという感じだと思います
前述したGoogle先生のまとめサイト(Google Workspace)を参考にしながらやってみたのですが、なぜかうまくいかず、、、
他にも「node.js Google Drive」と検索して出てきたサイトを参考にしてみたのですが、うまくいがず、、、
途中からそれぞれのサイトの内容がごちゃごちゃになってよくわからなくなり、詰み始めてきたので一呼吸おいて、もう一度調べてみました
そこで、英語のサイトですがシンプルにまとまっているサイト[2:1]があったので、そちらを参考にし、perplexity先輩のサポートも受けながらやってみるとあら不思議!
スムーズに進みました
サイトタイトルを翻訳すると「Node.js + Google Drive API: ファイル・ハンドリングに革命を起こす」となりますね(かっこいいw)
ということで、node.js(express)とGoogle Driveの連携について忘備録としてまとめておきたいと思います
node.jsとGoogle Driveとの連携
では、実際にnode.jsとGoogle Driveとの連携についてまとめていきます
まずはnode.jsアプリを作成していきます
ここでは最低限のものだけにします(node.js、npmのインストールの説明は割愛します)
まず任意のディレクトリ内(今回はsampleディレクトリ)で下記コードを実施します
$ npm init
アプリに関する情報の入力が求められるので、任意の値を入力してください
すべて入力するとpackage.jsonファイルが作成されます
続いて、必要なパッケージをインストールしていきます
まずはページを表示していくのでexpressをインストールします
$ npm install express
インストールすると、node_modulesディレクトリ、package-lock.jsonが作成されます
続いてルートディレクトリ内にindex.jsとpublicディレクトリを作成し、publicディレクトリ内にindex.htmlを作成します

ここからそれぞれのファイルをいじっていきます
まずpackage.json内のscriptを次の一文を追記し、npm startでプログラムが実行されるようにします
"scripts": {
    "start": "node index.js", // 追記する一文
    "test": "echo \"Error: no test specified\" && exit 1"
},
次はindex.jsに次のように記述をしていきます
const express = require("express");
const path = require("path");

const app = express();
app.use(express.static('public'));

app.get('/', (req, res) => {
    res.sendFile(path.join(__dirname, 'public', 'index.html'));
});

const PORT = 3000;
app.listen(PORT, () => {
    console.log(`Server is running on port ${PORT}`);
});
そして、public/index.htmlを下記のように編集します
<!DOCTYPE html>
<html lang="ja">
    <head>
        <title>サンプルページ</title>
    </head>
    <body>
        <h1>トップページ</h1>
    </body>
</html>
これでターミナルでnpm startを実行し、http:を開くとトップページが表示されます

続いて、Google Driveの認証をしていきます(こちらはGoogleアカウントがあることを前提としていきます)
ますGoogle Cloudのページ( https://console.cloud.google.com/ )に移動し、「プロジェクトを選択」から「新しいプロジェクト」を選択します


ここではプロジェクト名を「sample-project」とします

続いて、作成したプロジェクトページに移動し、「APIとサービス」を選択します


ページ左側の「OAuth同意画面」のタブをクリックし、求められた情報を入力します

ここではアプリ名を「sample-app」とし、任意のメールアドレスを入力します

対象は「外部」とします

再度、任意のメールアドレスを入力し、「GoogleAPIサービス〜〜〜」に同意し、作成します

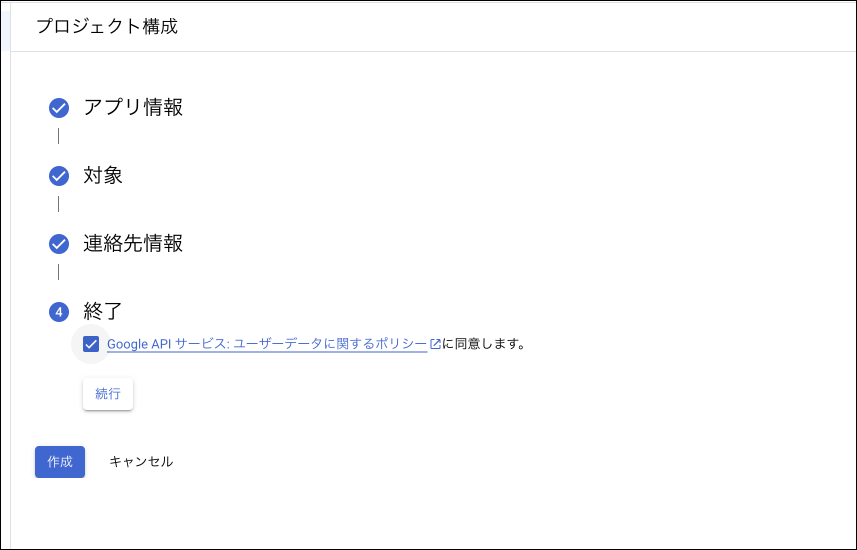
少し時間が経過すると処理が完了します
次にページ左側の「認証情報」のタブをクリックし、「認証情報を作成」をクリックします

ここではアプリの認証情報を入力していきます
今回は「ウェブアプリケーション」を選択します

承認済みのJavaScript生成元に「 http://localhost:3000 」とにゅうりょくします

承認済みのリダイレクトURLに「 http://localhost:3000/auth/google/callback 」と入力します(こちらはGoogleアカウントとの連携を認証したあとに表示されるページのURLですので、後ほど修正します)

作成をクリックすると、アプリの認証情報が完成し、「OAuthクライアントが完成しました」とひょうじされます
そちらの表示の下部の「JSONをダウンロード」をクリックし、「credentials.json」と名前を変更して保存します
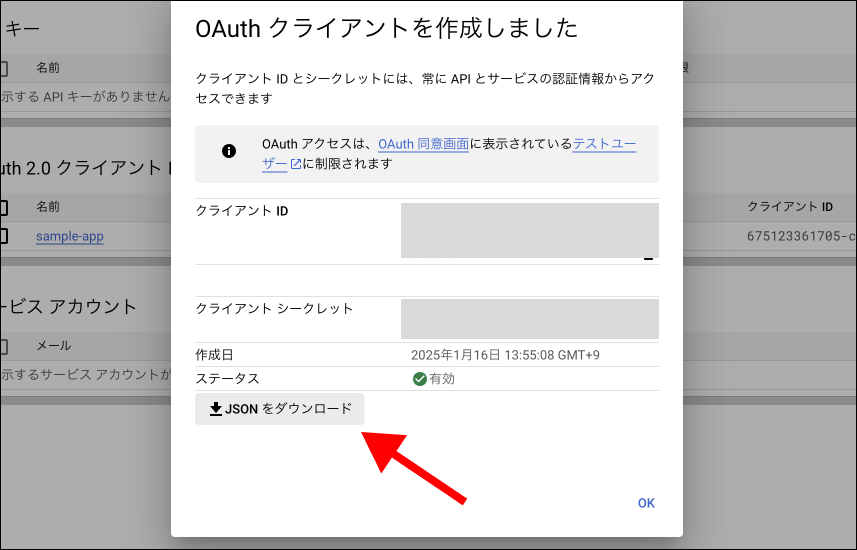
credentials.jsonはルートディレクトリ内に保存してください

こちらのcredenntials.jsonには「client_id」「project_id」「auth_uri」「auth_provider_x509_cert_url」「client_secret」「redirect_uris」「javascript_origins」といった情報が記載されているかと思います
「redirect_uris」の部分は、後ほど変更します
続いて、Google DriveのAPIを有効にしていきます
ページ左側の「有効なAPIとサービス」を選択し、「APIとサービスを有効にする」をクリックします

検索フォームが表示されるので、「Google Drive」と入力し、表示されるリストから「Google Drive API」を選択します


Google Drive APIのページに移行したら「有効にする」を選択します

最後にアプリを公開していきます
OAuth同意画面をクリックし、公開ステータスの「アプリを公開」をクリックします

「アプリを公開」が「テストへ戻る」に変わればOKです
では、ここからは認証のためのコードを書いていきます
まずルートディレクトリ内に「.env」ファイルを作成し、「CLIENT_ID」「CLIENT_SECRET」「REDIRECT_URI」を記載します
CLIENT_ID = "********************", // credentials.jsonからコピペ
CLIENT_SECRET = "********************", // credentials.jsonからコピペ
REDIRECT_URI = "http://localhost:3000/auth/google/callback" // credentials.jsonからコピペ
ここにはそれぞれcredentials.jsonに記載されてある「client_id」「client_secret」「redirect_uri」をコピペしてください
続いて、index.jsを編集していきます
まずgoogleapisとdotenvをインストールします
$ npm install googleapis dotenv
そして、index.jsを次のように編集します
const express = require("express");
const path = require("path");
const { google } = require("googleapis"); // 追記部分
const dotenv = require("dotenv"); // 追記部分

dotenv.config(); // 追記部分

const app = express();

const oauth2Client = new google.auth.OAuth2(
    process.env.CLIENT_ID,
    process.env.CLIENT_SECRET,
    process.env.REDIRECT_URI
); // 追記部分

app.use(express.static('public'));

app.get("/auth/google", (req, res) => {
    const url = oauth2Client.generateAuthUrl({
        access_type: "offline",
        scope: ["https://www.googleapis.com/auth/drive.file"]
    });
    res.redirect(url);
}); // 追記部分

app.get("/auth/google/callback", async (req, res) => {
    const { tokens } = await oauth2Client.getToken(req.query.code);
    oauth2Client.setCredentials(tokens);
    res.send("認証できました");
}); // 追記部分

app.get('/', (req, res) => {
    res.sendFile(path.join(__dirname, 'public', 'index.html'));
});

const PORT = 3000;
app.listen(PORT, () => {
    console.log(`Server is running on port ${PORT}`);
});
プログラムを実行し、http://localhost:3000/auth/google を開いてみてください
よく見るGoogleアカウント認証画面が表示されるかと思います

該当するGoogleアカウントを選択すると「認証されました」と表示されます

"/auth/google"でGoogleアカウントの認証ページに遷移し、認証されれば"/auth/google/callback"に遷移するという流れですね
画像ファイルのアップロードと画像ファイルの表示・削除
Google Driveとの連携ができたのですが、まだアカウントが認証されただけで、Google Driveとの連携ができたようには感じないかと思います
ここから、実際にGoogle Driveにファイルをアップロードしたり、Google Drive内のファイルを表示したり削除したりといったことをやっていきます
完成系のイメージとしては、トップ画面(index.html)からログインすると認証画面に遷移し、認証が成功すると画像管理画面(image_management.html)が表示されるようにします
画像管理画面では、画像を選択し、Google Driveにアップロードするボタンを表示します
また、アップロードされた画像は画像管理画面に表示されるようにし、それぞれの画像に対応した削除ボタンをクリックすると画像が画像管理画面とGoogle Driveから削除されるようにしていきます
まずはトップページ→ログイン→認証→画像管理画面と遷移するようにしていきます
index.htmlに"/auth/google"に遷移するログインボタンを追記します
<!DOCTYPE html>
<html lang="ja">
    <head>
        <title>サンプルページ</title>
    </head>
    <body>
        <h1>トップページ</h1>
        <button onClick = "location.href='/auth/google'">ログイン</button> // 追記部分
    </body>
</html>
次にpublicディレクトリ内にimage_management.htmlを作成し、下記のように記載する
<!DOCTYPE html>
<html lang="ja">
    <head>
        <title>サンプルページ</title>
    </head>
    <body>
        <h1>画像管理画面</h1>
    </body>
</html>
続いて、index.jsで、認証後に遷移する"/auth/google/callback"の部分を修正し、image_management.htmlが表示されるようにします
const express = require("express");
const path = require("path");
const { google } = require("googleapis");
const dotenv = require("dotenv");

dotenv.config();

const app = express();

const oauth2Client = new google.auth.OAuth2(
    process.env.CLIENT_ID,
    process.env.CLIENT_SECRET,
    process.env.REDIRECT_URI
);

app.use(express.static('public'));

app.get("/auth/google", (req, res) => {
    const url = oauth2Client.generateAuthUrl({
        access_type: "offline",
        scope: ["https://www.googleapis.com/auth/drive.file"]
    });
    res.redirect(url);
})

app.get("/image-management", async (req, res) => {
    const { tokens } = await oauth2Client.getToken(req.query.code);
    oauth2Client.setCredentials(tokens);
    res.sendFile(path.join(__dirname, "public", "image_management.html"));
}); // 修正部分

app.get('/', (req, res) => {
    res.sendFile(path.join(__dirname, 'public', 'index.html'));
});

const PORT = 3000;
app.listen(PORT, () => {
    console.log(`Server is running on port ${PORT}`);
});
これだけでは繊維がうまくいかないので、credentials.jsonや.env、Google Cloudの認証情報のredirectURLを「 http://localhost:3000/image-management 」に変更します
{
    "web":{
        "client_id":"*******************************",
        "project_id":"*******************************",
        "auth_uri":"*******************************",
        "token_uri":"*******************************",
        "auth_provider_x509_cert_url":"*******************************",
        "client_secret":"*******************************",
        "redirect_uris":[
            "http://localhost:3000/image-management"
        ],
        "javascript_origins": [
            "http://localhost:3000"
        ]
    }
}
CLIENT_ID = "*******************************"
CLIENT_SECRET = "*******************************"
REDIRECT_URI = "http://localhost:3000/image-management"

ここまでの変更をすると、トップページのログインをクリックすることで、認証ページを経由し、画像管理画面が表示されるようになります(一度認証すると認証ページは表示されなくなります)


ここから画像管理機能(アップデート、表示、削除)を実装していきます
まずimage_management.htmlを下記のように修正します
<!DOCTYPE html>
<html lang = "ja">
    <head>
        <title>サンプルページ</title>
    </head>
    <body>
        <h1>画像管理画面</h1>
        <form id = "uploadForm">
            <input type = "file" name = "images" multiple accept = "image/*">
            <button type = "submit">Upload</button>
        </form>  // 追記部分
    </body>
</html>
アップロードするためのコードをindex.jsに用意します
const express = require("express");
const path = require("path");
const { google } = require("googleapis");
const dotenv = require("dotenv");
const multer = require("multer");  // 追記部分
const fs = require("fs");  // 追記部分

dotenv.config();

const app = express();
const upload = multer({ dest: 'uploads/' });  // 追記部分

const oauth2Client = new google.auth.OAuth2(
      // 変更なし
);

const drive = google.drive({ version: 'v3', auth: oauth2Client });  // 追記部分
const FOLDER_ID = process.env.FOLDER_ID;  // 追記部分

app.use(express.static('public'));

app.get("/auth/google", (req, res) => {
      // 変更なし
})

app.get("/image-management", async (req, res) => {
      // 変更なし
});

app.get('/', (req, res) => {
      // 変更なし
});

app.post('/upload', upload.array('images', 10), async (req, res) => {
    try {
        const uploadPromises = req.files.map(file => {
            return drive.files.create({
                requestBody: {
                    name: file.originalname,
                    mimeType: file.mimetype,
                    parents: [FOLDER_ID]
                },
                media: {
                    mimeType: file.mimetype,
                    body: fs.createReadStream(file.path)
                }
            });
        });

        await Promise.all(uploadPromises);

        req.files.forEach(file => fs.unlinkSync(file.path));

        res.send('Files uploaded successfully');
    } catch (error) {
        console.error('Error uploading files:', error);
        res.status(500).send('Error uploading files to Google Drive');
    }
});  // 追記部分

const PORT = 3000;
app.listen(PORT, () => {
    console.log(`Server is running on port ${PORT}`);
});
Google Drive内の特定のフォルダに保存したいため、FOLDER_IDを指定しています
.envに保存先にしたいフォルダのidを追記します
ここでは「sampleapp」というフォルダを用意しました
CLIENT_ID = "*******************************"
CLIENT_SECRET = "*******************************"
REDIRECT_URI = "http://localhost:3000/image-management"
FOLDER_ID = "*******************************"
また、「upload.array('images', 10)」の部分で、画像ファイルを10枚まで同時にアップロードできるように設定しています
続いて、image_management.html内のアップロードボタンがクリックされるとindex.js内のapp.post("/upload")が実行されるようimage_management.htmlに追記します
<!DOCTYPE html>
<html lang = "ja">
    <head>
        // 変更なし
    </head>

    <body>
        // 変更なし
    </body>

    <script>
        document.getElementById('uploadForm').addEventListener('submit', function(e) {
            e.preventDefault();
            const formData = new FormData(this);
            fetch('/upload', {
                method: 'POST',
                body: formData
            })
            .then(response => response.text())
            .then(result => {
                console.log(result);
            })
            .catch(error => console.error('Error:', error));
        });
    </script> // 追記部分
</html>
以上の変更でプログラムを実行し、画像の選択、アップロードをすると、指定したGoogle Drive内のsampleapp内に画像がアップロードされました

次はGoogle Drive内のsampleappフォルダにアップロードされた画像が表示されるようにします
index.jsに下記のように追記します
const express = require("express");
const path = require("path");
const { google } = require("googleapis");
const dotenv = require("dotenv");
const multer = require("multer");
const fs = require("fs");

dotenv.config();

const app = express();
const upload = multer({ dest: 'uploads/' });

const oauth2Client = new google.auth.OAuth2(
    // 変更なし
);

const drive = google.drive({ version: 'v3', auth: oauth2Client });
const FOLDER_ID = process.env.FOLDER_ID;

app.use(express.static('public'));
app.use(express.json()); // 追記部分

app.get("/auth/google", (req, res) => {
    // 変更なし
})

app.get("/image-management", async (req, res) => {
    // 変更なし
});

app.get('/', (req, res) => {
    // 変更なし
});

app.post('/upload', upload.array('images', 10), async (req, res) => {
    // 変更なし
});

app.get('/images', async (req, res) => {
    try {
        const response = await drive.files.list({
                q: `'${FOLDER_ID}' in parents and mimeType contains 'image/'`,
                fields: 'files(id, name)',
        });
        res.json(response.data.files);
    } catch (error) {
        console.error('Error fetching images:', error);
        res.status(500).json({ error: 'Failed to fetch images' });
    }
}); // 追記部分

const PORT = 3000;
app.listen(PORT, () => {
    console.log(`Server is running on port ${PORT}`);
});
そして、image_management.htmlに下記のように追記します
<!DOCTYPE html>
<html lang = "ja">
<head>
// 変更なし
</head>
<body>
<h1>画像管理画面</h1>
<form id = "uploadForm">
<input type = "file" name = "images" multiple accept = "image/*">
<button type = "submit">Upload</button>
</form>
<div id="imageContainer" class="image-container"></div> // 追記部分
</body>
<script>
function loadImages() {
fetch('/images')
.then(response => response.json())
.then(images => {
const container = document.getElementById('imageContainer');
container.innerHTML = '';
images.forEach(image => {
const div = document.createElement('div');
div.className = 'image-item';
const imageUrl = `https://lh3.google.com/u/0/d/${image.id}`;
div.innerHTML = ``;
container.appendChild(div);
});
});
} // 追記部分
loadImages(); // 追記部分
document.getElementById('uploadForm').addEventListener('submit', function(e) {
// 変更なし
});
</script>
</html>
これでアップロードした画像が表示されるようになりました

今の状態では、アップロードしたあと、再度、画像管理画面が表示された際にアップロードした画像が表示される仕様ですので、アップロードしたあとにそのまま画像が表示されるようにするためにimage_management.htmlに下記のように追記します
<!DOCTYPE html>
<html lang = "ja">
    <head>
        // 変更なし
    </head>

    <body>
        // 変更なし
    </body>

    <script>
        function loadImages() {
            // 変更なし
        }

        loadImages();

        document.getElementById('uploadForm').addEventListener('submit', function(e) {
            e.preventDefault();
            const formData = new FormData(this);
            fetch('/upload', {
                method: 'POST',
                body: formData
            })
            .then(response => response.text())
            .then(result => {
                console.log(result);
                loadImages(); // 追記部分
            })
            .catch(error => console.error('Error:', error));
        });
    </script>
</html>
最後に削除機能を実装します
表示された画像の隣に削除ボタンを表示します
<!DOCTYPE html>
<html lang = "ja">
<head>
// 変更なし
</head>
<body>
// 変更なし
</body>
<script>
function loadImages() {
fetch('/images')
.then(response => response.json())
.then(images => {
const container = document.getElementById('imageContainer');
container.innerHTML = '';
images.forEach(image => {
const div = document.createElement('div');
div.className = 'image-item';
const imageUrl = `https://lh3.google.com/u/0/d/${image.id}`;
div.innerHTML = ``;
container.appendChild(div);
});
});
}
loadImages();
document.getElementById('uploadForm').addEventListener('submit', function(e) {
// 変更なし
});
</script>
</html>
index.jsに削除用の関数を追記します
const express = require("express");
const path = require("path");
const { google } = require("googleapis");
const dotenv = require("dotenv");
const multer = require("multer");
const fs = require("fs");

dotenv.config();

const app = express();
const upload = multer({ dest: 'uploads/' });

const oauth2Client = new google.auth.OAuth2(
    // 変更なし
);

const drive = google.drive({ version: 'v3', auth: oauth2Client });
const FOLDER_ID = process.env.FOLDER_ID;

app.use(express.static('public'));
app.use(express.json());

app.get("/auth/google", (req, res) => {
    // 変更なし
})

app.get("/image-management", async (req, res) => {
    // 変更なし
});

app.get('/', (req, res) => {
    // 変更なし
});

app.post('/upload', upload.array('images', 10), async (req, res) => {
    // 変更なし
});

app.get('/images', async (req, res) => {
    // 変更なし
});

app.delete('/delete/:fileId', async (req, res) => {
    try {
        const fileId = req.params.fileId;
        await drive.files.delete({ fileId: fileId });
        res.json({ message: 'File deleted successfully' });
    } catch (error) {
        console.error('Error deleting file:', error);
        res.status(500).json({ error: 'Failed to delete file' });
    }
});

const PORT = 3000;
app.listen(PORT, () => {
    console.log(`Server is running on port ${PORT}`);
});
image_management.htmlのscript内に下記のように追記します
<!DOCTYPE html>
<html lang = "ja">
    <head>
        // 変更なし
    </head>

    <body>
        // 変更なし
    </body>

    <script>
        function loadImages() {
            // 変更なし
        }

        loadImages();

        document.getElementById('uploadForm').addEventListener('submit', function(e) {
            // 変更なし
        });

        function deleteImage(fileId) {
            fetch(`/delete/${fileId}`, { method: 'DELETE' })
                .then(response => response.json())
                .then(data => {
                    console.log(data.message);
                    loadImages();
                })
                .catch(error => console.error('Error:', error));
        } // 追記部分
    </script>
</html>
これで、アップロードした画像の隣に削除ボタンが表示され、削除ボタンをクリックすると該当する画像が削除されました
Google Driveのsampleapp内のフォルダでも同様に画像が削除されているのが確認できました
【削除前】

【削除後】

【sampleapp内】

以上で、Google Driveと連携し、画像ファイルのアップロードと表示、削除の機能の実装ができました
Google先生とPerplexity先輩に相談しながらなんとか実装できましたが、所感としては「最適なサイトをGoogle先生に教えてもらい、そのサイトを参考にしながらPerplexity先輩に相談する」ことができれば実装が非常にスムーズに進む印象でした
とは言え、公式ドキュメントとも言えるGoogle Workplaceだけではうまくいかなかったので、「最適なサイト」を見つけられるかどうかが重要だなと思いました(基本的には公式ドキュメントなんでしょうけど)
今回は以上です
参考サイト
-
[Git] .gitignoreの仕様詳解( https://qiita.com/anqooqie/items/110957797b3d5280c44f ) ↩︎
-
Node.js のクイックスタート( https://developers.google.com/drive/api/quickstart/nodejs?hl=ja ) ↩︎ ↩︎
-
ファイルの作成と管理( https://developers.google.com/drive/api/guides/create-file?hl=ja ) ↩︎
-
ファイル データをアップロードする( https://developers.google.com/drive/api/guides/manage-uploads?hl=ja ) ↩︎
-
ファイルやフォルダをゴミ箱に移動する、削除する( https://developers.google.com/drive/api/guides/delete?hl=ja ) ↩︎
Discussion