Vuetify3 VDataTableのソート機能の実装 基本編
はじめに
Vuetify3で、VDataTableが正式に導入(Labsから移動)されてから、だいぶ経ちましたが、まだまだGoogleなどで検索すると、Vuetify2やLabsのときのVDataTableの情報が多くヒットして、Vuetify3のVDataTableの情報は少ないようです。
なので、もう少しVuetify3のVDataTableの記事を追加しようかと思います。
いくつか紹介したい内容はありますが、今回はVuetifyユーザーの方々がVDataTableを使ったときに、ほぼほぼ利用するであろうソート機能の基本的な実装方法について、解説していきます!
ソート機能付きVDataTableの実装
まずは公式で紹介されているとおり、ソート機能付きのVDataTableを実装してみましょう。
ここでは、少しだけTypeScript用に書き換えてはいますが、以下のような感じのコードが紹介されています。
<script lang="ts">
  type SortItem = {
    key: string;
    order?: 'asc' | 'desc';
  };
  type Header = {
    readonly title?: string;
    readonly align?: "center" | "end" | "start";
    readonly sortable?: boolean;
    readonly key?: string;
  };
  export default {
    data () {
      const sortBy: readonly SortItem[] = [{ key: 'calories', order: 'asc' }];
      const headers: readonly Header[] = [
          {
            title: 'Dessert (100g serving)',
            align: 'start',
            sortable: false,
            key: 'name',
          },
          {
            title: 'Calories',
            key: 'calories'
          },
          {
            title: 'Fat (g)',
            key: 'fat'
          },
          {
            title: 'Carbs (g)',
            key: 'carbs'
          },
          {
            title: 'Protein (g)',
            key: 'protein'
          },
          {
            title: 'Iron (%)',
            key: 'iron'
          },
        ];
      const desserts = [
          {
            name: 'Frozen Yogurt',
            calories: 200,
            fat: 6.0,
            carbs: 24,
            protein: 4.0,
            iron: '1%',
          },
          {
            name: 'Ice cream sandwich',
            calories: 200,
            fat: 9.0,
            carbs: 37,
            protein: 4.3,
            iron: '1%',
          },
          {
            name: 'Eclair',
            calories: 300,
            fat: 16.0,
            carbs: 23,
            protein: 6.0,
            iron: '7%',
          },
          {
            name: 'Cupcake',
            calories: 300,
            fat: 3.7,
            carbs: 67,
            protein: 4.3,
            iron: '8%',
          },
          {
            name: 'Gingerbread',
            calories: 400,
            fat: 16.0,
            carbs: 49,
            protein: 3.9,
            iron: '16%',
          },
          {
            name: 'Jelly bean',
            calories: 400,
            fat: 0.0,
            carbs: 94,
            protein: 0.0,
            iron: '0%',
          },
          {
            name: 'Lollipop',
            calories: 400,
            fat: 0.2,
            carbs: 98,
            protein: 0,
            iron: '2%',
          },
          {
            name: 'Honeycomb',
            calories: 400,
            fat: 3.2,
            carbs: 87,
            protein: 6.5,
            iron: '45%',
          },
          {
            name: 'Donut',
            calories: 500,
            fat: 25.0,
            carbs: 51,
            protein: 4.9,
            iron: '22%',
          },
          {
            name: 'KitKat',
            calories: 500,
            fat: 26.0,
            carbs: 65,
            protein: 7,
            iron: '6%',
          },
        ];
      return {
        sortBy: sortBy,
        headers: headers,
        desserts: desserts,
      };
    },
  }
</script>

<template>
  <v-app>
    <v-sheet
      class="pa-2"
      width="894"
    >
      <v-data-table
        v-model:sort-by="sortBy"
        :headers="headers"
        :items="desserts"
      ></v-data-table>
    </v-sheet>
  </v-app>
</template>
VDataTableのPropsのheadersとitemsを指定するのは、通常のVDataTableと同じです。
まずは、scriptタグ内で、headersに代入しているオブジェクト(連想配列)の配列を見てみましょう。
ひとつだけオブジェクトにsortableキーがあり、「sortable: false」となっていることに気づくかと思います。
これによって先頭のDessertの列はソートできないようになっており、それ以外の列はソートできるようになっています。
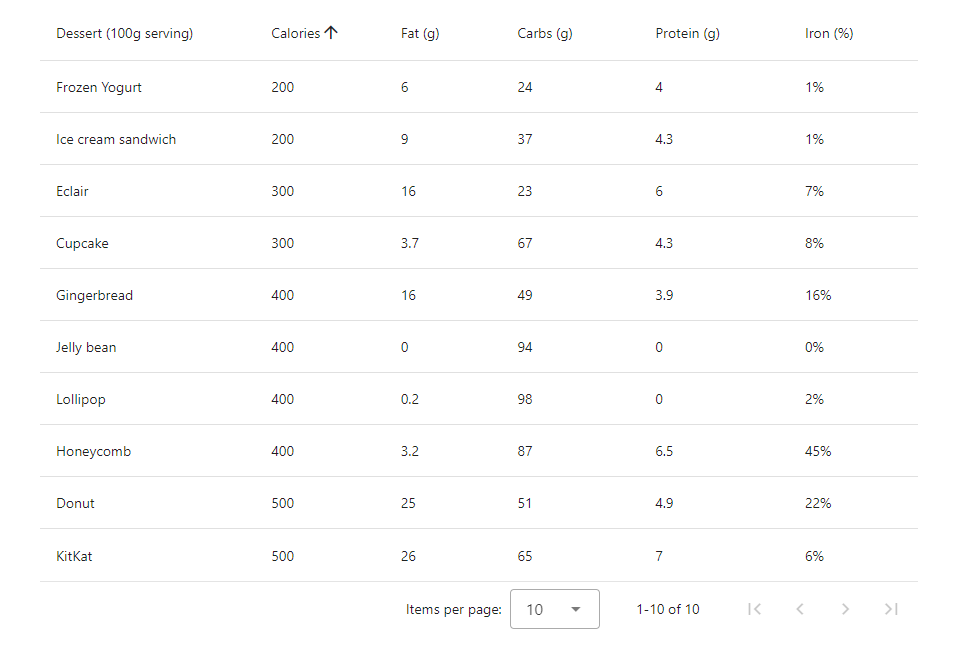
また、VDataTableのPropsのsortByを利用すると初期表示時に特定の列でソートされた状態とすることができます。今回は{ key: 'calories', order: 'asc' }ですので、以下のように、ヘッダーのCaloriesの横に上矢印のアイコンが表示され、列が昇順(asc)で並んだ状態で表示されます。

ここまでの説明でsortableのデフォルト値はtrueで、設定しなければソート機能がVDataTableの各列に付与されると思った方もいるかと思います。
(私は思っていました…)
しかし、sortableのデフォルト値は実はtrueとは限りません!
sortableのデフォルト値
例として、以下のようにheadersの配列内のオブジェクト{ title: 'Calories', key: 'calories' }を{ title: 'Calories', value: 'calories' }に置き換えてみます。
<script lang="ts">
  type SortItem = {
    key: string;
    order?: 'asc' | 'desc';
  };
  type Header = {
    readonly title?: string;
    readonly align?: "center" | "end" | "start";
    readonly sortable?: boolean;
    readonly key?: string;
    readonly value?: string;
  };
  export default {
    data () {
      const sortBy: readonly SortItem[] = [{ key: 'calories', order: 'asc' }];
      const headers: readonly Header[] = [
          {
            title: 'Dessert (100g serving)',
            align: 'start',
            sortable: false,
            key: 'name',
          },
          {
            title: 'Calories',
            value: 'calories'
          },
          {
            title: 'Fat (g)',
            key: 'fat'
          },
          {
            title: 'Carbs (g)',
            key: 'carbs'
          },
          {
            title: 'Protein (g)',
            key: 'protein'
          },
          {
            title: 'Iron (%)',
            key: 'iron'
          },
        ];
      const desserts = [
          {
            name: 'Frozen Yogurt',
            calories: 200,
            fat: 6.0,
            carbs: 24,
            protein: 4.0,
            iron: '1%',
          },
          {
            name: 'Ice cream sandwich',
            calories: 200,
            fat: 9.0,
            carbs: 37,
            protein: 4.3,
            iron: '1%',
          },
          {
            name: 'Eclair',
            calories: 300,
            fat: 16.0,
            carbs: 23,
            protein: 6.0,
            iron: '7%',
          },
          {
            name: 'Cupcake',
            calories: 300,
            fat: 3.7,
            carbs: 67,
            protein: 4.3,
            iron: '8%',
          },
          {
            name: 'Gingerbread',
            calories: 400,
            fat: 16.0,
            carbs: 49,
            protein: 3.9,
            iron: '16%',
          },
          {
            name: 'Jelly bean',
            calories: 400,
            fat: 0.0,
            carbs: 94,
            protein: 0.0,
            iron: '0%',
          },
          {
            name: 'Lollipop',
            calories: 400,
            fat: 0.2,
            carbs: 98,
            protein: 0,
            iron: '2%',
          },
          {
            name: 'Honeycomb',
            calories: 400,
            fat: 3.2,
            carbs: 87,
            protein: 6.5,
            iron: '45%',
          },
          {
            name: 'Donut',
            calories: 500,
            fat: 25.0,
            carbs: 51,
            protein: 4.9,
            iron: '22%',
          },
          {
            name: 'KitKat',
            calories: 500,
            fat: 26.0,
            carbs: 65,
            protein: 7,
            iron: '6%',
          },
        ];
      return {
        sortBy: sortBy,
        headers: headers,
        desserts: desserts,
      };
    },
  }
</script>

<template>
  <v-app>
    <v-sheet
      class="pa-2"
      width="894"
    >
      <v-data-table
        v-model:sort-by="sortBy"
        :headers="headers"
        :items="desserts"
      ></v-data-table>
    </v-sheet>
  </v-app>
</template>
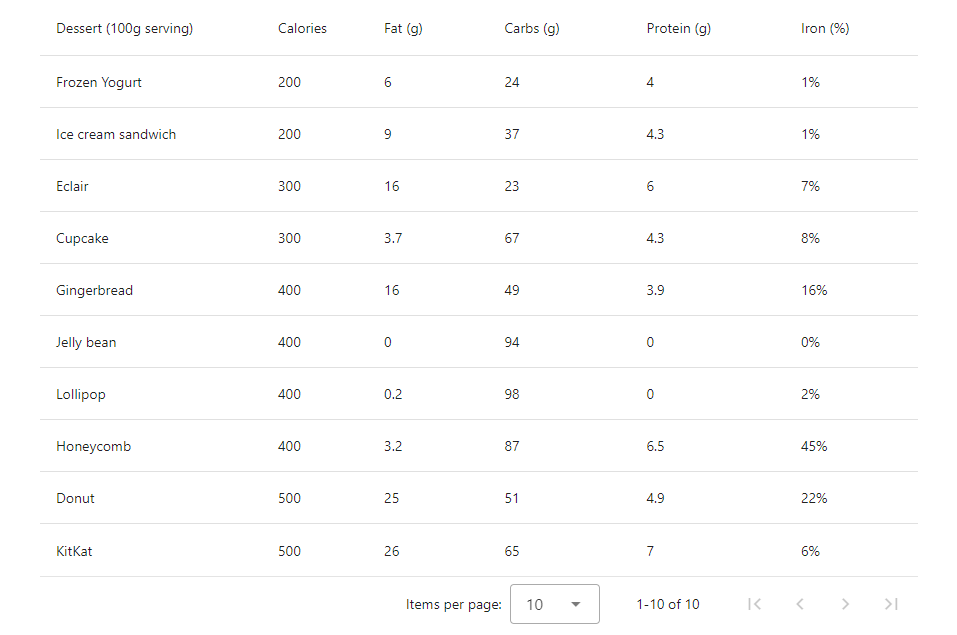
すると初期表示は以下のようになります。

あれ…なんかおかしい………
なんと、keyをvalueに変えただけで、Caloriesの列に表示されていた上矢印のアイコンが消えてしまい、Caloriesの列のソートもできなくなってしまいました!
なぜこのようになったのか、Vuetifyのソースコードを覗いてみましょう。
VDataTableのheadersのソースコードで探っていくと以下の関数のコードを見つけることができます。
function convertToInternalHeaders (items: DeepReadonly<DataTableHeader[]>) {
  const internalHeaders: InternalDataTableHeader[] = []
  for (const item of items) {
    const defaultItem = { ...getDefaultItem(item), ...item }
    const key = defaultItem.key ?? (typeof defaultItem.value === 'string' ? defaultItem.value : null)
    const value = defaultItem.value ?? key ?? null
    const internalItem: InternalDataTableHeader = {
      ...defaultItem,
      key,
      value,
      sortable: defaultItem.sortable ?? (defaultItem.key != null || !!defaultItem.sort),
      children: defaultItem.children ? convertToInternalHeaders(defaultItem.children) : undefined,
    }

    internalHeaders.push(internalItem)
  }

  return internalHeaders
}
いろいろ書かれていますが、今回は、このコードの以下に注目してください。
sortable: defaultItem.sortable ?? (defaultItem.key != null || !!defaultItem.sort)
「??」はNull合体演算子で左辺がnullまたはundefinedの場合に右の値を返し、それ以外の場合に左の値を返す演算子です。デフォルト値の設定によく用いられます。
この部分から、defaultItem.sortableがnullまたはundefinedの場合(sortableが省略された場合)、「(defaultItem.key != null || !!defaultItem.sort)」の値が設定されると読みとれます。
これで合点がいきました!
以上から、sortableのデフォルト値は以下のようになっていることが分かります。
sortableのデフォルト値は、keyまたはsortが設定されていればtrueで、keyまたはsortが設定されていなければfalse
※keyが'data-table-group'、'data-table-expand'、'data-table-select'の場合は例外でfalseになります。(header.tsのgetDefaultItem関数参照)
う~ん………
正直、この仕様は個人的には分かりづらいように思いました。
ですので、実際の実装としてはsortableを省略せず、以下のようにするのがよいかもしれません。
<script lang="ts">
  type SortItem = {
    key: string;
    order?: 'asc' | 'desc';
  };
  type Header = {
    readonly title?: string;
    readonly align?: "center" | "end" | "start";
    readonly sortable: boolean;
    readonly key?: string;
  };
  export default {
    data () {
      const sortBy: readonly SortItem[] = [{ key: 'calories', order: 'asc' }];
      const headers: readonly Header[] = [
          {
            title: 'Dessert (100g serving)',
            align: 'start',
            sortable: false,
            key: 'name',
          },
          {
            title: 'Calories',
            sortable: true,
            key: 'calories'
          },
          {
            title: 'Fat (g)',
            sortable: true,
            key: 'fat'
          },
          {
            title: 'Carbs (g)',
            sortable: true,
            key: 'carbs'
          },
          {
            title: 'Protein (g)',
            sortable: true,
            key: 'protein'
          },
          {
            title: 'Iron (%)',
            sortable: true,
            key: 'iron'
          },
        ];
      const desserts = [
          {
            name: 'Frozen Yogurt',
            calories: 200,
            fat: 6.0,
            carbs: 24,
            protein: 4.0,
            iron: '1%',
          },
          {
            name: 'Ice cream sandwich',
            calories: 200,
            fat: 9.0,
            carbs: 37,
            protein: 4.3,
            iron: '1%',
          },
          {
            name: 'Eclair',
            calories: 300,
            fat: 16.0,
            carbs: 23,
            protein: 6.0,
            iron: '7%',
          },
          {
            name: 'Cupcake',
            calories: 300,
            fat: 3.7,
            carbs: 67,
            protein: 4.3,
            iron: '8%',
          },
          {
            name: 'Gingerbread',
            calories: 400,
            fat: 16.0,
            carbs: 49,
            protein: 3.9,
            iron: '16%',
          },
          {
            name: 'Jelly bean',
            calories: 400,
            fat: 0.0,
            carbs: 94,
            protein: 0.0,
            iron: '0%',
          },
          {
            name: 'Lollipop',
            calories: 400,
            fat: 0.2,
            carbs: 98,
            protein: 0,
            iron: '2%',
          },
          {
            name: 'Honeycomb',
            calories: 400,
            fat: 3.2,
            carbs: 87,
            protein: 6.5,
            iron: '45%',
          },
          {
            name: 'Donut',
            calories: 500,
            fat: 25.0,
            carbs: 51,
            protein: 4.9,
            iron: '22%',
          },
          {
            name: 'KitKat',
            calories: 500,
            fat: 26.0,
            carbs: 65,
            protein: 7,
            iron: '6%',
          },
        ];
      return {
        sortBy: sortBy,
        headers: headers,
        desserts: desserts,
      };
    },
  }
</script>

<template>
  <v-app>
    <v-sheet
      class="pa-2"
      width="894"
    >
      <v-data-table
        v-model:sort-by="sortBy"
        :headers="headers"
        :items="desserts"
      ></v-data-table>
    </v-sheet>
  </v-app>
</template>
ちょっと長くはなってしまいますが、これでsortableのデフォルト値に左右されることなく、各列のソート機能の有効、無効を明示できます。
まぁ…この辺は好みの問題ですかね…
まとめ
以上がソート機能の基本的な実装方法になります。
これを基本として、要件によっては、ここからheadersのsortキーなどを使用してソートのカスタマイズを行います。
ソートのカスタマイズについては、書こうとしたら、長くなりそうだったので…後日、別の記事で記載する予定です以下の記事に記載しました。
今回の最終的なソースコードは以下に上げていますので、参考としてください。
参考文献
この記事は以下の情報を参考にして執筆しました。
Discussion