WordPress Gutenbergのブロックパネルをカスタムしよう

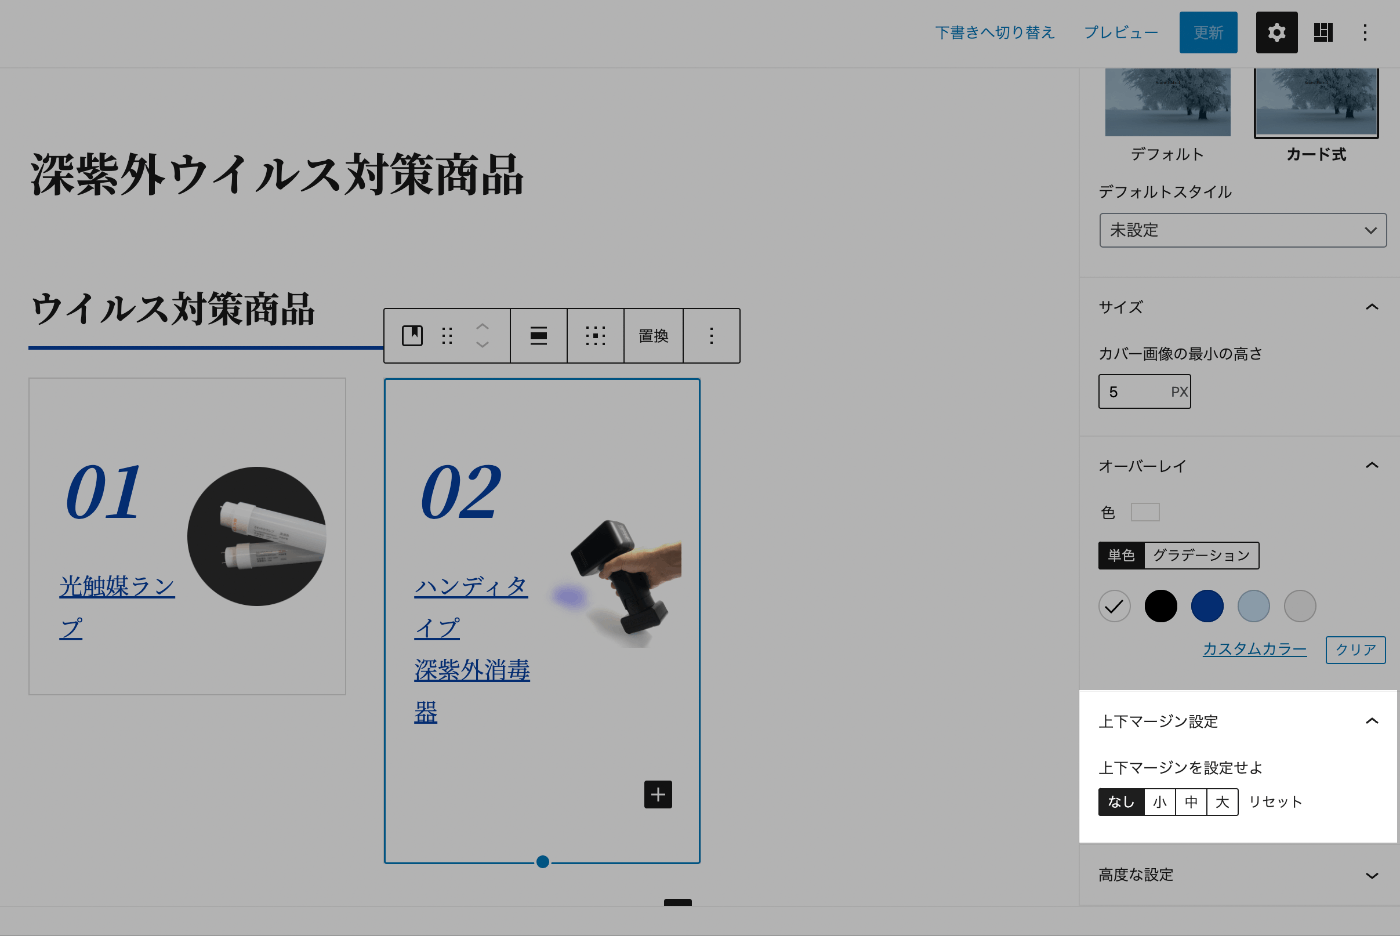
上図のように全てのブロック要素にマージン調整のパネルをカスタムできるようなやり方を紹介しようと思います
ファイルを整える
Gutenberg blockをカスタムできるように、まずは以下三つのファイルを用意しましょう
- functions.php(元々あるなら修正を入るだけ、名前は必ずそのまま)
- block.js(新規作成、名前は任意)
- block.css(新規作成、名前は任意)
functions.php
まずはblock.cssとblock.jsがサイトに読み込めるようにphpを書きます
// Add custom block setting file
add_action('enqueue_block_editor_assets', function() {
	wp_enqueue_style('block-type', get_stylesheet_directory_uri().'/block.css');
	wp_enqueue_script('block-type', get_stylesheet_directory_uri().'/block.js', array(), "", true);
});
マージンControlの見た目
まずは文章編集画面の右パネルのカスタムアイテムを作ります
const marginButtonControls = wp.compose.createHigherOrderComponent(function(BlockEdit){
    return function(props) {
        const controlButtons = wp.element.createElement(
            wp.components.PanelBody,
            {
                title: '上下マージン設定',
            },
        );

        return wp.element.createElement(
            wp.element.Fragment,
            {},
            wp.element.createElement(
                BlockEdit,
                props,
            ),
            wp.element.createElement(
                wp.blockEditor.InspectorControls,
                {
                    initialOpen: false,
                },
                controlButtons,
            ),
        );
    };
}, 'marginButtonControls');
wp.hooks.addFilter('editor.BlockEdit', 'my-plugin/add-margin', marginButtonControls);
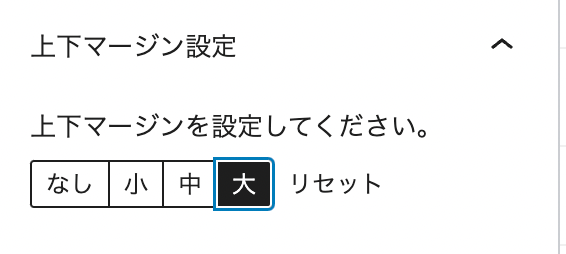
ブロックをセレクトしている状態での右パネルにカスタムアイテムが出でくるのを確認します
中身は空っぽです

次はアイテムの中身を作ります
ButtonGroupで四つのButtonを包み、
そしてリセットボタンを一緒に一行で表示できるようにBaseControlに包まれます
const marginButtonControls = wp.compose.createHigherOrderComponent(function(BlockEdit){
    return function(props) {
        const controlButtons = wp.element.createElement(
            wp.components.PanelBody,
            {
                title: '上下マージン設定',
            },
+           wp.element.createElement(
+               wp.components.BaseControl,
+               {
+                   label: '上下マージンを設定してください。'
+               },
+               wp.element.createElement(
+                   wp.components.ButtonGroup,
+                   {},
+                   wp.element.createElement(
+                       wp.components.Button,
+                       {
+                           value: '',
+                           isSmall: true,
+                       },
+                       'なし',
+                   ),
+                   wp.element.createElement(
+                       wp.components.Button,
+                       {
+                           value: '',
+                           isSmall: true,
+                       },
+                       '小',
+                   ),
+                   wp.element.createElement(
+                       wp.components.Button,
+                       {
+                           value: '',
+                           isSmall: true,
+                       },
+                       '中',
+                   ),
+                   wp.element.createElement(
+                       wp.components.Button,
+                       {
+                           value: '',
+                           isSmall: true,
+                       },
+                       '大',
+                   ),
+
+               ),
+               wp.element.createElement(
+                   wp.components.Button,
+                   {
+                       value: '',
+                       isSmall: true,
+                   },
+                   'リセット',
+               ),
+           ),
        );

        return wp.element.createElement(
            wp.element.Fragment,
            {},
            wp.element.createElement(
                BlockEdit,
                props,
            ),
            wp.element.createElement(
                wp.blockEditor.InspectorControls,
                {
                    initialOpen: false,
                },
                controlButtons,
            ),
        );

    };
}, 'marginButtonControls');
wp.hooks.addFilter('editor.BlockEdit', 'my-plugin/add-margin', marginButtonControls);
これで中身が出てくることを確認しました

マージンControlの機能
続いてマージンControlの機能を実装しようと思います
まずはマージンボタンのクリック関数を追加します
const marginButtonControls = wp.compose.createHigherOrderComponent(function(BlockEdit){
    return function(props) {
        const controlButtons = wp.element.createElement(
            wp.components.PanelBody,
            {
                title: '上下マージン設定',
            },
            wp.element.createElement(
                wp.components.BaseControl,
                {
                    label: '上下マージンを設定してください。'
                },
                wp.element.createElement(
                    wp.components.ButtonGroup,
                    {},
                    wp.element.createElement(
                        wp.components.Button,
                        {
-			    value: '',
+                           value: '0',
                            isSmall: true,
+                           onClick: onClickMarginButton,
                        },
                        'なし',
                    ),
                    wp.element.createElement(
                        wp.components.Button,
                        {
-			    value: '',
+                           value: '20',
                            isSmall: true,
+                           onClick: onClickMarginButton,
                        },
                        '小',
                    ),
                    wp.element.createElement(
                        wp.components.Button,
                        {
-			    value: '',
+                           value: '40',
                            isSmall: true,
+                           onClick: onClickMarginButton,
                        },
                        '中',
                    ),
                    wp.element.createElement(
                        wp.components.Button,
                        {
-			    value: '',
+                           value: '60',
                            isSmall: true,
+                           onClick: onClickMarginButton,
                        },
                        '大',
                    ),

                ),
                wp.element.createElement(
                    wp.components.Button,
                    {
                        value: '',
                        isSmall: true,
+                       onClick: onClickMarginButton,
                    },
                    'リセット',
                ),
            ),
        );

+       function onClickMarginButton(ev) {
+           const marginValue = ev.currentTarget.value;
+           console.log('marginValue', marginValue);
+       };

        return wp.element.createElement(
            wp.element.Fragment,
            {},
            wp.element.createElement(
                BlockEdit,
                props,
            ),
            wp.element.createElement(
                wp.blockEditor.InspectorControls,
                {
                    initialOpen: false,
                },
                controlButtons,
            ),
        );

    };
}, 'marginButtonControls');
wp.hooks.addFilter('editor.BlockEdit', 'my-plugin/add-margin', marginButtonControls)
クリックすると、console panelにデバッグ情報が出て来るのを確認しました

カスタムattributeを追加
まずはブロック要素のattributeを紹介しようと思います
block.js以下のコードを一旦追加します
function onClickMarginButton(ev) {
    const marginValue = ev.currentTarget.value;
    console.log('marginValue', marginValue);
+   console.log(props);
};
執行してみたら、こういうObjectが出て来ます
これがブロック要素のattributesです

マージンの値を保存できるため、props.attributesの中身に
カスタムattributeを追加します
marginを登録するために
block.jsの一番下に以下のコードを追加します
(登録がなければ後ほどの操作に不具合が出ます)
function addAttribute(settings, name) {
    settings.attributes = {
        ...settings.attributes,
        margin: {
            type: 'string',
            default: '',
        },
    };
    return settings;
}
wp.hooks.addFilter('blocks.registerBlockType', 'my-plugin/add-attr', addAttribute);
そして、onClickMarginButtonに少し修正を入る
function onClickMarginButton(ev) {
    const marginValue = ev.currentTarget.value;
    console.log(props);
-   console.log('marginValue', marginValue);

+   props.setAttributes({
+	margin: marginValue,
+   });
};
props.attributesの中にmarginというカスタムattributeが追加したことを確認しました

次は、そのmargin attributeを活用して
ボタンのセレクト状態を追加します
ボタンのコンポーネントに以下のコードを追加します
wp.element.createElement(
    wp.components.ButtonGroup,
    {},
    wp.element.createElement(
	wp.components.Button,
	{
	    value: '0',
	    isSmall: true,
	    onClick: onClickMarginButton,
+	    isPressed: props.attributes.margin == '0',
	},
	'なし',
    ),
    wp.element.createElement(
	wp.components.Button,
	{
	    value: '20',
	    isSmall: true,
	    onClick: onClickMarginButton,
+	    isPressed: props.attributes.margin == '20',
	},
	'小',
    ),
    wp.element.createElement(
	wp.components.Button,
	{
	    value: '40',
	    isSmall: true,
	    onClick: onClickMarginButton,
+	    isPressed: props.attributes.margin == '40',
	},
	'中',
    ),
    wp.element.createElement(
	wp.components.Button,
	{
	    value: '60',
	    isSmall: true,
	    onClick: onClickMarginButton,
+	    isPressed: props.attributes.margin == '60',
	},
	'大',
    ),

),
wp.element.createElement(
    wp.components.Button,
    {
	value: '',
	isSmall: true,
	onClick: onClickMarginButton,
    },
    'リセット',
),
これでセレクト状態が可能になりました

HTMLのmargin attribute
ブロックのattributeをHTMLに反映させるために
block.jsの一番下の以下のコードを追加します
function addMarginStyle(props, blockType, attributes) {
    if(attributes.margin) {
        return lodash.assign(
            props,
            {
                margin: attributes.margin,
            },
        );
    } else {
        return props;
    }
}
wp.hooks.addFilter('blocks.getSaveContent.extraProps', 'my-plugin/add-margin', addMarginStyle);
編集画面でマージンを設定して、保存したら
ページのHTML要素にmarginが追加したことを確認しました

CSSスタイルを追加
最後にstyle.cssの一番下に以下のコードを追加します
[margin="0"] {
	margin-top: 0px !important;
	margin-bottom: 0px !important;
}

[margin="20"] {
	margin-top: 20px !important;
	margin-bottom: 20px !important;
}

[margin="40"] {
	margin-top: 40px !important;
	margin-bottom: 40px !important;
}

[margin="60"] {
	margin-top: 60px !important;
	margin-bottom: 60px !important;
}
これでマージンを付けることができました

できなかった部分
マージンattributeをHTMLに付けられるのが、表示ページのみになったものの
本当は編集ページにも付けたかったが、付ける方法を見つけられなかったです

編集ページのHTMLに付けられないため、マージンボタンをクリックしても
要素の見た目が変われないです
Discussion