【NLU祭り】AWSとLINEで作る簡易感情分析くんハンズオン
はじめに
2021年9月1日に開催の 【NLU祭り】AWSとLINEで作る簡易感情分析くんハンズオンで利用するハンズオン手順です。

事前準備
ハンズオンを進めるには、AWSアカウント と LINE Developers への登録が必要です。
AWSアカウントの作成は以下のページを参考にしてください。
AWS アカウント作成の流れ
LINE Developers は、LINEアカウントでログインします。アカウントがないかたは、お手持ちのスマートフォンでLINE にサインアップしてください。
対象者
ハンズオンの対象者は以下のようなかたを想定しています。レベルとしてはビギナー向けの内容となっています。
- プログラミングを始めたばかりの人
- AWSのAIサービスを触ってみたい人
- LINEのサービス開発に興味のある人
- Botを作ってみたい人
使用言語
ハンズオンの一部では、コーディングをしていただきます。言語は javascript です。node.js を利用します。バージョンは14.0です。
ハンズオン中に出てくる用語
- LINE Developers コンソール(以下、LINE コンソール)
- AWS マネジメントコンソール(以下、AWS(の)マネコン)
進めかた
ハンズオンは 4つのステップで構成されています。各ステップで動作確認の工程を設けていますので、一つ一つ動くことを確認しながら進めます。各ステップには実際に手を動かして手順をなぞっている動画を置いていますので、参考にしながら進めてください。
ハンズオン
1. LINE Messaging APIの設定 (5分)
手順
- LINE Developers アカウントにログインして provider を選びます。
- Channels -> LINE message API の順にクリックします。
- 以下を入力します。
- チャンネル名: Ossekkai-BOT
- チャンネルの説明:Ossekkai-BOT
- カテゴリ:エンタメ
- サブカテゴリ:その他 エンタメ
- Privacy Policy URL: https://hugtech.io/privacy-policy
- Term of service URL: https://hugtech.io/terms-and-service
- LINE agreement 2つにチェックを入れて作成
- LINE Messaging API タブをクリック
- 画面一番下の Channel access token を作成しておきます。(後で使います
動作確認
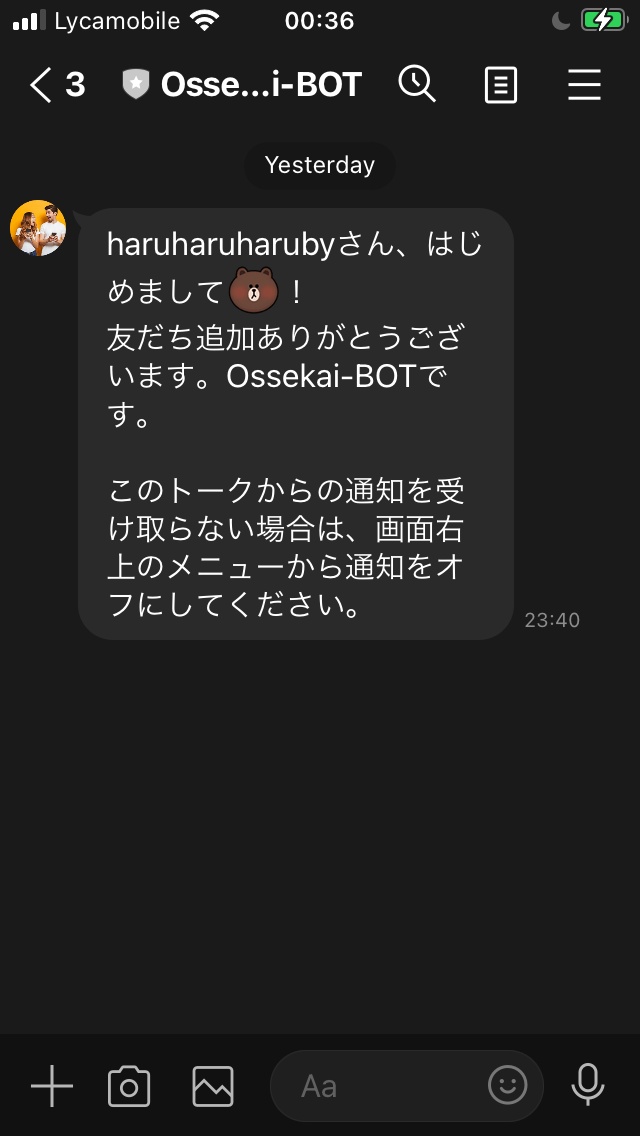
- LINE Messaging API タブに表示されるQRコードをLINEアプリで読み取り、友達追加します。Welcome メッセージが表示されたらOKです。

2. AWS API GatewayでAPIを作ろう (5分)
手順
- AWSのマネコンにログインして、API Gateway を選びます。
- Create API -> REST API -> New API を選び、APIの名前を入力します。
- Resource -> Actions -> Create Method -> POST の順に選びます。
- APIのルート ("/(スラッシュ)")を選択 -> Actions -> Enable CORS を選択して、デフォルト設定のまま ”Enable CORES and Replace .." をクリックします。(エラー出ますが気にせず進めます)
- ResourceのPOSTを選択 -> Create Lambda Function をクリックします。
- Function Name を入力し、Create
- [動作確認] Lambda Functions の Test を作成して、"Hello World"が出ることを確認します。
- API Gateway に戻り、-> POST -> Lambda Function に 7. で作成したLambda Function Name を入れて確定します。
- [動作確認] Testを選択して、Lambda Function のレスポンスが表示されることを確認します。
- Actions -> Deploy API を選択し、Stageに dev と入力し確定します。
- 画面上部 InvokeURL のところに LINEから呼び出すAPIのURLが生成されます。(後からつかいます。
CLIが使えるかたは、CURLで実際にAPIが呼び出せるか確認してみてください。
-> % curl -X POST https://m1axtw35c3.execute-api.eu-central-1.amazonaws.com/dev | jq .
  % Total    % Received % Xferd  Average Speed   Time    Time     Time  Current
                                 Dload  Upload   Total   Spent    Left  Speed
100    50  100    50    0     0    561      0 --:--:-- --:--:-- --:--:--   561
{
  "statusCode": 200,
  "body": "\"Hello from Lambda!\""
}
3. AWS LambdaでAPIの中身を実装しよう (15分)
Step1, 2
Step 3
Step 4, 5
手順
-
LINE のチャンネルにWebhookを設定します。webhookのURLは、APIGateway -> Stage を選択したときに画面上部に出てくるURLです。URLのVerify と WebhookをEnableにするtoggleを忘れずにOnにします。
-
[動作確認] Botにメッセージを送って、Lambdaで確認します。
-
Lambdaでレスポンスを実装します。ここからはPC上でコードを編集します。
-
AWSのマネコンで Lambda Function の環境変数に Channel Access Tokenを設定します
名前: CHANNEL_ACCESS_TOKEN
値: LINE Developers コンソールで作成した Channel Access Token -
以下のサイトからソースコードをダウンロードします。
https://resources.hugtech.io/LINExNLU/lambda.zip -
index.js を以下のように編集します。
const Axios = require('axios');
exports.handler = async (event) => {
    // TODO implement
    console.log(JSON.stringify(event));

    // 返信用のHTTPクライアント
    const axios = Axios.create({
        baseURL: 'https://api.line.me/v2/bot/',
        headers: {
            authorization: `Bearer ${process.env.CHANNEL_ACCESS_TOKEN}`
        }
    });

    // {
    //     "destination": "U09816cbb66f47b52439034e267624bdd",
    //     "events": [
    //         {
    //             "type": "message",
    //             "message": {
    //                 "type": "text",
    //                 "id": "14635305814473",
    //                 "text": "こんにちは"
    //             },
    //             "timestamp": 1629927717459,
    //             "source": {
    //                 "type": "user",
    //                 "userId": "Uc6d1807d59a0d007bee5567a44d2ebea"
    //             },
    //             "replyToken": "283100e2afbc4cc8a968ffc3ccf0f479",
    //             "mode": "active"
    //         }
    //     ]
    // }

    // 返信するメッセージ
    const res = await axios.post('/message/reply', {
        replyToken: event.events[0].replyToken,
        messages: [
            {
                type: 'text',
                text: 'こんにちは'
            }
        ]
    });
    console.log(res);
    const response = {
        statusCode: 200,
        body: JSON.stringify('Hello from Lambda!'),
    };
    return response;
};
- ソースコードを Zip に固めてアップロードします。
MacのTerminalでやるかたはこちらの例を参考にしててください。(デスクトップに作成されるlambda.zip をアップロードしてください)
[11時34分44秒] [~/hugtech/LiNE]
-> % ls
index.js     node_modules package.json yarn.lock
[11時34分45秒] [~/hugtech/LiNE]
-> % zip -r ~/Desktop/lambda.zip .
- [動作確認] 実際のBotからメッセージを送って応答が返ってくるか確認します。
4. Amazon Comprehend を使ってネガポジ判定して応答を返そう(15分)
Step 1, 2, 3
Step 4, 5
手順
- Lambda Function に Amazon Comprehend を使用する許可を与えます
Amazon Comprehend
- AWS Lambda のコンソールで、Configuration -> Permissions -> IAM Role を選択します。
- Add Policies -> ComprehendFullAccess を追加します。
- index.js を以下のように編集します。
const { Comprehend } = require('aws-sdk');
const Axios = require('axios');
exports.handler = async (event) => {
    // TODO implement
    console.log(JSON.stringify(event));
    const axios = Axios.create({
        baseURL: 'https://api.line.me/v2/bot/',
        headers: {
            authorization: `Bearer ${process.env.CHANNEL_ACCESS_TOKEN}`
        }
    });

    // {
    //     "destination": "U09816cbb66f47b52439034e267624bdd",
    //     "events": [
    //         {
    //             "type": "message",
    //             "message": {
    //                 "type": "text",
    //                 "id": "14635305814473",
    //                 "text": "こんにちは"
    //             },
    //             "timestamp": 1629927717459,
    //             "source": {
    //                 "type": "user",
    //                 "userId": "Uc6d1807d59a0d007bee5567a44d2ebea"
    //             },
    //             "replyToken": "283100e2afbc4cc8a968ffc3ccf0f479",
    //             "mode": "active"
    //         }
    //     ]
    // }

    const comprehend = new Comprehend();
    const sentiment = await comprehend.batchDetectSentiment({
        LanguageCode: 'ja',
        TextList: [
            event.events[0].message.text
        ]
    }).promise();

    console.log(JSON.stringify(sentiment));

    const res = await axios.post('/message/reply', {
        replyToken: event.events[0].replyToken,
        messages: [
            {
                type: 'text',
                text: 'こんにちは'
            }
        ]
    });
    console.log(res);
    const response = {
        statusCode: 200,
        body: JSON.stringify('Hello from Lambda!'),
    };
    return response;
};
-
[動作確認] LINEアプリから BOT にメッセージを送ります。AWSのマネコンに戻り、ネガポジ判定の結果を CloudWatchで 確認します。ネガポジ判定のレスポンスがログに出ていることを確認したら次のステップに進みましょう。
-
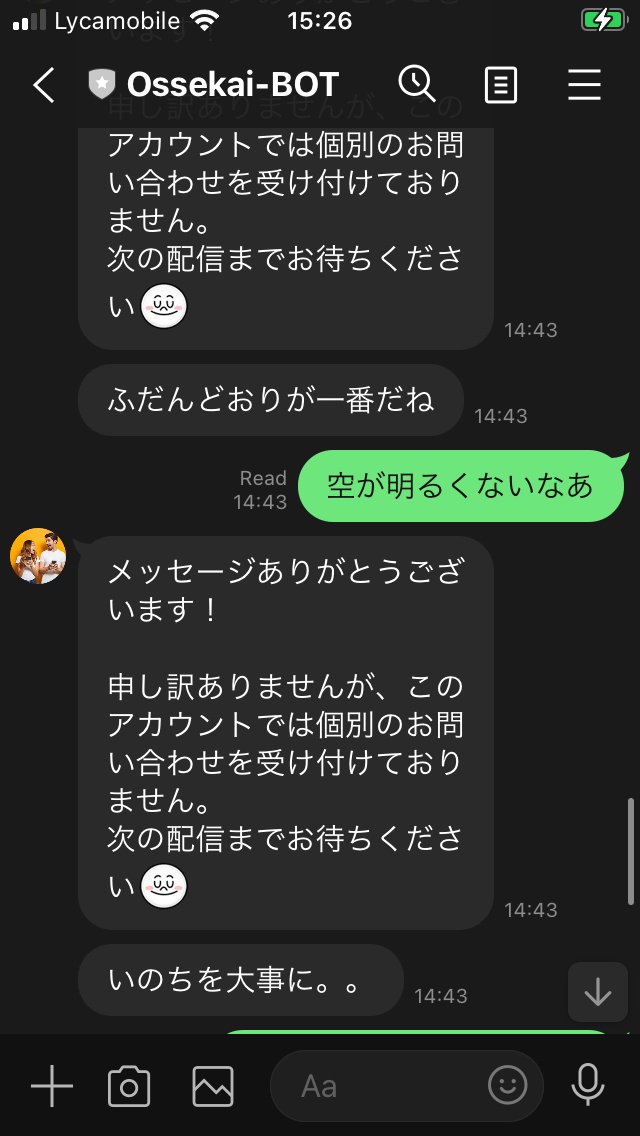
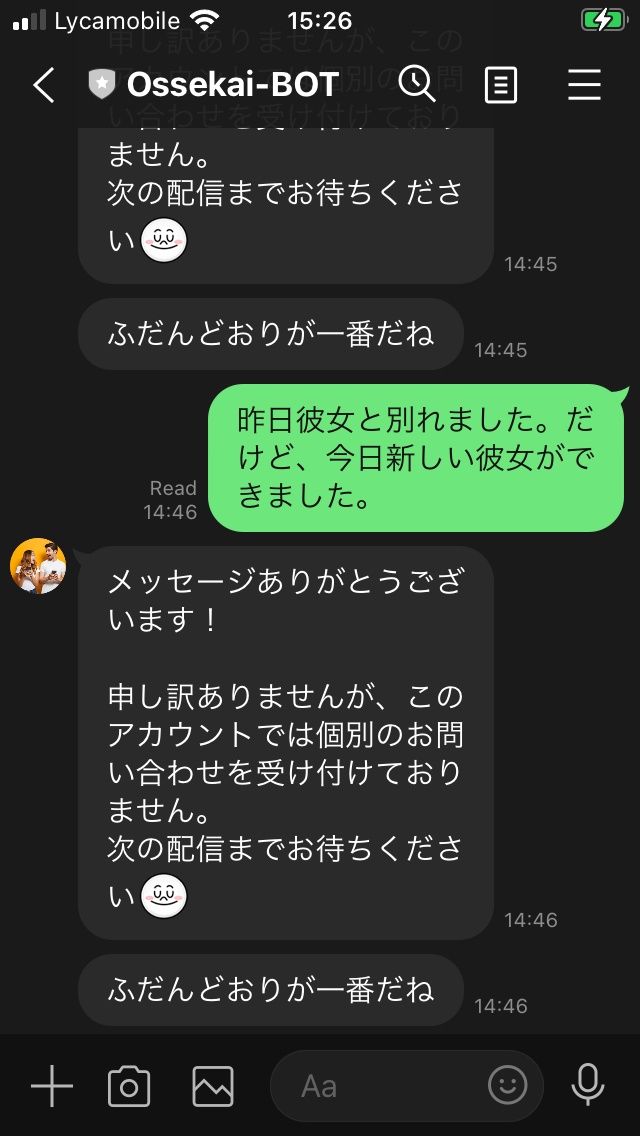
ネガポジ判定によって以下のように5段階で返却するように、index.js を編集します。
| condition | message |
|---|---|
| positive > 0.90 | 今日もガンガンいきましょう! |
| positive < 0.60 | きっと今日もバッチリ |
| negative < 0.60 | なにか元気ないね。嫌なことあった? |
| negative > 0.90 | いのちを大事に。。 |
| 上記以外 | ふだんどおりが一番だね |
編集後の index.js はこんな感じです。
const { Comprehend } = require('aws-sdk');
const Axios = require('axios');
exports.handler = async (event) => {
    // TODO implement
    console.log(JSON.stringify(event));
    const axios = Axios.create({
        baseURL: 'https://api.line.me/v2/bot/',
        headers: {
            authorization: `Bearer ${process.env.CHANNEL_ACCESS_TOKEN}`
        }
    });

    // {
    //     "destination": "U09816cbb66f47b52439034e267624bdd",
    //     "events": [
    //         {
    //             "type": "message",
    //             "message": {
    //                 "type": "text",
    //                 "id": "14635305814473",
    //                 "text": "こんにちは"
    //             },
    //             "timestamp": 1629927717459,
    //             "source": {
    //                 "type": "user",
    //                 "userId": "Uc6d1807d59a0d007bee5567a44d2ebea"
    //             },
    //             "replyToken": "283100e2afbc4cc8a968ffc3ccf0f479",
    //             "mode": "active"
    //         }
    //     ]
    // }

    const comprehend = new Comprehend();
    const sentiment = await comprehend.batchDetectSentiment({
        LanguageCode: 'ja',
        TextList: [
            event.events[0].message.text
        ]
    }).promise();

    console.log(JSON.stringify(sentiment));

    // {
    //     "ResultList": [
    //         {
    //             "Index": 0,
    //             "Sentiment": "POSITIVE",
    //             "SentimentScore": {
    //                 "Positive": 0.9982763528823853,
    //                 "Negative": 0.00011879993689944968,
    //                 "Neutral": 0.0015732598258182406,
    //                 "Mixed": 0.000031572893931297585
    //             }
    //         }
    //     ],
    //     "ErrorList": []
    // }

    let responseText = 'ふだんどおりが一番だね';
    const {
        Sentiment,
        SentimentScore
    } = sentiment.ResultList[0];

    switch (Sentiment) {
        case 'POSITIVE':
            if (SentimentScore.Positive > 0.90) {
                responseText = '今日もガンガンいきましょう!';
            } else if (SentimentScore.Positive > 0.60) {
                responseText = 'きっと今日もバッチリ';
            }
            break;
        case 'NEGATIVE':
            if (SentimentScore.Negative > 0.90) {
                responseText = 'いのちを大事に。。';
            } else if (SentimentScore.Negative > 0.60) {
                responseText = 'なにか元気ないね。嫌なことあった?';
            }
            break;
        case 'NEUTRAL': break;
        case 'MIXED': break;
        default: break;
    }
    console.log(responseText);


    const res = await axios.post('/message/reply', {
        replyToken: event.events[0].replyToken,
        messages: [
            {
                type: 'text',
                text: responseText
            }
        ]
    });
    console.log(res);
    const response = {
        statusCode: 200,
        body: JSON.stringify('Hello from Lambda!'),
    };
    return response;
};
- [動作確認] LINEアプリから BOT にメッセージを送って、判定できてるか確認します。


BOT完成後のソースは以下からダウンロードできます。
おつかれさまでした。これで今日のノルマは終了です。完走おめでとうございます!
余裕のあるかたはアドバンスドのセクションにもトライしてみてください。
(Advanced) 音声メッセージに対応しよう
Demo
ユーザーからの音声メッセージにも応答を返せるようにBotを改造しましょう。
Amazon Transcribe を使って、ユーザーの音声を文字に変換して、先ほどと同様に Amazon Comprehend でネガポジ判定にかけてみましょう。
準備
- IAM設定
- Lambda Function に S3FullAccessとTranscribeFullAccess を付与します。
- S3バケットの設定
- Amazon Transcribe の 入出力用に S3バケットを準備します
- ffmpeg の Lambda Layerを準備
- ffmpeg をLambda Function の中で使うために、以下のlayerをデプロイして、設定します。
serverless-application-repository-ffmpeg-lambda-layer
- ffmpeg をLambda Function の中で使うために、以下のlayerをデプロイして、設定します。
ソースコードの編集
- ユーザーのメッセージがaudioの場合に、音声データを LINEのgetMessageContentで取得する
/**
 * audioデータを取得するファンクション
 * @param {*} messageId LINEから送られたaudioのID
 * @returns Audio バイナリデータ
 */
const getAudioData = (messageId) => {
    const client = new line.Client({
        channelAccessToken: process.env.CHANNEL_ACCESS_TOKEN
    });

    return new Promise((resolve, reject) => {
        let audio = [];
        client.getMessageContent(messageId).then((stream) => {
           stream
            .on('data', (chunk) => audio.push(Buffer.from(chunk)))
            .on('end', () => resolve(Buffer.concat(audio)))
            .on('error', (err) => reject(err))
        })
    })
}
- 音声データをffmpegで Amazon Transcribe が読み取れるデータに変換する
/**
 * audioデータを Amazon Transcribe で読み取れる形式のデータ(wav)に変換して保存するファンクション
 * @param {*} audio getAudioData ファンクションで取得した音声バイナリデータ
 * @param {*} filename ファイル名
 * @returns audio data 保存先のパス
 */
const m4a2wav = (audio, filename) => {
    const inputFile = '/tmp/audio.m4a';
    const outputFile = `/tmp/${filename}.wav`;
    const fd = fs.openSync(inputFile, 'w');
    fs.writeSync(fd, audio);
    spawnSync('/opt/bin/ffmpeg', ['-i', inputFile, '-ar', '16000', '-c:a', 'pcm_s16le', outputFile]);
    return outputFile;
}
上述した2つのファンクションを使って、音声データの取得からファイルを変換するまでのコード
        const jobName = uuidv4();
        const audio = await getAudioData(event.events[0].message.id);
        console.log(audio);

        const audioFile = m4a2wav(audio, jobName);
        console.log(audioFile);
- 変換したファイルを入力用のS3バケットへ保存する
        // Amazon Transcribe の入力ファイルは S3 でホストする必要があるので、S3に保存
        const s3 = new S3();
        const s3Param = {
	   // バケットは準備のセクションで作成したもの
            Bucket: 'in.lineaudio.hugtech.io',
            Key: `${jobName}.wav`,
            Body: fs.readFileSync(audioFile)
        };
        console.log(s3Param);
        s3.putObject(s3Param).promise()
- Transcribe で文字起こしする
        // Transcribe 実行(文字起こし)
	// バケットは準備のセクションで作成したもの
        const OutputBucketName = 'out.lineaudio.hugtech.io';
        const transcribe = new TranscribeService();
        const transcribeParam = {
            TranscriptionJobName: jobName,
            LanguageCode: 'ja-JP',
            MediaFormat: 'wav',
            Media: {
		// 入力用バケットに保存した音声ファイルのURLを指定する
                MediaFileUri: `https://in.lineaudio.hugtech.io.s3.eu-central-1.amazonaws.com/${jobName}.wav`,

            },
            OutputBucketName
        };
        console.log(transcribeParam);
        await transcribe.startTranscriptionJob(transcribeParam).promise();
- Transcribe のジョブが終わるのを待つ
        // 文字起こしは非同期で行われるので完了を待つ
        const getJob = async (name) => {
            const job = await transcribe.getTranscriptionJob({
                TranscriptionJobName: name
            }).promise();
            return job;
        }

        let job = await getJob(jobName);
        let count = 0;
	// 文字起こしの完了は、ジョブを取得して、TranscriptionJobStatusを確認することで判定できる。
        while (job.TranscriptionJob.TranscriptionJobStatus !== 'COMPLETED' && count <= 100) {
            count++;
            await delay(500);
            job = await getJob(jobName);
        }
        console.log(job.TranscriptionJob.Transcript.TranscriptFileUri);
- Transcribe された結果が出力用のS3バケットにJSONで保存されるので、抽出して、Comprehendを実行する
        // 文字起こし結果を取得
        const Key = path.basename(job.TranscriptionJob.Transcript.TranscriptFileUri);
        const transcribeResult = await s3.getObject({
            Bucket: OutputBucketName,
            Key
        }).promise();

        // {
        //     "jobName": "3abacaa6-9d25-4f22-b610-9c48280294a2",
        //     "accountId": "623357820778",
        //     "results": {
        //         "transcripts": [
        //             {
        //                 "transcript": "を突かれたまでです"
        //             }
        //         ],
        //         "items": [
        // :

        const transcribeResultJson = JSON.parse(transcribeResult.Body.toString());
        console.log(transcribeResult.Body.toString());
        comprehendText = transcribeResultJson.results.transcripts[0].transcript;
- Comprehendの結果から応答メッセージを作成する(
- Push Message で ユーザーに応答する
    // 応答はpushメッセージで返す(文字起こしに時間がかかるので、replyメッセージの有効期間が切れてしまう
    const res = await axios.post('/message/push', {
        to: event.events[0].source.userId,
        messages: [
            {
                type: 'text',
                text: responseText
            }
        ]
    });
    console.log(res);
    const response = {
        statusCode: 200,
        body: JSON.stringify('Hello from Lambda!'),
    };
    return response;
};
ソースコード(完全版)
const { Comprehend, TranscribeService, S3 } = require('aws-sdk');
const Axios = require('axios');
const line = require('@line/bot-sdk');
const { spawnSync } = require('child_process')
const fs = require('fs');
const { v4: uuidv4 } = require('uuid');
const delay = require('delay');
const path = require('path');

/**
 * audioデータを取得するファンクション
 * @param {*} messageId LINEから送られたaudioのID
 * @returns Audio バイナリデータ
 */
const getAudioData = (messageId) => {
    const client = new line.Client({
        channelAccessToken: process.env.CHANNEL_ACCESS_TOKEN
    });

    return new Promise((resolve, reject) => {
        let audio = [];
        client.getMessageContent(messageId).then((stream) => {
           stream
            .on('data', (chunk) => audio.push(Buffer.from(chunk)))
            .on('end', () => resolve(Buffer.concat(audio)))
            .on('error', (err) => reject(err))
        })
    })
}

/**
 * audioデータを Amazon Transcribe で読み取れる形式のデータ(wav)に変換して保存するファンクション
 * @param {*} audio getAudioData ファンクションで取得した音声バイナリデータ
 * @param {*} filename ファイル名
 * @returns audio data 保存先のパス
 */
const m4a2wav = (audio, filename) => {
    const inputFile = '/tmp/audio.m4a';
    const outputFile = `/tmp/${filename}.wav`;
    const fd = fs.openSync(inputFile, 'w');
    fs.writeSync(fd, audio);
    spawnSync('/opt/bin/ffmpeg', ['-i', inputFile, '-ar', '16000', '-c:a', 'pcm_s16le', outputFile]);
    return outputFile;
}

exports.handler = async (event) => {
    // TODO implement
    console.log(JSON.stringify(event));
    const axios = Axios.create({
        baseURL: 'https://api.line.me/v2/bot/',
        headers: {
            authorization: `Bearer ${process.env.CHANNEL_ACCESS_TOKEN}`
        }
    });

    // {
    //     "destination": "U09816cbb66f47b52439034e267624bdd",
    //     "events": [
    //         {
    //             "type": "message",
    //             "message": {
    //                 "type": "audio",
    //                 "id": "14668691969739",
    //                 "duration": 1468,
    //                 "contentProvider": {
    //                     "type": "line"
    //                 }
    //             },
    //             "timestamp": 1630438177007,
    //             "source": {
    //                 "type": "user",
    //                 "userId": "Uc6d1807d59a0d007bee5567a44d2ebea"
    //             },
    //             "replyToken": "4f74af372c1e4b0c9eacdda76a9829df",
    //             "mode": "active"
    //         }
    //     ]
    // }
    let comprehendText = '';

    if (event.events[0].message.type === 'audio') {
        const jobName = uuidv4();
        const audio = await getAudioData(event.events[0].message.id);
        console.log(audio);

        const audioFile = m4a2wav(audio, jobName);
        console.log(audioFile);

        // Amazon Transcribe の入力ファイルは S3 でホストする必要があるので、S3に保存
        const s3 = new S3();
        const s3Param = {
            Bucket: 'in.lineaudio.hugtech.io',
            Key: `${jobName}.wav`,
            Body: fs.readFileSync(audioFile)
        };
        console.log(s3Param);
        s3.putObject(s3Param).promise()

        // Transcribe 実行(文字起こし)
        const OutputBucketName = 'out.lineaudio.hugtech.io';
        const transcribe = new TranscribeService();
        const transcribeParam = {
            TranscriptionJobName: jobName,
            LanguageCode: 'ja-JP',
            MediaFormat: 'wav',
            Media: {
                MediaFileUri: `https://in.lineaudio.hugtech.io.s3.eu-central-1.amazonaws.com/${jobName}.wav`,

            },
            OutputBucketName
        };
        console.log(transcribeParam);
        await transcribe.startTranscriptionJob(transcribeParam).promise();


        // 文字起こしは非同期で行われるので完了を待つ
        const getJob = async (name) => {
            const job = await transcribe.getTranscriptionJob({
                TranscriptionJobName: name
            }).promise();
            return job;
        }

        let job = await getJob(jobName);
        let count = 0;
        while (job.TranscriptionJob.TranscriptionJobStatus !== 'COMPLETED' && count <= 100) {
            count++;
            await delay(500);
            job = await getJob(jobName);
        }
        console.log(job.TranscriptionJob.Transcript.TranscriptFileUri);

        // 文字起こし結果を取得
        const Key = path.basename(job.TranscriptionJob.Transcript.TranscriptFileUri);
        const transcribeResult = await s3.getObject({
            Bucket: OutputBucketName,
            Key
        }).promise();

        // {
        //     "jobName": "3abacaa6-9d25-4f22-b610-9c48280294a2",
        //     "accountId": "623357820778",
        //     "results": {
        //         "transcripts": [
        //             {
        //                 "transcript": "を突かれたまでです"
        //             }
        //         ],
        //         "items": [
        // :

        const transcribeResultJson = JSON.parse(transcribeResult.Body.toString());
        console.log(transcribeResult.Body.toString());
        comprehendText = transcribeResultJson.results.transcripts[0].transcript;

    } if (event.events[0].message.type === 'text') {
        comprehendText = event.events[0].message.text
    }

    // {
    //     "destination": "U09816cbb66f47b52439034e267624bdd",
    //     "events": [
    //         {
    //             "type": "message",
    //             "message": {
    //                 "type": "text",
    //                 "id": "14635305814473",
    //                 "text": "こんにちは"
    //             },
    //             "timestamp": 1629927717459,
    //             "source": {
    //                 "type": "user",
    //                 "userId": "Uc6d1807d59a0d007bee5567a44d2ebea"
    //             },
    //             "replyToken": "283100e2afbc4cc8a968ffc3ccf0f479",
    //             "mode": "active"
    //         }
    //     ]
    // }

    const comprehend = new Comprehend();
    const sentiment = await comprehend.batchDetectSentiment({
        LanguageCode: 'ja',
        TextList: [
            // event.events[0].message.text
            comprehendText
        ]
    }).promise();

    console.log(JSON.stringify(sentiment));

    // {
    //     "ResultList": [
    //         {
    //             "Index": 0,
    //             "Sentiment": "POSITIVE",
    //             "SentimentScore": {
    //                 "Positive": 0.9982763528823853,
    //                 "Negative": 0.00011879993689944968,
    //                 "Neutral": 0.0015732598258182406,
    //                 "Mixed": 0.000031572893931297585
    //             }
    //         }
    //     ],
    //     "ErrorList": []
    // }

    let responseText = 'ふだんどおりが一番だね';
    const {
        Sentiment,
        SentimentScore
    } = sentiment.ResultList[0];

    switch (Sentiment) {
        case 'POSITIVE':
            if (SentimentScore.Positive > 0.90) {
                responseText = '今日もガンガンいきましょう!';
            } else if (SentimentScore.Positive > 0.60) {
                responseText = 'きっと今日もバッチリ';
            }
            break;
        case 'NEGATIVE':
            if (SentimentScore.Negative > 0.90) {
                responseText = 'いのちを大事に。。';
            } else if (SentimentScore.Negative > 0.60) {
                responseText = 'なにか元気ないね。嫌なことあった?';
            }
            break;
        case 'NEUTRAL': break;
        case 'MIXED': break;
        default: break;
    }
    console.log(responseText);

    // 応答はpushメッセージで返す(文字起こしに時間がかかるので、replyメッセージの有効期間が切れてしまう
    const res = await axios.post('/message/push', {
        to: event.events[0].source.userId,
        messages: [
            {
                type: 'text',
                text: responseText
            }
        ]
    });
    console.log(res);
    const response = {
        statusCode: 200,
        body: JSON.stringify('Hello from Lambda!'),
    };
    return response;
};
BOT完成後のソースは以下からダウンロードできます。
おつかれさまでした!
Discussion