UnityのUI Toolkitを触ってみる
UI ツールキットは、ユーザーインターフェースとエディターの拡張機能を開発するための機能、リソース、ツールのコレクションです。2021 LTS では、ゲームとアプリケーションのランタイム UI の作成とデバッグをサポートし、アーティストとデザイナーがより迅速に始めるのに役立つ直感的なワークフローを備えています。
Unity では新規 UI 開発プロジェクトに UI ツールキットを使用することを推奨していますが、Unity UI(uGUI)や IMGUI に用意されている機能により、古いシステムを使用したほうがよいケースも引き続き存在します。Unity の UI システムを比較して、自分にとってどれが適しているかを評価してください。
Runtime
uGUI is the recommended solution for the following:
- UI positioned and lit in a 3D world
- VFX with custom shaders and materials
- Easy referencing from MonoBehaviours
UI Toolkit is an alternative to uGUI if you create a screen overlay UI that runs on a wide variety of screen resolutions. Consider UI Toolkit to do the following:
- Produce work with a significant amount of user interfaces
- Require familiar authoring workflows for artists and designers
- Seek textureless UI rendering capabilities
Editor
IMGUI is the default solution for most use cases and is especially recommended for the following :
Unrestricted access to editor extensible capabilities
Some specialized control such as the TreeView
Light API to quickly render UI on screen
UI Toolkit is an alternative to IMGUI if you create complex editor tools. Consider UI Toolkit for the following:
Better reusability and decoupling
Visual tools for authoring UI
Better scalability for code maintenance and performance
Runtime = ゲームのユーザーインターフェース
Editor = エディターの拡張機能
という理解。今回焦点を置いてるのはRuntime UI。
使ってみた系記事
こちらはEditor側の使ってみた記事
思いっきりWebのUI開発に寄せた設計思想で、
- html的なUXMLで構造化を行い
- css的なUSSでスタイリングを行い
- js的なC#でインタラクションの制御する
ということらしい。
UXMLドキュメントはAssets > Create > UI Toolkit > UI Document で作成できる。
空のゲームオブジェクトにUI Documentコンポーネントを追加し、
UXMLとPanel Settingsを割り当てる。
Panel SettingはUXML をどのようにインスタンス化、視覚化するかを定義している。

UXMLの構築にはUI Builderを使用する。
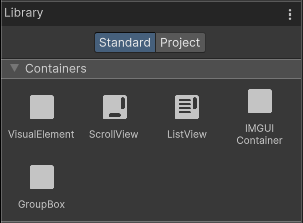
UI Builderの Containersがそれぞれどういう役割のものか調べる。

(UI ElementsはUI Toolkitの旧称)
VisualElement
VisualElement は、ビジュアルツリー内のすべてのノードの共通基本クラスです。VisualElement 基本クラスには、スタイル、レイアウトデータ、ローカルの変換、イベントハンドラーなどのプロパティが含まれています。
VisualElement には、特別なコントロールなどの、追加の動作と機能を定義するいくつかのサブクラスがあります。VisualElement は子要素を持つ場合もあります。
UIElement を使用するために、VisualElement 基本クラスから派生させる必要はありません。スタイルシートとイベントコールバックを使って、VisualElement の外観と動作をカスタマイズすることができます。
ScrollView
ScrollView displays its content inside a scrollable area. When you add content to a ScrollView, the content is added to the content container (#unity-content-container) of the ScrollView.
ListView
A ListView is a vertically scrollable area that links to and displays a list of items.
Note: The horizontal and vertical Scroller elements are standard UI Toolkit Scrollers.
IMGUI Container
Element that draws IMGUI content.
エディター拡張用IMGUIのラッパーであるという理解。
GroupBox
A GroupBox is a container element for a logical group of multiple visual elements
. You can use a combination of GroupBox and RadioButton if you want to have multiple groups of options in the same panel.
あまりVisualElementとの違いがわからないが、editor向けなのだろうか。
操作としてはUI BuilderでVisualElementでどんどん構造を作っていきつつ、レイアウトを整え、
共通化したい部分はスタイルを新規作成して、クラス名を新たに定義してVisualElementに個別にアタッチしていく形。レイアウトはFlexBox。Web開発に極めて近いが、エディターで直接コードを編集することはない。あくまでBuilder上で操作する。
UI Builder上のPreviewの画面解像度がGame Viewと異なるのが気持ち悪いので、どう調整するか調べる。
In the PanelSettings asset of your UIDocument, set "Scale Mode" to "Constant Pixel Size".
今回は、キャンバスサイズを1280×720に設定し、UI画面を作成していきます。キャンバスサイズはUI Builderウィンドウにて、Sample.uxml要素を選択することでインスペクター上にキャンバスサイズが表示されるので、そちらから変更します。
Match Game Viewというトグルもあるので、とりあえず実解像度はこれで合わせられる。
With a mobile device you usually want to go with "scale with screen size" for scale mode (at least for your HUD, probably some if not all menus) because that would make sure it works with all the form factors you need to support (you'd of course test out on either the Editor with those form factors on in actual devices). You'd use the "reference resolution" to make it scale and look good in all cases, including retina display. You can set multiple different resolutions on the Game View to test it out.
- PanelSettingsの
Scale ModeをScale With Screen Sizeに -
Reference ResolutionをGameViewのviewportに合わせたデバイスの論理ピクセルに - UI Builderの
Hierarchy欄のルートを選択してSizeにデバイスの論理ピクセルを入力 -
Viewportの右上部分のプルダウンでUnity Default Runtime Themeを選択
これでGameViewのプレビューとUI Builderのプレビューが一致する。サクサクとUIを組む準備ができた。
次はユーザーインタラクションの実装
同じくこちらの記事で考え方は理解。UI Document Componentを持っているgameObjectはUIDocumentとしてスクリプトから参照できる。UIDocument.rootVisualElementでルート要素を取得し、.Query<T>("name")で特定の要素を取得できる。このへんの設計はまんまJavaScriptのDOM。
public class UIEventHandler : MonoBehaviour
{
   [SerializeField]
   private UIDocument m_UIDocument;

   private Label m_Label;
   private int m_ButtonClickCount = 0;
   private Toggle m_Toggle;
   private Button m_Button;

   public void Start()
   {
       var rootElement = m_UIDocument.rootVisualElement;

       // This searches for the VisualElement Button named “EventButton”
       // rootElement.Query<> and rootElement.Q<> can both be used
       m_Button = rootElement.Q<Button>("EventButton");

       // Elements with no values like Buttons can register callBacks
// with clickable.clicked
       m_Button.clickable.clicked += OnButtonClicked;

       // This searches for the VisualElement Toggle named “ColorToggle”
       m_Toggle = rootElement.Query<Toggle>("ColorToggle");

       // Elements with changing values: toggle, TextField, etc...
// implement the INotifyValueChanged interface,
       // meaning they use RegisterValueChangedCallback and
// UnRegisterValueChangedCallback
       m_Toggle.RegisterValueChangedCallback(OnToggleValueChanged);

       // Cache the reference to the Label since we will access it repeatedly.
       // This avoids the relatively costly VisualElement search each time we update
       // the label.
       m_Label = rootElement.Q<Label>("IncrementLabel");
       m_Label.text = m_ButtonClickCount.ToString();
   }

   private void OnDestroy()
   {
       m_Button.clickable.clicked -= OnClicked;
       m_Toggle.UnregisterValueChangedCallback(OnToggleValueChanged);
   }

   private void OnButtonClicked()
   {
       m_ButtonClickCount++;
       m_Label.text = m_ButtonClickCount.ToString();
   }

   private void OnToggleValueChanged(ChangeEvent<bool> evt)
   {
       Debug.Log("New toggle value is: " + evt.newValue);
   }
}
各要素のスタイルには VisualElement.style からアクセスできるので、アプリの状態に応じたUIの出し分けなどはそちらから制御すれば良い。