NgOptimizedImageに入門する
はじめに
これはAngular Advent Calendar 2023 14日目の記事です。
Angular v15で実装された画像最適化ディレクティブNgOptimizedImageについて、せっかくの機会なので挑戦してみようと思います。
NgOptimizedImageとは?
Angular公式サイトによると、以下の通り。
NgOptimizedImage ディレクティブを使用すると、画像をロードするためのパフォーマンスのベストプラクティスを簡単に採用できます。
このディレクティブは、Largest Contentful Paint (LCP) 画像の読み込みが次によって優先されることを保証します:
https://angular.jp/guide/image-directive
画像サイズ・LCP要素・レイアウトシフト・レスポンシブなど、考慮することが多い画像に対しての「ベストプラクティスを簡単に採用」できます。
触ってみる
リポジトリ作成
超シンプルに。ssrも無効にしました。
$ ng new ng-optimized-image-sample -s -t --style=scss --ssr=false
まず普通に
<img src="./assets/images/ei.jpg" />
imgタグにsrcだけ書いた、いろいろ足りていない状態を用意しました。
画像にはあえて大きなもの(4032x3024, 2.12MB)を使っています。
大阪の海遊館で撮ったエイの裏側の写真です。かわいいですね。
// ng build後
<img src="./assets/images/ei.jpg">
この状態でビルドされたHTMLを見ると、上に書いたものがそのまま出力されています。
src→ngSrc
srcをngSrcに置き換えてみましょう。
<img ngSrc="./assets/images/ei.jpg" />
すると、ビルドエラーが発生しました。
main.ts:5 ERROR Error: NG02954: The NgOptimizedImage directive (activated on an <img> element with the `ngSrc="./assets/images/ei.jpg"`) has detected that these required attributes are missing: "width", "height". Including "width" and "height" attributes will prevent image-related layout shifts. To fix this, include "width" and "height" attributes on the image tag or turn on "fill" mode with the `fill` attribute.
レイアウトシフトを防ぐために、widthとheightを設定するか、fillモードにしろと言われています。
開発環境のような高速の環境だとレイアウトシフトの存在を見逃すこともあるので、警告を出してくれるのはありがたいですね。
今回はwidthとheightにそれぞれ画像のピクセル数を設定します。
<img
  ngSrc="./assets/images/ei.jpg"
  width="4032"
  height="3024"
/>
もう一つビルドエラーが発生しました。
common.mjs:6330 NG02955: The NgOptimizedImage directive (activated on an <img> element with the `ngSrc="http://localhost:4200/assets/images/ei.jpg"`) has detected that this image is the Largest Contentful Paint (LCP) element but was not marked "priority". This image should be marked "priority" in order to prioritize its loading. To fix this, add the "priority" attribute.
画像がLCP要素と判定されたために警告をしてくれています。
この場合はpriority属性を設定することで、fetchpriority="high"、loading="eager"を設定してくれます。
これらの属性によって画像の読み込み優先度が上がるため、最速で画像が表示されるようになります。
(逆に、priority属性が付与されていないimgにはfetchpriority="auto"、loading="lazy"が設定されて遅延読み込みされます)
ということでpriority属性を追加します。
<img
  ngSrc="./assets/images/ei.jpg"
  width="4032"
  height="3024"
  priority
/>
そしてブラウザのコンソールにはwarnが1つ表示されています。
main.ts:5 NG02960: The NgOptimizedImage directive (activated on an <img> element with the `ngSrc="./assets/images/ei.jpg"`) has detected that the intrinsic image is significantly larger than necessary.
Rendered image size: 1021.6w x 766.2h.
Intrinsic image size: 4032w x 3024h.
Recommended intrinsic image size: 2043.2w x 1532.4h.
Note: Recommended intrinsic image size is calculated assuming a maximum DPR of 2. To improve loading time, resize the image or consider using the "ngSrcset" and "sizes" attributes.
画像が大きすぎることを警告されています。
画像を縮小するか、ngSrcsetとsizes属性を利用して画像の出し分けをするか、いずれかを薦められていますが、いったんシンプルに画像を縮小し、widthとheightを画像サイズに合わせることとします。
<img
  ngSrc="./assets/images/ei_compressed.jpg"
  width="1024"
  height="768"
  priority
/>
この時点でproduction buildすると、出力されるHTMLはこうなります。
普段自分では意識してない属性が追記されてる、と思う方も居られるのではないでしょうか。
私はloadingやfetchpriorityを初めて使いました。
<img
     ngsrc="./assets/images/ei_compressed.jpg"
     width="1024"
     height="768"
     priority=""
     loading="eager"
     fetchpriority="high"
     ng-img="true"
     src="./assets/images/ei_compressed.jpg">
Image Loader&レスポンシブ
画像CDNを使うときに便利な機能です。
imgタグのsrc属性にPipeを噛ませるような形で、パスをImage Loader側で変更することができます。
Cloudflareやimgixで画像を配信している場合、パラメータなども自動で調整されるので、特に意識すること無く画面幅による画像の出し分けも可能です。
ということで無料プランのあるimgixに最初の画像を用意しました。この時点では圧縮されていません。
そして、providersにprovideImgixLoaderを追加し、ngSrc要素のパスをファイル名のみに変更します。
  template: `
    <img
      ngSrc="./assets/images/ei_compressed.jpg"
      width="1024"
      height="768"
      priority
    />
  `,
↓
  providers: [provideImgixLoader('https://hoshima.imgix.net/')],
  template: `
    <img
      ngSrc="ei.jpg"
      width="1024"
      height="768"
      priority
    /> `,
出力されるHTMLはこうなります。srcset属性が追加され、画面サイズごとに画像の出し分けがされるようになりました。
srcsetの内容は自動で計算されますが、自分で設定することもできます。
<img
ngsrc="ei.jpg"
width="1024"
height="768"
priority=""
loading="eager"
fetchpriority="high"
ng-img="true"
src="https://hoshima.imgix.net/ei.jpg?auto=format"
srcset="https://hoshima.imgix.net/ei.jpg?auto=format&w=1024 1x, https://hoshima.imgix.net/ei.jpg?auto=format&w=2048 2x">
LightHouseのBefore/After
GitHub PagesにデプロイしてPageSpeed Insightsやろうとしたらできなかった。SPA on GitHub Pagesだとrootパス以外はステータスコード404を返すんですね…
なのでビルド成果物に対してローカルサーバー立てて実行したLightHouseの結果ですので、参考程度にお考えください。
最適化前
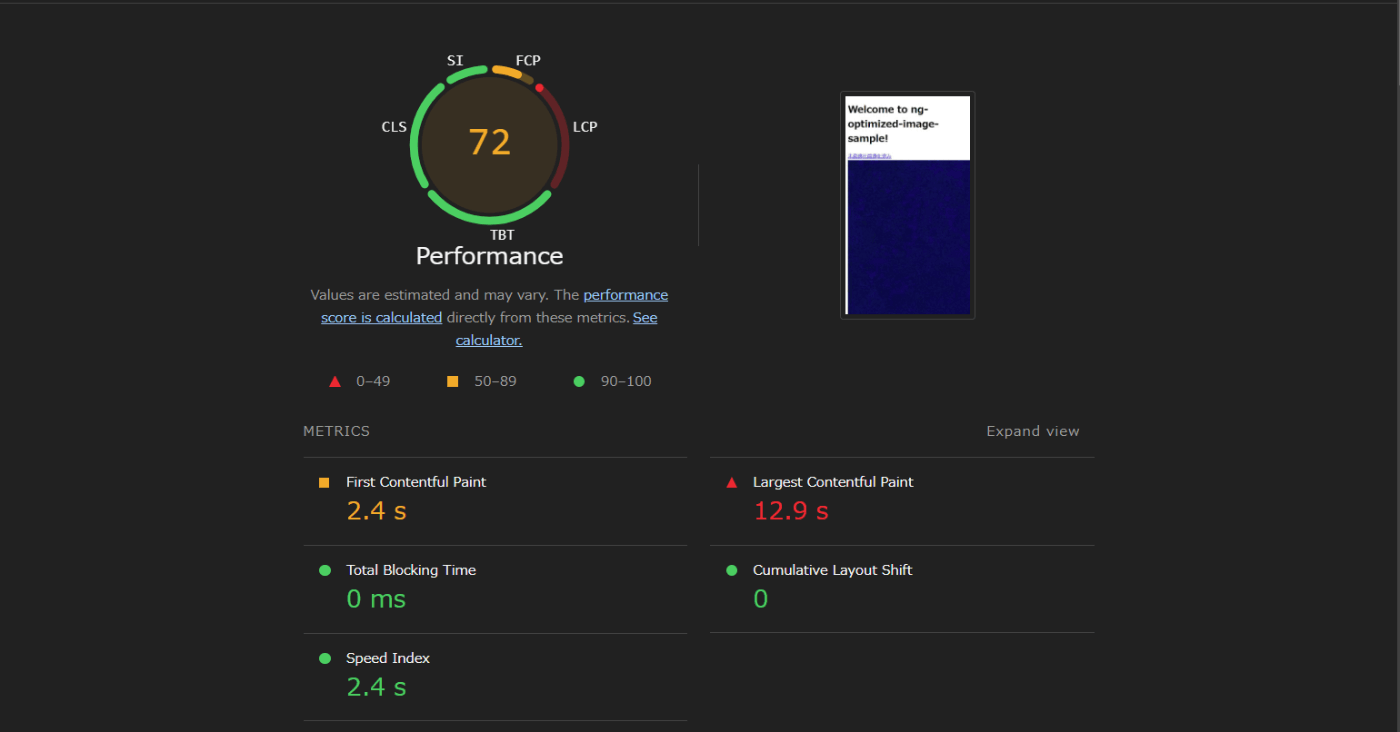
最適化後

公式の宣伝文句の通り、LCPのスコアが大幅に向上しています。(画像のCDN化の恩恵も大きそうですけど)
まとめ
画像のベストプラクティスっていろいろあって判断が難しいので、Angularの指摘に従うだけでかなり効果があるのはとても助かります。
あとimgixを今回初めて知ったのですが、これ便利そうですね。
ソースコードはこちら。
Discussion