NextJS+TypeScript+TailwindCSS+AWS Amplify 環境構築
前提
環境
| 項目 | 内容 |
|---|---|
| OS | macOS Monterey |
| パッケージマネージャ | yarn |
| エディター | VS Code |
ターゲット
Next JS を学習し始めた過去の自分へ。
同じ状態の方へ参考になれば幸いです。
作業フォルダの作成
ここでは[~/documents/develop/example]を作業フォルダにします。
cd documents/develop
mkdir  example
cd $_
code .
NextJS+TypeScriptのインストール。
ここでは今いる[example]ディレクトリにインストールします。
yarn create next-app --typescript .
TailwindCSSのインストール
yarn add tailwindcss postcss autoprefixer
yarn tailwindcss init -p
tailwind.config.jsを下記に書き換え
/** @type {import('tailwindcss').Config} */
module.exports = {
  content: [
    "./src/pages/**/*.{js,ts,jsx,tsx}",
    "./src/components/**/*.{js,ts,jsx,tsx}",
  ],
  theme: {
    extend: {},
  },
  plugins: [],
}
globals.cssに下記を追記
@tailwind base;
@tailwind components;
@tailwind utilities;
GitHubの設定・連携
- GitHub|Login
- 新規リポジトリ作成。ここでは[example]

| 項目 | 内容 |
|---|---|
| Owner | GitHubのユーザー名 |
| Repository name | example |
| Authority | Private |
- GitHub連携
基本的には …or push an existing repository from the command line の案内通り進める。

git remote add origin https://github.com/GitHubのユーザー名|/example.git
git branch -M main
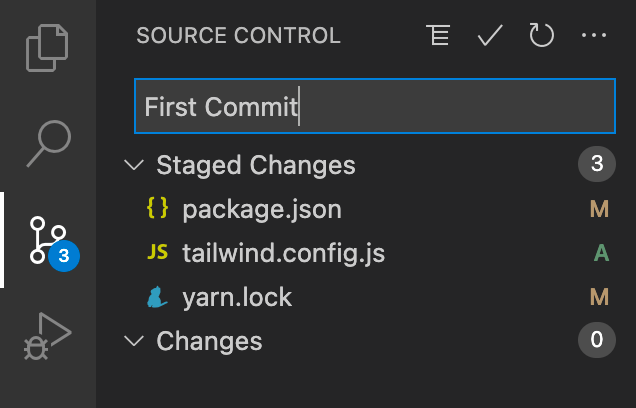
ここで、[First Commit]というタイトルでコミット(⌘+Enter)しておく。
git push -u origin main
- GitHubに戻ってちゃんとファイルが反映されていたら完了。
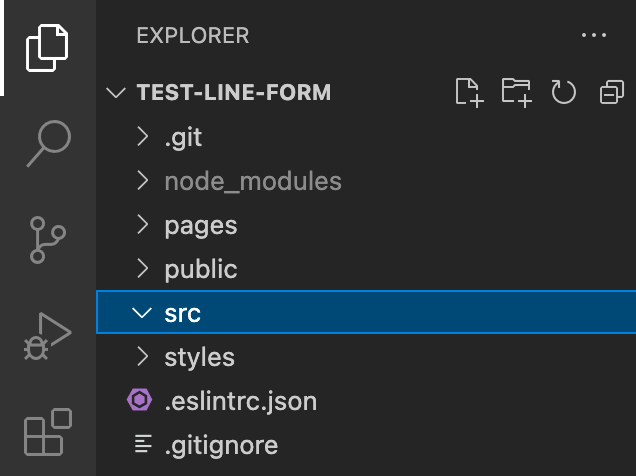
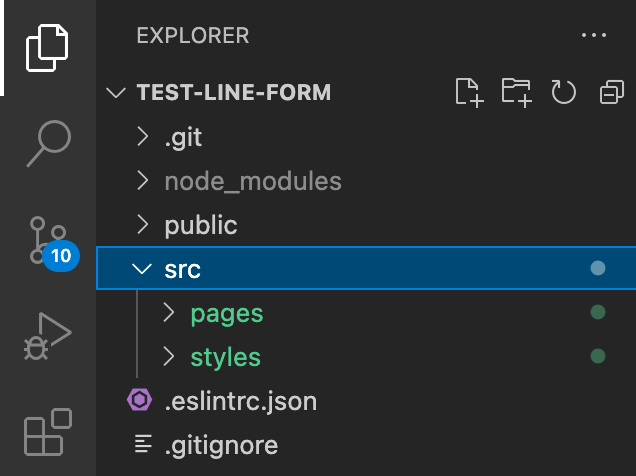
pagesとstylesをsrcに移動
mkdir src
mv styles src/styles
mv pages src/pages
必要ないファイルを削除
- Home.module.css
デフォルトの内容を書き換え
index.tsx
import Head from 'next/head'


const Home = () => {
  return (
    <>
      <Head>
        <title>Create Next App</title>
        <meta name="description" content="Generated by create next app" />
        <link rel="icon" href="/favicon.ico" />
      </Head>

      <main>
        <h1 className='text-5xl text-red-500'>Check Tailwind CSS</h1>
      </main>
    </>
  );
}

export default Home
TailwindCSSが効いているか確認する
yarn dev
http://localhost:3000を開いて、赤色の大文字で「Check Tailwind CSS」と表示されていたら成功。
(ダークモード時には背景が黒くなる。)


Tailwind CSS ライブラリを追加
よく使うライブラリを追加しておく。
- (Daisy UI)[https://daisyui.com/docs/install/]
- (Flowbite)[https://flowbite.com/docs/getting-started/quickstart/]
yarn add daisyui flowbite flowbite-react --save
tailwind.config.js
/**
 * @type {import('@types/tailwindcss/tailwind-config').TailwindConfig}
 */
module.exports = {
  content: [
    "./node_modules/flowbite/**/*.js",
    "./node_modules/flowbite-react/**/*.js",
    "./public/**/*.html",
    "./src/**/*.{ts,tsx}",
  ],
  plugins: [
    require("daisyui"),
    require("flowbite/plugin")
  ],
  daisyui: {
    themes: ["light"]
  },
  theme: {},
};
Flowbite の動作チェック
index.tsxを書き換える
import { Alert } from 'flowbite-react'
import type { NextPage } from 'next'
import Head from 'next/head'

const Home: NextPage = () => {
  return (
    <>
      <Head>
        <title>Create Next App</title>
        <meta name="description" content="Generated by create next app" />
        <link rel="icon" href="/favicon.ico" />
        <script src="../path/to/flowbite/dist/flowbite.js"></script>
      </Head>

      <main>
        <h1 className='text-5xl text-red-500'>Check Tailwind CSS</h1>
        <div>
        <Alert color="info">Alert!</Alert>
        </div>
      </main>
    </>

  )
}

export default Home
他のコンポーネントはTailwind CSS Componentsで確認できる。
このコンポーネントでスタイルを変える方法がわかる方、教えてください。
例えばNavbarのメニューをホバーした時の色を変えたい場合など。
<Navbar
  fluid={true}
  rounded={true}
>
  ・・・省略・・・
  <Navbar.Toggle />
  <Navbar.Collapse>
    <Navbar.Link
      href="/navbars"
      active={true}
    >
      Home
    </Navbar.Link>
  ・・・省略・・・
  </Navbar.Collapse>
</Navbar>
<Navbar
  fluid={true}
  rounded={true}
>
  ・・・省略・・・
  <Navbar.Toggle />
  <Navbar.Collapse>
    <Navbar.Link
      href="/navbars"
      active={true}
      className='hover:text-red-500' //追加
    >
      Home
    </Navbar.Link>
  ・・・省略・・・
  </Navbar.Collapse>
</Navbar>
その他ライブラリのインストール
React-icon
yarn add react-icons --save
AOS
yarn add aos@next @types/aos
Typscriptを使用する場合は@types/aosをインストールしないと、下記の『import AOS from 'aos';』で型定義されていないとエラーが出る↓
Could not find a declaration file for module 'aos'. '/Users/*****/my-project/node_modules/aos/dist/aos.cjs.js' implicitly has an 'any' type.
  Try `npm i --save-dev @types/aos` if it exists or add a new declaration (.d.ts) file containing `declare module 'aos';`ts(7016)
各ファイルに追記
・・・省略・・・

import AOS from 'aos';
import 'aos/dist/aos.css';

function MyApp({ Component, pageProps }: AppProps) {

  React.useEffect(() => {
    AOS.init();
  }, []);

・・・省略・・・
・・・省略・・・

  options: {
    whitelistPatterns: ["./node_modules/aos/dist/aos.css"],
  },

・・・省略・・・
Tailwindのpurge機能でAOSのアニメーションクラスが消えてしまうのでoptions{whitelistPatterns}でAOSのスタイルを指定する必要がある。
Tailwind CSS でいつも使う設定
各サービスのカラーコード
SNSなどのアイコンを追加するときなど、公式のカラーコードをクラス名として使いたい。
Tailwind CSSには [color] を追加することで任意の色を設定できる。
<!-- どちらも同じ白い文字になる -->
<div class="text-white">白い文字</div>
<div class="text-[#fff]">白い文字</div>
これをもっと直感的にしたい。
<div class="text-twitter">ツイッター</div>
<div class="text-insta">インスタグラム</div>
そのためにはTailwind CSSが用意している theme.extend.colors を使う。
tailwind.config.jsに下記を追記すればOK。
  theme: {
    extend: {
      colors: {
        twitter: '#1DA1F2',
        facebook: '#4267B2',
        insta: '#e76750',
        line: '#06c755',
      }
    }
  },
//CRM URL without trialing/
//Example: http://yourdomain.com/crm
'crm.url' => 'https://{ドメイン}/{CRM file}',

//Portal URL without trialing/
//Example: http://yourdomain.com/portal
- 'portal.url' => 'http://example.co.jp/portal',
+ 'portal.url' => 'https://nits.holykzm.work/portal',

'crm.version' => '7.3.6', // Framework version for API
config.inc.phpを変更
// url for customer portal (Example: http://vtiger.com/portal)
+ $PORTAL_URL = 'https://{ドメイン}/portal';
api.phpを変更
/htdocs/{CRM file}/modules/CustomerPortal/api.php
の <?php すぐ下に下記を追加
list($_SERVER['PHP_AUTH_USER'], $_SERVER['PHP_AUTH_PW']) = explode(':' , base64_decode(substr($_SERVER['HTTP_AUTHORIZATION'], 6)));