My Tips
クラスメソッドとスタティックメソッドの違い
クラスのインスタンスを必要とせず、共にクラス自身に紐付くメソッドではあるが、両者にはオーバーライド可能か否かという点で違いがある。クラスメソッドはオーバーライド可能、スタティックメソッドはオーバーライド不可である。
class Child {
    class func morningGreeting() {
        print("Good morning.")
    }

    static func nightGreeting() {
        print("Good evening.")
    }
}

class Parent: Child {
    // オーバーライド可能
    class override func morningGreeting() {
        print("Good morning!!!")
    }

    // オーバーライド不可(エラー発生)
    override static func nightGreeting() {
        print("Good evening!!!")
    }
}
クラスと構造体の一意性について
クラスは明示的にIdentifiableに準拠させることで、自動的にidプロパティを持つ。ヒープ領域を使用する参照型の特徴によるものか。
class C: Identifiable {}

let c1 = C()
let c2 = C()

print(c1.id) // ObjectIdentifier(0x0000600000014550)
print(c2.id) // ObjectIdentifier(0x00006000000143a0)
構造体の場合、一意性を保証するにはHashableなidを持たせる必要がある。これによりIdentifiableプロトコルに準拠する。
struct S: Identifiable {
    let id = UUID()
}

let s1 = S()
let s2 = S()
print(s1) // S(id: 6865FA7D-AE99-4C20-951B-6664635F781B)
print(s2) // S(id: BF19C9D6-59B1-48DD-A06B-BD5D2A9307EC)
The CFBundleVersion of an app extension ('1') must match that of its containing parent app ('2').
ウィジェットに対する警告。アプリターゲットのビルド番号とウィジェットターゲットのビルド番号が異なる際に表示される。
ウィジェットターゲットの「Build Settings > Versioning > Current Project Version」をアプリターゲットと同じ番号に設定する。
※ 念の為、アプリターゲットのバージョン番号とウィジェットのマーティング番号も揃える。
NSLayoutConstraintによる警告の回避
UIConstraintBasedLayoutLogUnsatisfiableをfalseに設定する。
@main
struct TestApp: App {
    var body: some Scene {
        WindowGroup {
            ContentView()
                .onAppear {
#if DEBUG
                    UserDefaults.standard.set(true, forKey: "_UIConstraintBasedLayoutLogUnsatisfiable")
#endif
                }
        }
    }
}
対症療法のような気もするが、なぜか下記のようなシンプルなものにも警告が出てくる。
TextField("Placeholder", text: $text)
    .toolbar {
        ToolbarItemGroup(placement: .keyboard) {
            Button("Button", action: {})
            Button("Button", action: {})
            Button("Button", action: {})
        }
    }
Apple Services Marketing Tools Apple Design Resources Product Bezels
Swift Packageの作成から使用まで
- GitHubでリモートリポジトリを作成
- 任意のディレクトリにクローン
- パッケージ作成:swift package init --type library -- name パッケージ名 (Xcodeで作成すると階層がめんどい。やってみりゃわかる。)
- Packageのイニシャライザの引数platformsに[SupportedPlatform.iOS(.v16), SupportedPlatform.macOS(.v13)]を指定(たぶんミニマムバージョン)。引数platformsはnameの次に記入。
- パッケージ名.swiftにシンボル(クラスや関数)を記入 ※ イニシャライザにもpublicをつけることを忘れずに!
- commitを済ませた後にGitHubにpush
- GitHubにてReleaseを作成 「github.com/username/repositoryname」に「tag」ってのがある。そこで作成する。Releaseはタグに対してつけるタグ?みたいな感じで、タグがなきゃつけられない模様。
- 適当なプロジェクトを作成する
- 「Project > Package Dependencies」の「+」を押下し、GitHubのリポジトリURLを入力し、パッケージを追加
- ライブラリをインポートして使用する
参考 色々知れそう
@StateObjectと@ObservedObjectの初期化
struct ContentView: View {
    @StateObject private var viewModel: ContentViewModel
    init() {
        self._viewModel = StateObject(wrappedValue: ContentViewModel())
    }

    var body: some View {
        Text("Sample")
    }
}
await MainActor.run {
    doSomething()
}
// 既にメインスレッドである場合は即時実行される。

Task { @MainActor in
    doSomething()
}
// 次のRunLoop
printChanges
Viewのbodyが再計算されたときに、どのプロパティが変更されたのかをコンソールに出力
import SwiftUI

struct ContentView: View {
    @State private var num = 10000

    var body: some View {
        let _ = Self._printChanges()

        Button {
            num = Int.random(in: 10000...99999)
        } label: {
            Text(String(num))
        }
        .buttonStyle(.borderedProminent)
    }
}

#Preview {
    ContentView()
}

// 出力
// ContentView: @self, @identity, _num changed.
// ContentView: _num changed.
// ContentView: _num changed.
// ContentView: _num changed.
XCodeのPreviewがクラッシュした場合の対処
- Previewで.environmentObject忘れの確認
- 表示するViewのイニシャライザの確認
- どこかしらに「.infinety」がある
NavigationPathを使用する際の注意点
NavigationLinkの引数valueにnavigationDestination(for:destination:)で設定されていない型があってもコンパイルエラーが出ない
struct ContentView: View {
    var body: some View {
        NavigationStack {
            List {
                NavigationLink("1", value: 1)
                NavigationLink("2", value: "2") // String
            }
            .navigationDestination(for: Int.self) { num in
                Text(num.description)
            }
        }
    }
}
単純な変換をmapを用いて行う場合は以下の書き方が便利。Optional, Result, Arrayでも以下の書き方は使える。
func convertToKanji(from num: Int) -> String {
    return switch num {
    case 1: "一"
    case 2: "二"
    case 3: "三"
    default: "不明"
    }
}

let subject = PassthroughSubject<Int, Never>()
let subscription = subject
    .map(convertToKanji(from:))
//    .map({ num in
//        convertToKanji(from: num)
//    })
    .sink { str in
        print(str)
    }

subject.send(1)
subject.send(2)
subject.send(3)
subject.send(4)
Modifier: toolbarTitleMenu
おそらくタイトルのディスプレイモードをインラインに指定しなければ機能しない。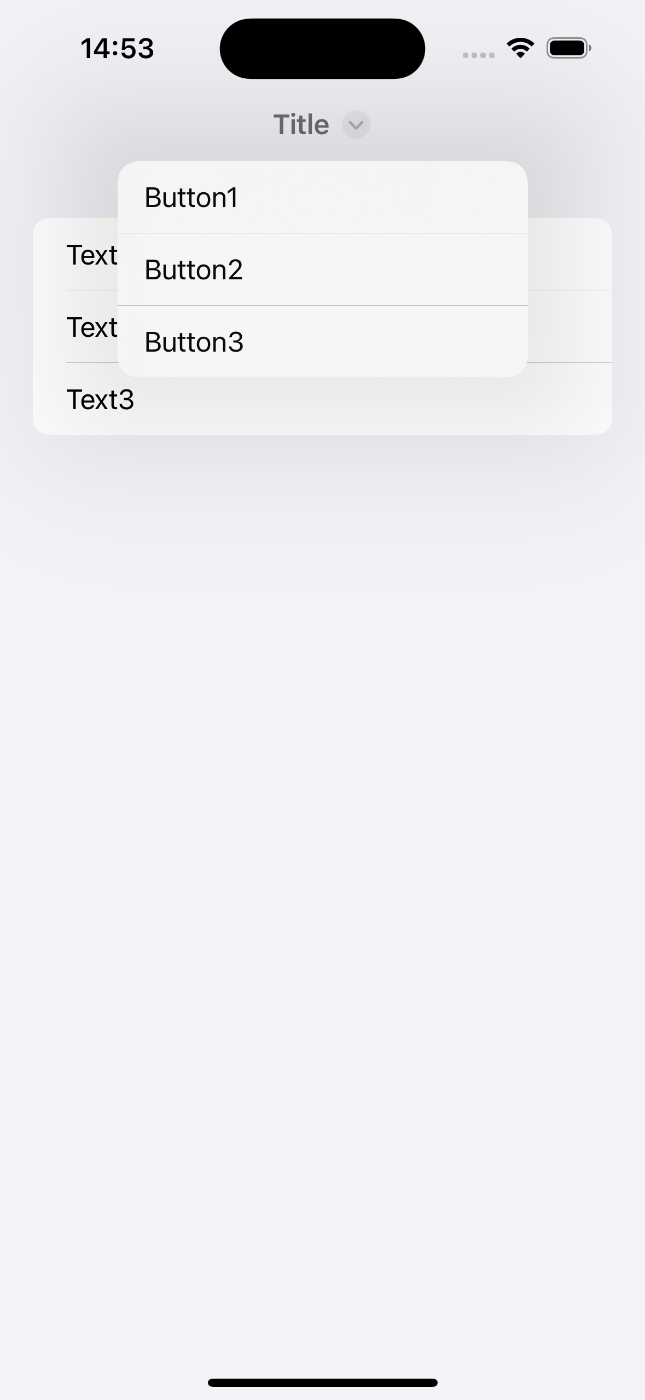
import SwiftUI

struct ContentView: View {
    var body: some View {
        NavigationStack {
            List {
                Text("Text1")
                Text("Text2")
                Text("Text3")
            }
            .navigationTitle("Title")
            .navigationBarTitleDisplayMode(.inline)
            .toolbarTitleMenu {
                Button("Button1") { print("Button1 pushed") }
                Button("Button2") { print("Button2 pushed") }
                Button("Button3") { print("Button3 pushed") }
            }
        }
    }
}

#Preview {
    ContentView()
}
Modifier: containerRelativeFrame
いつぞやに少々話題となっていたcontainerRelativeFrame。
最上位?の親Viewのサイズに応じたサイズを指定できる。要調査。

struct ContentView: View {
    var body: some View {
        NavigationStack {
            Text("25%")
                .foregroundStyle(.white)
                .frame(height: 100)
                .containerRelativeFrame(.horizontal) { length, _ in
                    return length * 0.25
                }
                .background(.pink)
            Text("50%")
                .frame(height: 100)
                .containerRelativeFrame(.horizontal) { length, _ in
                    return length * 0.5
                }
                .background(.blue)
            Text("75%")
                .frame(height: 100)
                .containerRelativeFrame(.horizontal) { length, _ in
                    return length * 0.75
                }
                .background(.green)
        }
        .font(.title2.bold())
        .foregroundStyle(.white)
    }
}
SwiftUI ContextMenu

struct ContentView: View {
    var body: some View {
        Text("Hello, world.")
            .padding()

            // previewなし
            .contextMenu(ContextMenu(menuItems: {
                Button("Button1", action: { print("Button1 pushed") })
                Button("Button2", action: { print("Button2 pushed") })
                Button("Button3", action: { print("Button3 pushed") })
            }))

//            // previewあり
//            .contextMenu {
//                Button("Button1", action: { print("Button1 pushed") })
//                Button("Button2", action: { print("Button2 pushed") })
//                Button("Button3", action: { print("Button3 pushed") })
//            } preview: {
//                Text("This is preview.")
//                    .padding()
//            }

    }
}
safeAreaPadding
iOS17以降
ScrollViewのStackに対してSafeAreaを付与している。

struct ContentView: View {
    var body: some View {
        VStack(spacing: 50.0) {
            ScrollView(.horizontal) {
                HStack(spacing: 10.0) {
                    ForEach(0..<10) { _ in
                        Text("safeAreaPadding適用前")
                    }
                }
            }
            .padding(.vertical)
            .border(.pink)
            ScrollView(.horizontal) {
                HStack(spacing: 10.0) {
                    ForEach(0..<10) { _ in
                        Text("safeAreaPadding適用前")
                    }
                }
            }
            .safeAreaPadding(.horizontal, 20.0)
            .padding(.vertical)
            .border(.blue)
        }
    }
}

 Image(systemName: "rectangle.inset.filled.and.person.filled")
            .resizable()
            .scaledToFit()
            .frame(width: 100, height: 100)
            .foregroundStyle(.pink, .yellow)