LINUXで動かしながら学ぶTCP/IPネットワーク入門 読書メモ
付録の通りvagrant&virtualboxでubuntuを立ち上げ、ssh。
> vagrant up
> vagrant ssh
vagrant@ubuntu-focal:~$ lsb_release -a
No LSB modules are available.
Distributor ID:	Ubuntu
Description:	Ubuntu 20.04.3 LTS
Release:	20.04
Codename:	focal
はじめは付録に気づかずに、virtualboxでubutu立ち上げたが、画面のリサイズやコピペできるように設定が必要だったりして、面倒だったので付録に従った方が楽。
コマンドラインでの操作なので無駄にGUIもいらないし
vagrant@ubuntu-focal:~$ ping -c 3 8.8.8.8
PING 8.8.8.8 (8.8.8.8) 56(84) bytes of data.
64 bytes from 8.8.8.8: icmp_seq=1 ttl=63 time=8.89 ms
64 bytes from 8.8.8.8: icmp_seq=2 ttl=63 time=14.5 ms
64 bytes from 8.8.8.8: icmp_seq=3 ttl=63 time=9.38 ms

--- 8.8.8.8 ping statistics ---
3 packets transmitted, 3 received, 0% packet loss, time 2004ms
rtt min/avg/max/mdev = 8.892/10.934/14.533/2.552 ms
vagrant@ubuntu-focal:~$ ip address show
1: lo: <LOOPBACK,UP,LOWER_UP> mtu 65536 qdisc noqueue state UNKNOWN group default qlen 1000
    link/loopback 00:00:00:00:00:00 brd 00:00:00:00:00:00
    inet 127.0.0.1/8 scope host lo
       valid_lft forever preferred_lft forever
    inet6 ::1/128 scope host
       valid_lft forever preferred_lft forever
2: enp0s3: <BROADCAST,MULTICAST,UP,LOWER_UP> mtu 1500 qdisc fq_codel state UP group default qlen 1000
    link/ether 02:c3:e3:75:4c:36 brd ff:ff:ff:ff:ff:ff
    inet 10.0.2.15/24 brd 10.0.2.255 scope global dynamic enp0s3
       valid_lft 85617sec preferred_lft 85617sec
    inet6 fe80::c3:e3ff:fe75:4c36/64 scope link
       valid_lft forever preferred_lft forever
vagrant@ubuntu-focal:~$ ping -c 3 127.0.0.1
PING 127.0.0.1 (127.0.0.1) 56(84) bytes of data.
64 bytes from 127.0.0.1: icmp_seq=1 ttl=64 time=0.050 ms
64 bytes from 127.0.0.1: icmp_seq=2 ttl=64 time=0.027 ms
64 bytes from 127.0.0.1: icmp_seq=3 ttl=64 time=0.021 ms

--- 127.0.0.1 ping statistics ---
3 packets transmitted, 3 received, 0% packet loss, time 2044ms
rtt min/avg/max/mdev = 0.021/0.032/0.050/0.012 ms
pingを打って、tcpdumpで確認
vagrant@ubuntu-focal:~$ ping -c 3 8.8.8.8
PING 8.8.8.8 (8.8.8.8) 56(84) bytes of data.
64 bytes from 8.8.8.8: icmp_seq=1 ttl=63 time=8.20 ms
64 bytes from 8.8.8.8: icmp_seq=2 ttl=63 time=19.0 ms
64 bytes from 8.8.8.8: icmp_seq=3 ttl=63 time=8.99 ms

--- 8.8.8.8 ping statistics ---
3 packets transmitted, 3 received, 0% packet loss, time 2020ms
rtt min/avg/max/mdev = 8.196/12.072/19.028/4.928 ms
vagrant@ubuntu-focal:~$ sudo tcpdump -tn -i any icpm
tcpdump: can't parse filter expression: syntax error
vagrant@ubuntu-focal:~$ sudo tcpdump -tn -i any icmp
tcpdump: verbose output suppressed, use -v or -vv for full protocol decode
listening on any, link-type LINUX_SLL (Linux cooked v1), capture size 262144 bytes
IP 10.0.2.15 > 8.8.8.8: ICMP echo request, id 3, seq 1, length 64
IP 8.8.8.8 > 10.0.2.15: ICMP echo reply, id 3, seq 1, length 64
IP 10.0.2.15 > 8.8.8.8: ICMP echo request, id 3, seq 2, length 64
IP 8.8.8.8 > 10.0.2.15: ICMP echo reply, id 3, seq 2, length 64
IP 10.0.2.15 > 8.8.8.8: ICMP echo request, id 3, seq 3, length 64
IP 8.8.8.8 > 10.0.2.15: ICMP echo reply, id 3, seq 3, length 64
tcpdumpの引数とオプション。
-
-t: 時刻に関する情報を出力しない -
-n: IPアドレスを逆引きしない -
-i ネットワークインターフェース: パケットキャプチャする対象のネットワークインターフェースを指定。anyで全て。
tcpdum オプション キャプチャ対象
sudo tcpdump -tn -i any icpm
↓
sudo tcpdump -tn -i any icmp
vagrant@ubuntu-focal:~$ traceroute -n 8.8.8.8
traceroute to 8.8.8.8 (8.8.8.8), 30 hops max, 60 byte packets
 1  10.0.2.2  0.078 ms  0.054 ms  0.044 ms
 2  192.168.3.1  32.982 ms  32.970 ms  32.958 ms
 3  221.111.179.174  39.307 ms  39.291 ms  39.278 ms
 4  221.111.179.173  39.188 ms  39.172 ms  39.157 ms
 5  * * *
 6  74.125.146.69  39.939 ms  39.897 ms  40.661 ms
 7  * * *
 8  8.8.8.8  9.873 ms  56.210 ms  58.009 ms
各行はパケットが通過したルーター。
tracerouteコマンドの仕組み
パケットのヘッダにはTTLというフィールドがある。
フィールドには0~255が入る。
TTLの値はパケットを送り出すノードが初期値を設定し、ルーターを通過するたびに1ずつ減る。
値が0になるとそのパケットはルーターによって破棄される。
パケットを破棄したルーターはICMPで時間切れのメッセージをパケットの送信元に送る(送らないように設定もできる)。
tracerouteコマンドは値を1ずつ増やしたパケットを送信し、意図的に経路上のルーターでパケットを破棄させてICMPを送るようにする。
ちなみに、時間切れのメッセージを送らないようになっているルーターは* * *になっている。
ルーティングテーブルの確認
vagrant@ubuntu-focal:~$ ip route show
default via 10.0.2.2 dev enp0s3 proto dhcp src 10.0.2.15 metric 100
10.0.2.0/24 dev enp0s3 proto kernel scope link src 10.0.2.15
10.0.2.2 dev enp0s3 proto dhcp scope link src 10.0.2.15 metric 100
| 宛先 | ネクストホップ |
|---|---|
| default | via 10.0.2.2 |
| 10.0.2.0/24 | dev enp0s3 |
| 10.0.2.2 | dev enp0s3 |
ネクストホップ: パケットを次に渡す相手
default: 他のどの宛先にも該当しない場合
dev enp0s3: ネットワークインターフェースを使って通信。今回では、自分自身がそこに直接つながっているので、ネクストホップのルータを介さずに通信できるという意味。
ここから推測できるネットワーク

vagrant@ubuntu-focal:~$ sudo ip netns add helloworld
vagrant@ubuntu-focal:~$ ip netns list
helloworld
vagrant@ubuntu-focal:~$ sudo ip netns exec helloworld ip address show
1: lo: <LOOPBACK> mtu 65536 qdisc noop state DOWN group default qlen 1000
    link/loopback 00:00:00:00:00:00 brd 00:00:00:00:00:00
helloworldというNetwork Namespaceを作成し、helloworld上でip address showコマンドを実行。
vagrant@ubuntu-focal:~$ sudo ip netns exec helloworld ip route show
Error: ipv4: FIB table does not exist.
Dump terminated
ルーティングテーブルがないので上記のコマンドはエラーになる。
Network Namespaceを二つ作成し、ネットワークインターフェースでそれを繋ぎ、pingで疎通確認を行ったがターミナルを閉じてしまったので記載できず、、
次の複数のセグメントをルーターで繋ぐところに移る。
今回作成するネットワーク
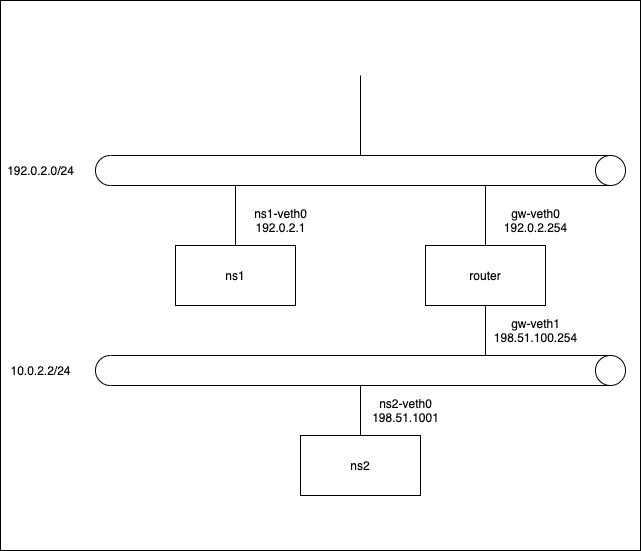
Network Namespaceを追加
vagrant@ubuntu-focal:~$ sudo ip netns add ns1
vagrant@ubuntu-focal:~$ sudo ip netns add router
vagrant@ubuntu-focal:~$ sudo ip netns add ns2
ネットワークインターフェース作成
vagrant@ubuntu-focal:~$ sudo ip link add ns1-veth0 type veth peer name gw-veth0
vagrant@ubuntu-focal:~$ sudo ip link add ns2-veth0 type veth peer name gw-veth1```
Network Namespaceに作成したネットワークインターフェースを追加
vagrant@ubuntu-focal:~$ sudo ip link set ns1-veth0 netns ns1
vagrant@ubuntu-focal:~$ sudo ip link set gw-veth0 netns router
vagrant@ubuntu-focal:~$ sudo ip link set gw-veth1 netns router
vagrant@ubuntu-focal:~$ sudo ip link set ns2-veth0 netns ns2
ネットワークインターフェースのUP
vagrant@ubuntu-focal:~$ sudo ip netns exec ns1 ip link set ns1-veth0 up
vagrant@ubuntu-focal:~$ sudo ip netns exec router ip link set gw-veth0 up
vagrant@ubuntu-focal:~$ sudo ip netns exec router ip link set gw-veth1 up
vagrant@ubuntu-focal:~$ sudo ip netns exec ns2 ip link set ns2-veth0 up
ネットワークインターフェースにIPアドレスを付与。
ちなみにルーターのIPにはセグメントの先頭or末尾を指定することが多いらしい。ホスト部がすべて1のアドレスはブロードキャストアドレスなのでホストアドレスとしては使えない。同じくホスト部がすべて0のアドレスはネットワークアドレスなので使えない。
vagrant@ubuntu-focal:~$ sudo ip netns exec ns1 ip address add 192.0.2.1/24 dev ns1-veth0
vagrant@ubuntu-focal:~$ sudo ip netns exec router ip address add 192.0.2.254/24 dev gw-veth0
vagrant@ubuntu-focal:~$ sudo ip netns exec router ip address add 198.51.100.254/24 dev gw-veth1
vagrant@ubuntu-focal:~$ sudo ip netns exec ns2 ip address add 198.51.100.1/24 dev ns2-veth0
まずセグメント内での疎通確認。
vagrant@ubuntu-focal:~$ sudo ip netns exec ns1 ping -c 3 192.0.2.254 -I 192.0.2.1
PING 192.0.2.254 (192.0.2.254) from 192.0.2.1 : 56(84) bytes of data.
64 bytes from 192.0.2.254: icmp_seq=1 ttl=64 time=0.029 ms
64 bytes from 192.0.2.254: icmp_seq=2 ttl=64 time=0.023 ms
64 bytes from 192.0.2.254: icmp_seq=3 ttl=64 time=0.023 ms

--- 192.0.2.254 ping statistics ---
3 packets transmitted, 3 received, 0% packet loss, time 2053ms
rtt min/avg/max/mdev = 0.023/0.025/0.029/0.003 ms
vagrant@ubuntu-focal:~$ sudo ip netns exec ns2 ping -c 3 198.51.100.254 -I 198.51.100.1
PING 198.51.100.254 (198.51.100.254) from 198.51.100.1 : 56(84) bytes of data.
64 bytes from 198.51.100.254: icmp_seq=1 ttl=64 time=0.123 ms
64 bytes from 198.51.100.254: icmp_seq=2 ttl=64 time=0.023 ms
64 bytes from 198.51.100.254: icmp_seq=3 ttl=64 time=0.019 ms

--- 198.51.100.254 ping statistics ---
3 packets transmitted, 3 received, 0% packet loss, time 2028ms
rtt min/avg/max/mdev = 0.019/0.055/0.123/0.048 ms
次にルーター越しの疎通確認。
vagrant@ubuntu-focal:~$ sudo ip netns exec ns1 ping -c 3 198.51.100.254 -I 192.0.2.1
PING 198.51.100.254 (198.51.100.254) from 192.0.2.1 : 56(84) bytes of data.
ping: sendmsg: Network is unreachable
ping: sendmsg: Network is unreachable
ping: sendmsg: Network is unreachable

--- 198.51.100.254 ping statistics ---
3 packets transmitted, 0 received, 100% packet loss, time 2034ms
失敗。ルーティングテーブルを設定してないので想定通り。
ns1とns2のルーティングテーブルに、defaultとしてルーターのIPアドレスを設定
vagrant@ubuntu-focal:~$ sudo ip netns exec ns1 ip route add default via 192.0.2.254
vagrant@ubuntu-focal:~$ sudo ip netns exec ns2 ip route add default via 198.51.100.254
再度疎通確認し、成功。
vagrant@ubuntu-focal:~$ sudo ip netns exec ns1 ping -c 3 198.51.100.254 -I 192.0.2.1
PING 198.51.100.254 (198.51.100.254) from 192.0.2.1 : 56(84) bytes of data.
64 bytes from 198.51.100.254: icmp_seq=1 ttl=64 time=0.016 ms
64 bytes from 198.51.100.254: icmp_seq=2 ttl=64 time=0.023 ms
64 bytes from 198.51.100.254: icmp_seq=3 ttl=64 time=0.031 ms

--- 198.51.100.254 ping statistics ---
3 packets transmitted, 3 received, 0% packet loss, time 2048ms
rtt min/avg/max/mdev = 0.016/0.023/0.031/0.006 ms
ちなみにこのとき、カーネルパラメーターnet.ipv4.ip_forwardが0の場合、失敗するらしいがなぜか0に設定してもpingが通った。。なぜ?
agrant@ubuntu-focal:~$ sudo ip netns exec router sysctl net.ipv4.ip_forward=0
net.ipv4.ip_forward = 0
vagrant@ubuntu-focal:~$ sudo ip netns exec router sysctl -a | grep ipv4.ip_forward
net.ipv4.ip_forward = 0
net.ipv4.ip_forward_update_priority = 1
net.ipv4.ip_forward_use_pmtu = 0
vagrant@ubuntu-focal:~$ sudo ip netns exec ns1 ping -c 3 198.51.100.254 -I 192.0.2.1
PING 198.51.100.254 (198.51.100.254) from 192.0.2.1 : 56(84) bytes of data.
64 bytes from 198.51.100.254: icmp_seq=1 ttl=64 time=0.015 ms
64 bytes from 198.51.100.254: icmp_seq=2 ttl=64 time=0.024 ms
64 bytes from 198.51.100.254: icmp_seq=3 ttl=64 time=0.021 ms

--- 198.51.100.254 ping statistics ---
3 packets transmitted, 3 received, 0% packet loss, time 2098ms
rtt min/avg/max/mdev = 0.015/0.020/0.024/0.003 ms
ルーター2つのパターンもあったが内容はそこまで変わらないので、読むだけにして、イーサネットの章に入る。
IPの一つ下のレイヤ(第二層: データリンク層)のイーサネットでのデータの単位はフレーム。
送信元と送信先は機器ごとの識別子であるMACアドレスを使う。
フレームを観察するために以下のようなネットワークを構築。
00:00:5e:00:53:01``00:00:5e:00:53:02はMACアドレス。

ネットワークの構築は略。
ネットワークインターフェースのMACアドレスはランダムで割り当てられるので、わかりやすくするために以下のコマンドで変更。
sudo ip netns exec ns1 ip link set dev ns1-veth0 address 00:00:5E:00:53:01
sudo ip netns exec ns2 ip link set dev ns2-veth0 address 00:00:5E:00:53:02
pingで通信。
vagrant@ubuntu-focal:~$ sudo ip netns exec ns1 ping -c 3 192.0.2.2 -I 192.0.2.1
PING 192.0.2.2 (192.0.2.2) from 192.0.2.1 : 56(84) bytes of data.
64 bytes from 192.0.2.2: icmp_seq=1 ttl=64 time=0.114 ms
64 bytes from 192.0.2.2: icmp_seq=2 ttl=64 time=0.044 ms
64 bytes from 192.0.2.2: icmp_seq=3 ttl=64 time=0.035 ms

--- 192.0.2.2 ping statistics ---
3 packets transmitted, 3 received, 0% packet loss, time 2053ms
rtt min/avg/max/mdev = 0.035/0.064/0.114/0.035 ms
tcpdumpでパケットキャプチャ。
vagrant@ubuntu-focal:~$ sudo ip netns exec ns1 tcpdump -tnel -i ns1-veth0 icmp
tcpdump: verbose output suppressed, use -v or -vv for full protocol decode
listening on ns1-veth0, link-type EN10MB (Ethernet), capture size 262144 bytes
00:00:5e:00:53:01 > 00:00:5e:00:53:02, ethertype IPv4 (0x0800), length 98: 192.0.2.1 > 192.0.2.2: ICMP echo request, id 7769, seq 1, length 64
00:00:5e:00:53:02 > 00:00:5e:00:53:01, ethertype IPv4 (0x0800), length 98: 192.0.2.2 > 192.0.2.1: ICMP echo reply, id 7769, seq 1, length 64
00:00:5e:00:53:01 > 00:00:5e:00:53:02, ethertype IPv4 (0x0800), length 98: 192.0.2.1 > 192.0.2.2: ICMP echo request, id 7769, seq 2, length 64
00:00:5e:00:53:02 > 00:00:5e:00:53:01, ethertype IPv4 (0x0800), length 98: 192.0.2.2 > 192.0.2.1: ICMP echo reply, id 7769, seq 2, length 64
00:00:5e:00:53:01 > 00:00:5e:00:53:02, ethertype IPv4 (0x0800), length 98: 192.0.2.1 > 192.0.2.2: ICMP echo request, id 7769, seq 3, length 64
00:00:5e:00:53:02 > 00:00:5e:00:53:01, ethertype IPv4 (0x0800), length 98: 192.0.2.2 > 192.0.2.1: ICMP echo reply, id 7769, seq 3, length 64
^C
6 packets captured
6 packets received by filter
0 packets dropped by kernel
tcpdumpのオプションに追加したもの。
-e: イーサネットのヘッダを表示。
-l: Network Namespaceでtcpdumpコマンドを使うときは指定すると表示がスムーズになるらしい。詳しくはシステムプログラミングの話になるから割愛してある。
ノードはARPを使って送信先のMACアドレスを知る。
まずMACアドレスのキャッシュを削除。
vagrant@ubuntu-focal:~$ sudo ip netns exec ns1 ip neigh flush all
再度pingを打って、arpも見えるようにtcpdump。
vagrant@ubuntu-focal:~$ sudo ip netns exec ns1 tcpdump -tnel -i ns1-veth0 icmp or arp
tcpdump: verbose output suppressed, use -v or -vv for full protocol decode
listening on ns1-veth0, link-type EN10MB (Ethernet), capture size 262144 bytes
00:00:5e:00:53:01 > ff:ff:ff:ff:ff:ff, ethertype ARP (0x0806), length 42: Request who-has 192.0.2.2 tell 192.0.2.1, length 28
00:00:5e:00:53:02 > 00:00:5e:00:53:01, ethertype ARP (0x0806), length 42: Reply 192.0.2.2 is-at 00:00:5e:00:53:02, length 28
00:00:5e:00:53:01 > 00:00:5e:00:53:02, ethertype IPv4 (0x0800), length 98: 192.0.2.1 > 192.0.2.2: ICMP echo request, id 8689, seq 1, length 64
00:00:5e:00:53:02 > 00:00:5e:00:53:01, ethertype IPv4 (0x0800), length 98: 192.0.2.2 > 192.0.2.1: ICMP echo reply, id 8689, seq 1, length 64
00:00:5e:00:53:01 > 00:00:5e:00:53:02, ethertype IPv4 (0x0800), length 98: 192.0.2.1 > 192.0.2.2: ICMP echo request, id 8689, seq 2, length 64
00:00:5e:00:53:02 > 00:00:5e:00:53:01, ethertype IPv4 (0x0800), length 98: 192.0.2.2 > 192.0.2.1: ICMP echo reply, id 8689, seq 2, length 64
00:00:5e:00:53:01 > 00:00:5e:00:53:02, ethertype IPv4 (0x0800), length 98: 192.0.2.1 > 192.0.2.2: ICMP echo request, id 8689, seq 3, length 64
00:00:5e:00:53:02 > 00:00:5e:00:53:01, ethertype IPv4 (0x0800), length 98: 192.0.2.2 > 192.0.2.1: ICMP echo reply, id 8689, seq 3, length 64
00:00:5e:00:53:02 > 00:00:5e:00:53:01, ethertype ARP (0x0806), length 42: Request who-has 192.0.2.1 tell 192.0.2.2, length 28
00:00:5e:00:53:01 > 00:00:5e:00:53:02, ethertype ARP (0x0806), length 42: Reply 192.0.2.1 is-at 00:00:5e:00:53:01, length 28
^C
10 packets captured
10 packets received by filter
0 packets dropped by kernel
以下でARPリクエストを行なっている。送信先のff:ff:ff:ff:ff:ffというMACアドレスはブロードキャストアドレス。
00:00:5e:00:53:01 > ff:ff:ff:ff:ff:ff, ethertype ARP (0x0806), length 42: Request who-has 192.0.2.2 tell 192.0.2.1, length 28
以下でARPリプライを行なっている。
00:00:5e:00:53:02 > 00:00:5e:00:53:01, ethertype ARP (0x0806), length 42: Reply 192.0.2.2 is-at 00:00:5e:00:53:02, length 28
ちなみにIPv6だとARPは使われずにNeighbor Discovery(近隣探索)という仕組みが使われるらしい。
これまではvethインターフェースを使ってNetwork Namespace同士を直接接続していたので、同じセグメントに2つのNetwork Namespaceしかなかった。
ブリッジを使って複数のNetwork Namespaceを同じブロードキャストドメインに参加させることができる。
ブリッジの役目は自身のどのポート(TCPで使うポートではない)にどのMACアドレスが繋がっているか管理すること。MACアドレステーブルという台帳を持っている。
Linuxにはブリッジの実装としてネットワークブリッジという機能がある。
次に作るネットワークの物理構成。
大きな菱形がネットワークブリッジ。bridgeという名前のNetwork Namespaceの中に作る。
vethインターフェースから伸びる破線は、そのインターフェースがネットワークブリッジに接続されていることを示す。

論理的な構成
