Cloud Functions 2nd genを解剖する
TL;DR
- Cloud Functions 2nd genはEventarc + Cloud RunのWrapperのように振る舞います
- Cloud RunでCloud Functions 2nd genと同等の振る舞いを構築します
はじめに
どうも、アニメマスターです。
今回は実質Cloud RunであるところのCloud Functions 2nd genについて、実際どのような構成になっているのか検証していきたいと思います。
概観

Cloud Functions 2nd genは上記の通り、Artifact Registry + Cloud Run (+ Eventarc)で構築されておりそれらのWrapperのような振る舞いをします。
EventarcはCloud Functionsと統合されていますが、オプションなので今回は触れません。
1. 実際にCloud Functions 2nd genを作成する
まずはCloud Functionsから実際に関数を作成してみます。

すると以下の2つのファイルが作成されます。
- function.go
- go.mod
それぞれの中身は以下です。
function.go
package helloworld

import (
  "encoding/json"
  "fmt"
  "html"
  "net/http"

  "github.com/GoogleCloudPlatform/functions-framework-go/functions"
)

func init() {
   functions.HTTP("HelloHTTP", helloHTTP)
}

// helloHTTP is an HTTP Cloud Function with a request parameter.
func helloHTTP(w http.ResponseWriter, r *http.Request) {
  var d struct {
    Name string `json:"name"`
  }
  if err := json.NewDecoder(r.Body).Decode(&d); err != nil {
    fmt.Fprint(w, "Hello, World!")
    return
  }
  if d.Name == "" {
    fmt.Fprint(w, "Hello, World!")
    return
  }
  fmt.Fprintf(w, "Hello, %s!", html.EscapeString(d.Name))
}
go.mod
module example.com/gcf

require (
  github.com/GoogleCloudPlatform/functions-framework-go v1.5.2
)
1-1. Artifact Registryの自動作成
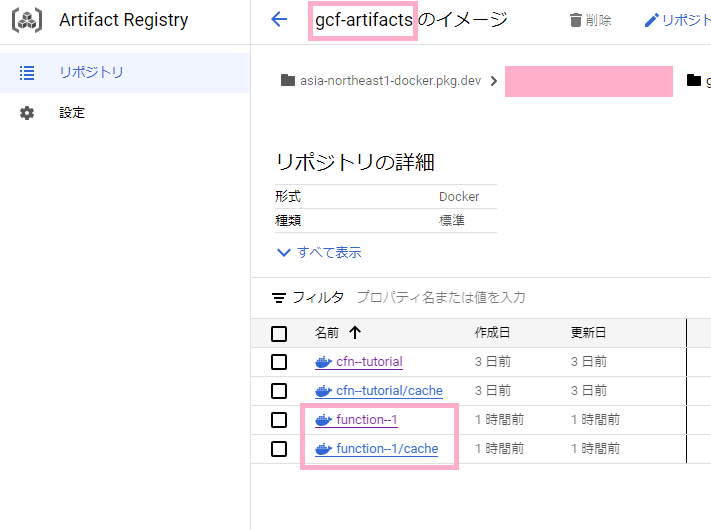
Cloud Functions 2nd genを作成すると自動的にArtifact Registry中に gcf-artifacts というリポジトリが作成され、DockerイメージとそのキャッシュがPushされます。
1-2. Cloud Runの自動作成
もう1つ自動作成されるものがCloud Runです。Cloud Runは先のArtifact Registry中のDockerイメージから作成されます。

2. Cloud Functions 2nd genを用いずに、Cloud Runで構築する
では、Cloud Functions 2nd genが行っていることをCloud Functionsを使わずに構築しましょう。
任意のディレクトリにCloud Run用のDockerイメージを作ります。
ディレクトリ構成は以下の様になります。
.
├── Dockerfile
├── function
│   └── function.go
├── go.mod
├── go.sum
└── main.go
それぞれのファイルの中身を確認しましょう。
まず、main.goです。
main.go
package main

import (
	"log"
	"os"

	// Blank-import the function package so the init() runs
	// _ "example.com/hello"
	_ "example.com/hello/function"
	"github.com/GoogleCloudPlatform/functions-framework-go/funcframework"
)

func main() {
	// Use PORT environment variable, or default to 8080.
	port := "8080"
	if envPort := os.Getenv("PORT"); envPort != "" {
		port = envPort
	}

	// By default, listen on all interfaces. If testing locally, run with
	// LOCAL_ONLY=true to avoid triggering firewall warnings and
	// exposing the server outside of your own machine.
	hostname := ""
	if localOnly := os.Getenv("LOCAL_ONLY"); localOnly == "true" {
		hostname = "127.0.0.1"
	}

    log.Printf("Listening on: %s:%s\n", hostname, port)
	if err := funcframework.StartHostPort(hostname, port); err != nil {
		log.Fatalf("funcframework.StartHostPort: %v\n", err)
	}
}
main.goではPORTとホストを設定して、funcframework.StartHostPortを実行しています。
このメソッドは以下の様にnet/httpをWrapするものです。
環境変数にFUNCTION_TARGET="handler_name"を設定すると、/で設定したハンドラが呼び出され、何も設定しない場合/handler_nameでそのハンドラが呼び出されます。
Cloud FunctionsのようなFaaSでは1つのハンドラしか実装されないので、エントリーポイントとしてFUNCTION_TARGETを設定しているようです。
次にfunction.goです。
function.go
package function

import (
	"fmt"
	"net/http"

	"github.com/GoogleCloudPlatform/functions-framework-go/functions"
)

func init() {
	functions.HTTP("HelloWorld", helloWorld)
}

// helloWorld writes "Hello, World!" to the HTTP response.
func helloWorld(w http.ResponseWriter, r *http.Request) {
	fmt.Println(w, "Hello, World!")
}
function packageはmain.goでblack importされているので、init()が自動的に実行されます。
init()はプライベート関数のhelloWorldをハンドラとしてサーバに登録する処理を行います。
これで環境変数にハンドラを指定した場合、ルートからhelloWorldを呼び出せます。
最後に、Dockerfileです。
Dockerfile
FROM golang:1.21-alpine AS builder
WORKDIR /app
COPY . .
RUN go build -o /app/main .
FROM alpine:3.14
ENV FUNCTION_TARGET=HelloWorld
COPY /app/main /app/main
CMD ["/app/main"]
これでdocker run -p 8080:8080 <image>とすることで、curl http://127.0.0.1/8080/でレスポンスが返るようになります。
3. デプロイ
あとはこちらを参考によしなにArtifact Registryを作成して、こちらを参考に先ほどのイメージからCloud Runを作成して、生成されたURLにリクエストを送ればレスポンスを受け取ることができます。
おわりに
今回はCloud Functions 2nd genをCloud Runで構築しました。
Cloud Functions 2nd genが実質Cloud Runだとするとどのように使い分ければいいのか分からなくなってくると思います。
Cloud FunctionsのProsはEventarcやArtifact Registryと統合されていることなので、他のリソースからのイベントドリブンで呼び出す場合や単一のハンドラの場合に向いていると思います。
一方で、バッチ処理はCloud Run Jobsでも実装できるので、コンテナとして管理したい場合やWebサーバのように複数のハンドラがある場合はCloud Runを使えば良いような気がしています。
それでは、良きアニメライフを!
Discussion