EmbulkプラグインをMaven Centralに公開する
EmbulkのプラグインはRubyのパッケージ管理システムであるRubygemsを通じて提供されています。しかし今後JRubyはEmbulkプラグインの第一開発言語から外れることがアナウンスされており、今後gem以外の方法でもプラグインが提供される予定です。
Java界隈にはmavenというプロジェクト管理システムがあり、Rubyのgemのようなパッケージ配布の仕組みも備わっています。mavenのパッケージをインターネット上で配布できるようにした仕組みは、Maven Centralと呼ばれ多くのパッケージがこの場所で配布されています。
本文書では、Embulkのプラグインを、Maven Centralに配布するまでに必要な手順を記載しています。なおまだEmbulk本体が、Maven Centralからプラグインをダウンロードする仕組みが提供されていないので、慌ててプラグインをアップロードする必要はありません。
なお、著者はこれが初めてのMaven Centralセットアップなので間違えていることがあれば是非教えてください。
※ ひととおり書いたつもりですが、校正中です。
主な手順
- OSSRHのアカウント登録
- GPGの鍵作成と登録
- パッケージのリリース
OSSRHのアカウント発行
まず、OSSRHのアカウントを作成します。OSSRHはJiraで管理されています。こちらのページにあるSign up for an accountを選択してアカウントを作成しましょう。ウィザードに従って回答をしていけばアカウントが作成できます。

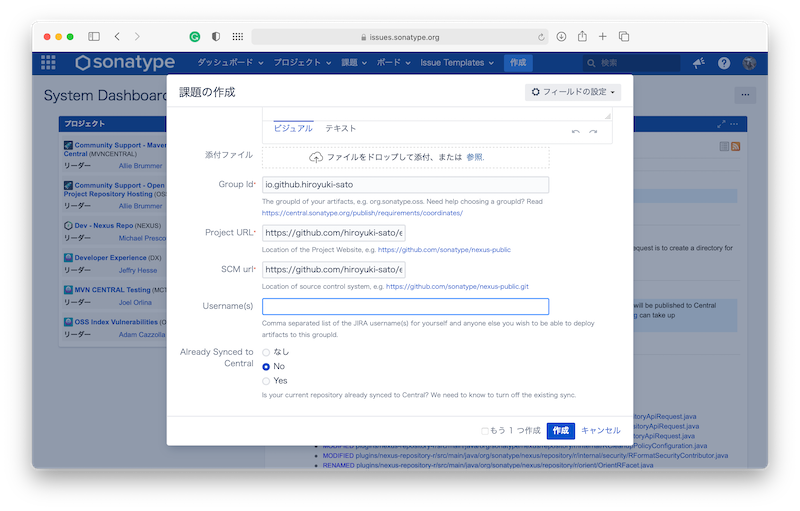
課題(Issue)の作成
アカウントが作成できると次のような画面が表示されます。画面上部の「作成」を押して課題を作成します。

課題には、以下のような記述をします。
- プロジェクト: Community Support - Open Source Project Repository Hosting (OSSRH)
- 課題タイプ: New Project
- 要約: プロジェクトの概要(Embulk filter plugin for calculating numbers)
- Group Id:
io.github.hiroyuki-satoなど公開するアーティファクト - Project URL: プロジェクトのURL
- SCM URL: Git等のプロジェクトのソースコードURL
- Username(s): このプロジェクトを公開できる人のユーザ名

所有者確認作業
しばらくすると、githubのリポジトリ内に、プロジェクトを作成せよとの指示があります。指示に従ってプロジェクトを作成します。

プロジェクトを作成したら、コメントを記述します。その後の指示があるので、指示に従います。

XXXX(グループID) has been prepared, now user(s) XXXX can:
Publish snapshot and release artifacts to s01.oss.sonatype.org
Have a look at this section of our official guide for deployment > instructions:
https://central.sonatype.org/publish/publish-guide/#deployment
Please comment on this ticket when you've released your first component(s), so we can activate the sync to Maven Central.
Depending on your build configuration, this might happen automatically. If not, you can follow the steps in this section of our guide:
https://central.sonatype.org/publish/release/
要するに: 上のURLをみて、プロジェクトのスナップショットを公開し、公開後コメントを残してください。という指示です。指示に従って作業を行います。
GPGの鍵作成と登録
Maven Centralに公開するライブラリは、PGPで署名をする必要があるため、GnuPGを使って鍵の設定をおこないます。この辺あまり詳しくないので、鍵長とか他の値のほうが良いのかもしれません。間違えていたら是非おしえてください。
鍵の生成
% gpg --full-gen-key
gpg (GnuPG) 2.3.1; Copyright (C) 2021 Free Software Foundation, Inc.
This is free software: you are free to change and redistribute it.
There is NO WARRANTY, to the extent permitted by law.

Please select what kind of key you want:
   (1) RSA and RSA
   (2) DSA and Elgamal
   (3) DSA (sign only)
   (4) RSA (sign only)
   (9) ECC (sign and encrypt) *default*
  (10) ECC (sign only)
  (14) Existing key from card
Your selection? 1  # ECCだとダメのなので、RSAを選択します。
RSA keys may be between 1024 and 4096 bits long.
# 2048でもいいらしいですが、とりあえず4096にしました。
What keysize do you want? (3072) 4096
Requested keysize is 4096 bits
Please specify how long the key should be valid.
         0 = key does not expire
      <n>  = key expires in n days
      <n>w = key expires in n weeks
      <n>m = key expires in n months
      <n>y = key expires in n years
Key is valid for? (0) 2y # 有効期間を設定します。2yは2年
Key expires at Fri Jun  9 00:02:52 2023 JST
Is this correct? (y/N) y

GnuPG needs to construct a user ID to identify your key.
# 氏名とメールアドレスを設定します。
Real name: NanashiNo Gonbei
Email address: gonbei@example.com
Comment:
You selected this USER-ID:
    "NanashiNo Gonbei <gonbei@example.com>"

Change (N)ame, (C)omment, (E)mail or (O)kay/(Q)uit? O
We need to generate a lot of random bytes. It is a good idea to perform
some other action (type on the keyboard, move the mouse, utilize the
disks) during the prime generation; this gives the random number
generator a better chance to gain enough entropy.
need to generate a lot of random bytes. It is a good idea to perform
some other action (type on the keyboard, move the mouse, utilize the
disks) during the prime generation; this gives the random number
generator a better chance to gain enough entropy.
# ランダムな値を生成するためにキーボードで適当な文字列を入力します。

gpg: key XXXXXXXXXXXXXXXX marked as ultimately trusted
gpg: revocation certificate stored as '/Users/user/.gnupg/openpgp-revocs.d/XXXXXXXXXXXXXXXXXXXXXXXXXXXXXXXXXXXXXXXX.rev'
public and secret key created and signed.

pub   rsa4096 2021-06-08 [SC] [expires: 2023-06-08]
      XXXXXXXXXXXXXXXXXXXXXXXXXXXXXXXXXXXXXXXX
uid                      NanashiNo Gonbei <gonbei@example.com>
sub   rsa4096 2021-06-08 [E] [expires: 2023-06-08]
生成した鍵は、gpg -kvコマンドで確認できます。
gpg -kv
gpg: Note: RFC4880bis features are enabled.
gpg: using pgp trust model
/Users/user/.gnupg/pubring.kbx
-------------------------------
...
pub   rsa4096 2021-06-08 [SC] [expires: 2023-06-08]
      XXXXXXXXXXXXXXXXXXXXXXXXXXXXXXXXXXXXXXXX # <-- 鍵のID
uid           [ultimate] NanashiNo Gonbei <gonbei@example.com>
sub   rsa4096 2021-06-08 [E] [expires: 2023-06-08]
余談鍵の登録(失敗編)
次に作成した鍵を鍵サーバに登録します。通常は gpg --send-keys 鍵ID とすれば鍵サーバに鍵を登録できるようなのですが、homebrewで入れたmacOSのGPGの場合?
gpg: keyserver receive failed: Network is unreachable
とか出て登録ができませんでした。(私だけ?)
仕方がないので、色々調べて、別ターミナルで、以下のようにdirmgrを--standard-resolver をつけて実行したら鍵サーバに登録できました。
dirmngr --debug-level=guru \
        --homedir /Users/user/.gnupg \
        --standard-resolver \
        --daemon
さらにしばらくしたらこのキーサーバから登録した鍵が消えてしまい参照できない状態となりました(なんで?)
余談おしまい。
鍵を鍵サーバに登録する
別の方法で、鍵サーバに鍵を登録します。利用するのは、https://keys.openpgp.org です。
こちらのサーバは、鍵の中に記述されているメールアドレスにメールを送ってメールアドレスの所有者確認をおこなっています。
また、gpg --send-keyコマンドではなく、curlを使って公開鍵を登録できるのも魅力です。
https://keys.openpgp.org/about/usage#gnupg こちらの指示に従って鍵をcurlでアップロードします。
gpg --export 2BXXXXXXXXXXXXXXXXXXXXXXXXXXXXXXXXXXXXXX | \
  curl -T - https://keys.openpgp.org
Key successfully uploaded. Proceed with verification here:
https://keys.openpgp.org/upload/xxxxxxxxx/
しばらくするとメールアドレスの確認用のメールが届きます。
どうも、

keys.openpgp.orgからの自動メッセージです。
このメッセージを要求していない場合、無視してください。

OpenPGPの鍵: 2BXXXXXXXXXXXXXXXXXXXXXXXXXXXXXXXXXXXXXX

他人があなたのメールアドレス "gonbei@example.com"からこの鍵を見つけられるためには、
以下のリンクをクリックしてください:

https://keys.openpgp.org/verify/HogehogehogeHogehoge

よりくわしい情報はこちら keys.openpgp.org/aboutにあります。

https://keys.openpgp.org
OpenPGPの鍵を2019年から配布しています
Embulkプラグインの修正
この辺の記事を参考に、build.gradle を gradle-embulk-plugins を利用するように修正をおこないます。
リリース関連で関係する build.gradle の修正は次の部分です。
publishing {
    publications {
        maven(MavenPublication) {
            groupId = project.group
            artifactId = project.name

            from components.java  // Must be "components.java". The dependency modification works only for it.
            // javadocJar and sourcesJar are added by java.withJavadocJar() and java.withSourcesJar() above.
            // See: https://docs.gradle.org/current/javadoc/org/gradle/api/plugins/JavaPluginExtension.html

            pom {  // https://central.sonatype.org/pages/requirements.html
                packaging "jar"

                name = project.name
                description = project.description
		// ソースコードを管理する場所のURLを記述します。
                url = "https://github.com/hiroyuki-sato/embulk-filter-calc"

                licenses {
                    license {
		        // ライセンス情報を記述します。
                        // http://central.sonatype.org/pages/requirements.html#license-information
                        name = "MIT License"
                        url = "http://www.opensource.org/licenses/mit-license.php"
                    }
                }

                developers {
                    developer {
                        name = "Nanashi Gonbei"
                        email = "gonbei@examplee.com"
                    }
                }

                scm {
                    connection = "scm:git:git://github.com/hiroyuki-sato/embulk-filter-calc.git"
                    developerConnection = "gitリポジトリのURL"
                    url = "https://github.com/hiroyuki-sato/embulk-filter-calc"
                }
            }
        }
    }

    repositories {
        maven {  // publishMavenPublicationToMavenCentralRepository
            name = "mavenCentral"
	    // ユーザ毎に`s01.oss`とならない場合もあるので、Issue等をみて自分のURL記述してください。
            if (project.version.endsWith("-SNAPSHOT")) {
                url "https://s01.oss.sonatype.org/content/repositories/snapshots"
            } else {
                url "https://s01.oss.sonatype.org/service/local/staging/deploy/maven2"
            }

            credentials {
                username = project.hasProperty("ossrhUsername") ? ossrhUsername : ""
                password = project.hasProperty("ossrhPassword") ? ossrhPassword : ""
            }
        }
    }
}

// GPG agentを利用するときのみ設定します。
signing {
    // https://docs.gradle.org/current/userguide/signing_plugin.html#sec:using_gpg_agent
    useGpgCmd()
    sign publishing.publications.maven
}
gradleの設定
gradleでパッケージをMaven Centralにアップロードする際の、sonatypeとGnuPGを使った署名を行うために認証情報の設定をおこないます。
設定は cat ~/.gradle/gradle.properties に記述します。GnuPGの署名の方法には、このファイルにパスワードを記述する方法と、gpgp-agentを使ってパスワードをエージェント経由で設定する方法の二つがあります。
# GPG Agentを使う場合はこちらを設定します。
signing.gnupg.keyName=GnuPGの鍵のID
signing.gnupg.executable=gpg

# GPG Agentを使わない場合(コメントを外してください)
#signing.keyId=GnuPGの鍵のID
#signing.password=GnuPGのパスワード
# これはなくても良いかもしれない
#signing.secretKeyRingFile=/Users/user/.gnupg/secring.gpg

# OSSRHの設定
ossrhUsername=ユーザ名
ossrhPassword=パスワード
gpg-agentを使っている場合は、gpg --clearsignコマンドでエージェントにパスワードを登録します。(と私はやっているのですが、他の方法があるのかもしれません。)
gpg --clearsign
gpg: using "XXXXXXX" as default secret key for signing
^D
   ┌───────────────────────────────────────────────────────────────┐
   │ Please enter the passphrase to unlock the OpenPGP secret key: │
   │ "Nanashi Gonbei <gonbei@example.com>"                         │
   │ 4096-bit RSA key, ID XXXXXXXXXXXXXXXX,                        │
   │ created 2021-XX-XX.                                           │
   │                                                               │
   │                                                               │
   │ Passphrase: _________________________________________________ │
   │                                                               │
   │         <OK>                                   <Cancel>       │
   └───────────────────────────────────────────────────────────────┘
いよいよリリース
準備ができたら、いよいよMaven Centralにパッケージをアップロードします。アップロードには、./gradlew publishMavenPublicationToMavenCentralRepository を実行します。
コマンドの実行に成功すると、nexus repository managerにログインしてアップロード状況を確認してみましょう。
※ これからアカウントを作る人は、多分 https://s01.oss.sonatype.org/ URLになると思いますが、過去にアカウントを作った人は別のURLになるようです。適宜確認をしてください。
https://central.sonatype.org/publish/release/#login-into-ossrh より
Note: As of February 2021, all new projects began being provisioned
on https://s01.oss.sonatype.org/. If your project is not provisioned
on https://s01.oss.sonatype.org/, please login to the
legacy host https://oss.sonatype.org/.
アップロードに成功すると次のような画面表示になります。

内容がよければ、closeボタンを押しリリースの準備を行います。

closeの案内が出て

処理が実行されて、全てgreenになるとリリースの準備は完了です。

リリースボタンが押せるようになるので、リリースボタンを押します。

リリースの案内がでて、confirmを押せばリリース完了です。

Maven Central Repository Searchで、公開されたパッケージが検索結果に出てくるか確認しましょう。
一応おわり
参考
Discussion