PHP PSRによるいい感じにバックエンドサーバーを書く方法が知りたい
PHPでいい感じに書く方法が知りた〜い!
作っているGitHubリポジトリ 参考
PSR(PHP Standards Recommendations)
PSRは全PHP開発者が守らなければいけない標準という性質ではない
- PSR-7: HTTP message interfaces
- リクエスト、レスポンス、URI、ストリームなどのインターフェイスが定義されている
- PSR-15: HTTP Server Request Handlers
- リクエストハンドラとミドルウェアのインターフェイスを定義
- PSR-17: HTTP Factories
- PSR-7で定義されるオブジェクトのファクトリが定義されている
Step1:レスポンスを返してみる
https://github.com/Nyholm/psr7 で提供されるPSR-17のファクトリを使って、PSR-7のResponseオブジェクトを作り、それを https://github.com/laminas/laminas-httphandlerrunner を使って返す。
composer require nyholm/psr7 laminas/laminas-httphandlerrunner
<?php

declare(strict_types=1);

require_once __DIR__ . '/../vendor/autoload.php';

use \Nyholm\Psr7\Factory\Psr17Factory;

$psr17Factory = new Psr17Factory();

$responseBody = $psr17Factory->createStream('Hello world');
$response = $psr17Factory->createResponse(200)->withBody($responseBody);
(new \Laminas\HttpHandlerRunner\Emitter\SapiEmitter())->emit($response);
cd public
php -S localhost:8080
すると、ブラウザからHello Worldが見えるようになる。
Step2: Controllerを作ってリクエストを受け取り、レスポンスを返してみる
Controllerは RequestHandlerInterface を継承したクラス。handleメソッドを実装する必要があり、handleメソッドはRequestを受け取ってResponseを返すもの。
ここではPSR-7のメッセージオブジェクトを使って書く、ということなので、レスポンスを作るのはPSR-17のファクトリを使って作る。
<?php

declare(strict_types=1);


namespace Hiroya\YuyuArticlesBackend\Http\Controllers;

use Psr\Http\Message\ResponseFactoryInterface;
use Psr\Http\Message\ResponseInterface;
use Psr\Http\Message\ServerRequestInterface;
use Psr\Http\Message\StreamFactoryInterface;
use Psr\Http\Server\RequestHandlerInterface;

class HelloWorldController implements RequestHandlerInterface
{
    public function __construct(
        private readonly ResponseFactoryInterface $responseFactory,
        private readonly StreamFactoryInterface   $streamFactory
    )
    {
    }

    public function handle(ServerRequestInterface $request): ResponseInterface
    {
        $content = [
            "message" => "Hello, World"
        ];
        $content = json_encode($content);

        return $this->responseFactory->createResponse(200)
            ->withHeader('Content-Type', 'application/json; charset=UTF-8')
            ->withBody($this->streamFactory->createStream($content));
    }
}
handleメソッドが引数で受け取る ServerRequestInterface は、ユーザからのリクエストが詰められたオブジェクトとなっている。PHPのスーパーグローバル変数$_GETや $_POSTを直接いじることはないように、これ経由で触るようにする。
作り方は、nyholm/psr7で提供されていて、以下のようにして作り、今作ったHelloWorldControllerへ渡す。
<?php

declare(strict_types=1);

require_once __DIR__ . '/../vendor/autoload.php';

use \Nyholm\Psr7\Factory\Psr17Factory;
use \Nyholm\Psr7Server\ServerRequestCreator;
use \Hiroya\YuyuArticlesBackend\Http\Controllers\HelloWorldController;

$psr17Factory = new Psr17Factory();

$creator = new ServerRequestCreator(
    $psr17Factory, // ServerRequestFactory
    $psr17Factory, // UriFactory
    $psr17Factory, // UploadedFileFactory
    $psr17Factory  // StreamFactory
);

// スーパーグローバル変数を使わず、ここで取得したリクエストを使うようにする
$serverRequest = $creator->fromGlobals();

// 後でルーティング出来るようにする
$response = (new HelloWorldController(
    $psr17Factory,
    $psr17Factory,
))->handle($serverRequest);

(new \Laminas\HttpHandlerRunner\Emitter\SapiEmitter())->emit($response);
ブラウザからアクセスしてみると、Hello, Worldのメッセージが詰められたJsonが得られる。
Step3: FactoryはDependency Injection(DI)する
Controllerを作るたびに毎回毎回Factoryを渡すのは面倒くさいので、DIすることで解決してくれるようにする。
DIは https://github.com/PHP-DI/PHP-DI を使う。
composer require php-di/php-di
DIでの対応付けを定義する。
<?php

declare(strict_types=1);

use \Nyholm\Psr7\Factory\Psr17Factory;

use function DI\autowire;

$builder = new DI\ContainerBuilder();

$definitions = [
    Psr17Factory::class => $psr17Factory = new Psr17Factory(),
    Psr\Http\Message\RequestFactoryInterface::class => $psr17Factory,
    Psr\Http\Message\ResponseFactoryInterface::class => $psr17Factory,
    Psr\Http\Message\ServerRequestFactoryInterface::class => $psr17Factory,
    Psr\Http\Message\StreamFactoryInterface::class => $psr17Factory,
    Psr\Http\Message\UploadedFileFactoryInterface::class => $psr17Factory,
    Psr\Http\Message\UriFactoryInterface::class => $psr17Factory,
    \Nyholm\Psr7Server\ServerRequestCreator::class => autowire(),
    // Controllers
    \Hiroya\YuyuArticlesBackend\Http\Controllers\HelloWorldController::class => autowire()
];

$builder->addDefinitions($definitions);
return $builder->build();
DIコンテナは、クラスのコンストラクタの引数が要求するものを自動的に解決し、インスタンスを返してくれる。これによって、Psr17Factoryを要求していたServerRequestCreatorやHelloWorldControllerは、コードで引数に渡すものを明記することなくDIコンテナからインスタンスを取得することが出来る。
<?php

declare(strict_types=1);

require_once __DIR__ . '/../vendor/autoload.php';

use \Nyholm\Psr7\Factory\Psr17Factory;
use \Nyholm\Psr7Server\ServerRequestCreator;
use \Hiroya\YuyuArticlesBackend\Http\Controllers\HelloWorldController;

// DIコンテナの設定を読み込む
$container = require __DIR__ . '/../src/dependency-injection.php';

$creator = $container->get(ServerRequestCreator::class);

// スーパーグローバル変数を使わず、ここで取得したリクエストを使うようにする
$serverRequest = $creator->fromGlobals();

// 後でルーティング出来るようにする
$response = ($container->get(HelloWorldController::class))->handle($serverRequest);

(new \Laminas\HttpHandlerRunner\Emitter\SapiEmitter())->emit($response);
Step4: Middlewareでリクエストを処理する
Middlewareの役割として、正常なリクエストかどうかを判定するようなものを事前に判定し、違反している場合は400 Bad Requestを返す。1ルールにつき、1Middlewareに対応させて、順番に判定をしていきたい。
結果として、受け入れるべきリクエストだった場合は、Routerが対応するControllerを呼び出すようにする。
まずはPSR-15のMiddleware Interfaceを使って、何もしないMiddlewareを作ってみる。
<?php

declare(strict_types=1);


namespace Hiroya\YuyuArticlesBackend\Http\Middlewares;

use Psr\Http\Message\ResponseInterface;
use Psr\Http\Message\ServerRequestInterface;
use Psr\Http\Server\MiddlewareInterface;
use Psr\Http\Server\RequestHandlerInterface;

class StrawMiddleware implements MiddlewareInterface
{
    public function process(ServerRequestInterface $request, RequestHandlerInterface $handler): ResponseInterface
    {
        return $handler->handle($request);
    }
}
これをRelayに渡し、Middlewareでリクエストを処理出来るようにする。このRelayから返ってきたResponseをどうすればいいのか、その先のControllerへ処理を続けるにはどうするのかがよく分かっていない。
どういった挙動をするのかよく分かっていないので、一旦Middlewareを登録してどのように動くのかを見てみる。
<?php

declare(strict_types=1);

require_once __DIR__ . '/../vendor/autoload.php';

use \Nyholm\Psr7\Factory\Psr17Factory;
use \Nyholm\Psr7Server\ServerRequestCreator;
use \Hiroya\YuyuArticlesBackend\Http\Middlewares;
use \Hiroya\YuyuArticlesBackend\Http\Controllers\HelloWorldController;
use Relay\Relay;

// DIコンテナの設定を読み込む
$container = require __DIR__ . '/../src/dependency-injection.php';

$creator = $container->get(ServerRequestCreator::class);

// スーパーグローバル変数を使わず、ここで取得したリクエストを使うようにする
$serverRequest = $creator->fromGlobals();

$queue = [
    new Middlewares\StrawMiddleware(),
];

$relay = new Relay($queue);
$response = $relay->handle($serverRequest);

// 後でルーティング出来るようにする
// 一旦コメントアウトした
// $response = ($container->get(HelloWorldController::class))->handle($serverRequest);

(new \Laminas\HttpHandlerRunner\Emitter\SapiEmitter())->emit($response);
エラーになってしまった。
Fatal error: Uncaught RuntimeException: Invalid middleware queue entry: . Middleware must either be callable or implement Psr\Http\Server\MiddlewareInterface. in /Users/hiroya/ghq/github.com/Hiroya-W/yuyu-articles-backend/vendor/relay/relay/src/Runner.php:40 Stack trace: #0 /Users/hiroya/ghq/github.com/Hiroya-W/yuyu-articles-backend/src/Http/Middlewares/StrawMiddleware.php(17): Relay\Runner->handle(Object(Nyholm\Psr7\ServerRequest)) #1 /Users/hiroya/ghq/github.com/Hiroya-W/yuyu-articles-backend/vendor/relay/relay/src/Runner.php(29): Hiroya\YuyuArticlesBackend\Http\Middlewares\StrawMiddleware->process(Object(Nyholm\Psr7\ServerRequest), Object(Relay\Runner)) #2 /Users/hiroya/ghq/github.com/Hiroya-W/yuyu-articles-backend/vendor/relay/relay/src/Relay.php(20): Relay\Runner->handle(Object(Nyholm\Psr7\ServerRequest)) #3 /Users/hiroya/ghq/github.com/Hiroya-W/yuyu-articles-backend/public/index.php(28): Relay\Relay->handle(Object(Nyholm\Psr7\ServerRequest)) #4 {main} thrown in /Users/hiroya/ghq/github.com/Hiroya-W/yuyu-articles-backend/vendor/relay/relay/src/Runner.php on line 40
StrawMiddlewareのprocessメソッド内の $handler->handle($request) をしたときに例外が投げられているよう(?)
RelayがMiddlewareを順番に判定していく、というのを実現するためにどのような処理をしているのかを読んでみる。Relayの内部で呼ばれるRunnerは以下のようになっている。
class Runner extends RequestHandler
{
    public function handle(ServerRequestInterface $request): ResponseInterface
    {
        $entry      = current($this->queue);
        $middleware = call_user_func($this->resolver, $entry);
        next($this->queue);

        if ($middleware instanceof MiddlewareInterface) {
            return $middleware->process($request, $this);
        }

        if ($middleware instanceof RequestHandlerInterface) {
            return $middleware->handle($request);
        }

        if (is_callable($middleware)) {
            return $middleware($request, $this);
        }

        throw new RuntimeException(
            sprintf(
                'Invalid middleware queue entry: %s. Middleware must either be callable or implement %s.',
                $middleware,
                MiddlewareInterface::class
            )
        );
// ...
- Rerayに渡されたMiddleware一覧が格納されたqueryの現在のポインタ位置の要素を取って、ポインタを1つ進める。
- Middlewareのインスタンスを取得する。resolverをRerayに指定しない場合(resolver === null)は$entryがそのまま返ってくる。
- 処理を呼び出す
- MiddlewareInterfaceを実装したインスタンスだったらprocessメソッドを呼び出す。
- processメソッドの最後で、Runnerのhandleメソッドを呼び出すため、1. に戻る。
- RequestHandlerInterfaceを実装したインスタンスだったらhandleメソッドを呼び出す。
- handleメソッドはResponseInterfaceを返す。
- ここで初めてRunnerのhandleメソッドに帰ってきて、全てのMiddlewareのprocessメソッドを辿ってResponseInterfaceが返される。
- MiddlewareInterfaceを実装したインスタンスだったらprocessメソッドを呼び出す。
- ResponseInterfaceが返される。
つまり、Rerayは何かのResponseオブジェクトを返すMiddlewareInterfaceかRequestHandlerInterfaceが必要になる。今回のStrawMiddlewareは何もしないので、RequestHandlerInterfaceを継承しているHelloWorldControllerがResponseオブジェクトを返すことになる。もちろん400や500のレスポンスを返すMiddlewareというのもあり、その時点でRelayからResponseオブジェクトが返ってくるような挙動になっていそう。
ということで、以下のようにMiddleware一覧を詰めた配列をRerayに渡し、返ってきたResponseオブジェクトをEmitterでレスポンスとして返す。
<?php

declare(strict_types=1);

require_once __DIR__ . '/../vendor/autoload.php';

use \Nyholm\Psr7\Factory\Psr17Factory;
use \Nyholm\Psr7Server\ServerRequestCreator;
use \Hiroya\YuyuArticlesBackend\Http\Middlewares;
use \Hiroya\YuyuArticlesBackend\Http\Controllers\HelloWorldController;
use Relay\Relay;

// DIコンテナの設定を読み込む
$container = require __DIR__ . '/../src/dependency-injection.php';

$creator = $container->get(ServerRequestCreator::class);

// スーパーグローバル変数を使わず、ここで取得したリクエストを使うようにする
$serverRequest = $creator->fromGlobals();

$queue = [
    new Middlewares\StrawMiddleware(),
    // 後でルーティング出来るようにする
    $container->get(HelloWorldController::class)
];

$relay = new Relay($queue);
$response = $relay->handle($serverRequest);

(new \Laminas\HttpHandlerRunner\Emitter\SapiEmitter())->emit($response);
これを見ると、MiddlewareでRoutingを実現すると良さそう、という方針が見えてくる。
Step X: LinterとFormatterの設定をする
Routingを作る前に、一旦立ち止まってLinterの設定をする。まずはPHPStanを入れる。
参考:
composer require --dev phpstan/phpstan phpstan/extension-installer
PHPStanの設定を書く。あまり厳しすぎても、手直しできない領域もあると思うので、Level6にして様子を見てみる。
parameters:
    level: 6
    paths:
        - public
        - src
実行しつつ、現在発生しているエラーをbaselineに追加してみる。
./vendor/bin/phpstan analyze --generate-baseline --allow-empty-baseline
Note: Using configuration file /Users/hiroya/ghq/github.com/Hiroya-W/yuyu-articles-backend/phpstan.dist.neon.
 4/4 [▓▓▓▓▓▓▓▓▓▓▓▓▓▓▓▓▓▓▓▓▓▓▓▓▓▓▓▓] 100%


 [OK] Baseline generated with 0 error.
全4ファイルを解析して、エラーは0個。良さそう。
次にFormatterの設定をする。Formatterには https://github.com/PHP-CS-Fixer/PHP-CS-Fixer を使う。READMEのInstallationにはtoolsディレクトリを作ってインストールするのを推奨しているそうなので、そのようにインストールする。
mkdir -p tools/php-cs-fixer
composer require --working-dir=tools/php-cs-fixer friendsofphp/php-cs-fixer
設定項目はこちらからお借りする。設定項目はこれからゆっくり取捨選択していければいいかなと思っている。
これをドキュメントにあるように、.php-cs-fixer.dist.phpとしてプロジェクトルートに配置しておく。
一部書き方が変わっているので、修正していく。まず、FinderとConfigはcreate()ではなくnewするようになった。また、探索対象のディレクトリはsrc、publicとなる。
- $finder = PhpCsFixer\Finder::create()
+ $finder = (new PhpCsFixer\Finder())
- $config = PhpCsFixer\Config::create()
+ $config = (new PhpCsFixer\Config())
 $finder = (new PhpCsFixer\Finder())
     ->in([
-         __DIR__ . '/app/',
+         __DIR__ . '/src/',
         __DIR__ . '/public/',
     ]);
<?php

$finder = (new PhpCsFixer\Finder())
    ->in([
        __DIR__ . '/src/',
        __DIR__ . '/public/',
    ]);
    $config = (new PhpCsFixer\Config())
    ->setRules([
        '@PSR12' => true,
        // ...
    ])
    ->setFinder($finder);

return $config;
設定するルールはお借りしたもののうち以下のものは変更が入っている。
- 'blank_line_before_return' => true,
+ 'blank_line_before_statement' => [
+     'statements' => [
+         'return'
+     ]
+ ],
- 'hash_to_slash_comment' => true,
+ 'single_line_comment_style' => [
+     'comment_types' => ['hash']
+ ],
- 'no_extra_consecutive_blank_lines' => true,
  'class_attributes_separation' => [
-     'elements' => ['method'],
+     'elements' => ['method' => 'one'],
   ],
後はコマンドから実行出来る。
./tools/php-cs-fixer/vendor/bin/php-cs-fixer fix
これ、PHPStanも同じようにtoolsディレクトリに作ったほうが良いのでは、という気がする。ということで、
composer remove --dev phpstan/phpstan phpstan/extension-installer
mkdir tools/phpstan
composer require --working-dir=tools/phpstan phpstan/phpstan phpstan/extension-installer
にした。コマンドは以下のように ./tools/phpstan/ディレクトリから指定する。
./tools/phpstan/vendor/bin/phpstan analyze
後は楽に実行出来るようにしておきたい。Composerをタスクランナーとして使えるように、以下のように composer.json に書いてみた。
  "scripts": {
    "lint": "./tools/phpstan/vendor/bin/phpstan analyze",
    "lint-baseline": "./tools/phpstan/vendor/bin/phpstan analyze --generate-baseline --allow-empty-baseline",
    "format": "./tools/php-cs-fixer/vendor/bin/php-cs-fixer fix"
  }
僕はPhpStormを使っているので、IDE側にも設定をしにいく。
PhpStormのSettingsからPHP>Quality Toolsと進み、PHP CS FixerのConfigurationからSystem PHPのPHP CS Fixer pathを /{PROJECT ROOT FULL PATHで置き換える}/tools/php-cs-fixer/vendor/bin/php-cs-fixer に設定する。
RulesetはCustomにして /Users/hiroya/ghq/github.com/Hiroya-W/yuyu-articles-backend/.php-cs-fixer.dist.php を指定する。
また、Quality Toolsの一番下にあるExternal formattersはPHP CS Fixerを設定しておく。
同様に、PHPStanもConfigurationからSystem PHPのPHPStan pathを {PROJECT ROOT FULL PATHで置き換える}/tools/phpstan/vendor/bin/phpstan に設定しておく。
Quality ToolsのPHPStanの項目にConfiguration file doesn't exists.と表示されていたので、Configuration fileは {PROJECT ROOT FULL PATH}/phpstan.dist.neon、ついでにautoload fileとして {PROJECT ROOT FULL PATH}/vendor/autoload.php を指定しておいた。
また、Editor上にエラー表示をしてくれるようにもしておく。
PhpStormのSettingsからPHP>Editor>Inspections>PHP>Quality Toolsと進み、PHP CS Fixer validationとPHPStan validationにチェックを入れておく。
保存時に自動的に適用してほしい場合は PhpStormのSettingsからTools>Actions on Save>Reformat codeにチェックを入れておく。
後はGitHub ActionsでCIを回せるようにしておく。PHP-CS-Fixerのキャッシュの作り方はhttps://github.com/OskarStark/php-cs-fixer-ga を参考にした。
    "scripts": {
        "lint": "./tools/phpstan/vendor/bin/phpstan analyze",
        "lint-baseline": "./tools/phpstan/vendor/bin/phpstan analyze --generate-baseline --allow-empty-baseline",
        "format": "./tools/php-cs-fixer/vendor/bin/php-cs-fixer fix",
        "format-check": "./tools/php-cs-fixer/vendor/bin/php-cs-fixer fix --diff --dry-run"
    },
name: CI

on:
  push:
  pull_request:

jobs:
  static-analysis:
    runs-on: ubuntu-20.04
    strategy:
      matrix:
        php-versions: [ 8.2 ]
    steps:
      - uses: actions/checkout@v3
      - name: Setup PHP ${{ matrix.php-versions }}
        uses: shivammathur/setup-php@v2
        with:
          php-version: ${{ matrix.php-versions }}
      - name: Install dependencies
        uses: php-actions/composer@v6
      - name: Install PHP-CS-Fixer
        uses: php-actions/composer@v6
        with:
          working_dir: "tools/php-cs-fixer"
      - name: Install PHPStan
        uses: php-actions/composer@v6
        with:
          working_dir: "tools/phpstan"
      - uses: actions/cache@v3
        with:
          path: .php-cs-fixer.cache
          key: ${{ runner.OS }}-${{ github.repository }}-phpcsfixer-${{ github.sha }}
          restore-keys: |
            ${{ runner.OS }}-${{ github.repository }}-phpcsfixer-
      - name: Run PHP-CS-Fixer
        run: composer format-check
      - name: Run PHPStan
        run: composer lint
Step 6: Routingを出来るようにする
先にまとめを話しておくと、sunrise-php/http-routerを使おうと思ったがDI Containerからのインスタンス生成が上手くいかなかったため、FastRouterを使うmakise-co/http-routerを採用した
ライブラリ選定
では、戻ってRoutingを作っていく。RoutingはMiddlewareとして実装すれば良さそうという方針は見えていた。
PSR-15を使ったRouterの実装は、全て書かれているわけではないが、ここに一覧がある。さて、どれを選ぼうか。
じっくり考えてみると、Middlewareでパスに応じてコントローラを呼び出すようにすればいいが、コントローラを呼び出すためにはDI Containerにアクセスする必要がある。
DI Containerをサポートしているものは、以下の2つのように見える。
DI Containerの渡し方は、sunrise-php/http-routerは後からメソッドで渡せるようになっていて、makise-co/http-router はコンストラクタで渡す必要があるという違いがある。
Routerの設定を別ファイルに切り出すことを考えると、sunrise-php/http-routerはrouterを返すphpファイルを作り、makise-co/http-routerはDI Containerを受け取ってRouterを返す関数を定義するようなイメージになる。
開発が続いているかどうかでいうと、Router本体はどちらも最近まで開発されているようだけど、FastRouteをPSR対応するmakise-co/http-routerだけしばらく更新されていない。変更する必要がないので止まっているのか、本当に止まっているのかどうかが分からない。
- makise-co/http-router: 2020/10/25
- nikic/FastRoute: 2023/11/19
- sunrise-php/http-router: 2023/01/02
良く使われていそうなのをpackagistでDownload数とStar数で見てみると、
- makise-co/http-router
- Download: 491
- Star: 2
- nikic/FastRoute
- Download: 57,262,112
- Star: 4949
- sunrise-php/http-router
- Download: 40,332
- Star: 156
FastRouteのStar数が多いので、注目されて広く使われていそうに見える。そのまま使うというよりは、Framworkに組み込まれて使われていそうな印象。ただし、PSR対応のmakise-co/http-routerはあまり使われていなさそうというのが気になる。
後は書き方。PSR-15ならRequestHandlerInterfaceのhandleメソッドを呼び出すのは分かり切っているので、省略しても呼び出せてほしい。sunrise-php/http-routerは省略出来そうだけど、makise-co/http-routerはメソッド名も指定することが必須になっている。Annotationで書けるsunrise-php/http-routerが面白そうではあるが、おそらく書かないため、ここはどちらでも良さそう。
おそらくFastRouterベースなmakise-co/http-routerのほうが早いRouterになりそうで興味があるが、今回はPSRに乗っかるからこそできる、という部分を試すべくsunrise-php/http-routerを採用して使ってみることにする。
sunrise-php/http-router(上手くいかなかった)
/へのGETアクセスにはHelloWorldControllerを割り当てたRouteCollectorを作る。他のルーティングもroutes.phpに書いていくのを想定している。
<?php

declare(strict_types=1);

use Hiroya\YuyuArticlesBackend\Http\Controllers\HelloWorldController;
use Sunrise\Http\Router\RouteCollector;

$collector = new RouteCollector();

$collector->get('home', '/', HelloWorldController::class);

return $collector;
<?php

declare(strict_types=1);

require_once __DIR__ . '/../vendor/autoload.php';

use Hiroya\YuyuArticlesBackend\Http\Middlewares;
use Nyholm\Psr7Server\ServerRequestCreator;
use Relay\Relay;
use Sunrise\Http\Router\Router;

// DIコンテナの設定を読み込む
$container = require __DIR__ . '/../src/dependency-injection.php';

$creator = $container->get(ServerRequestCreator::class);

// スーパーグローバル変数を使わず、ここで取得したリクエストを使うようにする
$serverRequest = $creator->fromGlobals();

// Routerを作成
$routeCollector = require __DIR__ . '/../src/routes.php';
$routeCollector->setContainer($container);
$router = new Router();
$router->addRoute(...$routeCollector->getCollection()->all());

$queue = [
    $container->get(Middlewares\StrawMiddleware::class),
    $router
];

$relay = new Relay($queue);
$response = $relay->handle($serverRequest);

(new \Laminas\HttpHandlerRunner\Emitter\SapiEmitter())->emit($response);
として使えると思ったが...。
Fatal error: Uncaught ArgumentCountError: Too few arguments to function Hiroya\YuyuArticlesBackend\Http\Controllers\HelloWorldController::__construct(), 0 passed in /Users/hiroya/ghq/github.com/Hiroya-W/yuyu-articles-backend/vendor/sunrise/http-router/src/ReferenceResolver.php on line 183 and exactly 2 expected
DI Container経由でコンストラクタが呼ばれていない...?原因が分からなかったので、代わりにmakise-co/http-routerを代わりに使っていく。
makise-co/http-router(上手くいった)
psr/container ^1.0に依存しているので、バージョンを落とす必要がある。
composer require psr/container ^1.0
composer require nikic/fast-route makise-co/http-router
<?php

declare(strict_types=1);

namespace Hiroya\YuyuArticlesBackend;

use Hiroya\YuyuArticlesBackend\Http\Controllers\HelloWorldController;
use MakiseCo\Http\Router\RouteCollectorFactory;
use Psr\Container\ContainerInterface;
use Psr\Http\Server\RequestHandlerInterface;

function createRouter(ContainerInterface $container): RequestHandlerInterface
{
    $collector = (new RouteCollectorFactory())->create(
        $container
    );

    // PSR-15ならRequestHandlerInterfaceのhandleメソッドを呼び出すのは分かり切っているので、省略しても呼び出せてほしかった
    $collector->get('/', [HelloWorldController::class, 'handle']);

    return $collector->getRouter();
}
DI Containerを受け取ってRequestHandlerInterfaceを返すcreateRouter関数を作成した。$collector->getRouter()が返すのはRouterInterfaceだけどこのインターフェースはRequestHandlerInterfaceを継承して定義されている。
<?php

declare(strict_types=1);

require_once __DIR__ . '/../vendor/autoload.php';

use Hiroya\YuyuArticlesBackend\Http\Middlewares;
use Nyholm\Psr7Server\ServerRequestCreator;
use Relay\Relay;

// DIコンテナの設定を読み込む
$container = require __DIR__ . '/../src/dependency-injection.php';

$creator = $container->get(ServerRequestCreator::class);

// スーパーグローバル変数を使わず、ここで取得したリクエストを使うようにする
$serverRequest = $creator->fromGlobals();

// Routerを取得
require __DIR__ . '/../src/routes.php';
$router = Hiroya\YuyuArticlesBackend\createRouter($container);

$queue = [
    $container->get(Middlewares\StrawMiddleware::class),
    $router
];

$relay = new Relay($queue);
$response = $relay->handle($serverRequest);

(new \Laminas\HttpHandlerRunner\Emitter\SapiEmitter())->emit($response);
後は、index.phpで作ったRouterをRelayに渡すことでRoutingが出来るようになる。
Step7: テストを書く
RequestHandlerとMiddlewareに対してテストを書く。
RequestHandler
テストのポイントは
- テストケースの内容はごく薄くする
- 「この値を渡したときに必ずこの値を返す」という構造に落とし込む
ということ。
まずは、テスト用のHelperを用意する。ここからお借りした。
同じように tests/Helper/HttpFactoryTrait.php に配置しnamespaceを今回のHiroya\YuyuArticlesBackend\Helperに変更。
testsディレクトリをautoloadするようにcomposer.jsonに追記する。
    "autoload-dev": {
        "psr-4": {
            "Hiroya\\YuyuArticlesBackend\\": "tests/"
        }
    },
これで、tests/HelloWorldControllerTest.phpから作成したHttpFactoryTraitを Hiroya\YuyuArticlesBackend\Helper\HttpFactoryTrait という名前で利用出来るようになる。
次に、HelloWorldController.phpを配置する。ここからお借りした。
そのうち、requestProviderではGETのみをテストすることにした。
    public function requestProvider(): iterable
    {
        yield 'GET' => [
            $this->createServerRequest('GET', '/dummy'),
            [
                'status_code' => 200,
                'headers' => [
                    'Content-Type' => ['application/json; charset=UTF-8'],
                ],
                'body' => '{"message":"Hello, World"}',
            ],
        ];
    }
HelloWorldControllerTest.phpの流れは以下のようになっている。
- setUpメソッドでテスト対象のコントローラを作成する
- testメソッドでテストが実行される
- dataProviderに指定したrequestProvidorメソッドが、テストへの入力であるServerRequestInterface $requestとリクエストを処理した結果、期待するレスポンスである array $expectedを作る
- testメソッドの引数であるServerRequestInterface $requestとarray $expectedを埋めて実行する
テストの実行は以下のコマンドを使うが...
./vendor/bin/phpunit --bootstrap vendor/autoload.php tests
エラーになってしまった。
Fatal error: Trait "Hiroya\YuyuArticlesBackend\Helper\HttpFactoryTrait" not found in /Users/hiroya/ghq/github.com/Hiroya-W/yuyu-articles-backend/tests/HelloWorldControllerTest.php on line 11
上手くautoload出来ていない様子なので、以下のコマンドで再生成する。
composer dumpautoload
今度は上手く実行できた。しかし、DeprecatedのWarningがある。
PHPUnit 10.5.5 by Sebastian Bergmann and contributors.

Runtime:       PHP 8.2.13

D                                                                   1 / 1 (100%)

Time: 00:00.002, Memory: 8.00 MB

1 test triggered 1 PHPUnit deprecation:

1) Hiroya\YuyuArticlesBackend\HelloWorldControllerTest::test
Data Provider method Hiroya\YuyuArticlesBackend\HelloWorldControllerTest::requestProvider() is not static

/Users/hiroya/ghq/github.com/Hiroya-W/yuyu-articles-backend/tests/HelloWorldControllerTest.php:28

OK, but there were issues!
Tests: 1, Assertions: 3, Deprecations: 1.
今回導入されたのはPHPUnit 10で、このバージョンからはdataProviderはstaticメソッドを推奨しているらしい。今回のHttpFactoryTraitの方針としては
- 特定のPSR-7ライブラリにあえて強く依存している
- Nyholm Psr17Factoryは状態を持たないのでオブジェクトをキャッシュしてもいいが、そもそも状態をまったく持たない軽量なオブジェクトなので必要な都度新しいインスタンスを作ってもボトルネックにならない
- 正攻法であればsetUpやsetUpBeforeClassで注入する形をとるが、dataProviderから依存できるようにあえて割り切っている
ということで、別にstaticであっても問題はなさそう。以下のようにstaticをつけ、$thisでメソッドの呼び出しをしていたところをself::に置き換える。
-public function getRequestFactory(): RequestFactoryInterface
+public static function getRequestFactory(): RequestFactoryInterface
 {
-    return $this->psr17factory();
+    return self::psr17factory();
 }
-public function requestProvider(): iterable
+public static function requestProvider(): iterable
また、PHPUnit 10からのDataProviderの指定はAttributeで出来るらしいので、置き換えておく。
+use PHPUnit\Framework\Attributes\DataProvider;

 /**
- * @dataProvider requestProvider
  * @param array{status_code:positive-int,headers:array<string,non-empty-list<string>>,body:string} $expected
  */
+#[DataProvider('requestProvider')]
 public function test(ServerRequest $request, array $expected): void
毎回コマンドを叩くのは面倒なので、設定ファイルにしておく。XMLで書くそうだが、ジェネレータがあるので、それを使って出力する。今回は全てデフォルトのままで問題が無かった。後は書かれているように、.gitignoreに.phpunit.cacheを追加しておけばOK。
./vendor/bin/phpunit --generate-configuration
PHPUnit 10.5.5 by Sebastian Bergmann and contributors.

Generating phpunit.xml in /Users/hiroya/ghq/github.com/Hiroya-W/yuyu-articles-backend

Bootstrap script (relative to path shown above; default: vendor/autoload.php):
Tests directory (relative to path shown above; default: tests):
Source directory (relative to path shown above; default: src):
Cache directory (relative to path shown above; default: .phpunit.cache):

Generated phpunit.xml in /Users/hiroya/ghq/github.com/Hiroya-W/yuyu-articles-backend.
Make sure to exclude the .phpunit.cache directory from version control.
これで今後は以下のコマンでテストを実行出来るようになるが、どうやらまだ何か言われる。
./vendor/bin/phpunit
PHPUnit 10.5.5 by Sebastian Bergmann and contributors.

Runtime:       PHP 8.2.13
Configuration: /Users/hiroya/ghq/github.com/Hiroya-W/yuyu-articles-backend/phpunit.xml

R                                                                   1 / 1 (100%)

Time: 00:00.003, Memory: 8.00 MB

There was 1 risky test:

1) Hiroya\YuyuArticlesBackend\HelloWorldControllerTest::test with data set "GET" (Nyholm\Psr7\ServerRequest Object (...), [200, [['application/json; charset=UTF-8']], '{"message":"Hello, World"}'])
This test does not define a code coverage target but is expected to do so

/Users/hiroya/ghq/github.com/Hiroya-W/yuyu-articles-backend/tests/HelloWorldControllerTest.php:29

OK, but there were issues!
Tests: 1, Assertions: 3, Risky: 1.
コードカバレッジの対象にしろ、ということなのでそれはそう。追加する。
+#[CoversClass(HelloWorldController::class)]
 class HelloWorldControllerTest extends TestCase
これで今度こそOK。
./vendor/bin/phpunit
PHPUnit 10.5.5 by Sebastian Bergmann and contributors.

Runtime:       PHP 8.2.13
Configuration: /Users/hiroya/ghq/github.com/Hiroya-W/yuyu-articles-backend/phpunit.xml

.                                                                   1 / 1 (100%)

Time: 00:00.002, Memory: 8.00 MB

OK (1 test, 3 assertions)
...カバレッジ取る方法も調べとくか。
Step X: カバレッジを取る
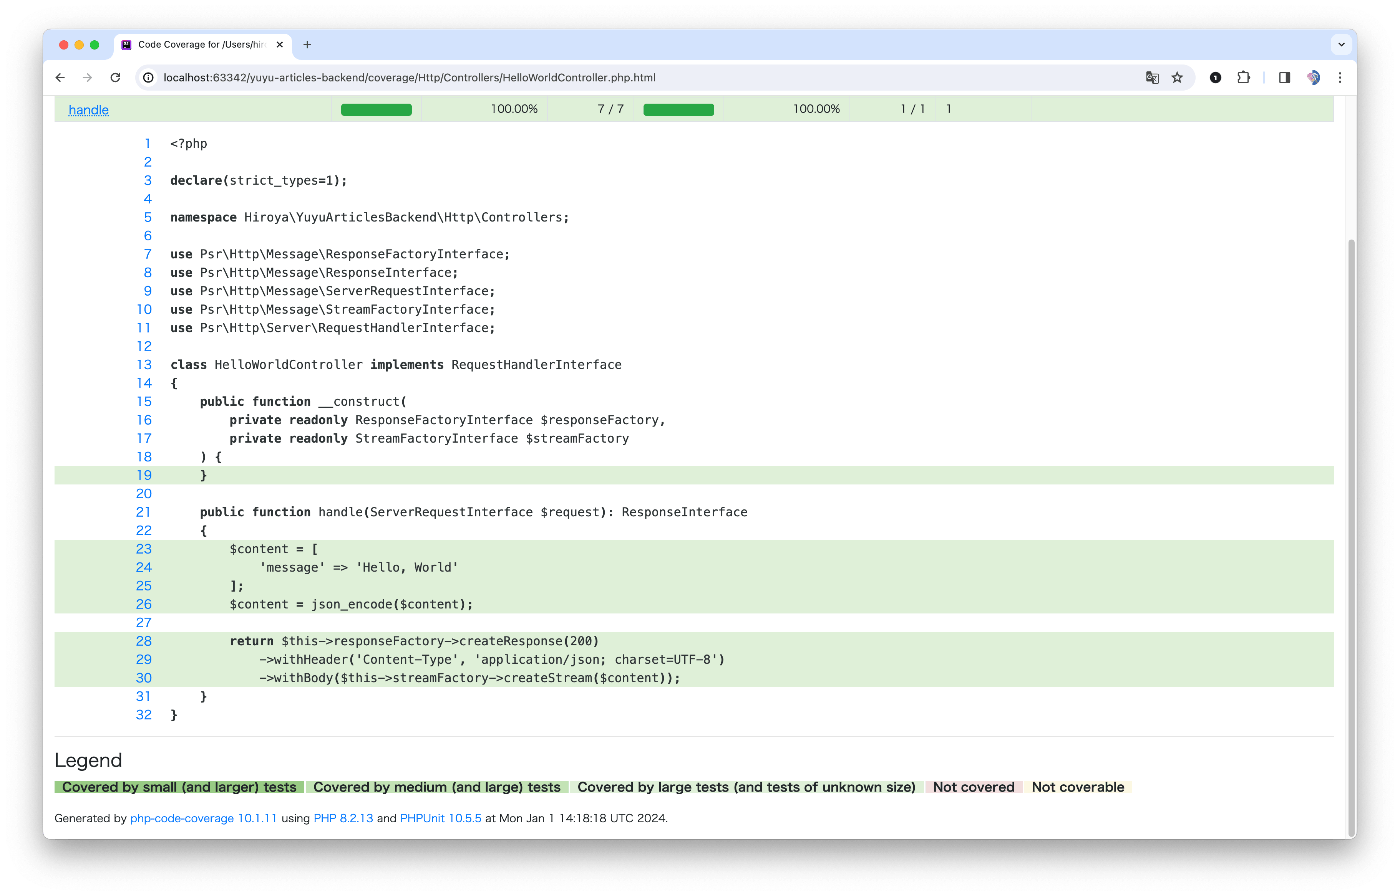
カバレッジを取るにはオプションをつければ良さそう。HTMLで出力してほしいので出力先ディレクトリをcoverageにした、以下のコマンドを使う。
./vendor/bin/phpunit --coverage-html coverage
PHPUnit 10.5.5 by Sebastian Bergmann and contributors.

Runtime:       PHP 8.2.13
Configuration: /Users/hiroya/ghq/github.com/Hiroya-W/yuyu-articles-backend/phpunit.xml

.                                                                   1 / 1 (100%)

Time: 00:00.006, Memory: 8.00 MB

There was 1 PHPUnit test runner warning:

1) No code coverage driver available

WARNINGS!
Tests: 1, Assertions: 3, Warnings: 1.
coverage driverなるものが必要とのこと。良く使われるのはXdebugだが、pcovの方が早いらしいので、それを使う。
インストールはPECLを使って出来るよう。
pecl install pcov
...
Build process completed successfully
Installing '/Users/hiroya/.asdf/installs/php/8.2.13/lib/php/extensions/no-debug-non-zts-20220829/pcov.so'
install ok: channel://pecl.php.net/pcov-1.0.11
configuration option "php_ini" is not set to php.ini location
You should add "extension=pcov.so" to php.ini
僕の環境では、asdfを使ってPHPをインストールしているので、以下のようにしてphp.iniに追加する。
echo "extension=pcov.so" >> $(asdf where php)/conf.d/php.ini
後は実行して出力された coverage/index.html をブラウザで表示すると確認出来るようになる。
./vendor/bin/phpunit --coverage-html coverage

Step X: testsにもFormatterとLinterを適用する
PHP-CS-Fixer
 $finder = (new PhpCsFixer\Finder())
     ->in([
         __DIR__ . '/src/',
         __DIR__ . '/public/',
+        __DIR__ . '/tests/'
     ]);
PHPStan
 parameters:
     level: 6
     paths:
         - public
         - src
+        - tests
この状態では、以下ののようにarrayにtypeがついてないと怒られるので
 ------ --------------------------------------------------------------------------------------------------------------------------------------------------------------------
  Line   tests/Helper/HttpFactoryTrait.php (in context of class Hiroya\YuyuArticlesBackend\HelloWorldControllerTest)
 ------ --------------------------------------------------------------------------------------------------------------------------------------------------------------------
  108    Method Hiroya\YuyuArticlesBackend\HelloWorldControllerTest::createServerRequest() has parameter $serverParams with no value type specified in iterable type array.
         💡 See: https://phpstan.org/blog/solving-phpstan-no-value-type-specified-in-iterable-type
 ------ --------------------------------------------------------------------------------------------------------------------------------------------------------------------
こんな感じにしておく。これよりもネストするarrayや要素があった場合はまた修正しないといけないかもしれない。
-      * @phpstan-param array<string,string|array> $serverParams
+     * @phpstan-param array<string,string|int|array<string,non-empty-list<string>>> $serverParams
Step X: CIでテストを実行する
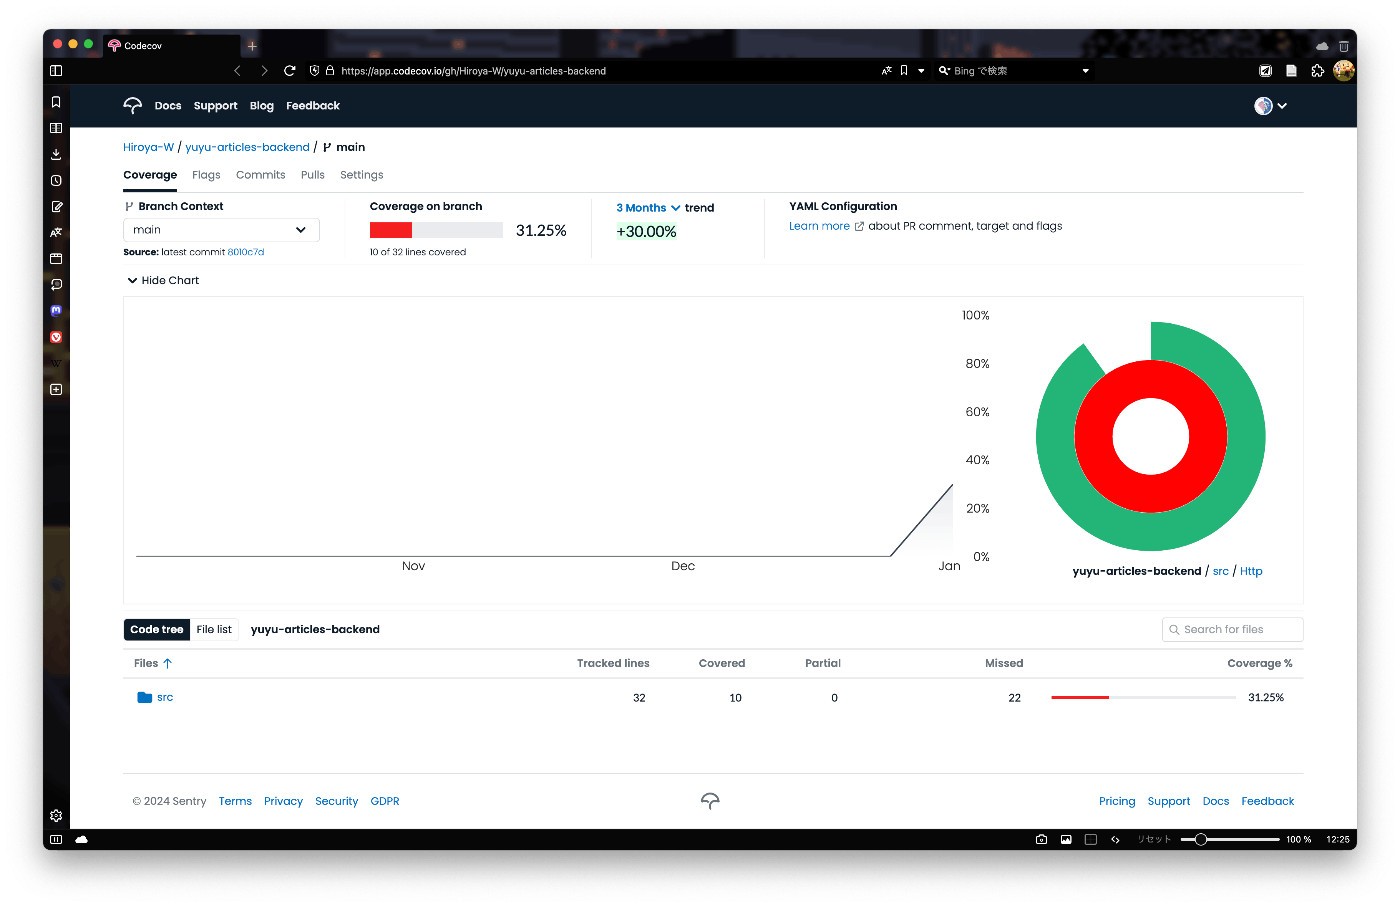
GitHub Actionsでテストも実行出来るようにしたい。取得したカバレッジはCodecovに繋いで可視化出来るようにもできる。
composer.jsonにテスト用のスクリプトを用意する。testとtest:coverageはローカル用で、test:ciはGitHub Actions上で実行する用のスクリプトとして用意した。
GitHub Actionsで取得するカバレッジはCodecov用に対応している形式で出力する。今回はClover形式で、coverage.xmlに出力することにした。coverage.xmlはCodecovにアップロードするのに使う codecov/codecov-action がデフォルトで収集してくれるファイル名となっている。
     "scripts": {
         "lint": "./tools/phpstan/vendor/bin/phpstan analyze",
         "lint-baseline": "./tools/phpstan/vendor/bin/phpstan analyze --generate-baseline --allow-empty-baseline",
         "format": "./tools/php-cs-fixer/vendor/bin/php-cs-fixer fix",
         "format-check": "./tools/php-cs-fixer/vendor/bin/php-cs-fixer fix --diff --dry-run",
+        "test": "./vendor/bin/phpunit",
+        "test:coverage": "./vendor/bin/phpunit --coverage-html coverage",
+        "test:ci": "./vendor/bin/phpunit --coverage-clover coverage.xml"
    },
後はGitHub Actinosのworkflowを変更していく。まずはpcovの設定。これはshivammathur/setup-phpによると、out of the boxで使えるようになっているとのことなので、1行追加するだけで有効になる。
       - name: Setup PHP ${{ matrix.php-versions }}
         uses: shivammathur/setup-php@v2
         with:
           php-version: ${{ matrix.php-versions }}
+          coverage: pcov
formatとlintチェックをpassした後、テストを実行し、収集したカバレッジをCodecovにアップロードする。トークンは事前にCodecovから取得してRepository secretとして登録しておいた。
      - name: Run PHPUnit
        run: composer test:ci
      - name: Upload coverage to Codecov
        uses: codecov/codecov-action@v3
        env:
          CODECOV_TOKEN: ${{ secrets.CODECOV_TOKEN }}
後はpushしてCIで実行してみる。
