Phaserでtilemapとプレイヤーを追跡するライトを実現
tilemapとプレイヤーを追跡するライト
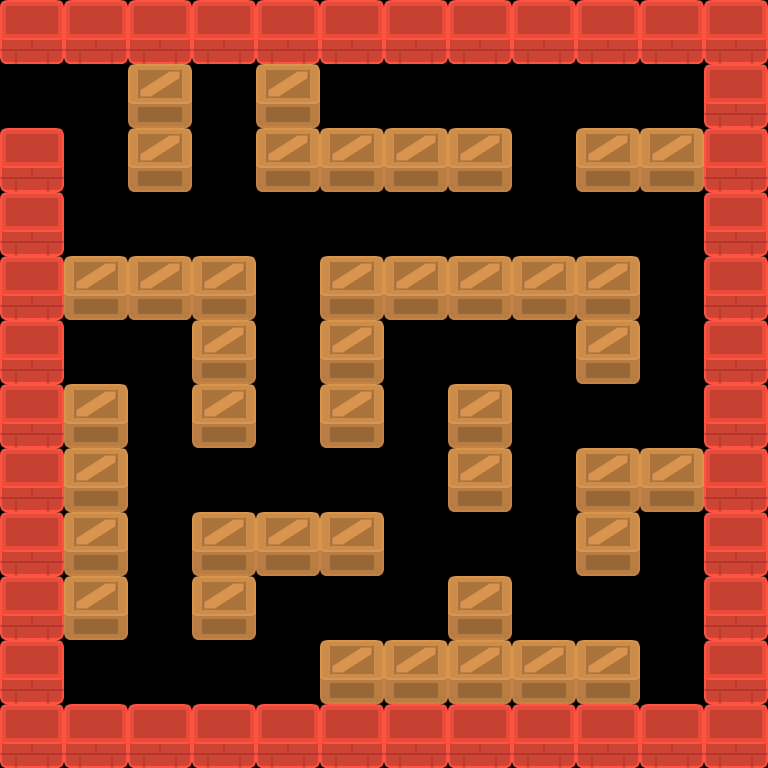
マップエディタ(Tiled)で作成したtilemapを利用して、マップを作成します。また、マップ内全体を暗くします。プレイヤー周辺だけを明るくして表示します。ライトの機能ではなく、Phaserのテクスチャーとマスク処理を利用して、プレイヤー周辺だけを疑似的に明るくします
参考にした記事
以下の記事を参考にしました。この記事では、画像を2枚重ねて、カバーしている画像でスポットライトのような効果を実現しています。この仕組みとtilemapを合体しました
Creating a Flashlight or Spotlight Effect in Phaser 3
マップの使用
- タイルは64x64
- 横は12マス、縦は12マス
- レイヤーは1個だけ、レイヤー名はstage
- レイヤーstageにはプレイヤーは衝突する
ここで目指すもの
- とりあえずtilemapの表示
- プレイヤーは上下左右に移動、1個の移動で64移動する
- プレイヤーは移動時にアニメーションする
- タイルデータとまったく同じ画像を用意して、カバー画像にする
- カバー画像にテクスチャーとますくしょりをする
- カバー画像に透明な円を描く
- プレイヤーの移動に合わせて、円が移動する
利用するスプライト画像
以下の画像を利用したtilemapとプレイヤーを作成します。1個のタイルのサイズは横64、縦64です

preloadメソッド
this.load.spritesheetでスプライト画像を読み込みます。frameWidthとframeHeightでタイルのサイズを指定します。マップデータはJSONでエクスポートします。this.load.tilemapTiledJSONで読み込みます
mainScene.preload = function() {
    // タイル画像
    this.load.spritesheet('tile', 'assets/images/sokoban_tilesheet.png', {
        frameWidth: 64,
        frameHeight: 64,
    });
    // マップのJSONファイルの読み込み
    this.load.tilemapTiledJSON('map01', 'assets/data/map01.json');
    // タイルマップデータを画像形式で出力したもの
    this.load.image('map01_cover', 'assets/images/map01_cover.png');
};
今回重要なのは、map01_cover.pngの画像です。この画像は、マップデータを画像としてエクスポートしたものです。この画像をカバー用の画像として利用します。カバー用の画像は背景を透過させないで、背景色を黒にしています。背景色を設定しないと、タイルの部分だけが隠れるようになってしまうからです
createメソッド
マップとプレイヤー、プレイヤーに連動するライトを作成します
mainScene.create = function() {
    this.createMap();
    this.createPlayer();
    this.createPlayerLight();
};
createMapによるマップデータ作成
createMapではtilemapのデータによるマップの作成と同時に、ライトを透かすためのカバー画像を作成します
mainScene.createMap = function() {
    // 中略
};
マップデータの読み込み
JSONのマップデータを読み込みます
    // JSON形式のマップデータの読み込み Tilemapオブジェクトの作成
    this.map = this.make.tilemap({key: 'map01'});
タイル画像の読み込み
preloadで読み込んだスプライト画像をthis.mapのtileという画像に割り当てます
    // タイル画像をマップデータに反映する Tilesetオブジェクトの作成
    const groundTiles = this.map.addTilesetImage("tile", "tile");
画像の倍率の計算
タイル画像のサイズとタイルの個数により倍率を計算します。layweWidthはマップのレイヤーの全体の幅を表します。レイヤーのサイズを調整したい場合、この計算式で調整可能にします
// 地面レイヤー作成 DynamicTilemapLayerオブジェクト作成
    const layerWidth = 64 * 1 * 12;
    const layerHeight = 64 * 1 * 12;
画面中央の座標
現在の画面中央の座標を計算しておきます。ウィンドウをリサイズしたときには再計算しないといけないのですが、ここではそこは考慮しないことにします
    // 画面中央のX座標
    const centerX = this.game.config.width / 2;
    // 画面中央のY座標
    const centerY = this.game.config.height / 2;
レイヤーを配置するための左上座標の計算
レイヤを配置する座標は、レイヤーの左上角を起点にします。本来は、setOriginで起点座標を自由に設定できるはずなのですが、setOriginがなぜか効かないので、左上角の座標を起点にしてレイヤーを配置します
    // レイヤーの左上X座標
    const layerOriginX = (this.game.config.width - layerWidth) / 2;
    // レイヤーの左上Y座標
    const layerOriginY = (this.game.config.height - layerHeight) / 2;
レイヤー作成
実際にプレイヤーが移動するレイヤーを作成します
layerOriginXとlayerOriginYの位置にstageというレイヤーを作成します。レイズの幅と高さも調整します
    // レイヤー作成
    this.groundLayer = this.map.createLayer('stage', groundTiles,layerOriginX, layerOriginY);
    this.groundLayer.setDisplaySize(layerWidth, layerHeight);
    this.groundLayer.setCollisionByExclusion([-1]);
カバー用画像の作成
ここからがライトのような仕組みを実現するためのコード。tilemapを利用したマップと同じ画像を用意して、tilemapを覆うような画像を上側にかぶせます。そのカバー画像に対してテクスチャーとマスク処理を行います
カバー画像には画像の中心点を起点にして配置します。そのため、座標はcenterXとcenterYです。がカバー画像の表示サイズはlayerWidthとlayerHeightなのでレイヤーと同じ幅と高さにします。これでレイヤーをカバー画像が覆うことになります
    // カバー用の画像作成
    this.groundLayerCoverImage = this.add.image(centerX, centerY, 'map01_cover');
    this.groundLayerCoverImage.setDisplaySize(layerWidth, layerHeight);
カバー画像の色合い変更
カバー用画像の色合いを変更します。今回は、プレイヤーの位置だけライトが当たっているようにして、マップ画像が表示されて、それ以外の場所は黒くなるようにします。そのため、カバー用画像の色合いを黒にします。黒以外の色にしてもいけます。setAlphaで透過度を設定してもいけましたが、そのあたりは、setTintとsetAlphaでの調整が可能です
    //this.groundLayerCoverImage.setTint(0x2d2b2b);
    this.groundLayerCoverImage.setTint(0x000000);
テクスチャー作成
画像の部分を表すためのテクスチャーを作成します。テクスチャーの幅と高さはレイヤーと同じサイズにします
    // テクスチャー作成
	this.renderTexture = this.make.renderTexture({
		width: layerWidth,
		height: layerHeight,
		add: false
	});
マスクするための画像作成
テクスチャーに基づく画像を作成します。マスク用画像の位置は画面の中心にします。これで、カバー用画像を覆っている画像に対してマスク用の画像を配置しました
    // テキスチャーに基づくマスク画像作成
	const maskImage = this.make.image({
		x : centerX,
		y : centerY,
		key: this.renderTexture.texture.key,
		add: false
	});
カバー用画像にマスクを設定
カバー用画像にマスの設定を行います。Phaser.Display.Masks.BitmapMaskでマスク用のオブジェクトを作成します。maskImageを利用してマスク用オブジェクトを作成して、カバー用画像のマスク設定に代入します。同時にレイヤーに対してもマスク設定を代入します
    // カバー用画像にマスク設定
	this.groundLayerCoverImage.mask = new Phaser.Display.Masks.BitmapMask(this, maskImage);
	this.groundLayerCoverImage.mask.invertAlpha = true;
    // レイヤにマスク設定
	this.groundLayer.mask = new Phaser.Display.Masks.BitmapMask(this, maskImage);
ゲーム空間の設定
ゲーム空間全体のサイズの設定をします
    // ゲームワールドの幅と高さの設定
    this.physics.world.bounds.width = this.game.config.width;
    this.physics.world.bounds.height = this.game.config.height;
    // カメラの表示サイズの設定をする。マップのサイズがカメラの表示サイズ
    this.cameras.main.setBounds(0, 0, this.physics.world.bounds.width, this.physics.world.bounds.height);
};
プレイヤー作成
プレイヤーの作成は大したことはしていない。プレイヤーを作成して、マップ内を移動するためのアニメーションを作成するだけです
mainScene.createPlayer = function() {
    // プレイヤー作成
    const tile = this.groundLayer.getTileAt(0,1,true);
    this.player = this.physics.add.sprite(tile.getCenterX(),tile.getCenterY(), 'tile');
    // 衝突サイズの調整
    // プレイヤーのサイズ変更
    this.player.setDisplaySize(64,64);
    // プレイヤーの最初の向きは右
    this.player.setFrame(52);
    // プレイヤーの衝突時のバウンス設定
    this.player.setBounce(0);
    // プレイヤーがゲームワールドの外に出ないように衝突させる
    this.player.setCollideWorldBounds(true);
    // プレイヤーが地面レイヤーと衝突する設定
    this.physics.add.collider(this.player, this.groundLayer);

    // 移動量
    this.player.dx = 64;
    this.player.dy = 64;

    // 下向きのアニメーション
    this.anims.create({
        key: 'down',
        frames: this.anims.generateFrameNumbers('tile', { start: 52, end: 54 }),
        frameRate: 10,
        repeat: -1
    });
    // 上向きのアニメーション
    this.anims.create({
        key: 'up',
        frames: this.anims.generateFrameNumbers('tile', { start: 55, end: 57 }),
        frameRate: 10,
        repeat: -1
    });

    // 左向きのアニメーション
    this.anims.create({
        key: 'left',
        frames: this.anims.generateFrameNumbers('tile', { start: 81, end: 83 }),
        frameRate: 10,
        repeat: -1
    });
    // 右向きのアニメーション
    this.anims.create({
        key: 'right',
        frames: this.anims.generateFrameNumbers('tile', { start: 78, end: 80 }),
        frameRate: 10,
        repeat: -1
    });
    this.cursors = this.input.keyboard.createCursorKeys();
};
プレイヤーをてらすライト作成
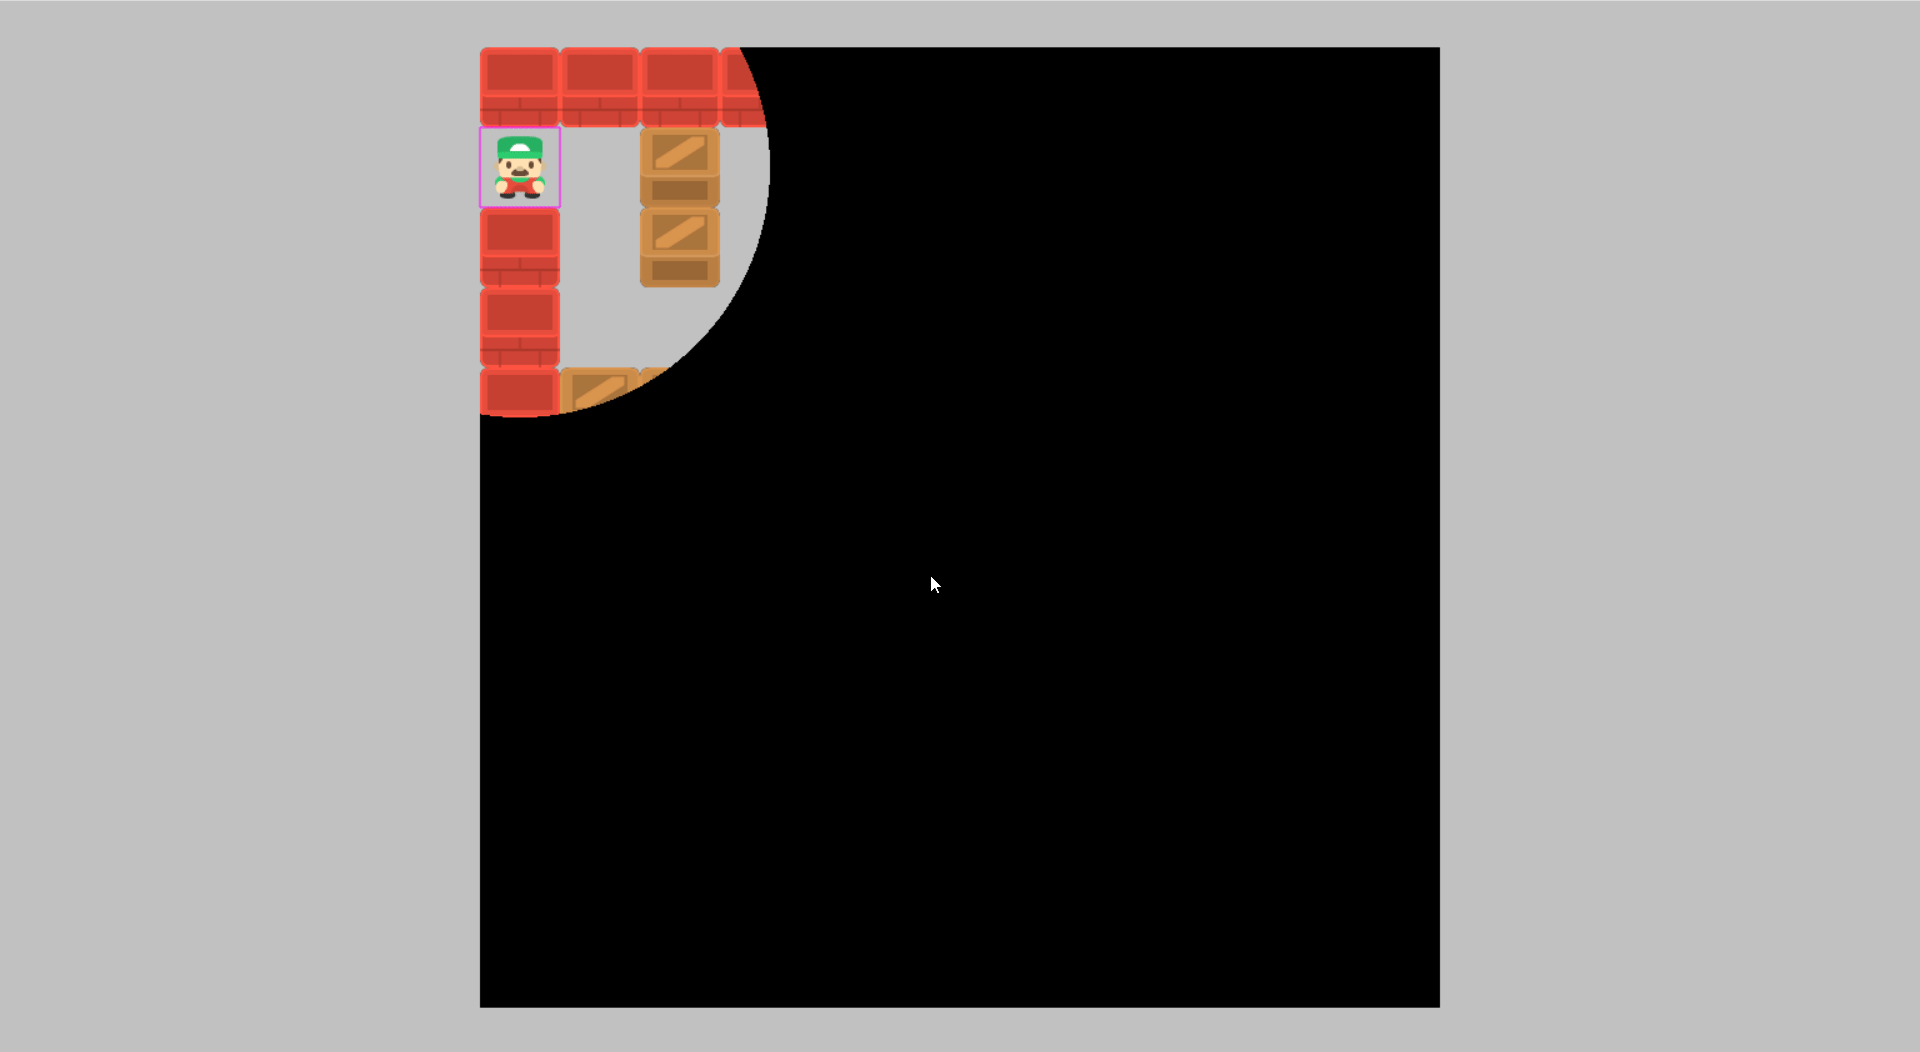
プレイヤーに移動に連動してプレイヤー周辺を照らす役割のライトを作成します。ライトの役割ですが、実体は円です。カバー用画像に円の空間が抜けている状態になります。なので、実際にはライトではないですね
mainScene.createPlayerLight = function() {
    // プレイヤー追跡ライトの作成
    // 実態はただのサークル
	this.light = this.add.circle(100, 100, 200, 0x000000, 1);
	this.light.visible = false;
};
updateメソッド
プレイヤーの移動処理を行います。タイルの画像に合わせて移動します。横64、縦64の移動です。移動に合わせてアニメーションを行います
mainScene.update = function() {
    // 中略
};
左方向の移動
this.input.keyboard.checkDownはようするにonkeydownを細かく調整するためのメソッドです。第1引数はキーがプレスダウンされているかを確認するキー、第2引数は待機時間のミリ秒です。ここでは左カーソルキーがプレスダウンされているかどうかを判定します
左カーソルキーであれば、プレイヤーのX座標から64差し引いた一のタイルを取り出します。タイルのindexがー1であれば、空のタイルなので、X座標を移動します。同時に左アニメーションを実行します
    if (this.input.keyboard.checkDown(this.cursors.left, 100)) {
        const tile = this.groundLayer.getTileAtWorldXY(this.player.x - this.player.dx, this.player.y, true);
        if (tile.index === -1) {
            this.player.x -= this.player.dx;
            this.player.anims.play('left', true);
        }
全体の移動判定
上下左右の移動は以下の通りです
mainScene.update = function() {
    if (this.input.keyboard.checkDown(this.cursors.left, 100)) {
        const tile = this.groundLayer.getTileAtWorldXY(this.player.x - this.player.dx, this.player.y, true);
        if (tile.index === -1) {
            this.player.x -= this.player.dx;
            this.player.anims.play('left', true);
        }
    } else if (this.input.keyboard.checkDown(this.cursors.right, 100)) {
        const tile = this.groundLayer.getTileAtWorldXY(this.player.x + this.player.dx, this.player.y, true);
        if (tile.index === -1) {
            this.player.x += this.player.dx;
            this.player.anims.play('right', true);
        }
    } else if (this.input.keyboard.checkDown(this.cursors.up, 100)) {
        const tile = this.groundLayer.getTileAtWorldXY(this.player.x, this.player.y - this.player.dy, true);
        if (tile.index === -1 ) {
            this.player.y -= this.player.dy;
            this.player.anims.play('up', true);
        }
    } else if (this.input.keyboard.checkDown(this.cursors.down, 100)){
        const tile = this.groundLayer.getTileAtWorldXY(this.player.x, this.player.y + this.player.dy, true);
        if (tile.index === -1) {
            this.player.y += this.player.dy;
            this.player.anims.play('down', true);
        }
    } else {
        this.player.anims.stop();
    }
    // 略
};
プレイヤー移動に連動してライトの移動
updateメソッドでプレイヤーの移動に連動して、ライトを移動します。ライトの実体はただの円です。円により、カバー画像に穴が開いているような状態を実現します
円の起点座標は画像の左上を起点にしています。また、プレイヤーの位置はウィンドウ内全体に基づく座標です。そのため、単純にプレイヤーの位置に円を表示すればいいわけではないです。プレイヤーの座標とカバー画像の位置から円の左上位置を計算します。そのうえで、テクスチャに円を描きます
mainScene.update = function() {
    // 中略

    const lightX = this.player.x - this.groundLayerCoverImage.x + this.groundLayerCoverImage.width * 0.5;
	const lightY = this.player.y - this.groundLayerCoverImage.y + this.groundLayerCoverImage.height * 0.5;
    this.renderTexture.clear();
	this.renderTexture.draw(this.light, lightX, lightY);
};
実行結果
Tilemapを利用したマップを表示します。プレイヤーはマップ内を移動します。左上の角のみプレイヤーが飛び出すとエラーになります。厳密には、移動する際にタイルがない場合、エラーになるので、移動の判定をするようにしないといけないです
プレイヤーの移動に合わせて、ライトで周辺を照らすこと、ライト以外の場所を暗くします。実際にはライトではなく、プレイヤーの位置周辺に円を描いていマスク処理が行われています
最終的に実現したコード
Discussion