LLMOpsって何だ?: MLflow Tracing for LLM Observabilityを読み込む
MLflow Tracing for LLM Observability
MLflow TracingとはいわゆるLLMOps系の処理であり、GenAIを活用した Applicationにおいて promptとresponseを記録して監視していこうというツールです。
MLflowを中心に、というよりは、GenAI applicationの tracingという概念の理解を中心に取り組みます。
ちなみに実際にtracingを始めてみたい方は脳死のautologが非常に強力だと感じており、下記コードは実際に動作した内容になるので是非これで結果をいくつか取得してみてください。
import mlflow

from langchain.prompts import PromptTemplate
from langchain_core.output_parsers import StrOutputParser
from langchain_openai import AzureChatOpenAI

mlflow.set_tracking_uri("http://localhost:8080")
mlflow.set_experiment("LangChain Tracing")

# Enabling autolog for LangChain will enable trace logging.
mlflow.langchain.autolog()

llm = AzureChatOpenAI(
    azure_deployment="gpt-4o-mini",
    model="gpt-4o-mini",
    api_version="2024-05-01-preview"
)

prompt_template = PromptTemplate.from_template(
    "Answer the question as if you are {person}, fully embodying their style, wit, personality, and habits of speech. "
    "constructive or inoffensive. The question is: {question}"
)

chain = prompt_template | llm | StrOutputParser()

# Let's test another call
result = chain.invoke(
    {
        "person": "Linus Torvalds",
        "question": "What is your favorite food? Answer simple and shortly.",
    }
)
print("#"*20)
print(result)
print("#"*20)
Tracing Fluent APIs
まずMLflowは fluent apiで書かれていますよ。ということです。
client apiを引き合いに出して管理の簡潔さをアピールしています。

下記のコードがfluent api規格に則った書き方です。
import mlflow


with mlflow.start_span(name="span") as span:
    span.set_attribute("key", "value")

trace = mlflow.get_trace(span.request_id)
print(trace)
逆にclientだとapiだとstart_runとend_runを書いてwith句を使わない書き方になります。
FAQの Q: Can I use the fluent API and the client API together? を読むと理解しやすいです。
また、上記の実行結果はUI条から確認すると以下のようになっていて、文字通り attributeのみが存在するしています。

このattributeにはどんなものが入っているか確認してみます。
例えばAzure OpenAIを利用した場合には以下の画像のようにmodelやtemperature等が保存されています。これは便利ですね。 ( api versionとかは自動では入ってきていませんね)

また、スパンとは何かというとLLMの応答までの一連のプロセスの中の最小単位だそうです。
またこれらのスパンの集合体で一つのtraceとなります。
Tracingを始めてみる。
Trace Decorator
また、デコレータも紹介されていました。
@mlflow.trace
def some_function(x, y, z=2):
    return x + (y - z)
基本は上記のままでも動きますし。
@mlflow.trace(name="My Span", span_type="func", attributes={"a": 1, "b": 2})
def my_func(x, y):
    return x + y
非同期処理にも対応
from openai import AsyncOpenAI
client = AsyncOpenAI()
@mlflow.trace
async def async_func(message: str):
    return await client.chat.completion.create(
        model="gpt-4o", messages=[{"role": "user", "content": message}]
    )

await async_func("What is MLflow Tracing?")
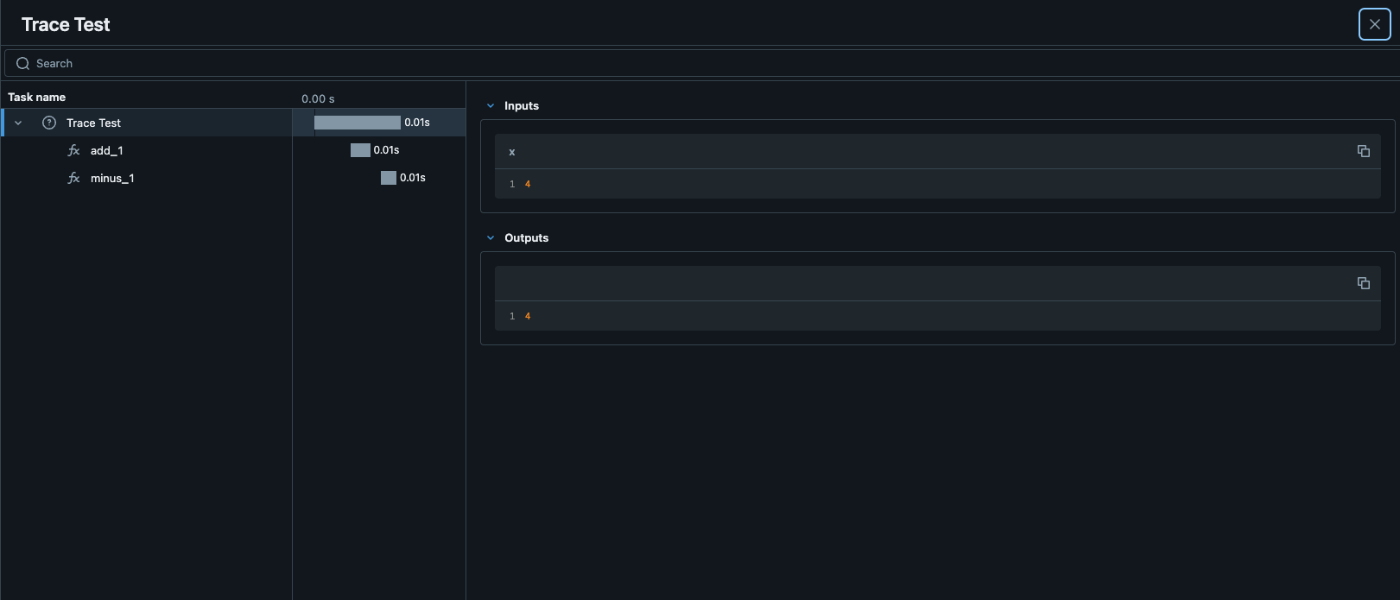
ネスト構造の作り方
import mlflow
@mlflow.trace(span_type="func", attributes={"key": "value"})
def add_1(x):
    return x + 1
@mlflow.trace(span_type="func", attributes={"key1": "value1"})
def minus_1(x):
    return x - 1
@mlflow.trace(name="Trace Test")
def trace_test(x):
    step1 = add_1(x)
    return minus_1(step1)
trace_test(4)

引用元
こんな感じで関数ごとにdecoratorをつけて、関数の中で再度読んであげると自動でネストしてくれるみたいです。
こんな感じで色々まとめましたが、基本は autologに頼りたいです。
SPAN TYPE
SPAN TYPEも色々あるので、以下を押さえておくと設定の際や、autolog読解の際に役に立ちます。
(https://mlflow.org/docs/latest/llms/tracing/index.html#span-type の和訳です)
| Span Type | Description |
|---|---|
| "LLM" | LLM(大規模言語モデル)のエンドポイント、もしくはローカルモデルへの呼び出しを表します。 |
| "CHAT_MODEL" | チャットモデルへの問い合わせを表します。これは LLM に対するやり取りの特別なケースです。 |
| "CHAIN" | 一連の操作を表します。 |
| "AGENT" | 自律エージェントの操作を表します。 |
| "TOOL" | (通常はエージェントによる)ツールの実行を表します。例えば検索エンジンへのクエリなど。 |
| "EMBEDDING" | テキストの埋め込み操作を表します。 |
| "RETRIEVER" | ベクトルデータベースへのクエリなど、コンテキストを取得する操作を表します。 |
| "PARSER" | テキストを構造化された形式に変換するパース操作を表します。 |
| "RERANKER" | 取得したコンテキストを関連性に基づいて順位付けする再ランキング操作を表します。 |
| "UNKNOWN" | 他のスパンタイプが指定されていない場合に使用されるデフォルトのスパンタイプです。 |
また、自分で実装する際には以下のようにspantypeを呼び出すこともできます。
from mlflow.entities import SpanType
@mlflow.trace(span_type=SpanType.RETRIEVER)
Context Handlerで複雑な処理に対応
この章は若干わかりにくかったのですが、ポイントを二つ理解しました。1. やはり with句で mlflow.start_span() できることが fluent APIの楽で簡潔なポイントである。2. 複雑な処理が必要な場合はこのmlflow.start_span()つまりはContext Handler使うべし。
実際のコードを確認してみます。
@mlflow.trace
def first_func(x, y=2):
    return x + y
@mlflow.trace
def second_func(a, b=3):
    return a * b
def do_math(a, x, operation="add"):
    # Use the fluent API context handler to create a new span
    with mlflow.start_span(name="Math") as span:
        # Specify the inputs and attributes that will be associated with the span
        span.set_inputs({"a": a, "x": x})
        span.set_attributes({"mode": operation})
        # Both of these functions are decorated for tracing and will be associated
        # as 'children' of the parent 'span' defined with the context handler
        first = first_func(x)
        second = second_func(a)
        result = None
        if operation == "add":
            result = first + second
        elif operation == "subtract":
            result = first - second
        else:
            raise ValueError(f"Unsupported Operation Mode: {operation}")
        # Specify the output result to the span
        span.set_outputs({"result": result})
        return result
こんな感じです。全体的な記録の内容はネスト構造の作り方と大差がなさそうではありますが。
例えば span.set_outputs({"result": result}) が少し特徴的で outputsの中で resultというkeyを指定した上で resultという outputを定義できます。スクショだとわかりやすいと思います。こんな感じです。
Before
After

これはあくまで一例ですが、つまりは with mlflow.start_span(name="Math") as span で span変数が現れるので、それに紐づくmethodで色々できますよ。ということで理解できます。
wrapper
MLflowでは wrapperを兼ね備えていて mlflow.trace(func) という形で funcを囲ってあげるだけで、 wrapperの機能を果たします。
with mlflow.start_span(name="Parent") as span:
    traced_pow = mlflow.trace(math.pow)
    raised = traced_pow(x, exp)
    span.set_outputs({"result": raised})
上記の実行結果は以下のようになります。

まとめ
ここまでは MLflow tracingをまずは走らせるという Quick start的な感じで進めてきました。
引き続いて以下を読み込んで理解を進めていこうと思います。
- Tracing Concepts
- MLflow Tracing Schema
Reference
Discussion