Hugging Face NLP Course - 6. THE 🤗 TOKENIZERS LIBRARY


概要
の要点纏め。
Introduction
スクラッチからモデルを開発する場合、別のドメインや言語のコーパスで事前学習されたトークナイザを使うのは最適ではない。
新規にトーカナイザを準備する方法についての解説。
Training a new tokenizer from an old one
手元のコーパスの中でどのサブワードが最も頻繁に出現し、どのサブワードが注目されるかを調べることをトレーニングと呼ぶ。
Assembling a corpus
英語以外の言語でGPT-2をゼロから訓練したいとする。
ここではPythonコードを学習することにする。
コードのダウンロード。
from datasets import load_dataset

# This can take a few minutes to load, so grab a coffee or tea while you wait!
raw_datasets = load_dataset("code_search_net", "python")
raw_datasets["train"]
Dataset({
    features: ['repository_name', 'func_path_in_repository', 'func_name', 'whole_func_string', 'language',
      'func_code_string', 'func_code_tokens', 'func_documentation_string', 'func_documentation_tokens', 'split_name',
      'func_code_url'
    ],
    num_rows: 412178
})
whole_func_stringを使いたいので、データを確認。
print(raw_datasets["train"][123456]["whole_func_string"])
def handle_simple_responses(
      self, timeout_ms=None, info_cb=DEFAULT_MESSAGE_CALLBACK):
    """Accepts normal responses from the device.

    Args:
      timeout_ms: Timeout in milliseconds to wait for each response.
      info_cb: Optional callback for text sent from the bootloader.

    Returns:
      OKAY packet's message.
    """
    return self._accept_responses('OKAY', info_cb, timeout_ms=timeout_ms)
すべてのテキストをメモリにロードする例。
※非推奨
# Don't uncomment the following line unless your dataset is small!
# training_corpus = [raw_datasets["train"][i: i + 1000]["whole_func_string"] for i in range(0, len(raw_datasets["train"]), 1000)]
pythonのgenerator表記を使うことで必要に応じてメモリに載せることができる。
training_corpus = (
    raw_datasets["train"][i : i + 1000]["whole_func_string"]
    for i in range(0, len(raw_datasets["train"]), 1000)
)
generatorは1度しか使えないことに注意
gen = (i for i in range(10))
print(list(gen))
print(list(gen))
[0, 1, 2, 3, 4, 5, 6, 7, 8, 9]
[]
そのため関数として定義すると良い。
def get_training_corpus():
    return (
        raw_datasets["train"][i : i + 1000]["whole_func_string"]
        for i in range(0, len(raw_datasets["train"]), 1000)
    )


training_corpus = get_training_corpus()
yieldを使って定義することもできる。
こちらの方が柔軟に制御できる。
def get_training_corpus():
    dataset = raw_datasets["train"]
    for start_idx in range(0, len(dataset), 1000):
        samples = dataset[start_idx : start_idx + 1000]
        yield samples["whole_func_string"]
Training a new tokenizer
まずはモデルとペアにしたいトーカナイザをロードする。
完全にゼロから始めるよりは既存のトーカナイザから始めるのが良い。
from transformers import AutoTokenizer

old_tokenizer = AutoTokenizer.from_pretrained("gpt2")
現状のトーカナイザの動作を見てみる。
スペースやアンダーバー等、あまり望ましくない分割方法になっている。
example = '''def add_numbers(a, b):
    """Add the two numbers `a` and `b`."""
    return a + b'''

tokens = old_tokenizer.tokenize(example)
tokens
['def', 'Ġadd', '_', 'n', 'umbers', '(', 'a', ',', 'Ġb', '):', 'Ċ', 'Ġ', 'Ġ', 'Ġ', 'Ġ"""', 'Add', 'Ġthe', 'Ġtwo',
 'Ġnumbers', 'Ġ`', 'a', '`', 'Ġand', 'Ġ`', 'b', '`', '."', '""', 'Ċ', 'Ġ', 'Ġ', 'Ġ', 'Ġreturn', 'Ġa', 'Ġ+', 'Ġb']
新しいコーパスで訓練してみる。
train_new_from_iteratorはfastトーカナイザのみ動作することに注意。
tokenizer = old_tokenizer.train_new_from_iterator(training_corpus, 52000)
ほとんどのTransformerモデルには高速トークナイザーが用意されており、デフォルトではそちらが使われる。
訓練されたトーカナイザの動作を見てみる。
スペースの扱いはそのままだが、インデントやアンダーバーの扱いは改善している。
tokens = tokenizer.tokenize(example)
tokens
['def', 'Ġadd', '_', 'numbers', '(', 'a', ',', 'Ġb', '):', 'ĊĠĠĠ', 'Ġ"""', 'Add', 'Ġthe', 'Ġtwo', 'Ġnumbers', 'Ġ`',
 'a', '`', 'Ġand', 'Ġ`', 'b', '`."""', 'ĊĠĠĠ', 'Ġreturn', 'Ġa', 'Ġ+', 'Ġb']
古いトーカナイザとの比較。
トークン数が短くなった。
print(len(tokens))
print(len(old_tokenizer.tokenize(example)))
27
36
別のソースコードをトーカナイズしてみる例。
ダブルインデントやpythonの予約後、キャメルケースにも対応できている。
example = """class LinearLayer():
    def __init__(self, input_size, output_size):
        self.weight = torch.randn(input_size, output_size)
        self.bias = torch.zeros(output_size)

    def __call__(self, x):
        return x @ self.weights + self.bias
    """
tokenizer.tokenize(example)
['class', 'ĠLinear', 'Layer', '():', 'ĊĠĠĠ', 'Ġdef', 'Ġ__', 'init', '__(', 'self', ',', 'Ġinput', '_', 'size', ',',
 'Ġoutput', '_', 'size', '):', 'ĊĠĠĠĠĠĠĠ', 'Ġself', '.', 'weight', 'Ġ=', 'Ġtorch', '.', 'randn', '(', 'input', '_',
 'size', ',', 'Ġoutput', '_', 'size', ')', 'ĊĠĠĠĠĠĠĠ', 'Ġself', '.', 'bias', 'Ġ=', 'Ġtorch', '.', 'zeros', '(',
 'output', '_', 'size', ')', 'ĊĊĠĠĠ', 'Ġdef', 'Ġ__', 'call', '__(', 'self', ',', 'Ġx', '):', 'ĊĠĠĠĠĠĠĠ',
 'Ġreturn', 'Ġx', 'Ġ@', 'Ġself', '.', 'weights', 'Ġ+', 'Ġself', '.', 'bias', 'ĊĠĠĠĠ']
Saving the tokenizer
トーカナイザの保存。
tokenizer.save_pretrained("code-search-net-tokenizer")
Hubにアップロードしたい場合。
ログイン。
from huggingface_hub import notebook_login

notebook_login()
ターミナルからログインする場合。
huggingface-cli login
アップロード。
tokenizer.push_to_hub("code-search-net-tokenizer")
モデルのロード。
# Replace "huggingface-course" below with your actual namespace to use your own tokenizer
tokenizer = AutoTokenizer.from_pretrained("huggingface-course/code-search-net-tokenizer")
Fast tokenizers' special powers
Batch encoding
オフセットマッピングについて見てみる。
トーカナイザはBatchEncodingオブジェクトを返す。
from transformers import AutoTokenizer

tokenizer = AutoTokenizer.from_pretrained("bert-base-cased")
example = "My name is Sylvain and I work at Hugging Face in Brooklyn."
encoding = tokenizer(example)
print(type(encoding))
<class 'transformers.tokenization_utils_base.BatchEncoding'>
fastトーカナイザが返すBatchEncodingオブジェクトには特別なメソッドが生えている。
fastトーカナイザか確認。
tokenizer.is_fast
True
これでも確認できる。
encoding.is_fast
True
分割されたトークンを確認。
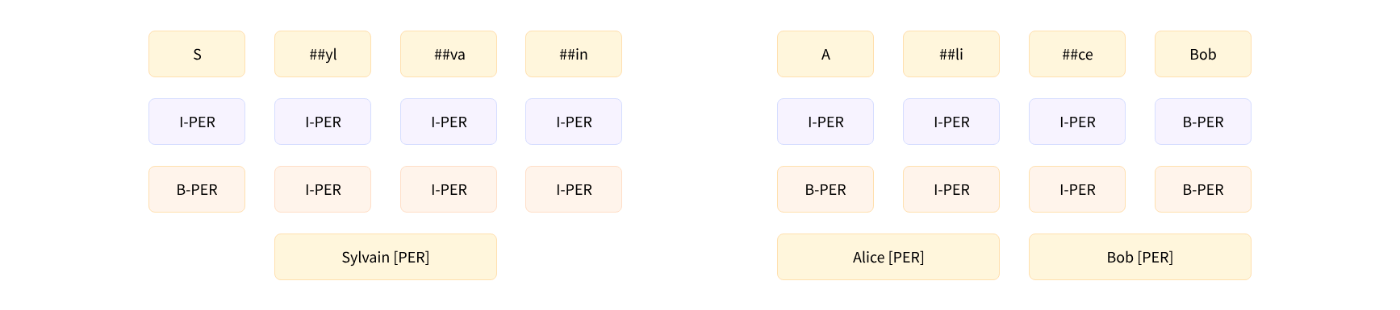
['[CLS]', 'My', 'name', 'is', 'S', '##yl', '##va', '##in', 'and', 'I', 'work', 'at', 'Hu', '##gging', 'Face', 'in',
 'Brooklyn', '.', '[SEP]']
ベースとなる単語のインデックスを確認。
Sylvainは分割されているが同じインデックスを指している。
"##"始まりかどうかも判断に使えるが、BERTの様な特定のトーカナイザにしかついていない。
encoding.word_ids()
[None, 0, 1, 2, 3, 3, 3, 3, 4, 5, 6, 7, 8, 8, 9, 10, 11, 12, None]
"I'll"や”81s”はトーカナイザによって分割方法が異なる。
word_to_chars()
token_to_chars()
char_to_word()
char_to_token()
を使うことで、ワード、トークン、文字の変換ができる。
ワードIDから文章内のオフセットに変換。
start, end = encoding.word_to_chars(3)
example[start:end]
Sylvain
Inside the token-classification pipeline
Getting the base results with the pipeline
dbmdz/bert-large-cased-finetuned-conll03-english
でNERタスクを実行する。
from transformers import pipeline

token_classifier = pipeline("token-classification")
token_classifier("My name is Sylvain and I work at Hugging Face in Brooklyn.")
[{'entity': 'I-PER', 'score': 0.9993828, 'index': 4, 'word': 'S', 'start': 11, 'end': 12},
 {'entity': 'I-PER', 'score': 0.99815476, 'index': 5, 'word': '##yl', 'start': 12, 'end': 14},
 {'entity': 'I-PER', 'score': 0.99590725, 'index': 6, 'word': '##va', 'start': 14, 'end': 16},
 {'entity': 'I-PER', 'score': 0.9992327, 'index': 7, 'word': '##in', 'start': 16, 'end': 18},
 {'entity': 'I-ORG', 'score': 0.97389334, 'index': 12, 'word': 'Hu', 'start': 33, 'end': 35},
 {'entity': 'I-ORG', 'score': 0.976115, 'index': 13, 'word': '##gging', 'start': 35, 'end': 40},
 {'entity': 'I-ORG', 'score': 0.98879766, 'index': 14, 'word': 'Face', 'start': 41, 'end': 45},
 {'entity': 'I-LOC', 'score': 0.99321055, 'index': 16, 'word': 'Brooklyn', 'start': 49, 'end': 57}]
同じエンティティをグループ化するオプション。
from transformers import pipeline

token_classifier = pipeline("token-classification", aggregation_strategy="simple")
token_classifier("My name is Sylvain and I work at Hugging Face in Brooklyn.")
[{'entity_group': 'PER', 'score': 0.9981694, 'word': 'Sylvain', 'start': 11, 'end': 18},
 {'entity_group': 'ORG', 'score': 0.97960204, 'word': 'Hugging Face', 'start': 33, 'end': 45},
 {'entity_group': 'LOC', 'score': 0.99321055, 'word': 'Brooklyn', 'start': 49, 'end': 57}]
aggregation_strategyオプション
simple: 平均
first: 最初のトークン
max: 最大値
average: 平均(1ワードの一度平均を取ってから更に平均する)
simple
>>> (0.97389334 + 0.976115 + 0.98879766) / 3
0.979602

average
>>> ((0.97389334 + 0.976115) / 2 + 0.98879766) / 2
0.981900915
From inputs to predictions
トーカナイズしてAutoModelForTokenClassificationモデルに渡す例。
from transformers import AutoTokenizer, AutoModelForTokenClassification

model_checkpoint = "dbmdz/bert-large-cased-finetuned-conll03-english"
tokenizer = AutoTokenizer.from_pretrained(model_checkpoint)
model = AutoModelForTokenClassification.from_pretrained(model_checkpoint)

example = "My name is Sylvain and I work at Hugging Face in Brooklyn."
inputs = tokenizer(example, return_tensors="pt")
outputs = model(**inputs)
19個のトークンを9個のラベルに分けている。
print(inputs["input_ids"].shape)
print(outputs.logits.shape)
torch.Size([1, 19])
torch.Size([1, 19, 9])
確率にして最大値を取る。
import torch

probabilities = torch.nn.functional.softmax(outputs.logits, dim=-1)[0].tolist()
predictions = outputs.logits.argmax(dim=-1)[0].tolist()
print(predictions)
[0, 0, 0, 0, 4, 4, 4, 4, 0, 0, 0, 0, 6, 6, 6, 0, 8, 0, 0]
indexとラベルのマッピングを見る。
0はどこにも属さないラベル。
B-XXX は、トークンがエンティティ XXX の先頭にあることを示す。(ex. S)
I-XXX は、トークンがエンティティ XXX の内部にあることを示す。(ex. ##yl, ##va, ##in)
model.config.id2label
{0: 'O',
 1: 'B-MISC',
 2: 'I-MISC',
 3: 'B-PER',
 4: 'I-PER',
 5: 'B-ORG',
 6: 'I-ORG',
 7: 'B-LOC',
 8: 'I-LOC'}
ラベルの付け方には以下のフォーマットがある。(Sylvainが全部'I-PER'なのはIOB1のため)
IOB1 format (in blue)
IOB2 format (in pink)
predictionsからpipelineと同様の結果を得る。
results = []
tokens = inputs.tokens()

for idx, pred in enumerate(predictions):
    label = model.config.id2label[pred]
    if label != "O":
        results.append(
            {"entity": label, "score": probabilities[idx][pred], "word": tokens[idx]}
        )

print(results)
[{'entity': 'I-PER', 'score': 0.9993828, 'index': 4, 'word': 'S'},
 {'entity': 'I-PER', 'score': 0.99815476, 'index': 5, 'word': '##yl'},
 {'entity': 'I-PER', 'score': 0.99590725, 'index': 6, 'word': '##va'},
 {'entity': 'I-PER', 'score': 0.9992327, 'index': 7, 'word': '##in'},
 {'entity': 'I-ORG', 'score': 0.97389334, 'index': 12, 'word': 'Hu'},
 {'entity': 'I-ORG', 'score': 0.976115, 'index': 13, 'word': '##gging'},
 {'entity': 'I-ORG', 'score': 0.98879766, 'index': 14, 'word': 'Face'},
 {'entity': 'I-LOC', 'score': 0.99321055, 'index': 16, 'word': 'Brooklyn'}]
トーカナイザにreturn_offsets_mappingを渡すことで各トークンに対応するテキストのスパンを取得できる。
inputs_with_offsets = tokenizer(example, return_offsets_mapping=True)
inputs_with_offsets["offset_mapping"]
[(0, 0), (0, 2), (3, 7), (8, 10), (11, 12), (12, 14), (14, 16), (16, 18), (19, 22), (23, 24), (25, 29), (30, 32),
 (33, 35), (35, 40), (41, 45), (46, 48), (49, 57), (57, 58), (0, 0)]
example[12:14]
yl
テキストのスパンを含めて再度実行。
results = []
inputs_with_offsets = tokenizer(example, return_offsets_mapping=True)
tokens = inputs_with_offsets.tokens()
offsets = inputs_with_offsets["offset_mapping"]

for idx, pred in enumerate(predictions):
    label = model.config.id2label[pred]
    if label != "O":
        start, end = offsets[idx]
        results.append(
            {
                "entity": label,
                "score": probabilities[idx][pred],
                "word": tokens[idx],
                "start": start,
                "end": end,
            }
        )

print(results)
[{'entity': 'I-PER', 'score': 0.9993828, 'index': 4, 'word': 'S', 'start': 11, 'end': 12},
 {'entity': 'I-PER', 'score': 0.99815476, 'index': 5, 'word': '##yl', 'start': 12, 'end': 14},
 {'entity': 'I-PER', 'score': 0.99590725, 'index': 6, 'word': '##va', 'start': 14, 'end': 16},
 {'entity': 'I-PER', 'score': 0.9992327, 'index': 7, 'word': '##in', 'start': 16, 'end': 18},
 {'entity': 'I-ORG', 'score': 0.97389334, 'index': 12, 'word': 'Hu', 'start': 33, 'end': 35},
 {'entity': 'I-ORG', 'score': 0.976115, 'index': 13, 'word': '##gging', 'start': 35, 'end': 40},
 {'entity': 'I-ORG', 'score': 0.98879766, 'index': 14, 'word': 'Face', 'start': 41, 'end': 45},
 {'entity': 'I-LOC', 'score': 0.99321055, 'index': 16, 'word': 'Brooklyn', 'start': 49, 'end': 57}]
Grouping entities
パイプラインのaggregation_strategy相当の事をする?
import numpy as np

results = []
inputs_with_offsets = tokenizer(example, return_offsets_mapping=True)
tokens = inputs_with_offsets.tokens()
offsets = inputs_with_offsets["offset_mapping"]

idx = 0
while idx < len(predictions):
    pred = predictions[idx]
    label = model.config.id2label[pred]
    if label != "O":
        # Remove the B- or I-
        label = label[2:]
        start, _ = offsets[idx]

        # Grab all the tokens labeled with I-label
        all_scores = []
        while (
            idx < len(predictions)
            and model.config.id2label[predictions[idx]] == f"I-{label}"
        ):
            all_scores.append(probabilities[idx][pred])
            _, end = offsets[idx]
            idx += 1

        # The score is the mean of all the scores of the tokens in that grouped entity
        score = np.mean(all_scores).item()
        word = example[start:end]
        results.append(
            {
                "entity_group": label,
                "score": score,
                "word": word,
                "start": start,
                "end": end,
            }
        )
    idx += 1

print(results)
[{'entity_group': 'PER', 'score': 0.9981694, 'word': 'Sylvain', 'start': 11, 'end': 18},
 {'entity_group': 'ORG', 'score': 0.97960204, 'word': 'Hugging Face', 'start': 33, 'end': 45},
 {'entity_group': 'LOC', 'score': 0.99321055, 'word': 'Brooklyn', 'start': 49, 'end': 57}]
Fast tokenizers in the QA pipeline
Using the question-answering pipeline
pipelineの例。
from transformers import pipeline

question_answerer = pipeline("question-answering")
context = """
🤗 Transformers is backed by the three most popular deep learning libraries — Jax, PyTorch, and TensorFlow — with a seamless integration
between them. It's straightforward to train your models with one before loading them for inference with the other.
"""
question = "Which deep learning libraries back 🤗 Transformers?"
question_answerer(question=question, context=context)
{'score': 0.97773,
 'start': 78,
 'end': 105,
 'answer': 'Jax, PyTorch and TensorFlow'}
このパイプラインはモデルの入力長を超える非常に長いコンテキストを扱うことができる。
long_context = """
🤗 Transformers: State of the Art NLP

🤗 Transformers provides thousands of pretrained models to perform tasks on texts such as classification, information extraction,
question answering, summarization, translation, text generation and more in over 100 languages.
Its aim is to make cutting-edge NLP easier to use for everyone.

🤗 Transformers provides APIs to quickly download and use those pretrained models on a given text, fine-tune them on your own datasets and
then share them with the community on our model hub. At the same time, each python module defining an architecture is fully standalone and
can be modified to enable quick research experiments.

Why should I use transformers?

1. Easy-to-use state-of-the-art models:
  - High performance on NLU and NLG tasks.
  - Low barrier to entry for educators and practitioners.
  - Few user-facing abstractions with just three classes to learn.
  - A unified API for using all our pretrained models.
  - Lower compute costs, smaller carbon footprint:

2. Researchers can share trained models instead of always retraining.
  - Practitioners can reduce compute time and production costs.
  - Dozens of architectures with over 10,000 pretrained models, some in more than 100 languages.

3. Choose the right framework for every part of a model's lifetime:
  - Train state-of-the-art models in 3 lines of code.
  - Move a single model between TF2.0/PyTorch frameworks at will.
  - Seamlessly pick the right framework for training, evaluation and production.

4. Easily customize a model or an example to your needs:
  - We provide examples for each architecture to reproduce the results published by its original authors.
  - Model internals are exposed as consistently as possible.
  - Model files can be used independently of the library for quick experiments.

🤗 Transformers is backed by the three most popular deep learning libraries — Jax, PyTorch and TensorFlow — with a seamless integration
between them. It's straightforward to train your models with one before loading them for inference with the other.
"""
question_answerer(question=question, context=long_context)
{'score': 0.97149,
 'start': 1892,
 'end': 1919,
 'answer': 'Jax, PyTorch and TensorFlow'}
Using a model for question answering
from transformers import AutoTokenizer, AutoModelForQuestionAnswering

model_checkpoint = "distilbert-base-cased-distilled-squad"
tokenizer = AutoTokenizer.from_pretrained(model_checkpoint)
model = AutoModelForQuestionAnswering.from_pretrained(model_checkpoint)

inputs = tokenizer(question, context, return_tensors="pt")
outputs = model(**inputs)

question answeringモデルは
"答えを開始するトークンのインデックス(ここでは21)"と"答えを終了するトークンのインデックス(ここでは24)"を予測するように学習されている。
start_logits = outputs.start_logits
end_logits = outputs.end_logits
print(start_logits.shape, end_logits.shape)
torch.Size([1, 66]) torch.Size([1, 66])
コンテキストでは無いトークンをマスクする。
[CLS] question [SEP] context [SEP]
の内、[CLS]とcontext部分以外はマスクする。
-10000とすることでsoftmaxで選択されないようにしている。
[CLS]トークンは、答えがコンテキストにないことを示すために使用するモデルもあるので、そのままにしておく。
import torch

sequence_ids = inputs.sequence_ids()
# Mask everything apart from the tokens of the context
mask = [i != 1 for i in sequence_ids]
# Unmask the [CLS] token
mask[0] = False
mask = torch.tensor(mask)[None]

start_logits[mask] = -10000
end_logits[mask] = -10000
softmaxを取る。
start_probabilities = torch.nn.functional.softmax(start_logits, dim=-1)[0]
end_probabilities = torch.nn.functional.softmax(end_logits, dim=-1)[0]
この時
start_index <= end_index
である必要がある。
答えがstart_indexで始まりend_indexで終わる確率は次のようになる。
start_probabilities[start_index]×end_probabilities[end_index]
すべての組み合わせのスコアを計算する。
scores = start_probabilities[:, None] * end_probabilities[None, :]
start_index > end_indexの値を0にしてマスクする。
scores = torch.triu(scores)
最大値のインデックスを取得。
max_indexはフラットにされた配列のインデックス。
max_index = scores.argmax().item()
start_index = max_index // scores.shape[1]
end_index = max_index % scores.shape[1]
print(scores[start_index, end_index])
0.97773
offsetsを使って回答の文字列を取得。
inputs_with_offsets = tokenizer(question, context, return_offsets_mapping=True)
offsets = inputs_with_offsets["offset_mapping"]

start_char, _ = offsets[start_index]
_, end_char = offsets[end_index]
answer = context[start_char:end_char]
サマリを出力。
result = {
    "answer": answer,
    "start": start_char,
    "end": end_char,
    "score": scores[start_index, end_index],
}
print(result)
{'answer': 'Jax, PyTorch and TensorFlow',
 'start': 78,
 'end': 105,
 'score': 0.97773}
Handling long contexts
コンテキストがモデルの入力の最大長(384)よりも長いケース。
inputs = tokenizer(question, long_context)
print(len(inputs["input_ids"]))
461
only_secondによる切り捨てを実行した場合。
文末の回答部分が切り捨てられてしまっている。
inputs = tokenizer(question, long_context, max_length=384, truncation="only_second")
print(tokenizer.decode(inputs["input_ids"]))
"""
[CLS] Which deep learning libraries back [UNK] Transformers? [SEP] [UNK] Transformers : State of the Art NLP

[UNK] Transformers provides thousands of pretrained models to perform tasks on texts such as classification, information extraction,
question answering, summarization, translation, text generation and more in over 100 languages.
Its aim is to make cutting-edge NLP easier to use for everyone.

[UNK] Transformers provides APIs to quickly download and use those pretrained models on a given text, fine-tune them on your own datasets and
then share them with the community on our model hub. At the same time, each python module defining an architecture is fully standalone and
can be modified to enable quick research experiments.

Why should I use transformers?

1. Easy-to-use state-of-the-art models:
  - High performance on NLU and NLG tasks.
  - Low barrier to entry for educators and practitioners.
  - Few user-facing abstractions with just three classes to learn.
  - A unified API for using all our pretrained models.
  - Lower compute costs, smaller carbon footprint:

2. Researchers can share trained models instead of always retraining.
  - Practitioners can reduce compute time and production costs.
  - Dozens of architectures with over 10,000 pretrained models, some in more than 100 languages.

3. Choose the right framework for every part of a model's lifetime:
  - Train state-of-the-art models in 3 lines of code.
  - Move a single model between TF2.0/PyTorch frameworks at will.
  - Seamlessly pick the right framework for training, evaluation and production.

4. Easily customize a model or an example to your needs:
  - We provide examples for each architecture to reproduce the results published by its original authors.
  - Model internal [SEP]
"""
文章をある程度の長さで切ってチャンク化する。
strideでオーバーラップを指定できる。
sentence = "This sentence is not too long but we are going to split it anyway."
inputs = tokenizer(
    sentence, truncation=True, return_overflowing_tokens=True, max_length=6, stride=2
)

for ids in inputs["input_ids"]:
    print(tokenizer.decode(ids))
'[CLS] This sentence is not [SEP]'
'[CLS] is not too long [SEP]'
'[CLS] too long but we [SEP]'
'[CLS] but we are going [SEP]'
'[CLS] are going to split [SEP]'
'[CLS] to split it anyway [SEP]'
'[CLS] it anyway. [SEP]'
inputsの確認。
print(inputs.keys())
dict_keys(['input_ids', 'attention_mask', 'overflow_to_sample_mapping'])
overflow_to_sample_mappingは各結果がどの文章に依存しているかを示すマップ。
print(inputs["overflow_to_sample_mapping"])
[0, 0, 0, 0, 0, 0, 0]
複数文章を与えたときに有効。
sentences = [
    "This sentence is not too long but we are going to split it anyway.",
    "This sentence is shorter but will still get split.",
]
inputs = tokenizer(
    sentences, truncation=True, return_overflowing_tokens=True, max_length=6, stride=2
)

print(inputs["overflow_to_sample_mapping"])
[0, 0, 0, 0, 0, 0, 0, 1, 1, 1, 1]
元々の文章をチャンク化してトーカナイズする。
inputs = tokenizer(
    question,
    long_context,
    stride=128,
    max_length=384,
    padding="longest",
    truncation="only_second",
    return_overflowing_tokens=True,
    return_offsets_mapping=True,
)
モデルの入力に使わないパラメータを除去する。
_ = inputs.pop("overflow_to_sample_mapping")
offsets = inputs.pop("offset_mapping")

inputs = inputs.convert_to_tensors("pt")
print(inputs["input_ids"].shape)
torch.Size([2, 384])
2つに分割したので、2つのlogitsが得られる。
outputs = model(**inputs)

start_logits = outputs.start_logits
end_logits = outputs.end_logits
print(start_logits.shape, end_logits.shape)
torch.Size([2, 384]) torch.Size([2, 384])
マスク処理を行う。
パディングトークンもマスクする。
sequence_ids = inputs.sequence_ids()
# Mask everything apart from the tokens of the context
mask = [i != 1 for i in sequence_ids]
# Unmask the [CLS] token
mask[0] = False
# Mask all the [PAD] tokens
mask = torch.logical_or(torch.tensor(mask)[None], (inputs["attention_mask"] == 0))

start_logits[mask] = -10000
end_logits[mask] = -10000
ソフトマックスを取る。
start_probabilities = torch.nn.functional.softmax(start_logits, dim=-1)
end_probabilities = torch.nn.functional.softmax(end_logits, dim=-1)
各チャンクごとのすべての組み合わせのスコアを計算し、もっとも確率の高い組み合わせを抽出する。
candidates = []
for start_probs, end_probs in zip(start_probabilities, end_probabilities):
    scores = start_probs[:, None] * end_probs[None, :]
    idx = torch.triu(scores).argmax().item()

    start_idx = idx // scores.shape[1]
    end_idx = idx % scores.shape[1]
    score = scores[start_idx, end_idx].item()
    candidates.append((start_idx, end_idx, score))

print(candidates)
[(0, 18, 0.33867), (173, 184, 0.97149)]
各チャンクごとのサマリを出力。
2つ目のチャンクが確率が高いので採用する。
for candidate, offset in zip(candidates, offsets):
    start_token, end_token, score = candidate
    start_char, _ = offset[start_token]
    _, end_char = offset[end_token]
    answer = long_context[start_char:end_char]
    result = {"answer": answer, "start": start_char, "end": end_char, "score": score}
    print(result)
{'answer': '\n🤗 Transformers: State of the Art NLP', 'start': 0, 'end': 37, 'score': 0.33867}
{'answer': 'Jax, PyTorch and TensorFlow', 'start': 1892, 'end': 1919, 'score': 0.97149}
Normalization and pre-tokenization
normalization
pre-tokenization
について解説。
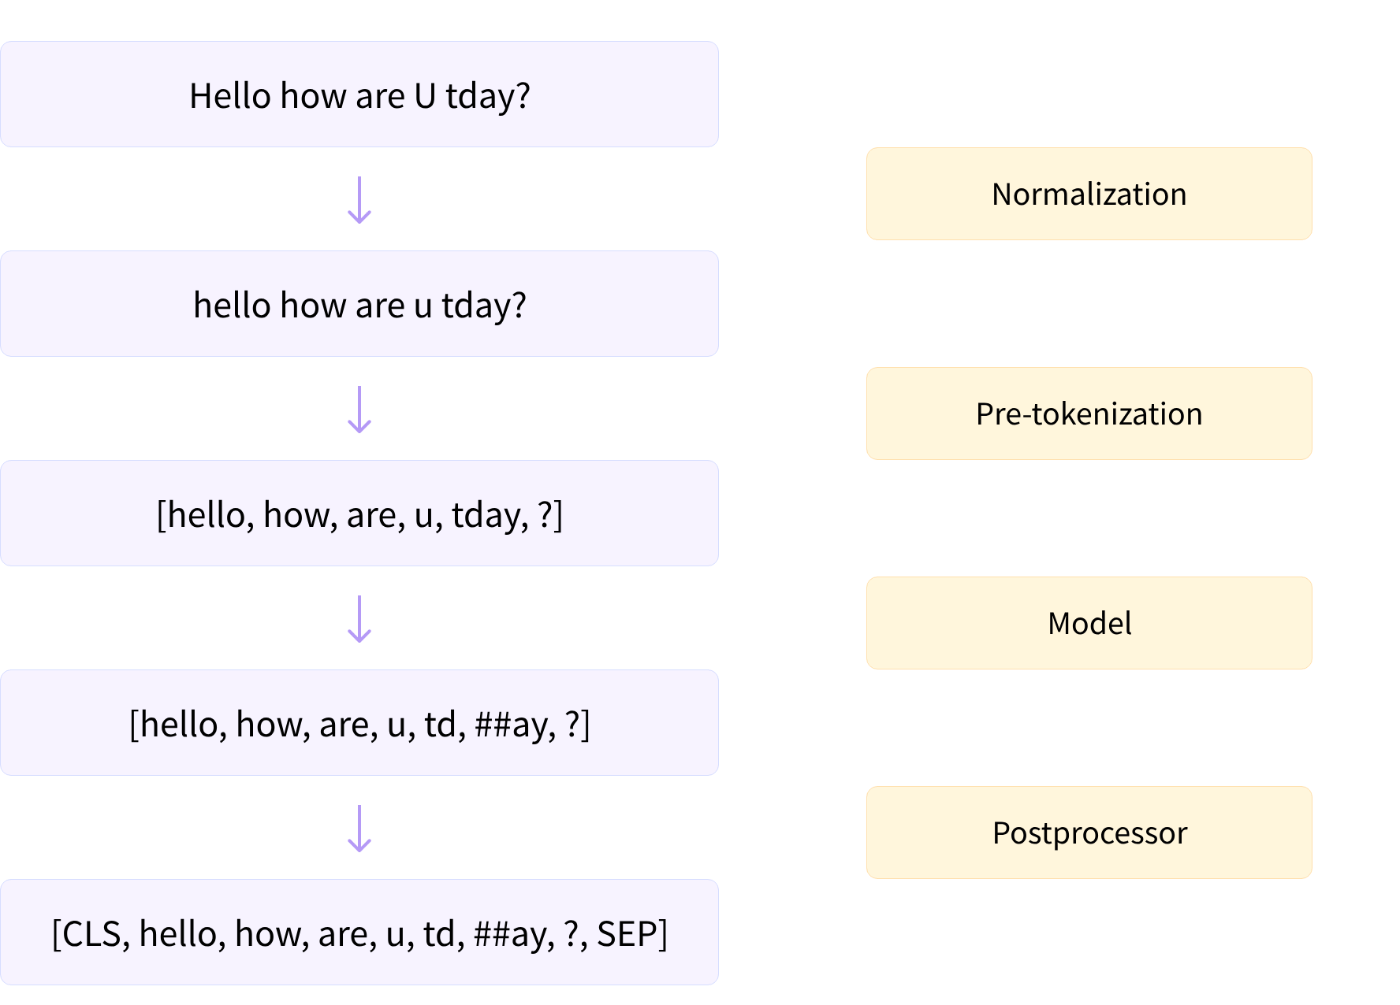
Normalization
不要な空白の除去、小文字化、アクセント記号の除去などが行われる。
Unicode normalizationが行われることもある。
backend_tokenizer属性で基礎となるトーカナイザにアクセスできる。
from transformers import AutoTokenizer

tokenizer = AutoTokenizer.from_pretrained("bert-base-uncased")
print(type(tokenizer.backend_tokenizer))
<class 'tokenizers.Tokenizer'>
ノーマライズ部分だけ適応する。
この場合小文字化とアクセント記号の削除だけ行われた。
print(tokenizer.backend_tokenizer.normalizer.normalize_str("Héllò hôw are ü?"))
'hello how are u?'
Pre-tokenization
生のテキストを空白と句読点で単純に単語に分割。(BERT)
tokenizer.backend_tokenizer.pre_tokenizer.pre_tokenize_str("Hello, how are you?")
[('Hello', (0, 5)), (',', (5, 6)), ('how', (7, 10)), ('are', (11, 14)), ('you', (16, 19)), ('?', (19, 20))]
gpt2のトーカナイザだとまた違った挙動になる。
tokenizer = AutoTokenizer.from_pretrained("gpt2")
tokenizer.backend_tokenizer.pre_tokenizer.pre_tokenize_str("Hello, how are  you?")
[('Hello', (0, 5)), (',', (5, 6)), ('Ġhow', (6, 10)), ('Ġare', (10, 14)), ('Ġ', (14, 15)), ('Ġyou', (15, 19)),
 ('?', (19, 20))]
T5のトーカナイザの場合。
SentencePieceベース。
SentencePieceは今のところ広く使われている。
tokenizer = AutoTokenizer.from_pretrained("t5-small")
tokenizer.backend_tokenizer.pre_tokenizer.pre_tokenize_str("Hello, how are  you?")
[('▁Hello,', (0, 6)), ('▁how', (7, 10)), ('▁are', (11, 14)), ('▁you?', (16, 20))]
SentencePiece
SentencePieceは次回以降紹介する3つのモデル全てで使用できる。
テキストをUnicode文字の列とみなし、スペースを特殊文字(▁)で置き換える。
Unigramアルゴリズムを使うことでpre-tokenizationステップも不要になる。
スペース文字が使用されない言語(中国語や日本語など)では非常に便利。
可逆的なトークン化である。
BERTは連続スペースを削除したりするので不可逆。
Algorithm overview
3つの主要なサブワードトークン化アルゴリズムのまとめ。

Byte-Pair Encoding tokenization
Training algorithm
コーパスに以下の単語が使われているとする。
"hug", "pug", "pun", "bun", "hugs"
基本語彙は以下になる。
通常はすべてのASCII文字&いくつかの Unicode charactersとなる。
トークン化する文が学習しているコーパスにない場合"unknown token"に変換される。
(絵文字は"unknown token"になりやすく、解析しづらいのはこのため。)
"b", "g", "h", "n", "p", "s", "u"
GPT-2、RoBERTaはUnicode charactersをバイト単位で認識することで、"unknown token"問題を解決している。
ベースとなる語彙のサイズは256と小さくなる。
byte-level BPEと呼ばれる。
ベース語彙ができたらラーニングマージを行い、望ましい語彙サイズに達するまで新しいトークンを追加する。
2文字から増やしていく。
最も頻度の高いペアがマージされていく仕組み。
単語が以下の頻度で出現していた場合。
("hug", 10), ("pug", 5), ("pun", 12), ("bun", 4), ("hugs", 5)
まずは各単語に分割する。
("h" "u" "g", 10), ("p" "u" "g", 5), ("p" "u" "n", 12), ("b" "u" "n", 4), ("h" "u" "g" "s", 5)
("u", "g")の組み合わせが一番多く出現しているので語彙に追加する。
20回
Vocabulary: ["b", "g", "h", "n", "p", "s", "u", "ug"]
Corpus: ("h" "ug", 10), ("p" "ug", 5), ("p" "u" "n", 12), ("b" "u" "n", 4), ("h" "ug" "s", 5)
次に("u", "n")の組み合わせが一番多く出現しているので語彙に追加する。
16回
Vocabulary: ["b", "g", "h", "n", "p", "s", "u", "ug", "un"]
Corpus: ("h" "ug", 10), ("p" "ug", 5), ("p" "un", 12), ("b" "un", 4), ("h" "ug" "s", 5)
次に("h", "ug")の組み合わせが一番多く出現しているので語彙に追加する。
15回
Vocabulary: ["b", "g", "h", "n", "p", "s", "u", "ug", "un", "hug"]
Corpus: ("hug", 10), ("p" "ug", 5), ("p" "un", 12), ("b" "un", 4), ("hug" "s", 5)
これを望ましい語彙サイズになるまで繰り返す。
Tokenization algorithm
現状では
"bug" > ["b", "ug"]
"mug" > ["[UNK]", "ug"]
"thug" > ["[UNK]", "hug"]
の様にマージされる。
Implementing BPE
BPEの実装を見てみる。
コーパスは以下とする。
corpus = [
    "This is the Hugging Face Course.",
    "This chapter is about tokenization.",
    "This section shows several tokenizer algorithms.",
    "Hopefully, you will be able to understand how they are trained and generate tokens.",
]
pre-tokenizeのためgpt2モデルをロードする。
from transformers import AutoTokenizer

tokenizer = AutoTokenizer.from_pretrained("gpt2")
単語の出現頻度を取得する。
from collections import defaultdict

word_freqs = defaultdict(int)

for text in corpus:
    words_with_offsets = tokenizer.backend_tokenizer.pre_tokenizer.pre_tokenize_str(text)
    new_words = [word for word, offset in words_with_offsets]
    for word in new_words:
        word_freqs[word] += 1

print(word_freqs)
defaultdict(int, {'This': 3, 'Ġis': 2, 'Ġthe': 1, 'ĠHugging': 1, 'ĠFace': 1, 'ĠCourse': 1, '.': 4, 'Ġchapter': 1,
    'Ġabout': 1, 'Ġtokenization': 1, 'Ġsection': 1, 'Ġshows': 1, 'Ġseveral': 1, 'Ġtokenizer': 1, 'Ġalgorithms': 1,
    'Hopefully': 1, ',': 1, 'Ġyou': 1, 'Ġwill': 1, 'Ġbe': 1, 'Ġable': 1, 'Ġto': 1, 'Ġunderstand': 1, 'Ġhow': 1,
    'Ġthey': 1, 'Ġare': 1, 'Ġtrained': 1, 'Ġand': 1, 'Ġgenerate': 1, 'Ġtokens': 1})
ベース語彙を作成する。
alphabet = []

for word in word_freqs.keys():
    for letter in word:
        if letter not in alphabet:
            alphabet.append(letter)
alphabet.sort()

print(alphabet)
[ ',', '.', 'C', 'F', 'H', 'T', 'a', 'b', 'c', 'd', 'e', 'f', 'g', 'h', 'i', 'k', 'l', 'm', 'n', 'o', 'p', 'r', 's',
  't', 'u', 'v', 'w', 'y', 'z', 'Ġ']
スペシャルトークンを追加する。
vocab = ["<|endoftext|>"] + alphabet.copy()
すべてのキャラクターを取得する。
splits = {word: [c for c in word] for word in word_freqs.keys()}
ペアごとの出現数を取得する関数。
def compute_pair_freqs(splits):
    pair_freqs = defaultdict(int)
    for word, freq in word_freqs.items():
        split = splits[word]
        if len(split) == 1:
            continue
        for i in range(len(split) - 1):
            pair = (split[i], split[i + 1])
            pair_freqs[pair] += freq
    return pair_freqs
一部を確認する。
pair_freqs = compute_pair_freqs(splits)

for i, key in enumerate(pair_freqs.keys()):
    print(f"{key}: {pair_freqs[key]}")
    if i >= 5:
        break
('T', 'h'): 3
('h', 'i'): 3
('i', 's'): 5
('Ġ', 'i'): 2
('Ġ', 't'): 7
('t', 'h'): 3
最も出現頻度の高いペアを取得。
best_pair = ""
max_freq = None

for pair, freq in pair_freqs.items():
    if max_freq is None or max_freq < freq:
        best_pair = pair
        max_freq = freq

print(best_pair, max_freq)
('Ġ', 't') 7
語彙にマージする。
merges = {("Ġ", "t"): "Ġt"}
vocab.append("Ġt")
def merge_pair(a, b, splits):
    for word in word_freqs:
        split = splits[word]
        if len(split) == 1:
            continue

        i = 0
        while i < len(split) - 1:
            if split[i] == a and split[i + 1] == b:
                split = split[:i] + [a + b] + split[i + 2 :]
            else:
                i += 1
        splits[word] = split
    return splits
splits = merge_pair("Ġ", "t", splits)
print(splits["Ġtrained"])
['Ġt', 'r', 'a', 'i', 'n', 'e', 'd']
語彙数が50になるまで繰り返す。
vocab_size = 50

while len(vocab) < vocab_size:
    pair_freqs = compute_pair_freqs(splits)
    best_pair = ""
    max_freq = None
    for pair, freq in pair_freqs.items():
        if max_freq is None or max_freq < freq:
            best_pair = pair
            max_freq = freq
    splits = merge_pair(*best_pair, splits)
    merges[best_pair] = best_pair[0] + best_pair[1]
    vocab.append(best_pair[0] + best_pair[1])
19のペアがマージされて、元々の31トークンと合わせて50になった。
print(merges)
{('Ġ', 't'): 'Ġt', ('i', 's'): 'is', ('e', 'r'): 'er', ('Ġ', 'a'): 'Ġa', ('Ġt', 'o'): 'Ġto', ('e', 'n'): 'en',
 ('T', 'h'): 'Th', ('Th', 'is'): 'This', ('o', 'u'): 'ou', ('s', 'e'): 'se', ('Ġto', 'k'): 'Ġtok',
 ('Ġtok', 'en'): 'Ġtoken', ('n', 'd'): 'nd', ('Ġ', 'is'): 'Ġis', ('Ġt', 'h'): 'Ġth', ('Ġth', 'e'): 'Ġthe',
 ('i', 'n'): 'in', ('Ġa', 'b'): 'Ġab', ('Ġtoken', 'i'): 'Ġtokeni'}
print(vocab)
['<|endoftext|>', ',', '.', 'C', 'F', 'H', 'T', 'a', 'b', 'c', 'd', 'e', 'f', 'g', 'h', 'i', 'k', 'l', 'm', 'n', 'o',
 'p', 'r', 's', 't', 'u', 'v', 'w', 'y', 'z', 'Ġ', 'Ġt', 'is', 'er', 'Ġa', 'Ġto', 'en', 'Th', 'This', 'ou', 'se',
 'Ġtok', 'Ġtoken', 'nd', 'Ġis', 'Ġth', 'Ġthe', 'in', 'Ġab', 'Ġtokeni']
train_new_from_iteratorは少し仕様が異なるので、全く同じ結果にはならない。
トーカナイズを行う関数。
def tokenize(text):
    pre_tokenize_result = tokenizer._tokenizer.pre_tokenizer.pre_tokenize_str(text)
    pre_tokenized_text = [word for word, offset in pre_tokenize_result]
    splits = [[l for l in word] for word in pre_tokenized_text]
    for pair, merge in merges.items():
        for idx, split in enumerate(splits):
            i = 0
            while i < len(split) - 1:
                if split[i] == pair[0] and split[i + 1] == pair[1]:
                    split = split[:i] + [merge] + split[i + 2 :]
                else:
                    i += 1
            splits[idx] = split

    return sum(splits, [])
トーカナイズしてみる。
※未知の文字があるとエラーになるので注意。
tokenize("This is not a token.")
['This', 'Ġis', 'Ġ', 'n', 'o', 't', 'Ġa', 'Ġtoken', '.']
WordPiece tokenization
WordPieceはBERT, DistilBERT, MobileBERT, Funnel Transformers, MPNET等に使われている。
Training algorithm
BPEと同様にWordPieceも特別なトークンと最初のアルファベットを含む小さな語彙から始る。
"word"を分割した場合以下の様になる。
w ##o ##r ##d
初期アルファベットには、単語の先頭に存在する全ての文字と、WordPiece接頭辞(##)で始まる単語の内部に存在する文字が含まれる。
その後マージが行われる。
ペアの選択方法として以下のスコアが使用される。
ペアの頻度を各パートの頻度の積で割っている。
例えば
("un", "##able")などは頻繁に出現するが独立して出現しやすいので必ずしもマージされない。
("hu", "##gging")などは独立して出現し辛いのでマージされやすい
score=(freq_of_pair)/(freq_of_first_element×freq_of_second_element)
こちらを対象にする。
("hug", 10), ("pug", 5), ("pun", 12), ("bun", 4), ("hugs", 5)
分割する。
("h" "##u" "##g", 10), ("p" "##u" "##g", 5), ("p" "##u" "##n", 12), ("b" "##u" "##n", 4), ("h" "##u" "##g" "##s", 5)
最も頻度の高いペアは("##u", "##g")だがスコアは高くない。(1 / 36)
>>> (10 + 5 + 5) / ((10 + 5 + 12 + 4 + 5) * (10 + 5 + 5))
0.027777777777777776
("##g", "##s")は頻度は高くないがスコアが高い。(1 / 20)
>>> (5) / ((10 + 5 + 5) * (5))
0.05
マージされた後の語彙。
Vocabulary: ["b", "h", "p", "##g", "##n", "##s", "##u", "##gs"]
Corpus: ("h" "##u" "##g", 10), ("p" "##u" "##g", 5), ("p" "##u" "##n", 12), ("b" "##u" "##n", 4), ("h" "##u" "##gs", 5)
次はスコアが同じものが並ぶが、最初の("h", "##u")がマージされる。
Vocabulary: ["b", "h", "p", "##g", "##n", "##s", "##u", "##gs", "hu"]
Corpus: ("hu" "##g", 10), ("p" "##u" "##g", 5), ("p" "##u" "##n", 12), ("b" "##u" "##n", 4), ("hu" "##gs", 5)
同様に次は("hu", "##g")がマージされる。
Vocabulary: ["b", "h", "p", "##g", "##n", "##s", "##u", "##gs", "hu", "hug"]
Corpus: ("hug", 10), ("p" "##u" "##g", 5), ("p" "##u" "##n", 12), ("b" "##u" "##n", 4), ("hu" "##gs", 5)
Tokenization algorithm
トークン化はWordPieceとBPEで異なり、WordPieceは学習したマージルールではなく、最終的な語彙のみを保存する。
トークン化する単語にたいして、WordPieceはボキャブラリーに含まれる最も長いサブワードを見つけ、それを元に分割する。
例えば
"hugs" > ["hug", "##s"]
となる。
BPEは学習したマージルールを順に適応するので、
"hugs" > ["hu", "##gs"]
となる。
"bugs"の場合は
"b"始まりの最も長いサブワード("b")を検索して、以下のように分割され、
["b", "##ugs"]
"##u"始まりの最も長いサブワード("##u")を検索して、以下のように分割され、
["b", "##u, "##gs"]
"##g"始まりの最も長いサブワード("##gs")を検索して、以下のようになる。
["b", "##u, "##gs"]
ボキャブラリーからサブワードを見つけることができないと、単語全体がunknownとしてトーカナイズされる。
例えば"mug"は["[UNK]"]に変換される。
"bum"もb u までは見つかるが"##m"がボキャブラリーにないので、["[UNK]"]に変換される。
["b", "##u", "[UNK]]"とはならない
Implementing WordPiece
コーパスは以下とする。
corpus = [
    "This is the Hugging Face Course.",
    "This chapter is about tokenization.",
    "This section shows several tokenizer algorithms.",
    "Hopefully, you will be able to understand how they are trained and generate tokens.",
]
pre-tokenizeするためのトーカナイザ。
from transformers import AutoTokenizer

tokenizer = AutoTokenizer.from_pretrained("bert-base-cased")
単語の出現頻度を取得する。
from collections import defaultdict

word_freqs = defaultdict(int)
for text in corpus:
    words_with_offsets = tokenizer.backend_tokenizer.pre_tokenizer.pre_tokenize_str(text)
    new_words = [word for word, offset in words_with_offsets]
    for word in new_words:
        word_freqs[word] += 1

word_freqs
defaultdict(
    int, {'This': 3, 'is': 2, 'the': 1, 'Hugging': 1, 'Face': 1, 'Course': 1, '.': 4, 'chapter': 1, 'about': 1,
    'tokenization': 1, 'section': 1, 'shows': 1, 'several': 1, 'tokenizer': 1, 'algorithms': 1, 'Hopefully': 1,
    ',': 1, 'you': 1, 'will': 1, 'be': 1, 'able': 1, 'to': 1, 'understand': 1, 'how': 1, 'they': 1, 'are': 1,
    'trained': 1, 'and': 1, 'generate': 1, 'tokens': 1})
ベース語彙を作成する。
先頭文字以外には##をつける。
alphabet = []
for word in word_freqs.keys():
    if word[0] not in alphabet:
        alphabet.append(word[0])
    for letter in word[1:]:
        if f"##{letter}" not in alphabet:
            alphabet.append(f"##{letter}")

alphabet.sort()
alphabet

print(alphabet)
['##a', '##b', '##c', '##d', '##e', '##f', '##g', '##h', '##i', '##k', '##l', '##m', '##n', '##o', '##p', '##r', '##s',
 '##t', '##u', '##v', '##w', '##y', '##z', ',', '.', 'C', 'F', 'H', 'T', 'a', 'b', 'c', 'g', 'h', 'i', 's', 't', 'u',
 'w', 'y']
スペシャルトークンを追加する。
vocab = ["[PAD]", "[UNK]", "[CLS]", "[SEP]", "[MASK]"] + alphabet.copy()
すべてのキャラクターを取得する。
splits = {
    word: [c if i == 0 else f"##{c}" for i, c in enumerate(word)]
    for word in word_freqs.keys()
}
各ペアのスコアを計算する。
def compute_pair_scores(splits):
    letter_freqs = defaultdict(int)
    pair_freqs = defaultdict(int)
    for word, freq in word_freqs.items():
        split = splits[word]
        if len(split) == 1:
            letter_freqs[split[0]] += freq
            continue
        for i in range(len(split) - 1):
            pair = (split[i], split[i + 1])
            letter_freqs[split[i]] += freq
            pair_freqs[pair] += freq
        letter_freqs[split[-1]] += freq

    scores = {
        pair: freq / (letter_freqs[pair[0]] * letter_freqs[pair[1]])
        for pair, freq in pair_freqs.items()
    }
    return scores
一部を見てみる。
pair_scores = compute_pair_scores(splits)
for i, key in enumerate(pair_scores.keys()):
    print(f"{key}: {pair_scores[key]}")
    if i >= 5:
        break
('T', '##h'): 0.125
('##h', '##i'): 0.03409090909090909
('##i', '##s'): 0.02727272727272727
('i', '##s'): 0.1
('t', '##h'): 0.03571428571428571
('##h', '##e'): 0.011904761904761904
最も大きなスコアを取得。
best_pair = ""
max_score = None
for pair, score in pair_scores.items():
    if max_score is None or max_score < score:
        best_pair = pair
        max_score = score

print(best_pair, max_score)
('a', '##b') 0.2
語彙に追加。
vocab.append("ab")
ペアになったものをマージする関数。
def merge_pair(a, b, splits):
    for word in word_freqs:
        split = splits[word]
        if len(split) == 1:
            continue
        i = 0
        while i < len(split) - 1:
            if split[i] == a and split[i + 1] == b:
                merge = a + b[2:] if b.startswith("##") else a + b
                split = split[:i] + [merge] + split[i + 2 :]
            else:
                i += 1
        splits[word] = split
    return splits
マージ。
splits = merge_pair("a", "##b", splits)
splits["about"]
['ab', '##o', '##u', '##t']
語彙数が70になるまで繰り返す。
vocab_size = 70
while len(vocab) < vocab_size:
    scores = compute_pair_scores(splits)
    best_pair, max_score = "", None
    for pair, score in scores.items():
        if max_score is None or max_score < score:
            best_pair = pair
            max_score = score
    splits = merge_pair(*best_pair, splits)
    new_token = (
        best_pair[0] + best_pair[1][2:]
        if best_pair[1].startswith("##")
        else best_pair[0] + best_pair[1]
    )
    vocab.append(new_token)
print(vocab)
['[PAD]', '[UNK]', '[CLS]', '[SEP]', '[MASK]', '##a', '##b', '##c', '##d', '##e', '##f', '##g', '##h', '##i', '##k',
 '##l', '##m', '##n', '##o', '##p', '##r', '##s', '##t', '##u', '##v', '##w', '##y', '##z', ',', '.', 'C', 'F', 'H',
 'T', 'a', 'b', 'c', 'g', 'h', 'i', 's', 't', 'u', 'w', 'y', 'ab', '##fu', 'Fa', 'Fac', '##ct', '##ful', '##full', '##fully',
 'Th', 'ch', '##hm', 'cha', 'chap', 'chapt', '##thm', 'Hu', 'Hug', 'Hugg', 'sh', 'th', 'is', '##thms', '##za', '##zat',
 '##ut']
BPEと比べると学習スピードが少し早い。
また、同じコーパスにtrain_new_from_iteratorを使っても、全く同じ語彙が得られるわけではない。
これはTokenizersライブラリが学習用にWordPieceを実装しておらず(内部を完全に把握していないため)、代わりにBPEを使用しているため。
単語を分割するメソッド。
def encode_word(word):
    tokens = []
    while len(word) > 0:
        i = len(word)
        while i > 0 and word[:i] not in vocab:
            i -= 1
        if i == 0:
            return ["[UNK]"]
        tokens.append(word[:i])
        word = word[i:]
        if len(word) > 0:
            word = f"##{word}"
    return tokens
実行してみる。
print(encode_word("Hugging"))
print(encode_word("HOgging"))
['Hugg', '##i', '##n', '##g']
['[UNK]']
最終的にトーカナイズするメソッド。
def tokenize(text):
    pre_tokenize_result = tokenizer._tokenizer.pre_tokenizer.pre_tokenize_str(text)
    pre_tokenized_text = [word for word, offset in pre_tokenize_result]
    encoded_words = [encode_word(word) for word in pre_tokenized_text]
    return sum(encoded_words, [])
tokenize("This is the Hugging Face course!")
['Th', '##i', '##s', 'is', 'th', '##e', 'Hugg', '##i', '##n', '##g', 'Fac', '##e', 'c', '##o', '##u', '##r', '##s',
 '##e', '[UNK]']
Unigram tokenization
UnigramアルゴリズムはSentencePieceでよく使われる。
AlBERT, T5, mBART, Big Bird, XLNet
等で使われる。
Training algorithm
大きな語彙集から開始し、目的の語彙サイズに達するまでトークンを削除する方式。
ベースとなる語彙の作り方はpre-tokenizedされた単語を分割して作っても良いし、初期コーパスに大きな語彙数をしていしてBPEを適応して作ることもある。
各ステップでコーパスに対して、現状の語彙集を使ってlossを計算する。
またそれぞれの語彙に対してそれが削除されたときのlossを計算する。
その中からlossが増加しない(必要性が低い)シンボルを削除する。
これはコストの掛かる処理なので、1つのシンボルを削除するだけではなく
p: 最低のloss増加割合。 通常は10%か20%
を設定してその割合で削除する。
これを指定の語彙数になるまで繰り返す。
ベースとなる文字は決して削除されない。
使用するコーパス。
("hug", 10), ("pug", 5), ("pun", 12), ("bun", 4), ("hugs", 5)
ベース語彙。
分割できる全パターンの組み合わせ。
["h", "u", "g", "hu", "ug", "p", "pu", "n", "un", "b", "bu", "s", "hug", "gs", "ugs"]
Tokenization algorithm
Unigramモデルはlanguage modelのようなもの。
前の文脈からトークンXが出現する確率がそのままトークンXの確率になる。
あるトークンの確率
コーパスの中に現れる頻度 / 語彙にある全てのトークンの頻度の合計
すべてのトークンを足すと1になる。
"ug"は20回現れるので
20/210
になる。
すべての語彙の頻度一覧。
足すと210になる。
("h", 15) ("u", 36) ("g", 20) ("hu", 15) ("ug", 20) ("p", 17) ("pu", 17) ("n", 16)
("un", 16) ("b", 4) ("bu", 4) ("s", 5) ("hug", 15) ("gs", 5) ("ugs", 5)
単語をトーカナイズするときは、すべての分割方法に対してUnigram modelで確率を計算する。
確率は各トークンの確率の積。
"pug"に対する["p", "u", "g"]の確率は

※5/210の部分17/210が正しい?
"pug"に対する["pu", "g"]の確率は

※5/210の部分17/210が正しい?
一般的に、可能な限り少ないトークンでトークン化された単語が最も高い確率を持つ。
最も確率の高い分割方法を採用する。
"pug"の分割方法の確率を並べたもの。
["p", "u", "g"] : 0.000389
["p", "ug"] : 0.0022676
["pu", "g"] : 0.0022676
この場合は["p", "ug"]か["pu", "g"]のどちらか先に判定したものが採用される。
一般的にすべての分割方法の確率を計算するのは大変なので、Viterbiアルゴリズムで効率化する。
グラフを作って最もスコアの良いパスを見つけるアルゴリズム。
"unhug"というワードは["un", "hug"]に分割される。
最もスコアが良い。
Character 0 (u): "u" (score 0.171429)
Character 1 (n): "un" (score 0.076191)
Character 2 (h): "un" "h" (score 0.005442)
Character 3 (u): "un" "hu" (score 0.005442)
Character 4 (g): "un" "hug" (score 0.005442)
Back to training
lossは現在の語彙集とUnigram modelによって計算される。
コーパス。
("hug", 10), ("pug", 5), ("pun", 12), ("bun", 4), ("hugs", 5)
各単語の分割とスコア。
"hug": ["hug"] (score 0.071428)
"pug": ["pu", "g"] (score 0.007710)
"pun": ["pu", "n"] (score 0.006168)
"bun": ["bu", "n"] (score 0.001451)
"hugs": ["hug", "s"] (score 0.001701)
lossの計算。
10 * (-log(0.071428)) + 5 * (-log(0.007710)) + 12 * (-log(0.006168)) + 4 * (-log(0.001451)) + 5 * (-log(0.001701)) = 169.8
ここで各トークンを取り除くと損失にどのような影響があるかを計算する。
例えば"pu"を取り除いても、"pug"を["p", "ug"]と分割すれば同じスコアになるので損失は変わらない。
※語彙から削除されることになる。
例えば"hug"を取り除くと、以下のようにlossが増える。
"hug": ["hu", "g"] (score 0.006802)
"hugs": ["hu", "gs"] (score 0.001701)
細かくは以下の値lossが増える。
"hug"の分。
- 10 * (-log(0.071428)) + 10 * (-log(0.006802)) = 23.5
Implementing Unigram
Unigramの実装を見てみる。
コーパスは以下とする。
corpus = [
    "This is the Hugging Face Course.",
    "This chapter is about tokenization.",
    "This section shows several tokenizer algorithms.",
    "Hopefully, you will be able to understand how they are trained and generate tokens.",
]
ベースとなるトーカナイザの準備。
from transformers import AutoTokenizer

tokenizer = AutoTokenizer.from_pretrained("xlnet-base-cased")
単語の出現頻度を取得する。
from collections import defaultdict

word_freqs = defaultdict(int)
for text in corpus:
    words_with_offsets = tokenizer.backend_tokenizer.pre_tokenizer.pre_tokenize_str(text)
    new_words = [word for word, offset in words_with_offsets]
    for word in new_words:
        word_freqs[word] += 1

word_freqs
最初に大きな語彙集をつくる。
分割できる全パターンの組み合わせ。
最後に複数文字列のサブワードを出現頻度で並べる。
char_freqs = defaultdict(int)
subwords_freqs = defaultdict(int)
for word, freq in word_freqs.items():
    for i in range(len(word)):
        char_freqs[word[i]] += freq
        # Loop through the subwords of length at least 2
        for j in range(i + 2, len(word) + 1):
            subwords_freqs[word[i:j]] += freq

# Sort subwords by frequency
sorted_subwords = sorted(subwords_freqs.items(), key=lambda x: x[1], reverse=True)
sorted_subwords[:10]
[('▁t', 7), ('is', 5), ('er', 5), ('▁a', 5), ('▁to', 4), ('to', 4), ('en', 4), ('▁T', 3), ('▁Th', 3), ('▁Thi', 3)]
単語1文字と、複数文字列のサブワードの内頻度が多い300個を最初の語彙集とする。
token_freqs = list(char_freqs.items()) + sorted_subwords[: 300 - len(char_freqs)]
token_freqs = {token: freq for token, freq in token_freqs}
SentencePieceはEnhanced Suffix Array (ESA)と呼ばれるより効率的なアルゴリズムを使って初期語彙を作成する。
すべての語彙の頻度の和と、それぞれの語彙の確率を取得する。
対数を取ることで計算を安定させる。
from math import log

total_sum = sum([freq for token, freq in token_freqs.items()])
model = {token: -log(freq / total_sum) for token, freq in token_freqs.items()}
Viterbiアルゴリズムを使用して単語をトークン化する関数。
def encode_word(word, model):
    best_segmentations = [{"start": 0, "score": 1}] + [
        {"start": None, "score": None} for _ in range(len(word))
    ]
    for start_idx in range(len(word)):
        # This should be properly filled by the previous steps of the loop
        best_score_at_start = best_segmentations[start_idx]["score"]
        for end_idx in range(start_idx + 1, len(word) + 1):
            token = word[start_idx:end_idx]
            if token in model and best_score_at_start is not None:
                score = model[token] + best_score_at_start
                # If we have found a better segmentation ending at end_idx, we update
                if (
                    best_segmentations[end_idx]["score"] is None
                    or best_segmentations[end_idx]["score"] > score
                ):
                    best_segmentations[end_idx] = {"start": start_idx, "score": score}

    segmentation = best_segmentations[-1]
    if segmentation["score"] is None:
        # We did not find a tokenization of the word -> unknown
        return ["<unk>"], None

    score = segmentation["score"]
    start = segmentation["start"]
    end = len(word)
    tokens = []
    while start != 0:
        tokens.insert(0, word[start:end])
        next_start = best_segmentations[start]["start"]
        end = start
        start = next_start
    tokens.insert(0, word[start:end])
    return tokens, score
試しにトークン化してみる。
print(encode_word("Hopefully", model))
print(encode_word("This", model))
(['H', 'o', 'p', 'e', 'f', 'u', 'll', 'y'], 41.5157494601402)
(['This'], 6.288267030694535)
全コーパスに対するlossの計算。
def compute_loss(model):
    loss = 0
    for word, freq in word_freqs.items():
        _, word_loss = encode_word(word, model)
        loss += freq * word_loss
    return loss
現状のlossを計算してみる。
compute_loss(model)
413.10377642940875
各語彙を削除したときの、lossの変化の一覧を取得する。
import copy


def compute_scores(model):
    scores = {}
    model_loss = compute_loss(model)
    for token, score in model.items():
        # We always keep tokens of length 1
        if len(token) == 1:
            continue
        model_without_token = copy.deepcopy(model)
        _ = model_without_token.pop(token)
        scores[token] = compute_loss(model_without_token) - model_loss
    return scores
scores = compute_scores(model)
print(scores["ll"])
print(scores["his"])
6.376412403623874
0.0
SentencePieceでは削除する語彙を残っている語彙のセグメンテーションで置き換える近似を使って効率化している。
語彙数が100以下になるまで語彙を除去していく。
percent_to_remove = 0.1
while len(model) > 100:
    scores = compute_scores(model)
    sorted_scores = sorted(scores.items(), key=lambda x: x[1])
    # Remove percent_to_remove tokens with the lowest scores.
    for i in range(int(len(model) * percent_to_remove)):
        _ = token_freqs.pop(sorted_scores[i][0])

    total_sum = sum([freq for token, freq in token_freqs.items()])
    model = {token: -log(freq / total_sum) for token, freq in token_freqs.items()}
トーカナイズしてみる。
def tokenize(text, model):
    words_with_offsets = tokenizer.backend_tokenizer.pre_tokenizer.pre_tokenize_str(text)
    pre_tokenized_text = [word for word, offset in words_with_offsets]
    encoded_words = [encode_word(word, model)[0] for word in pre_tokenized_text]
    return sum(encoded_words, [])


tokenize("This is the Hugging Face course.", model)
['▁This', '▁is', '▁the', '▁Hugging', '▁Face', '▁', 'c', 'ou', 'r', 's', 'e', '.']
Building a tokenizer, block by block
トークン化のステップ。
-
Normalization
スペースやアクセント記号の除去、Unicode 正規化など -
Pre-tokenization
テキストを単語に分割 -
Running the input through the model
トークンのシーケンスを生成
BPE、WordPiece、Unigram など -
Post-processing
スペシャルトークン、アテンションマスク、token type IDsの作成

ここではゼロからトーカナイザを作成する方法を見ていく。
それぞれのコンポーネントは以下にまとまっている。
Acquiring a corpus
コーパスの取得。
from datasets import load_dataset

dataset = load_dataset("wikitext", name="wikitext-2-raw-v1", split="train")


def get_training_corpus():
    for i in range(0, len(dataset), 1000):
        yield dataset[i : i + 1000]["text"]
テキストファイルから学習したい場合にファイルを作成する方法。
with open("wikitext-2.txt", "w", encoding="utf-8") as f:
    for i in range(len(dataset)):
        f.write(dataset[i]["text"] + "\n")
Building a WordPiece tokenizer from scratch
WordPiece modelを指定してトーカナイザの作成。
from tokenizers import (
    decoders,
    models,
    normalizers,
    pre_tokenizers,
    processors,
    trainers,
    Tokenizer,
)

tokenizer = Tokenizer(models.WordPiece(unk_token="[UNK]"))
normalizerの設定。
tokenizer.normalizer = normalizers.BertNormalizer(lowercase=True)
normalizerを手動で設定する場合。
※NFD Unicode normalizerが無いとStripAccents normalizerがアクセント記号付き文字を正しく認識できない。
tokenizer.normalizer = normalizers.Sequence(
    [normalizers.NFD(), normalizers.Lowercase(), normalizers.StripAccents()]
)
動作確認。
print(tokenizer.normalizer.normalize_str("Héllò hôw are ü?"))
hello how are u?
pre_tokenizerの設定。
tokenizer.pre_tokenizer = pre_tokenizers.BertPreTokenizer()
pre_tokenizerを手動で設定する場合。
tokenizer.pre_tokenizer = pre_tokenizers.Whitespace()
ホワイトスペースと、文字、数字、アンダースコア文字以外のすべての文字を分割する。
動作確認。
tokenizer.pre_tokenizer.pre_tokenize_str("Let's test my pre-tokenizer.")
[('Let', (0, 3)), ("'", (3, 4)), ('s', (4, 5)), ('test', (6, 10)), ('my', (11, 13)), ('pre', (14, 17)),
 ('-', (17, 18)), ('tokenizer', (18, 27)), ('.', (27, 28))]
ホワイトスペースのみで分割したい場合はこちらを使う。
pre_tokenizer = pre_tokenizers.WhitespaceSplit()
pre_tokenizer.pre_tokenize_str("Let's test my pre-tokenizer.")
[("Let's", (0, 5)), ('test', (6, 10)), ('my', (11, 13)), ('pre-tokenizer.', (14, 28))]
pre_tokenizerをSequenceで手動で設定する場合。
pre_tokenizer = pre_tokenizers.Sequence(
    [pre_tokenizers.WhitespaceSplit(), pre_tokenizers.Punctuation()]
)
pre_tokenizer.pre_tokenize_str("Let's test my pre-tokenizer.")
[('Let', (0, 3)), ("'", (3, 4)), ('s', (4, 5)), ('test', (6, 10)), ('my', (11, 13)), ('pre', (14, 17)),
 ('-', (17, 18)), ('tokenizer', (18, 27)), ('.', (27, 28))]
modelは初期化済みだが、WordPieceTrainerを使って訓練する必要がある。
最初にすべてのスペシャルトークンを設定する。
special_tokens = ["[UNK]", "[PAD]", "[CLS]", "[SEP]", "[MASK]"]
trainer = trainers.WordPieceTrainer(vocab_size=25000, special_tokens=special_tokens)
コーパスを使って訓練する。
tokenizer.train_from_iterator(get_training_corpus(), trainer=trainer)
テキストファイルを使って訓練する場合。
tokenizer.model = models.WordPiece(unk_token="[UNK]")
tokenizer.train(["wikitext-2.txt"], trainer=trainer)
エンコードしてみる。
encodingには以下の属性がセットされている。
ids, type_ids, tokens, offsets, attention_mask, special_tokens_mask, and overflowing
encoding = tokenizer.encode("Let's test this tokenizer.")
print(encoding.tokens)
['let', "'", 's', 'test', 'this', 'tok', '##eni', '##zer', '.']
post-processingを設定する前に[CLS][SEP]トークンのIDを取得する。
cls_token_id = tokenizer.token_to_id("[CLS]")
sep_token_id = tokenizer.token_to_id("[SEP]")
print(cls_token_id, sep_token_id)
(2, 3)
TemplateProcessorを定義する。
古典的なBERT template
$A > first (or single) sentence
$B > second sentence
colonの後ろにはtoken type IDを記載する。
tokenizer.post_processor = processors.TemplateProcessing(
    single=f"[CLS]:0 $A:0 [SEP]:0",
    pair=f"[CLS]:0 $A:0 [SEP]:0 $B:1 [SEP]:1",
    special_tokens=[("[CLS]", cls_token_id), ("[SEP]", sep_token_id)],
)
改めてエンコードしてみる。
スペシャルトークンが入っている。
encoding = tokenizer.encode("Let's test this tokenizer.")
print(encoding.tokens)
['[CLS]', 'let', "'", 's', 'test', 'this', 'tok', '##eni', '##zer', '.', '[SEP]']
文のペアをエンコードしてみる。
encoding = tokenizer.encode("Let's test this tokenizer...", "on a pair of sentences.")
print(encoding.tokens)
print(encoding.type_ids)
['[CLS]', 'let', "'", 's', 'test', 'this', 'tok', '##eni', '##zer', '...', '[SEP]', 'on', 'a', 'pair', 'of', 'sentences', '.', '[SEP]']
[0, 0, 0, 0, 0, 0, 0, 0, 0, 0, 0, 1, 1, 1, 1, 1, 1, 1]
最後にデコーダを設定する。
tokenizer.decoder = decoders.WordPiece(prefix="##")
デコードしてみる。
tokenizer.decode(encoding.ids)
"let's test this tokenizer... on a pair of sentences."
トーカナイザをjsonとして保存する。
tokenizer.save("tokenizer.json")
ロードする場合。
new_tokenizer = Tokenizer.from_file("tokenizer.json")
作成したトーカナイザを使うには、PreTrainedTokenizerFastでラップする必要がある。
ジェネリッククラスを使うか、BertTokenizerFastなどの既存のモデルに対応するクラスを使用する。
今回は0ベースで作成したのでジェネリッククラスを使う。
スペシャルトークンを指定しないと認識してくれないので注意。
from transformers import PreTrainedTokenizerFast

wrapped_tokenizer = PreTrainedTokenizerFast(
    tokenizer_object=tokenizer,
    # tokenizer_file="tokenizer.json", # You can load from the tokenizer file, alternatively
    unk_token="[UNK]",
    pad_token="[PAD]",
    cls_token="[CLS]",
    sep_token="[SEP]",
    mask_token="[MASK]",
)
既存のモデルに対応するクラスを使用する場合。
from transformers import BertTokenizerFast

wrapped_tokenizer = BertTokenizerFast(tokenizer_object=tokenizer)
Building a BPE tokenizer from scratch
BPE modelを指定してトーカナイザの作成。
tokenizer = Tokenizer(models.BPE())
ゼロから学習するので語彙で初期化する必要はない。
GPT-2はバイトレベルのBPEを使用するため、unk_tokenを指定する必要もない。
GPT-2はnormalizerを使用しないので、スキップしてpre-tokenizationに進む。
ByteLevelのpre_tokenizerを設定。
tokenizer.pre_tokenizer = pre_tokenizers.ByteLevel(add_prefix_space=False)
動作確認。
tokenizer.pre_tokenizer.pre_tokenize_str("Let's test pre-tokenization!")
[('Let', (0, 3)), ("'s", (3, 5)), ('Ġtest', (5, 10)), ('Ġpre', (10, 14)), ('-', (14, 15)),
 ('tokenization', (15, 27)), ('!', (27, 28))]
modelの訓練を行う。
スペシャルトークンとしてend-of-textを指定する。
trainer = trainers.BpeTrainer(vocab_size=25000, special_tokens=["<|endoftext|>"])
tokenizer.train_from_iterator(get_training_corpus(), trainer=trainer)
テキストファイルで訓練する場合。
tokenizer.model = models.BPE()
tokenizer.train(["wikitext-2.txt"], trainer=trainer)
エンコードしてみる。
encoding = tokenizer.encode("Let's test this tokenizer.")
print(encoding.tokens)
['L', 'et', "'", 's', 'Ġtest', 'Ġthis', 'Ġto', 'ken', 'izer', '.']
post-processingの設定。
trim_offsets=Falseオプションは、'Ġ'で始まるトークンのオフセットをそのままにしておくオプション。
tokenizer.post_processor = processors.ByteLevel(trim_offsets=False)
スペースの扱いに注意。
sentence = "Let's test this tokenizer."
encoding = tokenizer.encode(sentence)
start, end = encoding.offsets[4]
sentence[start:end]
' test'
decoderの設定。
tokenizer.decoder = decoders.ByteLevel()
デコードしてみる。
tokenizer.decode(encoding.ids)
"Let's test this tokenizer."
PreTrainedTokenizerFastでラップする。
from transformers import PreTrainedTokenizerFast

wrapped_tokenizer = PreTrainedTokenizerFast(
    tokenizer_object=tokenizer,
    bos_token="<|endoftext|>",
    eos_token="<|endoftext|>",
)
対応するクラスを使用する場合。
from transformers import GPT2TokenizerFast

wrapped_tokenizer = GPT2TokenizerFast(tokenizer_object=tokenizer)
Building a Unigram tokenizer from scratch
Unigram modelを指定してトーカナイザの作成。
tokenizer = Tokenizer(models.Unigram())
normalizerの設定。
SentencePieceに習っている。
from tokenizers import Regex

tokenizer.normalizer = normalizers.Sequence(
    [
        normalizers.Replace("``", '"'),
        normalizers.Replace("''", '"'),
        normalizers.NFKD(),
        normalizers.StripAccents(),
        normalizers.Replace(Regex(" {2,}"), " "),
    ]
)
pre-tokenizerの設定。
MetaspaceはSentencePiece用のトーカナイザ。
tokenizer.pre_tokenizer = pre_tokenizers.Metaspace()
動作確認。
tokenizer.pre_tokenizer.pre_tokenize_str("Let's test the pre-tokenizer!")
[("▁Let's", (0, 5)), ('▁test', (5, 10)), ('▁the', (10, 14)), ('▁pre-tokenizer!', (14, 29))]
modelの訓練。
unk_tokenの指定を忘れないこと。
special_tokens = ["<cls>", "<sep>", "<unk>", "<pad>", "<mask>", "<s>", "</s>"]
trainer = trainers.UnigramTrainer(
    vocab_size=25000, special_tokens=special_tokens, unk_token="<unk>"
)
tokenizer.train_from_iterator(get_training_corpus(), trainer=trainer)
テキストファイルで訓練する場合。
tokenizer.model = models.Unigram()
tokenizer.train(["wikitext-2.txt"], trainer=trainer)
エンコードしてみる。
encoding = tokenizer.encode("Let's test this tokenizer.")
print(encoding.tokens)
['▁Let', "'", 's', '▁test', '▁this', '▁to', 'ken', 'izer', '.']
XLNetは<cls>トークンを文末に置く。
type ID は2になる。
パディングは左に入る。
post-processingを設定する前に<cls><sep>トークンのIDを取得する。
cls_token_id = tokenizer.token_to_id("<cls>")
sep_token_id = tokenizer.token_to_id("<sep>")
print(cls_token_id, sep_token_id)
0 1
post_processorの設定。
tokenizer.post_processor = processors.TemplateProcessing(
    single="$A:0 <sep>:0 <cls>:2",
    pair="$A:0 <sep>:0 $B:1 <sep>:1 <cls>:2",
    special_tokens=[("<sep>", sep_token_id), ("<cls>", cls_token_id)],
)
エンコードしてみる。
encoding = tokenizer.encode("Let's test this tokenizer...", "on a pair of sentences!")
print(encoding.tokens)
print(encoding.type_ids)
['▁Let', "'", 's', '▁test', '▁this', '▁to', 'ken', 'izer', '.', '.', '.', '<sep>', '▁', 'on', '▁', 'a', '▁pair',
  '▁of', '▁sentence', 's', '!', '<sep>', '<cls>']
[0, 0, 0, 0, 0, 0, 0, 0, 0, 0, 0, 0, 1, 1, 1, 1, 1, 1, 1, 1, 1, 1, 2]
decoderの設定。
tokenizer.decoder = decoders.Metaspace()
PreTrainedTokenizerFastでラップする。
パディングを指定する必要がある。
from transformers import PreTrainedTokenizerFast

wrapped_tokenizer = PreTrainedTokenizerFast(
    tokenizer_object=tokenizer,
    bos_token="<s>",
    eos_token="</s>",
    unk_token="<unk>",
    pad_token="<pad>",
    cls_token="<cls>",
    sep_token="<sep>",
    mask_token="<mask>",
    padding_side="left",
)
対応するクラスを使用する場合。
from transformers import XLNetTokenizerFast

wrapped_tokenizer = XLNetTokenizerFast(tokenizer_object=tokenizer)
Discussion