Hugging Face NLP Course - 2. USING 🤗 TRANSFORMERS




概要
の要点纏め。
Behind the pipeline
pipelineがやっていること
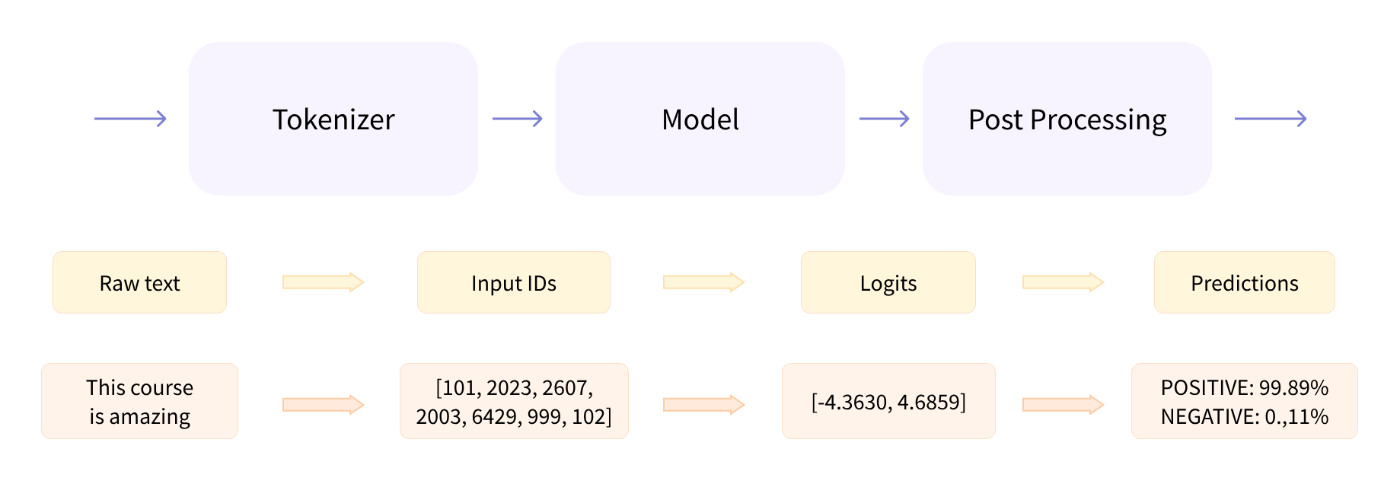
Preprocessing with a tokenizer
tokenizerがやっていること
このすべての前処理は、モデルが事前学習されたときとまったく同じ方法で行われる必要がある。
- Splitting the input into words, subwords, or symbols (like punctuation) that are called tokens
- Mapping each token to an integer
- Adding additional inputs that may be useful to the model
トーカナイザーの読み込み
from transformers import AutoTokenizer

checkpoint = "distilbert-base-uncased-finetuned-sst-2-english"
tokenizer = AutoTokenizer.from_pretrained(checkpoint)
トーカナイズ
return_tensors="pt"
でpytorch用のテンソルを返す
raw_inputs = [
    "I've been waiting for a HuggingFace course my whole life.",
    "I hate this so much!",
]
inputs = tokenizer(raw_inputs, padding=True, truncation=True, return_tensors="pt")
print(inputs)
{
    'input_ids': tensor([
        [  101,  1045,  1005,  2310,  2042,  3403,  2005,  1037, 17662, 12172, 2607,  2026,  2878,  2166,  1012,   102],
        [  101,  1045,  5223,  2023,  2061,  2172,   999,   102,     0,     0,     0,     0,     0,     0,     0,     0]
    ]),
    'attention_mask': tensor([
        [1, 1, 1, 1, 1, 1, 1, 1, 1, 1, 1, 1, 1, 1, 1, 1],
        [1, 1, 1, 1, 1, 1, 1, 1, 0, 0, 0, 0, 0, 0, 0, 0]
    ])
}
Going through the model
モデルの作成(ロード)
from transformers import AutoModel

checkpoint = "distilbert-base-uncased-finetuned-sst-2-english"
model = AutoModel.from_pretrained(checkpoint)
モデルにinputsを渡すと、hidden states(隠れ状態)またはfeatures(特徴)と呼ばれるものを返す。
hidden statesはそのままで使用されることもあるが、通常はheadと呼ばれる部分への入力に使用される。
headはタスクによって異なる。
A high-dimensional vector?
モデルの一般的な戻り値
-
Batch size: 与える文章の数
-
Sequence length: 与える文章のトークン数
-
Hidden size: 高次元のベクターサイズ
確認
outputs = model(**inputs)
print(outputs.last_hidden_state.shape)
torch.Size([2, 16, 768])
outputsはnamedtuplesの様に振る舞うので、
outputs[0]
の様にインデックスアクセスも出来る。
以下はoutputs.last_hidden_state.shapeと同じ意味になる。
print(outputs[0].shape)
torch.Size([2, 16, 768])
Model heads: Making sense out of numbers
headはhidden statesとして取得した高次元ベクトルを指定の次元に変換する。
単数もしくは複数のlinear layerで構成される。

タスクに応じた様々なアーキテクチャ
*Model (retrieve the hidden states)
*ForCausalLM
*ForMaskedLM
*ForMultipleChoice
*ForQuestionAnswering
*ForSequenceClassification
*ForTokenClassification
and others 🤗
sequence classification head
を実装したモデルを使用する例。
from transformers import AutoModelForSequenceClassification

checkpoint = "distilbert-base-uncased-finetuned-sst-2-english"
model = AutoModelForSequenceClassification.from_pretrained(checkpoint)
outputs = model(**inputs)
print(outputs.logits.shape)
torch.Size([2, 2])
Postprocessing the output
logitsを表示
print(outputs.logits)
tensor([[4.0195e-02, 9.5980e-01],
        [9.9946e-01, 5.4418e-04]], grad_fn=<SoftmaxBackward>)
1つめのセンテンス
[0.0402, 0.9598]
2つめのセンテンス
[0.9995, 0.0005]
各インデックスとラベルの対応
model.config.id2label
{0: 'NEGATIVE', 1: 'POSITIVE'}
First sentence: NEGATIVE: 0.0402, POSITIVE: 0.9598
Second sentence: NEGATIVE: 0.9995, POSITIVE: 0.0005
Models
Creating a Transformer
Bertモデルを生成する例
重みは完全にランダム
from transformers import BertConfig, BertModel

# Building the config
config = BertConfig()

# Building the model from the config
model = BertModel(config)
print(config)
BertConfig {
  [...]
  "hidden_size": 768,
  "intermediate_size": 3072,
  "max_position_embeddings": 512,
  "num_attention_heads": 12,
  "num_hidden_layers": 12,
  [...]
}
Different loading methods
訓練済みの重みでモデルをロード
実際は同等の AutoModel クラスを使うほうが好ましい。
(アーキテクチャが変わっても対応できるため)
BertConfigもチェックポイントの作者が設定したものになる。
モデルカードに詳細が記載してある。
from transformers import BertModel

model = BertModel.from_pretrained("bert-base-cased")
重みがキャッシュされる位置
※HF_HOMEで変更可能
~/.cache/huggingface/transformers
BertModelに対応したチェックポイントの一覧
Saving methods
モデルのセーブ
model.save_pretrained("directory_on_my_computer")
2つのファイルが保存される
!ls directory_on_my_computer
config.json pytorch_model.bin
config.jsonの中身
!cat directory_on_my_computer/config.json
{
  "_name_or_path": "bert-base-cased",
  "architectures": [
    "BertModel"
  ],
  "attention_probs_dropout_prob": 0.1,
  "classifier_dropout": null,
  "gradient_checkpointing": false,
  "hidden_act": "gelu",
  "hidden_dropout_prob": 0.1,
  "hidden_size": 768,
  "initializer_range": 0.02,
  "intermediate_size": 3072,
  "layer_norm_eps": 1e-12,
  "max_position_embeddings": 512,
  "model_type": "bert",
  "num_attention_heads": 12,
  "num_hidden_layers": 12,
  "pad_token_id": 0,
  "position_embedding_type": "absolute",
  "torch_dtype": "float32",
  "transformers_version": "4.34.0",
  "type_vocab_size": 2,
  "use_cache": true,
  "vocab_size": 28996
}
Tokenizers
Word-based
単語単位で分割するパターン
空白で分割するイメージ

句読点のルールを加味したパターンも有る。
vocabularies(語彙)は独立したトークンの総数の事。
各単語にはIDが割り当てられ、0から始まり語彙の大きさまで割り当てられる。モデルはこれらのIDを使って各単語を識別する。
すべての単語をカバーすると英語だけでも500,000 wordsあり、膨大なID数になる。
また単数形複数形なども別のトークンとして管理される。
語彙にないトークンを“unknown” トークンとして扱う。
”[UNK]”や””として表現される。
Character-based
文字単位で分割するパターン
vocabularies(語彙)が少なくなる。
“unknown” トークンが少なくなる。
などのメリットがある。
一方で
文字自体は意味を持っていない。※中国語など例外はある。
トークン数が膨大になる。
などの問題がある。

Subword tokenization
上記2つのアプローチを併用した良いパターン。
単語を更に分割する
頻繁に使われる単語はより小さなサブワードに分割すべきではないが、希少な単語は意味のあるサブワードに分解すべきであるという原則に基づいている。

意味を維持しつつ語彙数を抑えることが可能。
And more!
その他のテクニックもある
- Byte-level BPE, as used in GPT-2
- WordPiece, as used in BERT
- SentencePiece or Unigram, as used in several multilingual models
Loading and saving
トーカナイザーのロードの例
from transformers import BertTokenizer

tokenizer = BertTokenizer.from_pretrained("bert-base-cased")
AutoTokenizerでロードする例(推奨)
from transformers import AutoTokenizer

tokenizer = AutoTokenizer.from_pretrained("bert-base-cased")
tokenizer("Using a Transformer network is simple")
{'input_ids': [101, 7993, 170, 11303, 1200, 2443, 1110, 3014, 102],
 'token_type_ids': [0, 0, 0, 0, 0, 0, 0, 0, 0],
 'attention_mask': [1, 1, 1, 1, 1, 1, 1, 1, 1]}
トーカナイザーの保存
tokenizer.save_pretrained("directory_on_my_computer")
Encoding
テキストを数字に変換することをエンコードという。
エンコーディングは、「トークン化」と「入力IDへの変換」という2段階のプロセスで行われる。
-
トークン化: テキストのスプリット
このプロセスには複数のルールがあり、モデルが事前学習されたときと同じルールを使用するために、モデルの名前を使用してトークナイザをインスタンス化する必要がある。 -
入力IDへの変換: トークンの数値化
同様にモデルが事前学習されたときと同じルールを使用する必要がある。
以下でそれぞれを別に実行してみる。
(説明のためなので実際の運用では一気にやれば良い。)
Tokenization
Subword tokenizationの例
from transformers import AutoTokenizer

tokenizer = AutoTokenizer.from_pretrained("bert-base-cased")

sequence = "Using a Transformer network is simple"
tokens = tokenizer.tokenize(sequence)

print(tokens)
['Using', 'a', 'transform', '##er', 'network', 'is', 'simple']
From tokens to input IDs
ids = tokenizer.convert_tokens_to_ids(tokens)

print(ids)
[7993, 170, 11303, 1200, 2443, 1110, 3014]
Decoding
トークンIDをトークンに復元。
同じ単語の一部であったトークンをグループ化してくれていることに注意。
decoded_string = tokenizer.decode([7993, 170, 11303, 1200, 2443, 1110, 3014])
print(decoded_string)
'Using a Transformer network is simple'
Handling multiple sequences
Models expect a batch of inputs
モデルの入力に次元を合わせる必要がある
import torch
from transformers import AutoTokenizer, AutoModelForSequenceClassification

checkpoint = "distilbert-base-uncased-finetuned-sst-2-english"
tokenizer = AutoTokenizer.from_pretrained(checkpoint)
model = AutoModelForSequenceClassification.from_pretrained(checkpoint)

sequence = "I've been waiting for a HuggingFace course my whole life."

tokens = tokenizer.tokenize(sequence)
ids = tokenizer.convert_tokens_to_ids(tokens)

input_ids = torch.tensor([ids])
print("Input IDs:", input_ids)

output = model(input_ids)
print("Logits:", output.logits)
Input IDs: [[ 1045,  1005,  2310,  2042,  3403,  2005,  1037, 17662, 12172,  2607, 2026,  2878,  2166,  1012]]
Logits: [[-2.7276,  2.8789]]
Padding the inputs
複数文章をバッチで入力する際、パディングトークンでトークン数を揃える必要がある。
model = AutoModelForSequenceClassification.from_pretrained(checkpoint)

sequence1_ids = [[200, 200, 200]]
sequence2_ids = [[200, 200]]
batched_ids = [
    [200, 200, 200],
    [200, 200, tokenizer.pad_token_id],
]

print(model(torch.tensor(sequence1_ids)).logits)
print(model(torch.tensor(sequence2_ids)).logits)
print(model(torch.tensor(batched_ids)).logits)
tensor([[ 1.5694, -1.3895]], grad_fn=<AddmmBackward>)
tensor([[ 0.5803, -0.4125]], grad_fn=<AddmmBackward>)
tensor([[ 1.5694, -1.3895],
        [ 1.3373, -1.2163]], grad_fn=<AddmmBackward>)
[200, 200]
[200, 200, tokenizer.pad_token_id]
で、結果が変わることに注意する。
パディングトークンも推論に使用されるため。
attention maskを使用することで解決できる。
Attention masks
attention maskを指定することでアテンション層に無視してもらう。
[200, 200]
を渡した時と結果が一致する。
batched_ids = [
    [200, 200, 200],
    [200, 200, tokenizer.pad_token_id],
]

attention_mask = [
    [1, 1, 1],
    [1, 1, 0],
]

outputs = model(torch.tensor(batched_ids), attention_mask=torch.tensor(attention_mask))
print(outputs.logits)
tensor([[ 1.5694, -1.3895],
        [ 0.5803, -0.4125]], grad_fn=<AddmmBackward>)
Longer sequences
モデルに渡せるトークン数には限界がある。
ほとんどのモデルは512または1024トークンまで。
それ以上のトークン数を渡すとクラッシュする。
この問題の解決策は
-
より長い配列長をサポートするモデルを使う。
Longformer、LED等 -
シーケンスを切り捨てる。
sequence = sequence[:max_sequence_length]
Putting it all together
一般的な実行例
from transformers import AutoTokenizer

checkpoint = "distilbert-base-uncased-finetuned-sst-2-english"
tokenizer = AutoTokenizer.from_pretrained(checkpoint)

sequence = "I've been waiting for a HuggingFace course my whole life."

model_inputs = tokenizer(sequence)
複数の文をトーカナイズするパターン
sequences = ["I've been waiting for a HuggingFace course my whole life.", "So have I!"]

model_inputs = tokenizer(sequences)
パディングのパターン
# Will pad the sequences up to the maximum sequence length
model_inputs = tokenizer(sequences, padding="longest")

# Will pad the sequences up to the model max length
# (512 for BERT or DistilBERT)
model_inputs = tokenizer(sequences, padding="max_length")

# Will pad the sequences up to the specified max length
model_inputs = tokenizer(sequences, padding="max_length", max_length=8)
trancate(切り捨て)のパターン
sequences = ["I've been waiting for a HuggingFace course my whole life.", "So have I!"]

# Will truncate the sequences that are longer than the model max length
# (512 for BERT or DistilBERT)
model_inputs = tokenizer(sequences, truncation=True)

# Will truncate the sequences that are longer than the specified max length
model_inputs = tokenizer(sequences, max_length=8, truncation=True)
各フレームワークに対応した行列を得る
sequences = ["I've been waiting for a HuggingFace course my whole life.", "So have I!"]

# Returns PyTorch tensors
model_inputs = tokenizer(sequences, padding=True, return_tensors="pt")

# Returns TensorFlow tensors
model_inputs = tokenizer(sequences, padding=True, return_tensors="tf")

# Returns NumPy arrays
model_inputs = tokenizer(sequences, padding=True, return_tensors="np")
Special tokens
モデルによっては最初と最後に特別なトークンが付与されることがある。
事前学習時に付与して学習されている場合。
推論時や、ファインチューニング時も同様に処理する必要がある。
(指定のトーカナイザーを使っていれば問題ない)
sequence = "I've been waiting for a HuggingFace course my whole life."

model_inputs = tokenizer(sequence)
print(model_inputs["input_ids"])

tokens = tokenizer.tokenize(sequence)
ids = tokenizer.convert_tokens_to_ids(tokens)
print(ids)
[101, 1045, 1005, 2310, 2042, 3403, 2005, 1037, 17662, 12172, 2607, 2026, 2878, 2166, 1012, 102]
[1045, 1005, 2310, 2042, 3403, 2005, 1037, 17662, 12172, 2607, 2026, 2878, 2166, 1012]
デコードしてみる
print(tokenizer.decode(model_inputs["input_ids"]))
print(tokenizer.decode(ids))
"[CLS] i've been waiting for a huggingface course my whole life. [SEP]"
"i've been waiting for a huggingface course my whole life."
Wrapping up: From tokenizer to model
今までのまとめ
import torch
from transformers import AutoTokenizer, AutoModelForSequenceClassification

checkpoint = "distilbert-base-uncased-finetuned-sst-2-english"
tokenizer = AutoTokenizer.from_pretrained(checkpoint)
model = AutoModelForSequenceClassification.from_pretrained(checkpoint)
sequences = ["I've been waiting for a HuggingFace course my whole life.", "So have I!"]

tokens = tokenizer(sequences, padding=True, truncation=True, return_tensors="pt")
output = model(**tokens)
Discussion