StreamDeckプラグインをNodeJSで開発する
少し前にElgato/StreamDeck公式が、NodeJS v20用のSDKをリリースしました(ベータ)。
StreamDeck公式ソフトウェア 6.4 以降が必要です。
これまでの開発について
これまでもJavaScriptを使用した開発は可能でしたが、NodeJSではなくWebView(PropertyInspector)上で動くJSだったため、サーバーサイド用のモジュールなどは使用できない問題がありました。
そのため、C++、C#、GoやRustなどを使った開発が主流でしたが、公式がNodeJSで開発できるSDKを提供したことによりPropertyInspectorとバックエンドを同一の言語で開発することが可能になりました。
(厳密には非公式ドライバ/ソフトウェアであるbitfocus/companion を使用すれば開発が可能でしたが、公式ドライバとの共存が難しいこと、安定性に難があることから、自分はプロダクションでの採用に批判的です。)
実際に開発してみる
プロジェクト作成
まずは、公式のQuick Startに沿ってCLIをグローバルにインストールします。
npm install -g @elgato/cli
(npm以外のパッケージマネージャーを使用している場合は適宜置き換えてください)
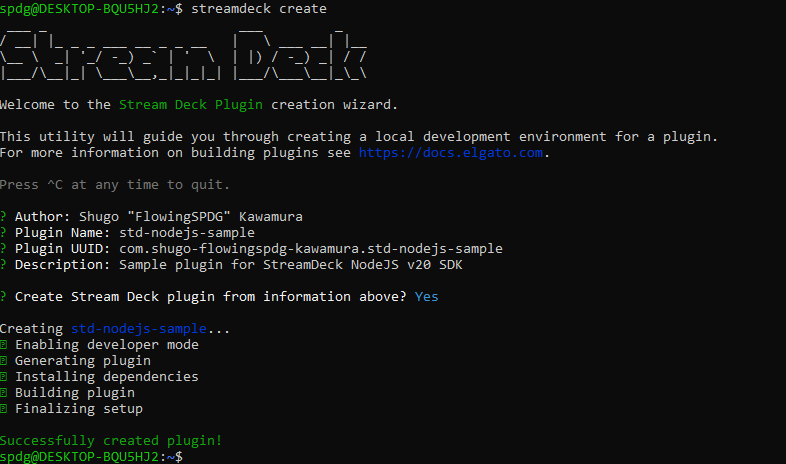
プロジェクトを作成します。
streamdeck create
開発者名、プラグイン名、UUID(任意)、説明と、プラグインの設定ファイル(manifest.json) を作成するか聞かれるため、任意の情報を入力して進みます。
自分の環境ではUUIDの入力後、>> Error: ENOENT: no such file or directory, scandir '/home/spdg/AppData/Roaming/Elgato/StreamDeck/Plugins というエラーが発生しました。
作業ディレクトリ直下にAppDataを作成しようとして発生するようです(なぜ...?)
WSL2上のUbuntu 22.04.3 LTSで発生したため、他環境での再現性は不明です。
(余談ですが、後述するシンボリックリンクの件もあり、Windows/Mac上で直接開発する方がDXは高そうです...)
問題がなければ、以下のようにプロジェクトが生成されます。

アクションの開発
ボタンを押したとき(KeyDown)に発火されるactionはsrc/actions 以下、プラグインの設定などは*.sdPlugin/ に格納されています。
まずはサンプル通り、ボタンが押された際にボタンに"Hello world!" と表示されるアクションを作成します。
// src/actions/say-hello.ts
import { action, KeyDownEvent, SingletonAction } from "@elgato/streamdeck";

// UUIDは適宜読み替えてください
@action({ UUID: "com.shugo-flowingspdg-kawamura.std-nodejs-sample.say-hello" })
export class SayHelloAction extends SingletonAction {
    // KeyDownイベントが発火された際のコールバック
    // 本来はPayloadの該当する部分にGenericsを設定できる
    async onKeyDown(ev: KeyDownEvent<any>) {
        // ボタンが押された際にタイトルを変更する
        await ev.action.setTitle("Hello world");
    }
}
エントリーポイントにアクションを登録します。
// src/plugin.ts
import streamDeck from "@elgato/streamdeck";

import { SayHelloAction } from "./actions/say-hello";

// Register the action, and connect to Stream Deck.
streamDeck.actions.registerAction(new SayHelloAction());
streamDeck.connect();
manifest.json にアクションの設定を記述します。
// *.sdPlugin/manifest.json
{
    "Actions": [
        {
            "Name": "Say Hello",
            "UUID": "com.shugo-flowingspdg-kawamura.std-nodejs-sample.say-hello",
            "States": [{ "TitleAlignment": "middle" }]
        }
    ]
}
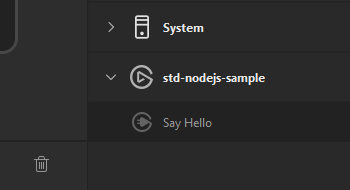
アクションが登録されました。
ビルド
試しにビルドしてみます。
npm run build
com.shugo-flowingspdg-kawamura.std-nodejs-sample.sdPlugin 以下に成果物が吐き出されます。
公式ではシンボリックリンクを作成することが推奨されていますが、今回はファイルを直接コピーしてプラグインを読み込みます。
C:\Users\%USERNAME%\AppData\Roaming\Elgato\StreamDeck\Pluginsへ、プラグインファイル群(私の場合com.shugo-flowingspdg-kawamura.std-nodejs-sample.sdPlugin を丸ごとコピーします。
(わかっていればWSL2上で開発はしなかった...。)

シンボリックリンクを作成する場合:
Windows
# Note: this works inside the cmd, not on PowerShell
# %cd% gets the full absolute path to the plugin folder
mklink /D C:\Users\%USERNAME%\AppData\Roaming\Elgato\StreamDeck\Plugins\com.example.my-plugin.sdPlugin %cd%\src\com.example.my-plugin.sdPlugin
macOS
# Using $(pwd) to get the full absolute path to the plugin folder
ln -s $(pwd)/src/com.example.my-plugin.sdPlugin ~/Library/Application\ Support/com.elgato.StreamDeck/Plugins/
StreamDeckソフトウェアを再起動すると、プラグインが認識されています。

その他
デバッグ
manifest.json 以下、Nodejs.Debug を"enabled" や"break"に設定するとデバッグモードが有効になります。
ロギング
ログレベルの設定が可能なようです。
const logger = streamDeck.logger.createScope("Custom Scope");
logger.setLevel(LogLevel.TRACE);
パッケージ化・配布
TLDR; https://docs.elgato.com/sdk/plugins/packaging
以下コマンドを実行すると、プラグインを.sdPlugin 拡張子のファイルへパッケージ化できます。
Mac: DistributionTool -b -i com.elgato.counter.sdPlugin -o ~/Desktop/
Windows: DistributionTool.exe -b -i com.elgato.counter.sdPlugin -o Release
また、公式ストアでの配布も申請すれば可能なようです(今回は未確認)。
開発者ポータルも準備中とのことで、かなり期待できそうです。
このプロジェクトで作成した成果物は以下のレポジトリに格納してあります。
Happy hacking!
Discussion