【Flutter】音声ファイルをバックグラウンド再生する
概要
Flutterにて音声ファイルを再生するのにjust_audioを使いますが、実際アプリとして使うような場合はバックグラウンド再生もやりたいですよね。
今回はjust_audioパッケージに加え、audio_seriveパッケージを使って音楽の再生+バックグラウンでの操作を可能にしていきましょう
その1: 音声ファイルを再生する
その2: 音声ファイルをバックグラウンド再生する ⬅︎ 今回
環境
Dart: 2.14.4
Flutter: 2.10.3
just_audio: 0.9.19
audio_service: 0.18.4
rxdart: 0.27.3
audio_video_progress_bar: 0.9.0
全体像
以下の責務を担うクラスを作成していきます
-
AudioPlayerクラス:音声ファイル自体を保持し、再生や停止などファイル操作を行います -
AudioHandlerクラス:上記のAudioPlayerクラスを内包し、その動作を端末のシステム側に繋ぎ込みます -
状態管理クラス (
PageManagerと命名):UIの状態値を管理します - UI:操作用のボタンと進捗を伝えるスライダーを描画します
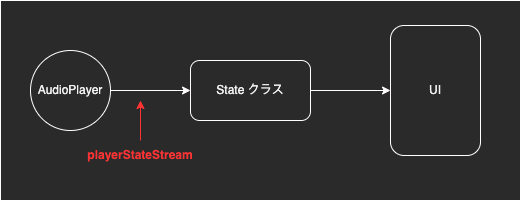
音声ファイル再生を行うAudioPlayerクラスと端末の音楽再生機能を、audio_serviceパッケージのAudioHandlerクラスで繋げ、お互いの状態変化をお互いに伝えられる様にしていきます
絵にすると下記のようなイメージ

just_audioを使った音声ファイル再生についてはこちらの記事をご参照ください
全体のコードはこちらを参照ください GitHub
AudioPlayerクラス、AudioHandlerクラス
前回の音声ファイルの再生では、AudioPlayerクラスのplayerStateStreamをlistenする事で、音声ファイルの状態値を監視し、ボタンのUIやスライダーをコントロールしていました
今回はAudioPlayerクラスのplaybackEventStreamに流れてくる値を、AudioHandlerクラスのplaybackStateStreamに流し入れ、そのStreamを監視してシステム側音声とUI側をコントロールしていきます

下記が実際のコードです。
AudioPlayerクラスのplaybackEventStreamにサブスクライブし、その値に応じて、playbackStateオブジェクトをcopyWithで生成し、ストリームに流しています。
  void _notifyAudioHandlerAboutPlaybackEvents() {
    player.playbackEventStream.listen((PlaybackEvent event) {
      final playing = player.playing;
      playbackState.add(playbackState.value.copyWith(
        controls: [
          MediaControl.skipToPrevious,
          if (playing) MediaControl.pause else MediaControl.play,
          MediaControl.stop,
          MediaControl.skipToNext,
        ],
        systemActions: const {
          MediaAction.seek,
        },
        androidCompactActionIndices: const [0, 1, 3],
        processingState: const {
          ProcessingState.idle: AudioProcessingState.idle,
          ProcessingState.loading: AudioProcessingState.loading,
          ProcessingState.buffering: AudioProcessingState.buffering,
          ProcessingState.ready: AudioProcessingState.ready,
          ProcessingState.completed: AudioProcessingState.completed,
        }[player.processingState]!,
        playing: playing,
        updatePosition: player.position,
        bufferedPosition: player.bufferedPosition,
        speed: player.speed,
        queueIndex: event.currentIndex,
      ));
    });
  }
実装手順
下記手順で実装していきます
- 各platformのセットアップ(iOS,Android)
- AudioHandlerのセットアップ
- AudioScreenState(状態管理クラス)のセットアップ
- AudioScreen( ボタン、スライダー)のセットアップ
作成していくファイルはAudioHandler、AudioScreenとAudioScreenStateの3つです
各Platformのセットアップ
Andorid
android/app/src/mainに存在するAndroidManifest.xmlに以下の設定を追加
1. Permissions:
applicationセクションに以下を追加
-
wake_lock:アプリがsleep modeになるのを操作する権限 -
foreground_service:他のアプリ起動時にフォアグラウンドで動作する権限 -
internet: ネットから曲をstreamする為の権限
<uses-permission android:name="android.permission.WAKE_LOCK"/>
<uses-permission android:name="android.permission.FOREGROUND_SERVICE"/>
<uses-permission android:name="android.permission.INTERNET"/>
2. Activity name:
android:name=".MainActivity" と記載されている箇所を下記に書き換え
android:name="com.ryanheise.audioservice.AudioServiceActivity"
3. Intents:
</activity>と</application>の間に以下を追記
MediaBrowserServicehandling_media_button_input
<service android:name="com.ryanheise.audioservice.AudioService">
  <intent-filter>
    <action android:name="android.media.browse.MediaBrowserService" />
  </intent-filter>
</service>

<receiver android:name="com.ryanheise.audioservice.MediaButtonReceiver" >
  <intent-filter>
    <action android:name="android.intent.action.MEDIA_BUTTON" />
  </intent-filter>
</receiver>
iOS
ios/Runner内のInfo.plistに以下のkey/valueを追加
-
UIBackgroundModes:音声のバックグラウンド再生に関する権限
<key>UIBackgroundModes</key>
<array>
  <string>audio</string>
</array>
ios/Runner内のPodfileのpost_install部分に下の記述を追記
target.build_configurations.each do |config|
  config.build_settings['GCC_PREPROCESSOR_DEFINITIONS'] ||= [
    '$(inherited)',
    'AUDIO_SESSION_MICROPHONE=0'
  ]
end
こちらの記述理由はJust Audioが使用しているAVAudioSessionというAPIに録音に関する機能が含まれており、そのままだとiOS側に録音に関するkey/value権限も記載する様に求められてしまう所を、上記記述で回避する為です
記述後の完成形
post_install do |installer|
  installer.pods_project.targets.each do |target|
    flutter_additional_ios_build_settings(target)
    # Remove microphone APIs
    target.build_configurations.each do |config|
      config.build_settings['GCC_PREPROCESSOR_DEFINITIONS'] ||= [
        '$(inherited)',
        'AUDIO_SESSION_MICROPHONE=0'
      ]
    end
  end
end
AudioHandlerのセットアップ
AudioHandlerは今回のサンプルで言う心臓部分です
AudioHandlerクラスはアプリ内で1つだけあれば良いので、シングルトンとして生成し、getItパッケージを使ってDIしていきます
主な責務としては音声メディアを保持・操作するAudioPlayerクラスを持ち、その変更を「デバイスのシステム側」と「UIの状態側」に伝える橋渡し役を担います
audio_serviceパッケージが提供するBaseAudioHandlerクラスを継承する事でシステム側と繋がる様々なメソッドやフィールドを使える様になります
class AudioServiceHandler extends BaseAudioHandler {
  final AudioPlayer player = AudioPlayer();
  ...
}
メソッド
音声ファイル初期設定メソッド
AudioPlayerクラスに音声メディアを登録し、再生の準備をします
  Future<void> initPlayer(MediaItem item) async {
    try {
      _notifyAudioHandlerAboutPlaybackEvents();
      player.setAudioSource(AudioSource.uri(Uri.parse(item.id)));
      mediaItem.add(item.copyWith(duration: player.duration));
    } catch (e) {
      debugPrint('ERROR OCCURED:$e');
    }
  }
-
_notifyAudioHandlerAboutPlaybackEventsメソッドは先に紹介したAudioPlayerクラスの状態変化を監視し、システム側に伝えるサブスクリプションを行うメソッドです -
setAudioSourceメソッドに音声メディアのダウンロード元のUriを渡す事でAudioPlayerクラスが音声メディアを取得します -
mediaItemはBaseAudioHandlerクラスが保有するストリームで、audio_serviceが提供するMediaItemオブジェクトを流します
今回のサンプルでは以下の様なMediaItemをUI側からこちらのメソッドに渡します
  // for test
  static final _item = MediaItem(
    id: 'https://firebasestorage.googleapis.com/v0/b/flutter-toybox.appspot.com/o/audios%2Fcreative_commons_piano.mp3?alt=media',
    album: "THE CREATIVE COMMONS",
    title: "Beautiful Piano",
    artist: "Creative commons of Soundclound",
    artUri: Uri.parse(
        'https://firebasestorage.googleapis.com/v0/b/flutter-toybox.appspot.com/o/audios%2Fartwork%2Fcreative_commons_piano_artwork.png?alt=media'),
  );
idに楽曲のダウンロード先を指定しています
タイトルやアーティスト名、ジャケット画像などを持つクラスでバックグラウンド再生のウィンドウで表示されます
AudioPlayerクラスを操作する各種メソッド
音声ファイルの操作を行う各種メソッドです。再生、一時停止、シーク(再生位置変更)、停止の4つです。
これらはBaseAudioHandler側で定義されているので、@overrideで上書きしています
final AudioPlayer player = AudioPlayer();
/* --- Audio Control --- */
Future<void> play() async {
player.play();
}
Future<void> pause() async {
player.pause();
}
Future<void> seek(Duration position) => player.seek(position);
Future<void> stop() {
player.stop();
return super.stop();
}
サブスクリプション
先にも紹介したAudioPlayerクラスのPlaybackEventStreamにサブスクライブするメソッドです
コードは先に挙げたものを参照してもらうとして、ここではフィールドについて少し紹介します
      playbackState.add(playbackState.value.copyWith(
        controls: [
          MediaControl.skipToPrevious,
          if (playing) MediaControl.pause else MediaControl.play,
          MediaControl.stop,
          MediaControl.skipToNext,
        ],
        systemActions: const {
          MediaAction.seek,
        },
        androidCompactActionIndices: const [0, 1, 3],
controls:バックグラウンド再生の操作ウィンドウに表示される操作ボタンを指定しています
systemActions:上記controls以外で操作ウィンドウから実行される操作を指定します。ボタン以外なのでスライダー操作での再生位置の変更が主な操作です。
androidCompactActionIndices:Androidで表示されるコンパクトな操作ウィンドウに表示される操作ボタンを指定しています
DI
以上で作成したAudioHandlerクラスをインスタンス化して、getItを通して、アプリのどこからでも呼び出し可能にします
初期化
Future<AudioServiceHandler> initeAudioService() async {
  return await AudioService.init(
      builder: () => AudioServiceHandler(),
      config: const AudioServiceConfig(
        androidNotificationChannelId: 'com.mycompany.myapp.audio',
        androidNotificationChannelName: 'Test Audio Service',
        androidNotificationOngoing: true,
        androidStopForegroundOnPause: true,
      ));
}
getItに登録
import 'package:get_it/get_it.dart';

GetIt getIt = GetIt.instance;

Future<void> initServiceLocator() async {
  getIt.registerSingleton<AudioServiceHandler>(await initeAudioService());
}
mainメソッドで呼び出し
void main() async {
  WidgetsFlutterBinding.ensureInitialized();
  await initServiceLocator();
  runApp(const MyApp());
}
AudioScreenState(状態管理クラス)のセットアップ
変数
状態管理クラスでは以下変数を管理します。
class AudioScreenState extends ChangeNotifier {
  ProgressBarState progressBarState = ProgressBarState(
    current: Duration.zero,
    buffered: Duration.zero,
    total: Duration.zero,
  );
  AudioState audioState = AudioState.paused;
  late StreamSubscription _playbackSubscription;
  late StreamSubscription _progressBarSubscription;

  final AudioServiceHandler _handler = getIt<AudioServiceHandler>();

  // for test
  static final _item = MediaItem(
    id: 'https://firebasestorage.googleapis.com/v0/b/flutter-toybox.appspot.com/o/audios%2Fcreative_commons_piano.mp3?alt=media',
    album: "THE CREATIVE COMMONS",
    title: "Beautiful Piano",
    artist: "Creative commons of Soundclound",
    artUri: Uri.parse(
        'https://firebasestorage.googleapis.com/v0/b/flutter-toybox.appspot.com/o/audios%2Fartwork%2Fcreative_commons_piano_artwork.png?alt=media'),
  );
上述の通り、Providerを使ってUI側に注入していきます。
初期化メソッド
状態管理クラス生成時に走らせるメソッドです
GetItを通して取得したAudioHandlerクラスのinitPlayerメソッドに音声ファイルを渡し、再生の準備をします。
その他はボタンとスライダー用のサブスクライブメソッドです。
  /* --- INITIALIZE --- */
  void init() {
    _handler.initPlayer(_item);
    _listenToPlaybackState(); // ボタン用のサブスクライブメソッド
    _listenForProgressBarState(); // スライダー用のサブスクライブメソッド
  }
音声ファイルの操作メソッド
ボタンとスライダー操作でこちらのメソッドを発火、AudioHandlerに渡した音声ファイルを操作します
  /* --- PLAYER CONTROL  --- */
  void play() => _handler.play();

  void pause() => _handler.pause();

  void seek(Duration position) => _handler.seek(position);
状態値の操作メソッド
ボタン用の状態値AudioStateとスライダー用の状態値ProgressBarStateの更新をUI側に通知します
  /* --- STATE CONTROL --- */

  void setAudioState(AudioState state) {
    audioState = state;
    notifyListeners();
  }

  void setProgressBarState(ProgressBarState state) {
    progressBarState = state;
    notifyListeners();
  }
disposeメソッド
状態管理クラスが破棄される際にAudioHandlerを止め、とStreamへのサブスクリプションを閉じてメモリを解放します
void dispose() {
_handler.stop();
_playbackSubscription.cancel();
_progressBarSubscription.cancel();
super.dispose();
}
ボタン、スライダー
ボタンUI
ボタンのUIは音声ファイルの状態に応じて、「再生ボタン」、「停止ボタン」、「ローディング中」の三つを切り替えます
switch (state) {
  // ローディング中
  case AudioState.loading:
    return Padding(
      padding: const EdgeInsets.all(8.0),
      child: SizedBox(
        height: 32,
        width: 32,
        child: CircularProgressIndicator(),
      ),
    );
  case AudioState.ready:
  case AudioState.paused:
  // 再生ボタン
    return IconButton(
      onPressed: () =>
          context.read<JustAudioScreenState>().play(),
      icon: Icon(Icons.play_arrow),
      iconSize: 32.0,
    );
  case AudioState.playing:
  // 停止ボタン
    return IconButton(
      onPressed: () =>
          context.read<JustAudioScreenState>().pause(),
      icon: Icon(Icons.pause),
      iconSize: 32.0,
    );
  default:
    return SizedBox(
      height: 32,
      width: 32,
    );
}
ボタンState
Stateクラス
ボタンが監視する状態値は音声ファイルの状態です。以下4つの状態のいずれかになる状態値としてenumで定義したAudioStateを状態管理クラス側で管理します。
-
ready:再生準備OK -
paused:停止中 -
playing:再生中 -
loading:読み込み中
enum AudioState {
  ready,
  paused,
  playing,
  loading,
}
Streamにサブスクライブ
音声ファイルの状態値はAudioHandlerのplaybackStateStreamにサブスクライブする事で監視します
こちらは最初の方に紹介した_notifyAudioHandlerAboutPlaybackEventsメソッドで流しているplaybackStateオブジェクトになります
playbackStateStreamから流れてくるPlaybackStateオブジェクトはprocessingStateとplayingというフィールドを持っており、この2つの値を見る事で音声ファイルの状態を判定していきます
-
PlaybackState.processingState:音声ファイルのダウンロード状況。以下4つの状態を取ります-
idle:ロード前 -
loading:ローディング中 -
buffering:バッファリング中で再生出来ない状態 -
ready:再生可能な量データのローディング完了 -
completed:ローディング完了
-
-
PlaybackState.playing:音声ファイルを再生中かのbool値
  /* --- SUBSCRIBE --- */

  void _listenToPlaybackState() {
    _playbackSubscription =
        _handler.playbackState.listen((PlaybackState state) {
      debugPrint('current state:${state.processingState}');
      debugPrint('playing:${state.playing}');

      if (isLoadingState(state)) {
        setAudioState(AudioState.loading);
      } else if (isAudioReady(state)) {
        setAudioState(AudioState.ready);
      } else if (isAudioPlaying(state)) {
        setAudioState(AudioState.playing);
      } else if (isAudioPaused(state)) {
        setAudioState(AudioState.paused);
      } else if (hasCompleted(state)) {
        setAudioState(AudioState.paused);
      }
    });
  }

  /* --- UTILITY METHODS --- */
  bool isLoadingState(PlaybackState state) {
    return state.processingState == AudioProcessingState.loading ||
        state.processingState == AudioProcessingState.buffering;
  }

  bool isAudioReady(PlaybackState state) {
    return state.processingState == AudioProcessingState.ready &&
        !state.playing;
  }

  bool isAudioPlaying(PlaybackState state) {
    return state.playing && !hasCompleted(state);
  }

  bool isAudioPaused(PlaybackState state) {
    return !state.playing && !isLoadingState(state);
  }

  bool hasCompleted(PlaybackState state) {
    return state.processingState == AudioProcessingState.completed;
  }
スライダーUI
自前でSliderを用意する事もできますが、音声メディア再生に特化したaudio_video_progress_barというライブラリを使っていきます
ProgressBarクラスは音声メディア再生に特化した様々なフィールドを持っていますが、その中から今回は下記の4つを使っていきます
 ProgressBar(
    progress: null, // 現在の再生位置
    buffered: null, // ダウンロードが完了した分数
    total: null,    // 音声ファイル全体の分数
    onSeek: (Duration position) => null,   // 再生位置の変更メソッド
  ),
スライダーState
Stateクラス
上記のProgressBarクラスに対して、progress、buffered、totalをState側から与え続ける事で再生に伴って、スライダーを変化させていきます
State側でprogress、buffered、totalに対応する「現在の再生位置」、「ダウンロードが完了した分数」、「音声ファイルのトータル分数」を併せ持つProgressBarStateというクラスを作ってまとめて管理してしまいましょう
class ProgressBarState {
  ProgressBarState({
    this.progress,
    this.buffered,
    this.total,
  });

  final Duration progress;
  final Duration buffered;
  final Duration total;
}
Streamにサブスクライブ
ProgressBarStateクラスの1つ1つのフィールドの状態値は以下3つのStreamから受け取ります
-
AudioService.position: 現在の再生位置currentに対応 -
AudioHandler.playbackState: こちらのbufferedPositionがスライダーのbufferedに対応 -
AudioHandler.mediaItem: totalに対応
1本1本のStreamに個別にサブスクライブし、それぞれProgressBarStateオブジェクトを更新する様に書く事も出来ますが、記述量が多くなるので、今回はStreamの加工などが容易に出来るrx_dartパッケージを使って、3本のStreamを1本にまとめて、それをサブスクライブしましょう
  void _listenForProgressBarState() {
    _progressBarSubscription = CombineLatestStream.combine3(
      AudioService.position,
      _handler.playbackState,
      _handler.mediaItem,
      (Duration current, PlaybackState state, MediaItem? mediaItem) =>
          ProgressBarState(
        current: current,
        buffered: state.bufferedPosition,
        total: mediaItem?.duration ?? Duration.zero,
      ),
    ).listen((ProgressBarState state) => setProgressBarState(state));
  }
完成
動画の通り、iOSとAndroidそれぞれでのバックグラウンド再生、そして画面を閉じた状態からの操作が可能になりました。
参考
Discussion