執筆日
2025/5/1
やること
TerraformやBicepなどのIaCツールを用いて、Azure環境の構築をよく行っています。Terraformのドキュメントを確認していると、terraform graph という気になるコマンドを発見しました。今回は、このコマンドの役割や使い方について検証しました。
結論
terraform graph は、Terraformで定義したリソース間の依存関係をグラフ形式で出力するためのコマンドです。
準備
- Graphvizをインストール済みであること
実行手順
以下のコマンドで依存関係を視覚的に確認できます。
terraform init
terraform graph | dot -Tpng > dependency_graph.png
これで生成されたPNG画像を通じて、リソース間の依存関係が一目で確認できます。
サンプル
サンプル①
main.tf
terraform {
  required_providers {
    azurerm = {
      source  = "hashicorp/azurerm"
      version = "~> 3.0"
    }
  }
}

provider "azurerm" {
  features {}
}

# Resource Groupの作成
resource "azurerm_resource_group" "example" {
  name     = "example-rg"
  location = "Japan East"
}

# ストレージアカウントの作成
resource "azurerm_storage_account" "example" {
  name                     = "examplestorageacct01"
  resource_group_name      = azurerm_resource_group.example.name
  location                 = azurerm_resource_group.example.location
  account_tier             = "Standard"
  account_replication_type = "LRS"
}

# Blobコンテナの作成
resource "azurerm_storage_container" "example" {
  name                  = "example-container"
  storage_account_name  = azurerm_storage_account.example.name
  container_access_type = "private"
}
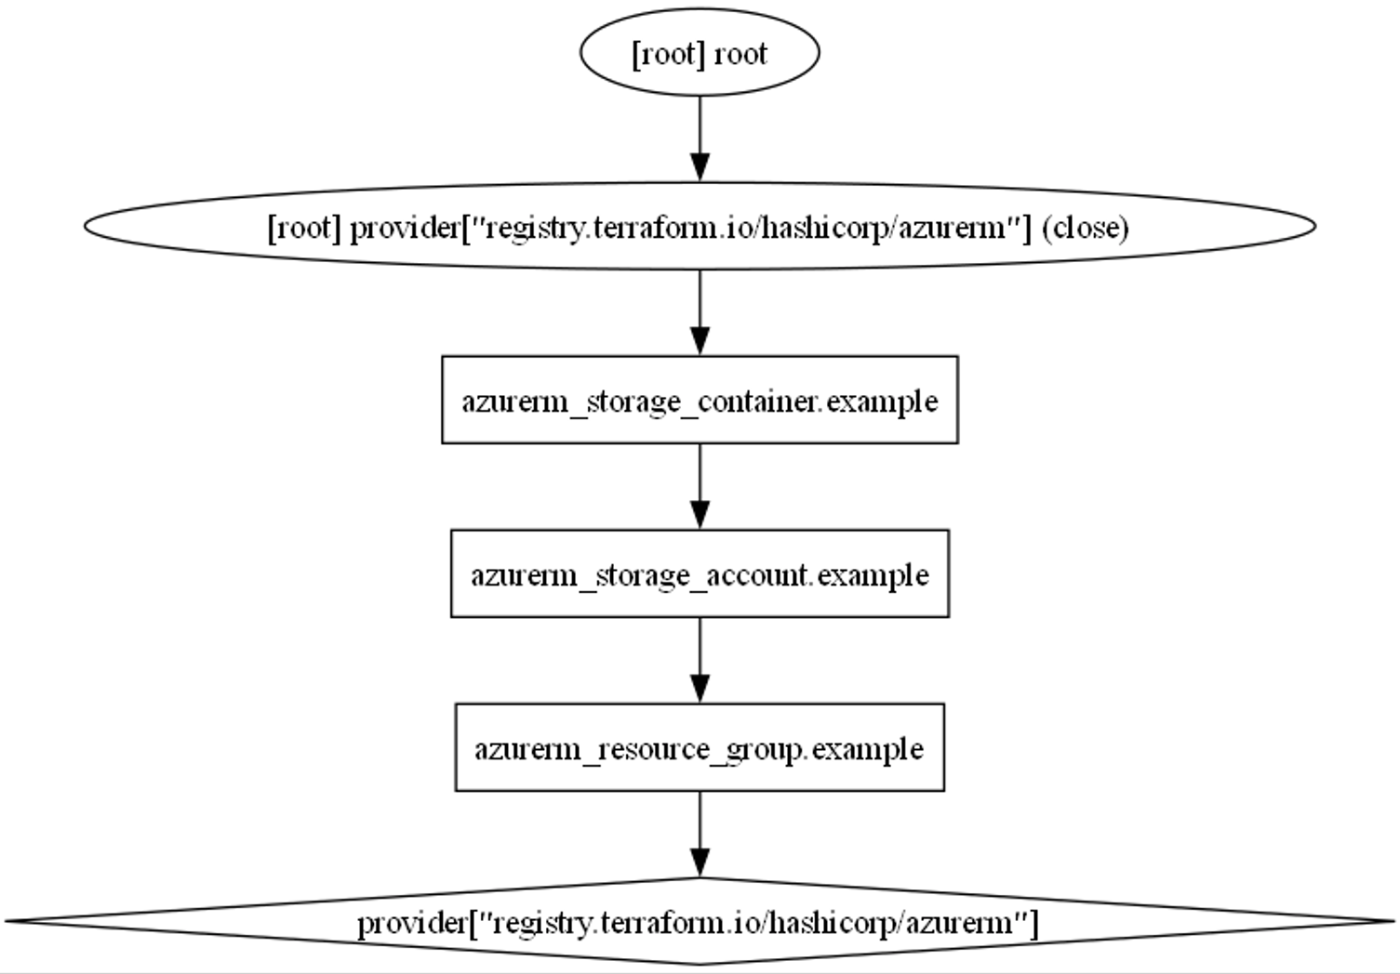
リソースグループ>Blob Storage>コンテナーで依存関係が表示されている。
サンプル②
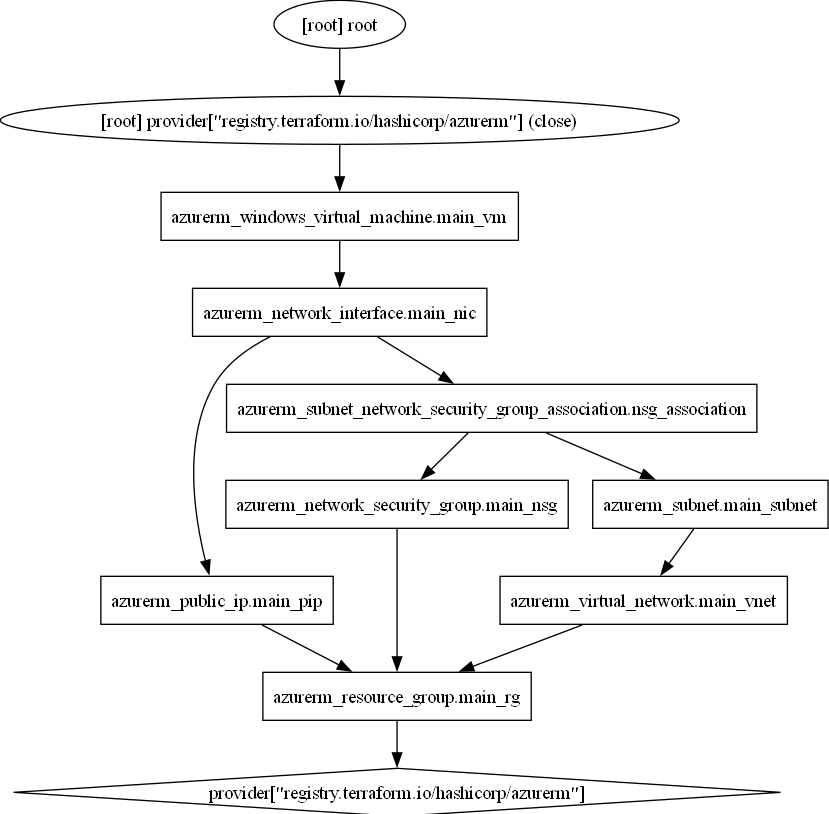
次のような依存関係を意図的に作成します:
- Resource Group(親リソース)
- 仮想ネットワーク(VNet)(Resource Groupに依存)
- サブネット(VNetに依存)
- ネットワークセキュリティグループ(NSG)(サブネットに依存)
- パブリックIPアドレス(Resource Groupに依存)
- ネットワークインターフェース(NIC)(NSG, サブネット, パブリックIPに依存)
- 仮想マシン(VM)(NICに明示的に依存指定)
main.tf
terraform {
  required_providers {
    azurerm = {
      source  = "hashicorp/azurerm"
      version = "~> 3.0"
    }
  }
}

provider "azurerm" {
  features {}
}

# Resource Group作成
resource "azurerm_resource_group" "main_rg" {
  name     = "complex-rg"
  location = "Japan East"
}

# 仮想ネットワーク(VNet)
resource "azurerm_virtual_network" "main_vnet" {
  name                = "complex-vnet"
  resource_group_name = azurerm_resource_group.main_rg.name
  location            = azurerm_resource_group.main_rg.location
  address_space       = ["10.0.0.0/16"]
}

# サブネット
resource "azurerm_subnet" "main_subnet" {
  name                 = "complex-subnet"
  resource_group_name  = azurerm_resource_group.main_rg.name
  virtual_network_name = azurerm_virtual_network.main_vnet.name
  address_prefixes     = ["10.0.1.0/24"]
}

# ネットワークセキュリティグループ(NSG)
resource "azurerm_network_security_group" "main_nsg" {
  name                = "complex-nsg"
  resource_group_name = azurerm_resource_group.main_rg.name
  location            = azurerm_resource_group.main_rg.location
}

# NSGとサブネットの関連付け
resource "azurerm_subnet_network_security_group_association" "nsg_association" {
  subnet_id                 = azurerm_subnet.main_subnet.id
  network_security_group_id = azurerm_network_security_group.main_nsg.id

  depends_on = [
    azurerm_subnet.main_subnet,
    azurerm_network_security_group.main_nsg
  ]
}

# パブリックIPアドレス
resource "azurerm_public_ip" "main_pip" {
  name                = "complex-pip"
  resource_group_name = azurerm_resource_group.main_rg.name
  location            = azurerm_resource_group.main_rg.location
  allocation_method   = "Dynamic"
}

# ネットワークインターフェース(NIC)
resource "azurerm_network_interface" "main_nic" {
  name                = "complex-nic"
  resource_group_name = azurerm_resource_group.main_rg.name
  location            = azurerm_resource_group.main_rg.location

  ip_configuration {
    name                          = "internal"
    subnet_id                     = azurerm_subnet.main_subnet.id
    private_ip_address_allocation = "Dynamic"
    public_ip_address_id          = azurerm_public_ip.main_pip.id
  }

  depends_on = [
    azurerm_subnet_network_security_group_association.nsg_association,
    azurerm_public_ip.main_pip
  ]
}

# 仮想マシン(VM)
resource "azurerm_windows_virtual_machine" "main_vm" {
  name                = "complex-vm"
  resource_group_name = azurerm_resource_group.main_rg.name
  location            = azurerm_resource_group.main_rg.location
  size                = "Standard_DS1_v2"
  admin_username      = "azureuser"
  admin_password      = "ComplexP@ssword1234"

  network_interface_ids = [
    azurerm_network_interface.main_nic.id
  ]

  os_disk {
    caching              = "ReadWrite"
    storage_account_type = "Standard_LRS"
  }

  source_image_reference {
    publisher = "MicrosoftWindowsServer"
    offer     = "WindowsServer"
    sku       = "2019-Datacenter"
    version   = "latest"
  }

  depends_on = [
    azurerm_network_interface.main_nic
  ]
}

Discussion