2024年10月1日に新しいモデルが登場しましたので、早速使ってみました。
GPT-4o Realtime Audioとは
GPT-4oモデルの一つであり、音声入力→音声出力を実現する新しいモデルです。
低遅延でリアルタイムな会話を実現するように設計されており、AIアシスタントやリアルタイム翻訳などに活用されることが予測されています。
今まではAzure Speech to TeztやWhisperを使って一度音声を文字化、GPTが生成したテキストをAzure Text to Speechを使って音声合成する必要がありました。
少なからずタイムラグが発生していたので、音声だけでやり取りできる非常に魅力的なモデルです。
現在はEast US2とSweden Centralリージョンで利用可能です。
試す方法
現在動かせる環境
ドキュメントにアクセスすると、Azure AI Studioで試す方法とJavaScriptを使ったWebアプリのサンプルコードが提供されていました。
しかし、このモデルのユースケースって主にスマホアプリになるんじゃないかなと想定しているため、スマホアプリで動かしたいです。
スマホアプリで動かせるか調査
サンプルコードがあるMicrosoftのリポジトリにアクセスしてみたところ、JavaScript以外にもPythonのサンプルコードがありました。
どのみちアプリケーションに組み込むことを考えると、バックエンド側で処理を行う想定だったのでちょうど良かったです。
ここにアップされているPythonのソースコードをAPI化して、クライアント側と疎通させて動かせるようにしていきます。
事前準備
East US2もしくはSweden CentralリージョンでAzure OpenAIリソースを作成してください。
モデル一覧の中にgpt-4o-realtime-previewがあるのでデプロイしておいてください。
前提
音声to音声ができるのがこのモデルの醍醐味ですが、動かすことを最優先にしてるので実装が最適化されてないことご認識ください。
最適化された実装は後日アップします。
この記事ではスマホアプリで動かせるようにすることを目標としてます。
API側の開発
API側はサンプルコードの通り、Pythonと軽量フレームワークのFastAPIを使用します。
1. 環境構築
まずはローカルにクローン
git clone https://github.com/Azure-Samples/aoai-realtime-audio-sdk.git
サンプルリポジトリ内のpython/samples配下にあるReadme.mdファイルの手順に従って構築していきます。
仮想環境立ち上げ
python -m venv .venv
仮想環境を起動
source .venv/bin/activate
シェルコマンドを実行
このファイルを実行することで必要なパッケージがプロジェクトに導入されるそうです。
./download-pkg.sh
パッケージをインストール
pip install -r requirements.txt
環境ファイルを作成
cp development.env .env
各値はAzureにアクセスしてIDを参照して入れてください。
2. API化する
APIで叩けるようにするために、FastAPIという軽量フレームワークを導入します。
pip install fastapi uvicorn python-dotenv
次にエンドポイントを定義するためにmain.pyファイルを作成します。
touch main.py
main.pyファイル内にAPIの定義を行っていきます。
import os

from fastapi import FastAPI, UploadFile, File, Form
from fastapi.responses import JSONResponse
from dotenv import load_dotenv
from client_sample import with_azure_openai, with_openai


app = FastAPI()

load_dotenv()

@app.post("/process_audio/")
def process_audio(audio_file: UploadFile = File(...), out_dir: str = Form(...), provider: str = Form("azure")):
    temp_file_path = f"/tmp/{audio_file.filename}"
    with open(temp_file_path, "wb") as temp_file:
        temp_file.write(await audio_file.read())

    if not os.path.exists(out_dir):
        os.makedirs(out_dir)

    # Validate provider
    if provider not in ["azure", "openai"]:
        return JSONResponse(status_code=400, content={"message": "Provider must be 'azure' or 'openai'"})

    try:
        if provider == "azure":
            await with_azure_openai(temp_file_path, out_dir)
        else:
            await with_openai(temp_file_path, out_dir)
    except Exception as e:
        return JSONResponse(status_code=500, content={"message": str(e)})

    return {"message": "Processing completed successfully"}

if __name__ == "__main__":
    import uvicorn
    uvicorn.run(app, host="0.0.0.0", port=8000)
ローカルで立ち上げてみます。
uvicorn main:app --reload
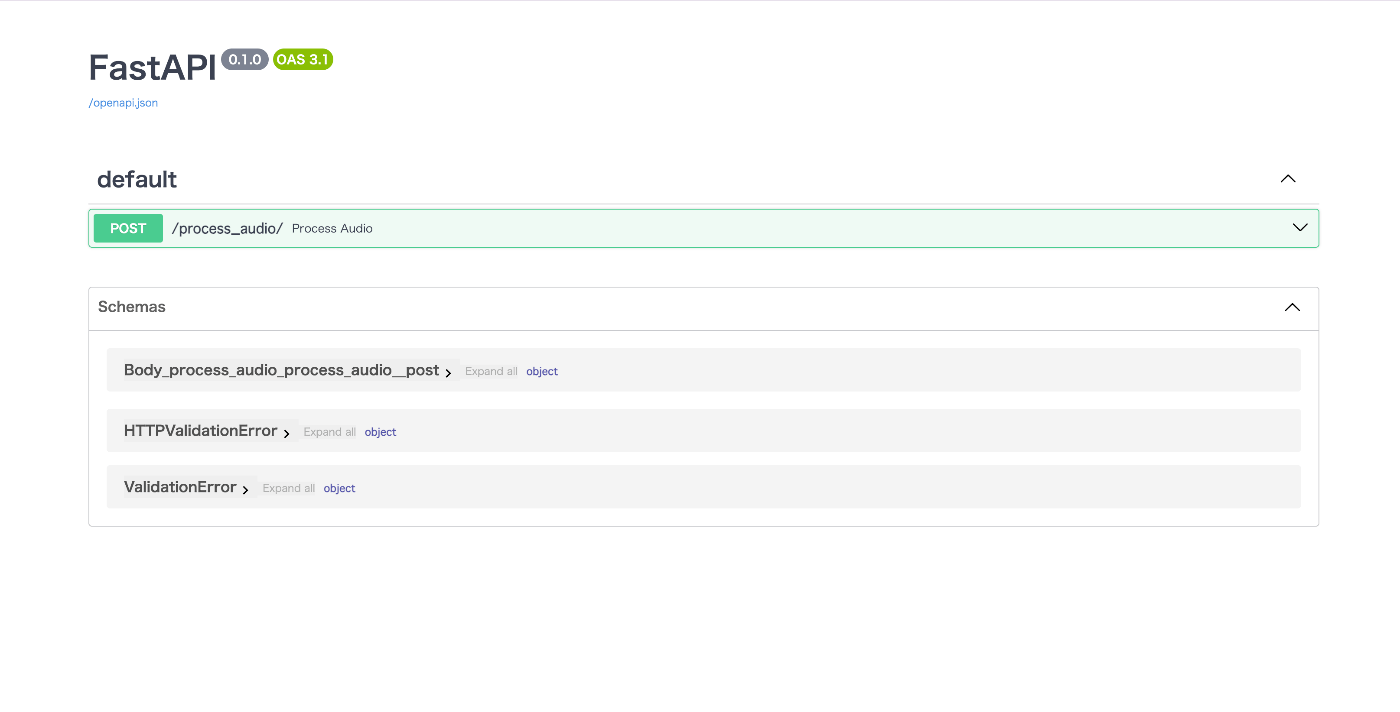
以下のように定義したAPIが表示されればOKです。
3. 実際に動かしてみる
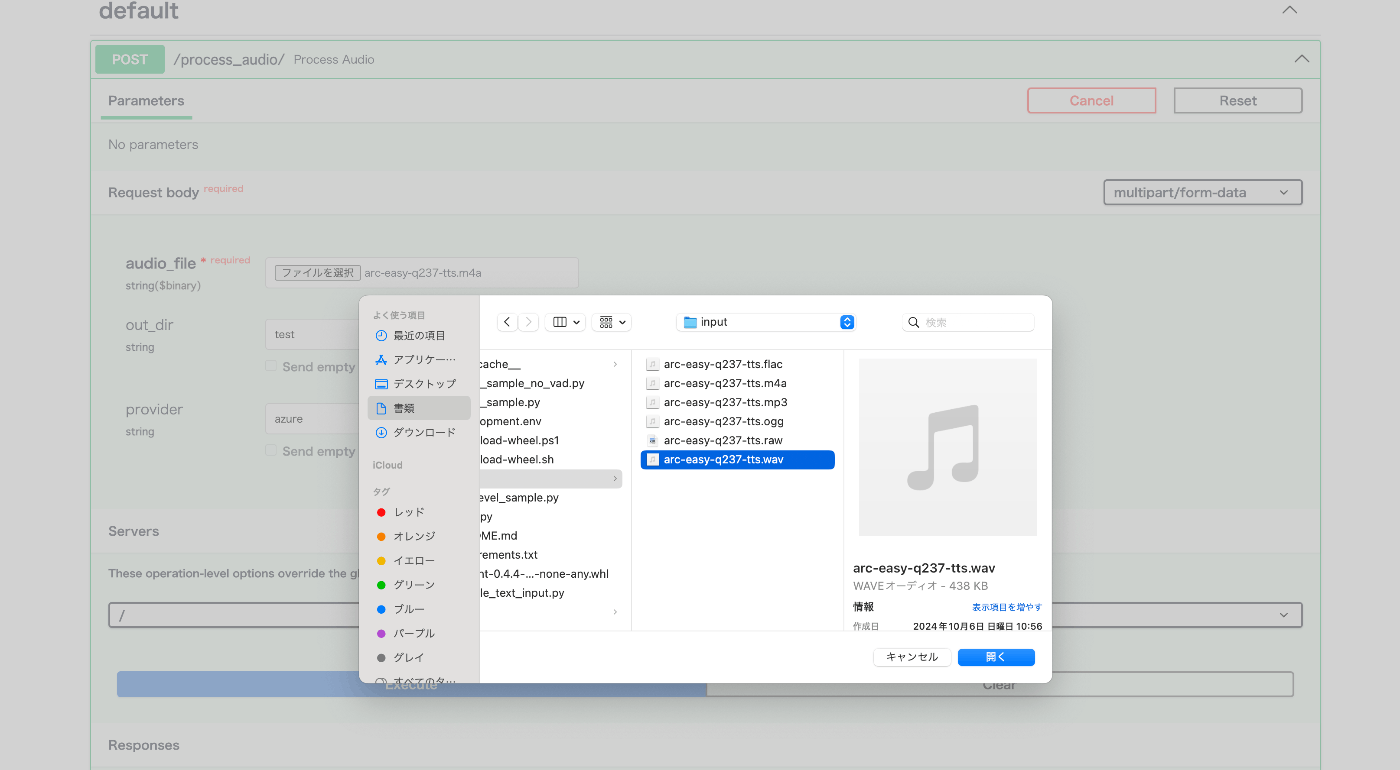
サンプルプロジェクトのpython/samplesフォルダ配下にinputフォルダがあるので、そこの音声ファイルを使って試してみます。
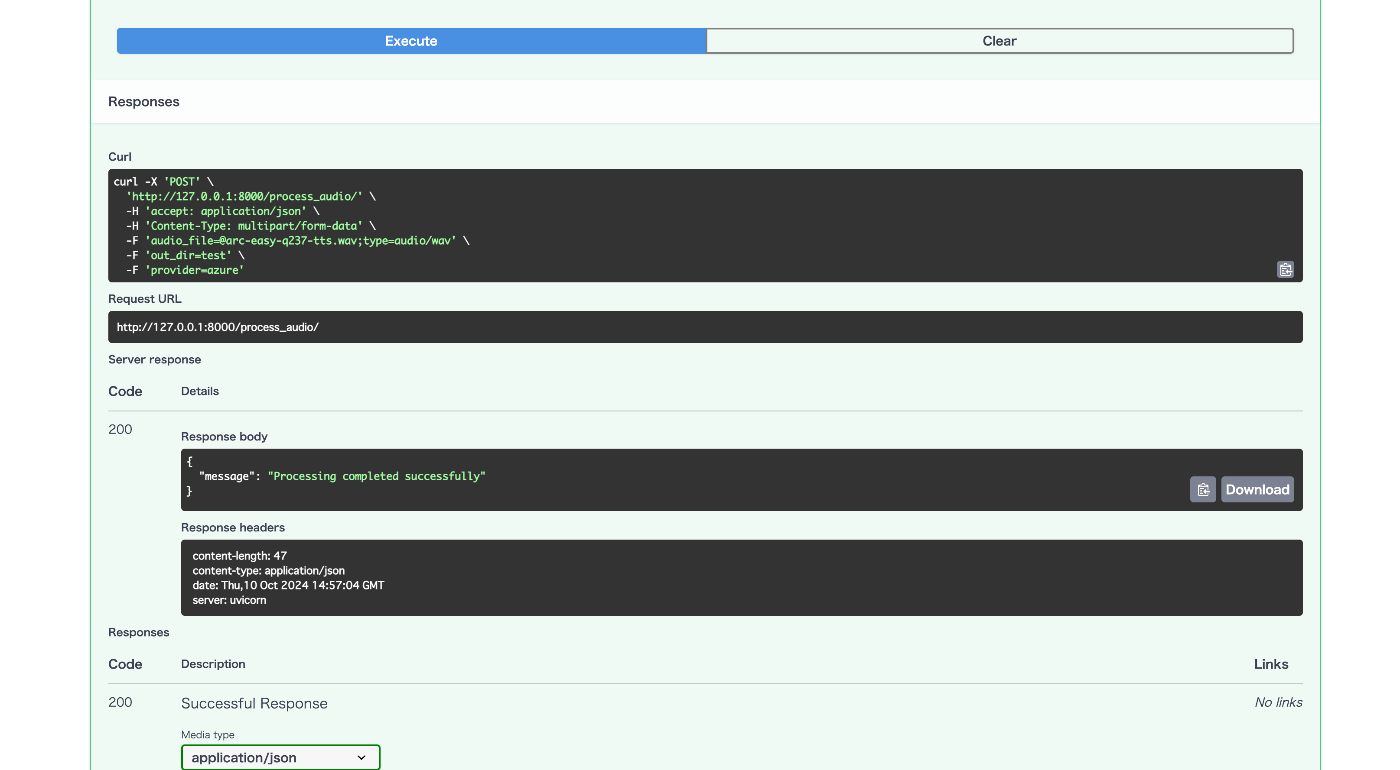
無事処理が最後まで成功したようなのでここまでは上手くできてます。
4. スマホからアップされる音声ファイルに対応するように修正
スマホから試しにアップしようとすると以下のエラーが発生しました。
{"message":"Error opening '/tmp/audio_xxxxx.m4a': Format not recognised."}"""
スマホではm4aファイルが生成されるのですが、拡張子が「.m4a」だと正しく認識できない??ようです。
ですのでAPI側でm4aファイルを一度wavファイルに変換させます。
まず必要なパッケージを導入
brew install ffmpeg
pip install pydub
以下の拡張子変換関数を作成します。
from pydub import AudioSegment

...

def convert_audio(input_file, output_file, input_format, output_format):
    """
    指定された形式間で音声ファイルを変換する関数

    Parameters:
    input_file (str): 入力する音声ファイルのパス
    output_file (str): 出力する音声ファイルのパス
    input_format (str): 入力ファイルの形式 ('mp3', 'wav', 'm4a')
    output_format (str): 出力ファイルの形式 ('mp3', 'wav', 'm4a')
    """
    try:
        # 入力ファイルをロード
        audio = AudioSegment.from_file(input_file, format=input_format)

        # 指定された形式で出力
        audio.export(output_file, format=output_format)

        print(f"変換が完了しました: {input_file} ({input_format}) -> {output_file} ({output_format})")
    except Exception as e:
        print(f"エラーが発生しました: {e}")
次にAPIの処理フローの前半でこの関数を実行させます。
@app.post("/process_audio/")
async def process_audio(audio_file: UploadFile = File(...), out_dir: str = Form("test"), provider: str = Form("azure")):
    # Save the uploaded file to a temporary location
    temp_file_path = f"/tmp/{audio_file.filename}"
    with open(temp_file_path, "wb") as temp_file:
        temp_file.write(await audio_file.read())

    # ↓追加(m4a to wav)
    wav_file_path = temp_file_path.rsplit(".", 1)[0] + ".wav"
    convert_audio(temp_file_path , wav_file_path, "m4a", "wav")

    # Ensure the output directory exists
    if not os.path.exists(out_dir):
        os.makedirs(out_dir)

    # Validate provider
    if provider not in ["azure", "openai"]:
        return JSONResponse(status_code=400, content={"message": "Provider must be 'azure' or 'openai'"})

....
5. 音声バイナリデータをレスポンスで返すようにする
最後にクライアントに音声データを返すための処理を追加します。
今回は動作確認レベルしか行ってないので、全くもって最適なフローではないですが以下のロジックでクライアント側に返却します。
- 生成AIからのストリーミング型レスポンスをバックエンド側で保持する
- その音声データをもとに一度wavファイルを生成する
- レスポンスを返す際に2.で出力したwavファイルから音声バイナリデータを作成してjson形式で返す
理想はバックエンド側でwavファイルに一度起こすことなく、生成AIから返ってきたストリーミング情報をクライアント側に順次返していくフローです。
また今後実装します。
先に現状のサンプルコードだと可変になってるので、出力するwavファイルの名前を固定します。
async def receive_item(item: RTOutputItem, out_dir: str):
    prefix = f"[response={item.response_id}][item={item.id}]"
    audio_data = None
    audio_transcript = None
    text_data = None
    arguments = None
    async for chunk in item:
        if chunk.type == "audio_transcript":
            audio_transcript = (audio_transcript or "") + chunk.data
        elif chunk.type == "audio":
            if audio_data is None:
                audio_data = bytearray()
            audio_bytes = base64.b64decode(chunk.data)
            audio_data.extend(audio_bytes)
        elif chunk.type == "tool_call_arguments":
            arguments = (arguments or "") + chunk.data
        elif chunk.type == "text":
            text_data = (text_data or "") + chunk.data
    if text_data is not None:
        print(prefix, f"Text: {text_data}")
        with open(os.path.join(out_dir, f"{item.id}.text.txt"), "w", encoding="utf-8") as out:
            out.write(text_data)
    if audio_data is not None:
        print(prefix, f"Audio received with length: {len(audio_data)}")
        # outputに変更
        with open(os.path.join(out_dir, f"output.wav"), "wb") as out:
            audio_array = np.frombuffer(audio_data, dtype=np.int16)
            sf.write(out, audio_array, samplerate=24000)
    if audio_transcript is not None:
        print(prefix, f"Audio Transcript: {audio_transcript}")
        # outputに変更
        with open(os.path.join(out_dir, f"output.audio_transcript.txt"), "w", encoding="utf-8") as out:
            out.write(audio_transcript)
    if arguments is not None:
        print(prefix, f"Tool Call Arguments: {arguments}")
        with open(os.path.join(out_dir, f"{item.id}.tool.streamed.json"), "w", encoding="utf-8") as out:
            out.write(arguments)
return処理の前で作成されたwavファイルの音声バイナリデータを取得します。
    # Process the audio file
    try:
        if provider == "azure":
            await with_azure_openai(temp_file_path, out_dir)
        else:
            await with_openai(temp_file_path, out_dir)
    except Exception as e:
        return JSONResponse(status_code=500, content={"message": str(e)})

    with open("./test/output.wav", "rb") as f:
        audio_binary = f.read()

    return JSONResponse(content={"audio_data": audio_binary.hex()})
6. 最終的な全体のコード
Azure OpenAIしか想定してないので、openaiでのケースは削除してます。
import os

from fastapi import FastAPI, UploadFile, File, Form
from fastapi.responses import JSONResponse
from dotenv import load_dotenv
from client_sample import with_azure_openai
from pydub import AudioSegment

app = FastAPI()

load_dotenv()

def convert_audio(input_file, output_file, input_format, output_format):
    """
    指定された形式間で音声ファイルを変換する関数

    Parameters:
    input_file (str): 入力する音声ファイルのパス
    output_file (str): 出力する音声ファイルのパス
    input_format (str): 入力ファイルの形式 ('mp3', 'wav', 'm4a')
    output_format (str): 出力ファイルの形式 ('mp3', 'wav', 'm4a')
    """
    try:
        # 入力ファイルをロード
        audio = AudioSegment.from_file(input_file, format=input_format)

        # 指定された形式で出力
        audio.export(output_file, format=output_format)

        print(f"変換が完了しました: {input_file} ({input_format}) -> {output_file} ({output_format})")
    except Exception as e:
        print(f"エラーが発生しました: {e}")

@app.post("/process_audio/")
async def process_audio(audio_file: UploadFile = File(...), out_dir: str = Form("test"), provider: str = Form("azure")):
    # Save the uploaded file to a temporary location
    temp_file_path = f"/tmp/{audio_file.filename}"
    with open(temp_file_path, "wb") as temp_file:
        temp_file.write(await audio_file.read())

    wav_file_path = temp_file_path.rsplit(".", 1)[0] + ".wav"
    convert_audio(temp_file_path , wav_file_path, "m4a", "wav")

    # Ensure the output directory exists
    if not os.path.exists(out_dir):
        os.makedirs(out_dir)

    # Validate provider
    if provider not in ["azure", "openai"]:
        return JSONResponse(status_code=400, content={"message": "Provider must be 'azure' or 'openai'"})

    # Process the audio file
    await with_azure_openai(wav_file_path, out_dir)

    with open("./test/output.wav", "rb") as f:
        audio_binary = f.read()

    return JSONResponse(content={"audio_data": audio_binary.hex()})

if __name__ == "__main__":
    import uvicorn
    uvicorn.run(app, host="0.0.0.0", port=8000)
実装2.クライアント側の開発
アプリ側はFlutterを使用します。
1. 環境構築
プロジェクト作成
flutter create <プロジェクト名>
アプリ起動
cd <プロジェクト名> & flutter run
起動先OSを指定して、カウントアップアプリが立ち上がればOK
2. 必要なパッケージの導入
flutter pub add speech_to_text audioplayers record convert
3. 音声ファイル作成処理
音声の読み取り、音声ファイルの作成にはrecordというパッケージを利用します。
音声の出力にはaudioplayersというパッケージを利用します。
recordパッケージのGitHubにアクセスしてサンプルコードをお借りします。
↑上記リポジトリのlib配下のファイルを全てプロジェクトにコピーします。
ここのサンプルコードを流用するだけで音声周りの処理は全部活用できます。
4. ロジックの修正
main.dartファイルを少し修正していきます。
サンプルコードでは音声をレコードすると再生ボタンに移動しますが、APIからのレスポンスが返ってき次第再生したいので、showPlayer変数のtrue時には何もしないようにします。
また音声レコーディング後のsendAudioToAPI関数はこの後実装します。
   home: Scaffold(
        resizeToAvoidBottomInset: true,
        body: Center(
          child: showPlayer
              ? const Padding(
                  padding: const EdgeInsets.symmetric(horizontal: 25),
                  child: Text("Response...."))
              : Recorder(
                  onStop: (path) {
                    if (kDebugMode) print('Recorded file path: $path');
                    setState(() {
                      audioPath = path;
                    });
                    sendAudioToAPI(path);
                  },
                ),
        ),
      ),
5. APIにリクエストを送る処理の実装
今回はAPIにファイルを添付して送るのでmultipart形式でAPIリクストを送ります。
  Future<void> sendAudioToAPI(path) async {
    final url = Uri.parse("http://127.0.0.1:8000/process_audio/");
    var request = http.MultipartRequest(
      'POST',
      url,
    );
    Map<String, String> header = {
      "Content-Type": "application/json",
      "accept": "multipart/form-data",
    };
    request.headers.addAll(header);
    request.files.add(await http.MultipartFile.fromPath('audio_file', path));

    final result = await request.send();
    final response = await http.Response.fromStream(result);
    final jsonResponse = jsonDecode(response.body);

    # オーディオデータを取得
    final audioDataHex = jsonResponse["audio_data"];
    final audioDataBytes = hex.decode(audioDataHex);

    # wavファイルを作成してアプリ内フォルダに保存
    final dir = await getApplicationDocumentsDirectory();
    final res_path = p.join(
      dir.path,
      'response_${DateTime.now().millisecondsSinceEpoch}.wav',
    );
    final data = File(res_path);
    await data.writeAsBytes(audioDataBytes);

    setState(() {
      showPlayer = true;
    });
    # 音声出力処理
    final _audioPlayer = ap.AudioPlayer();
    Source _source = ap.DeviceFileSource(res_path);
    _audioPlayer.setSource(_source);
    _audioPlayer.play(_source);
  }
動作確認
zennでは動画を貼り付けられないので、スクショになります。
まずはアプリ側でレコーディングができて..
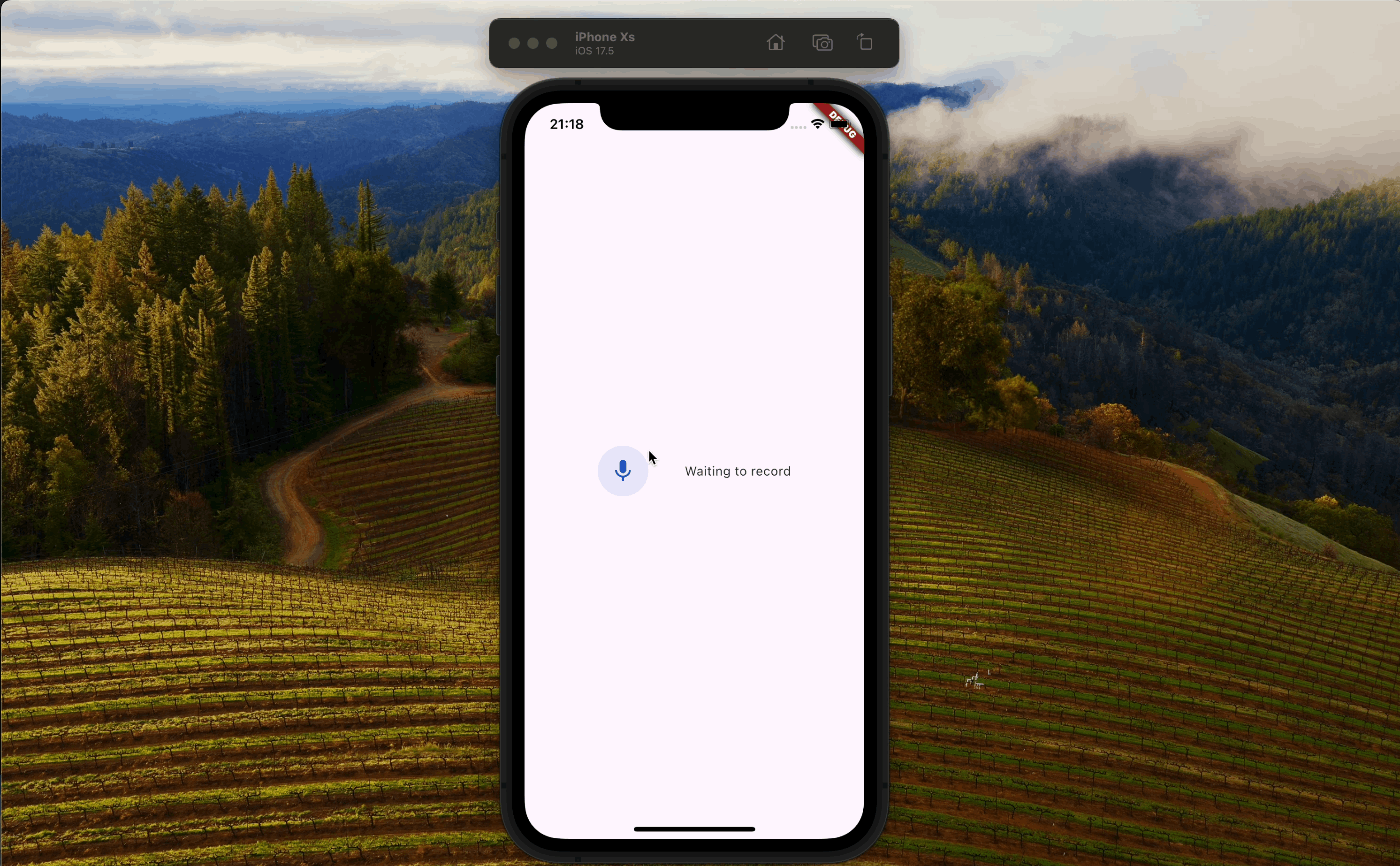
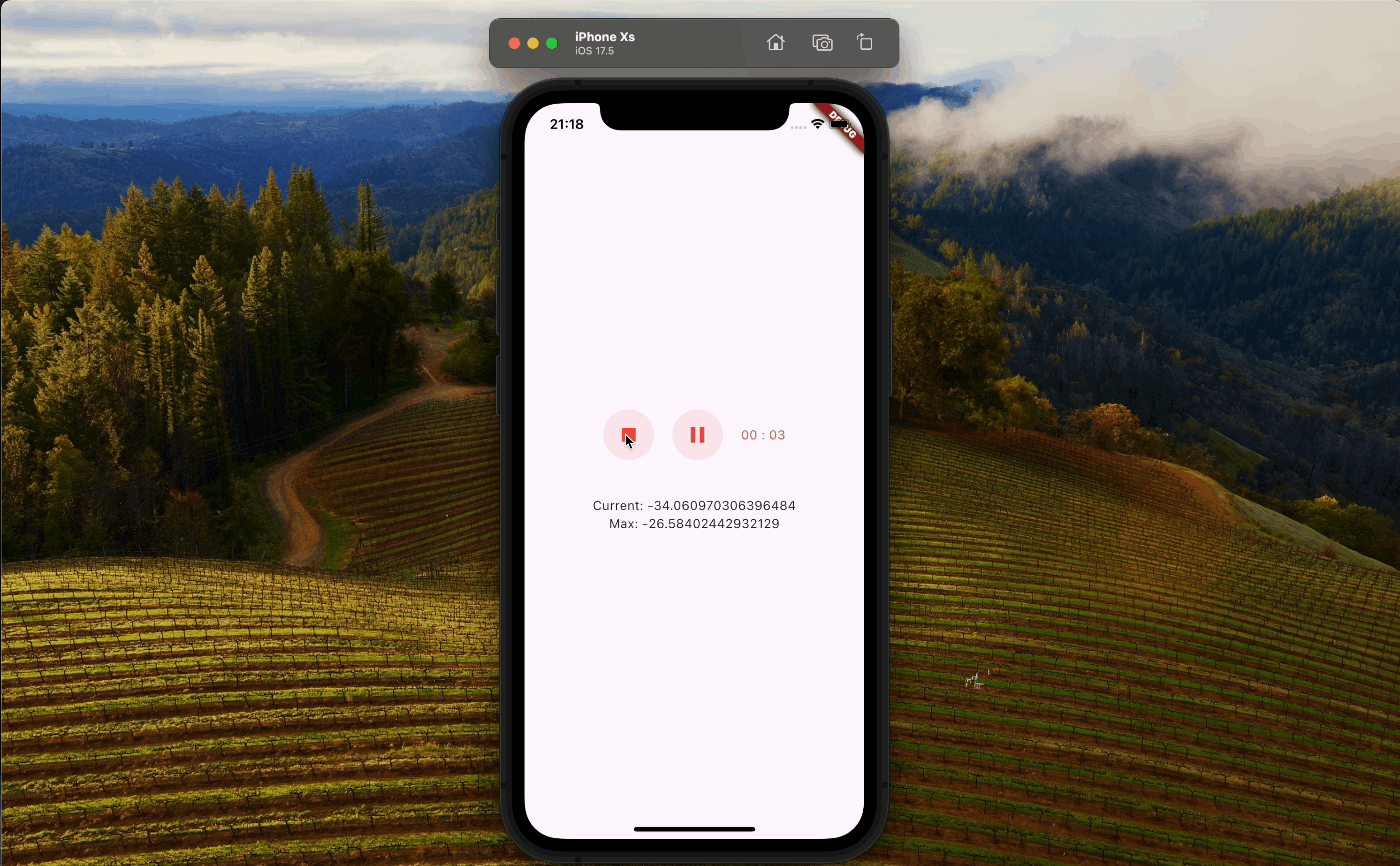
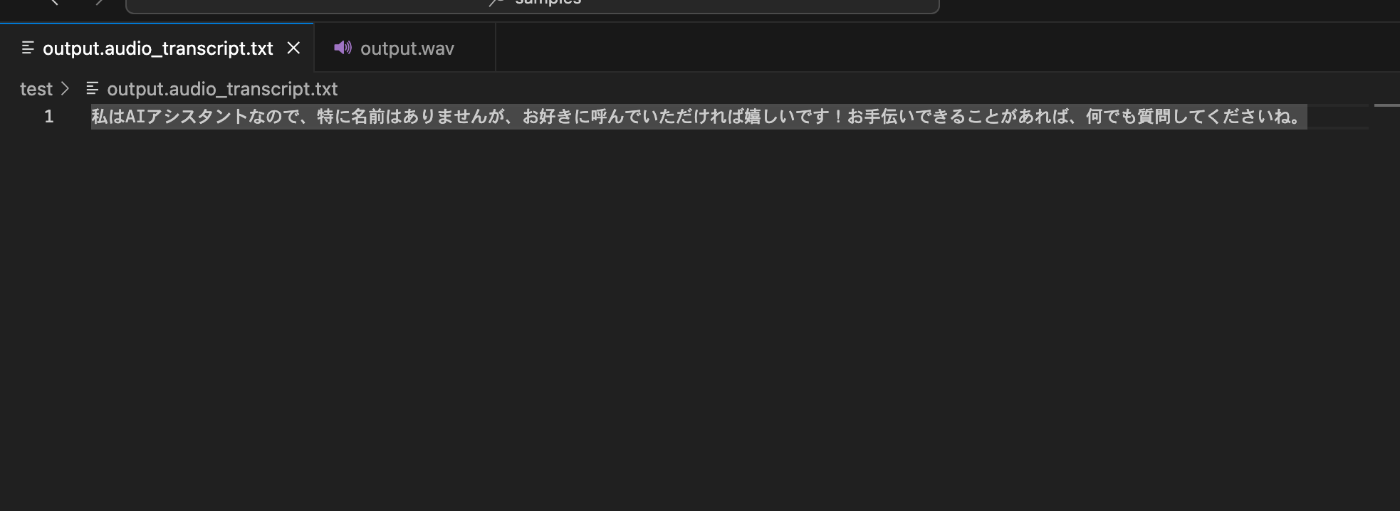
バックエンド側でもレスポンスから音声ファイルが作成されました。
最終的にアプリ側で回答が音声で出力されました。
音声が人間ぽい抑揚になってたのでちょっと驚きました。
ぜひ試してみてください。
最後に
今回は一連のフローの中で無駄に音声ファイルを作成したり、処理を最後までまったりしてたのでレスポンスに少々時間がかかりましたが、本来はもっとリアルタイムに近いスピードでやり取りができるっぽいです。
まだまだコードの最適化の余地があるのでアプリの機能として組み込めるように次回は改修を行なっていきます。s

Discussion