執筆日
2024/04/25
概要
Azure OpenAIクライアントでchat.completions.createするとき、system or userメッセージがあるかどうか、画像を入力するのか、ビジョン拡張機能を有効化するのか、過去の会話履歴を使うか……でいちいちレスポンス生成を書き換えるのが面倒だったので1つで完結する関数を作りました。
(関数化よりクラス化すればよかったのは……)
前提
- python実行環境
- Azure OpenAIのリソース作成済み
- リソース作成には申請が必要(申請から半日くらい待ちました)
- GPT-4Vを使えるリージョンは限られているのでリソース作成時は注意
- Azure Computer Visionのリソース作成済み
- ビジョン拡張機能有効化のために必要
依存ライブラリインストール
pip install openai
Note
- ビジョン拡張機能について
- (2024/05/29追記)ビジョン拡張はGPT-4のvision-previewモデルのみの機能になっています。ですが、現状使ってみた感想としてGPT-4oの画像認識機能はビジョン拡張を含むvision-previewモデル以上であると感じています。
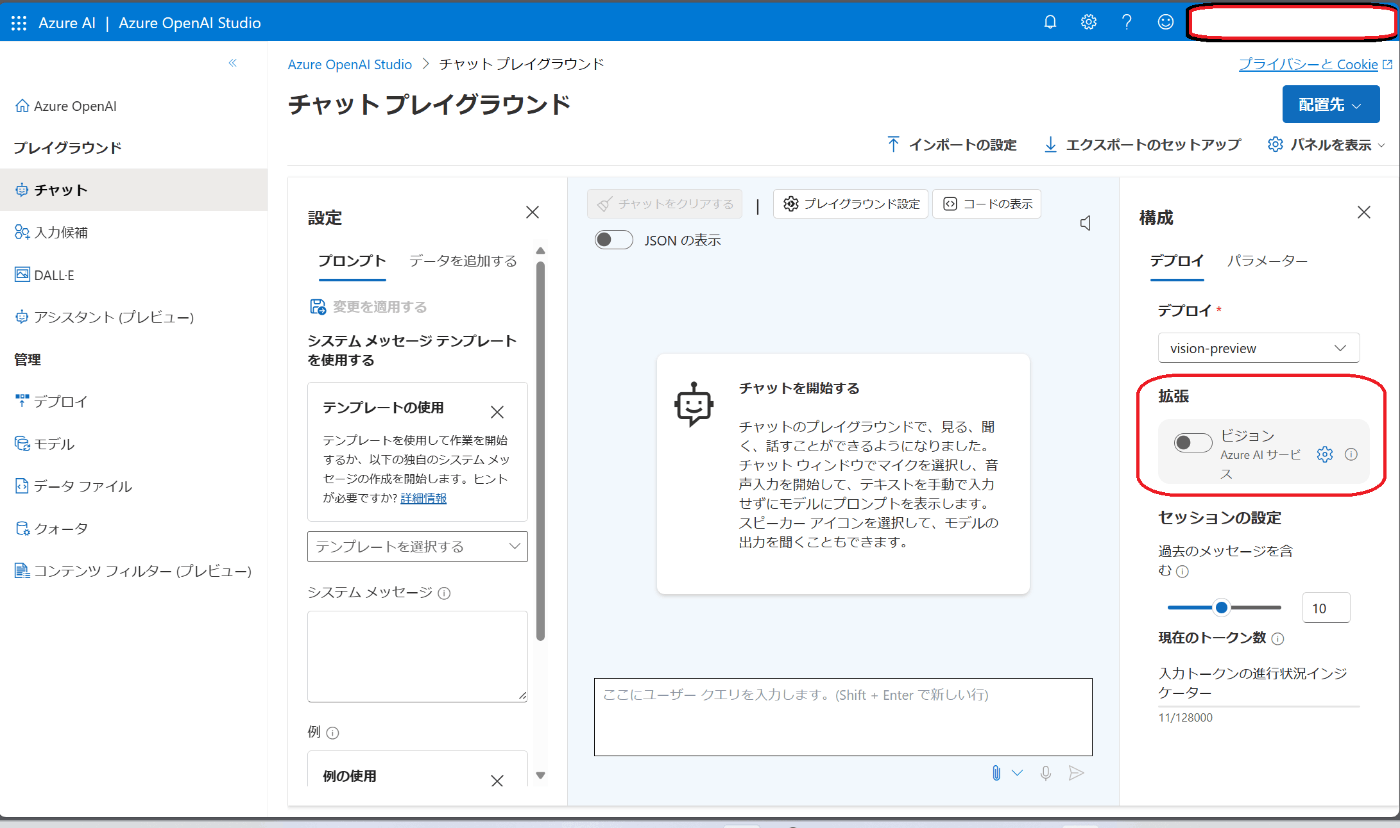
- Azure Computer Visionによる、OCR(光学式文字認識)・grounding(オブジェクト位置検出など)の結果をコンテキストに含めることで画像分析精度を向上させられます。Azure OpenAIのチャットプレイグラウンドでは下の画像部分にあたります。
- 以下拡張機能について公式の説明文翻訳
- 光学式文字認識(OCR)の統合により、このモデルは、高密度のテキスト、変換された画像、数字の多い財務文書に対して、より高品質の回答を生成できるようになった。また、より幅広い言語に対応しています。
- object groundingの統合は、処理する画像内の重要な要素を視覚的に区別し強調することができるため、データ分析とユーザーインタラクションに新しいレイヤーをもたらします。
- 実際コンテキストにどんな形で分析結果を入れているのか調べた方がいらっしゃれば教えてほしいです。
- api_versionについて
- AzureOpenAIのclient呼び出しの際
api_versionをモデルのバージョンと勘違いしないようにしましょう。以下のページの「サポートされているバージョン」のところに一覧があります。 - 記事執筆時は最新バージョン
2024-02-01を使いました。バージョンが変わるとAPI呼び出しの方法も変わる可能性があるので注意が必要です。
- AzureOpenAIのclient呼び出しの際
コード
get_response
# ローカル画像をデータURLに変換する関数
def local_image_to_data_url(image_path):
    mime_type, _ = guess_type(image_path)
    if mime_type is None:
        mime_type = 'application/octet-stream'

    # Read and encode the image file
    with open(image_path, "rb") as image_file:
        base64_encoded_data = base64.b64encode(image_file.read()).decode('utf-8')

    # Construct the data URL
    return f"data:{mime_type};base64,{base64_encoded_data}"

# レスポンス取得関数
def get_response(
        client, deployment_name, past_messages=[], system_message=None, user_message="", image_path=None,
        azure_cv_endpoint=None, azure_cv_key=None, ocr=True, grounding=True,
        temperature=0.7, top_p=0.95, frequency_penalty=0, presence_penalty=0, max_tokens=2048):

    messages = []

    # 会話履歴の追加
    messages.extend(past_messages)

    # システムメッセージの追加
    if system_message:
        messages.append({ "role": "system", "content": system_message })

    # ユーザーメッセージの追加
    user_message = { "role": "user", "content": [{"type": "text", "text": user_message}] }
    ## 画像の追加
    if image_path:
        if image_path.startswith('https://your-azure-storage-url'):
            # Azure Blob Storageから画像を取得したい場合
            # TODO: retrieve_image_from_azure_storage関数作成
            image_data_url = retrieve_image_from_azure_storage(image_path)
        elif image_path.startswith('http'):
            # URLから画像を取得
            image_data_url = image_path
        else:
            # ローカルの画像をデータURLに変換
            image_data_url = local_image_to_data_url(image_path)
        user_message["content"].append({ "type": "image_url", "image_url": { "url": image_data_url } })
    messages.append(user_message)

    # ビジョン拡張機能の設定
    # GPT-4V(vision-preview)でのみ有効
    if azure_cv_endpoint and azure_cv_key and image_path:
        print(f"ビジョン拡張機能が有効です - OCR: {ocr}, Grounding: {grounding}")
        extra_body={
            "data_sources": [
                {
                "type": "AzureComputerVision",
                    "parameters": {
                        "endpoint": azure_cv_endpoint,
                        "key": azure_cv_key
                    }
                }],
            "enhancements": {
                "ocr": {
                    "enabled": ocr
                },
                "grounding": {
                    "enabled": grounding
                }
            }
        }
    else:
        if image_path:
            print("ビジョン拡張機能は無効です")
        extra_body = None

    # 回答生成
    try:
        response = client.chat.completions.create(
            model=deployment_name,
            temperature=temperature,
            top_p=top_p,
            frequency_penalty=frequency_penalty,
            presence_penalty=presence_penalty,
            max_tokens=max_tokens,
            messages=messages,
            extra_body=extra_body, # GPT-4V(vision-preview)でのみ有効
        )
        message = response.choices[0].message.content
    except Exception as e:
        message = "error"
        response = str(e)

    return message, response

if __name__ == "__main__":
    import os
    from dotenv import load_dotenv
    from openai import AzureOpenAI

    # APIキー等を設定
    load_dotenv("../../environment/.env")
    # Azure OpenAIのエンドポイント・キー
    aoai_endpoint = os.getenv("AZURE_OPENAI_ENDPOINT")
    aoai_key = os.getenv("AZURE_OPENAI_KEY")
    aoai_api_version = os.getenv("AZURE_OPENAI_API_VERSION")
    deployment_name = os.getenv("AZURE_OPENAI_DEPLOYMENT_NAME_GPT4V")
    # Azure CVのエンドポイント・キー
    # GPT-4V(vision-preview)でのみ有効
    azure_cv_endpoint = os.getenv("AZURE_CV_ENDPOINT")
    azure_cv_key = os.getenv("AZURE_CV_KEY")

    # クライアント生成
    client = AzureOpenAI(
        api_key=aoai_key,
        api_version=aoai_api_version,
        azure_endpoint=aoai_endpoint
    )

    # レスポンス生成テスト
    ## システムメッセージとユーザーメッセージのみ
    system_message = "あなたはユーザーの友人です"
    user_message = "こんにちは"
    message, _ = get_response(client, deployment_name, system_message=system_message, user_message=user_message)
    print(message)
    ## システムメッセージと画像のみ
    system_message = "あなたは画像分析のエキスパートです 何が写っているか説明してください"
    image_path = "../../../image.png"
    message, _ = get_response(client, deployment_name, system_message=system_message, image_path=image_path)
    print(message)
    ## ビジョン拡張機能でOCR, groundingを有効にする
    message, _ = get_response(client, deployment_name, system_message=system_message, image_path=image_path,
                 azure_cv_endpoint=azure_cv_endpoint, azure_cv_key=azure_cv_key, ocr=True, grounding=True)
    print(message)
出力チェック
python get_response.py
- Azureのエンドポイント・キー・デプロイ名の設定はご自分の環境に合わせてください
- image_pathには何かしらの画像ファイルパスを設定して試してください
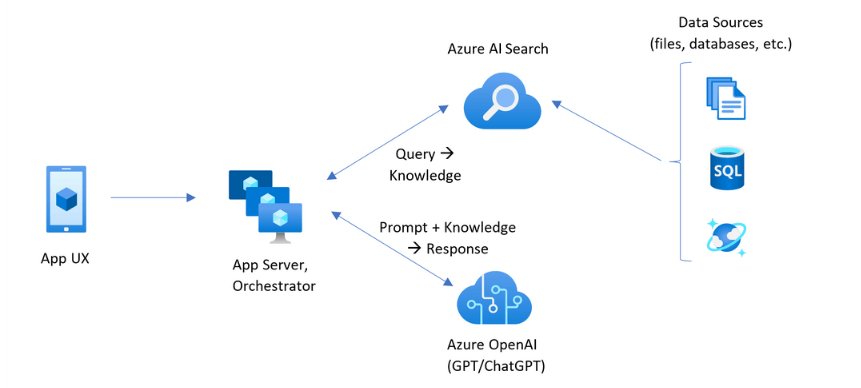
- この記事ではこちらよりRAGシステム概念図を拝借しました。
- この記事ではこちらよりRAGシステム概念図を拝借しました。
- ビジョン拡張機能を有効にすると回答が英語になったのは、おそらくOCRやgroundingが追加するコンテキストが英語だったからだと思います。
システムメッセージとユーザーメッセージのみ
こんにちは!お元気ですか?何かお手伝いできることがあれば教えてください。
システムメッセージと画像のみ
ビジョン拡張機能は無効です
この画像は、アプリケーションのユーザーインターフェース(App UX)から始まり、アプリケーションサーバーとオーケストレーター(App Server, Orchestrator)を経由し、Azure AI Search および Azure OpenAI(GPT/ChatGPT)を使用してデータソース(ファイル、データベースなど)と連携するアーキテクチャのフロー図を表しています。

プロセスは以下のように進行します:

1. App UX(モバイルアプリのアイコンで表されています)からリクエストが始まります。
2. 次に、App Server, Orchestrator(複数のサーバーのアイコンで表されています)がそのリクエストを処理します。
3. Azure AI Search(検索アイコン)は、データソースからの情報をクエリして知識を取得します。
4. Azure OpenAI(GPT/ChatGPTのアイコン)は、プロンプトとその知識を組み合わせて応答を生成します。
5. データソースは、SQLデータベースと水滴を持つドキュメントのアイコンで示されており、Azure AI Searchによってアクセスされます。

全体として、このフロー図はAIおよび機械学習モデルを使用してデータを処理し、ユーザーのクエリに応答するシステムの構造を示しています。
ビジョン拡張機能でOCR, groundingを有効にする
ビジョン拡張機能が有効です - OCR: True, Grounding: True
The image is a flowchart or diagram that illustrates the interaction between various components of a software application ecosystem that uses Azure services, specifically focusing on AI and search functionalities.

On the left side of the image, there's an icon labeled "App UX," representing the user experience or interface of an application. This connects to a central hub with two icons labeled "App Server, Orchestrator," which likely represents the backend server and the system that manages the workflow between different services.

From this central hub, there are two outgoing connections. One leads to the top-right icon labeled "Azure AI Search," which is connected to "Data Sources" indicated by icons of files, a database, and an SQL logo, signifying that Azure AI Search can handle various data types, including structured databases. The flow indicates that a "Query" is sent to Azure AI Search and "Knowledge" is returned.

The other connection from the central hub leads to the bottom-right icon labeled "Azure OpenAI (GPT/ChatGPT)," suggesting that this component uses Azure's implementation of OpenAI's language models for generating responses based on the "Prompt + Knowledge."

The arrows between the components show the direction of data flow or interactions, beginning with the user interface, moving through the application server and orchestrator, interacting with Azure's AI search and data sources, and finally, using Azure's OpenAI services to generate responses.

The diagram simplifies the architecture of a complex system into a few key components, highlighting how queries and data flow through an application that leverages Azure's AI and search capabilities.
各変数について
| 変数 | 概要 | デフォルト |
|---|---|---|
| client | 必須: AzureOpenAIのクライアント。関数実行の度にクライアントを呼び出すのは無駄なため関数内で呼び出さない。 | - |
| deployment_name | 必須: Azure OpenAIで作成したモデルのデプロイ名 | - |
| past_massages | 会話履歴 | [] |
| system_message | システムメッセージ | None |
| user_message | ユーザーメッセージ | "" |
| image_path | 画像のパス。ローカル画像、Web上の画像に対応。Azure blobからも対応したい | None |
| azure_cv_endpoint | ビジョン拡張用Azure Conputer Visionリソースのエンドポイント | None |
| azure_cv_key | ビジョン拡張用Azure Conputer Visionリソースのキー | None |
| ocr | ビジョン拡張有効化時、OCR結果をコンテキストに含めるか | True |
| grounding | ビジョン拡張有効化時、grounding結果をコンテキストに含めるか | True |
| temperature | 創造性の高さ(0~1)、大きいほど結果に多様性が出る(安定性が低) | 0.7 |
| top_p | temperatureと同じようなもの。検証時に同時に変化させない | 0.95 |
| frequency_penalty | 繰り返しに対するペナルティ(-2.0~2.0)。大きくすると繰り返し出力を減らせる | 0 |
| presence_penalty | frequencyよりちょっと緩い繰り返しに対するペナルティだと思えばよさそう(-2.0~2.0) | 0 |
| max_tokens | 入出力の最大トークン数 | 2048 |

Discussion