Server Actionsを利用して、Slackのチャンネルに通知を飛ばす
はじめに
- Slack のチャンネルに通知を飛ばす方法をまとめます。
- Incoming Webhooksを利用し通知を飛ばします。
- Server Actions を利用し、サーバサイドから Slack のチャンネルに通知を飛ばします。
今回作成するプログラムです。
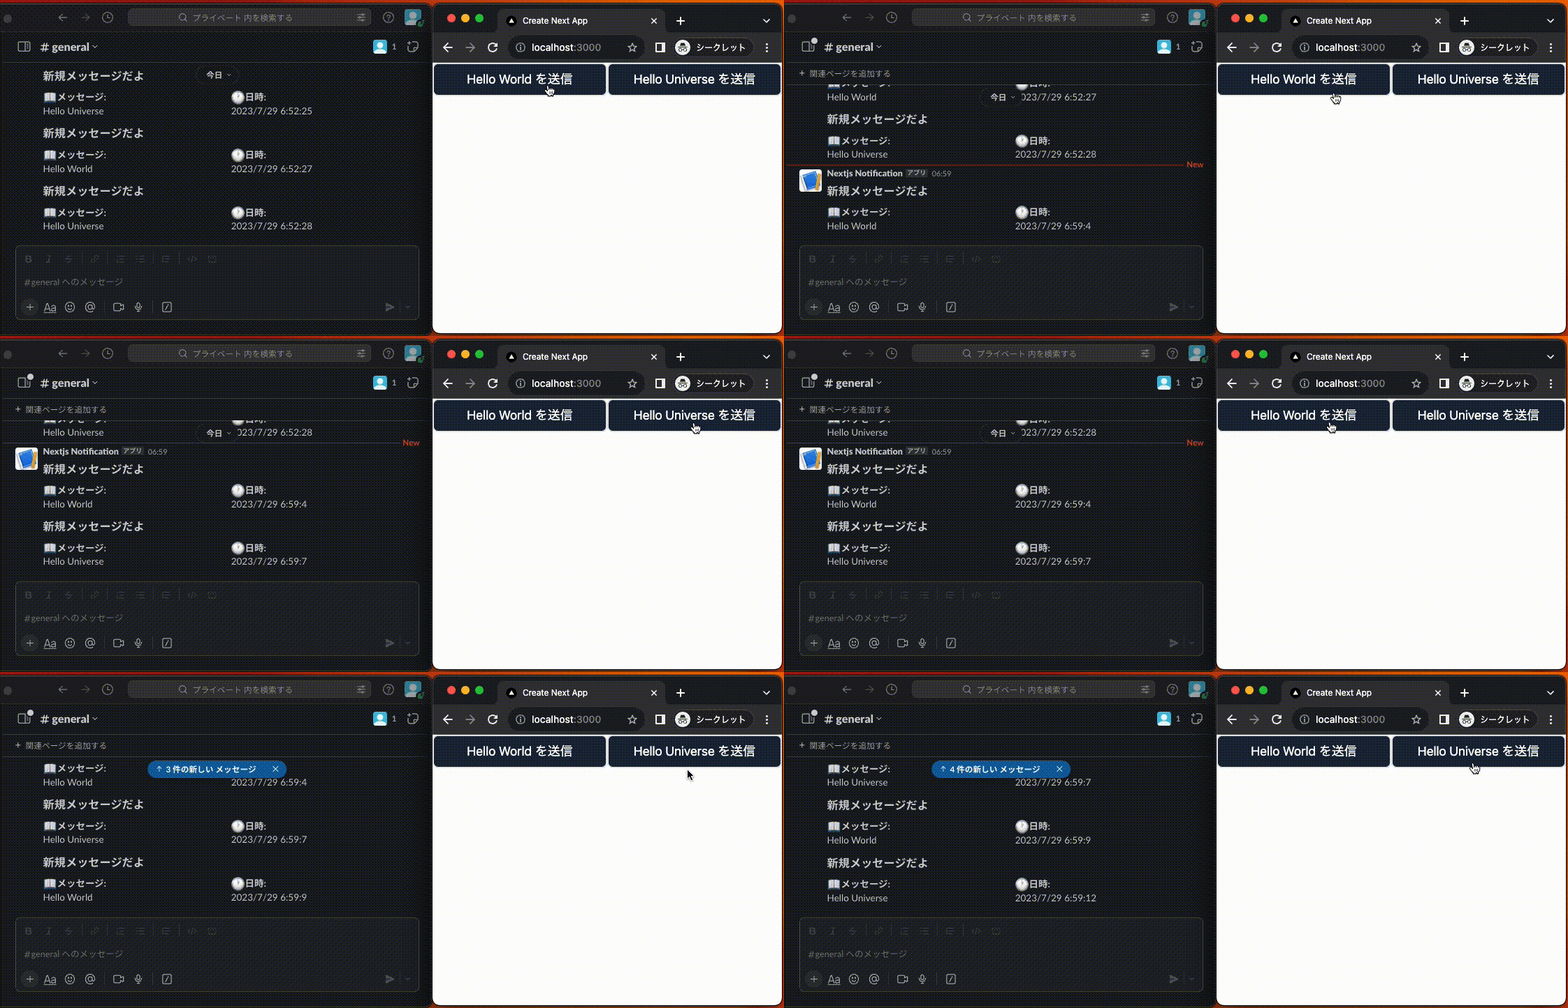
作業したコードはこちらにあります。
Incoming Webhooksの設定手順
Incoming Webhooks を Slack に設定する手順を紹介します。詳細はこちらに記載されています。
ステップ1:Slackのワークスペースを作成
以下を参考にワークスペースを作成します。
ステップ2:Slack Appの作成
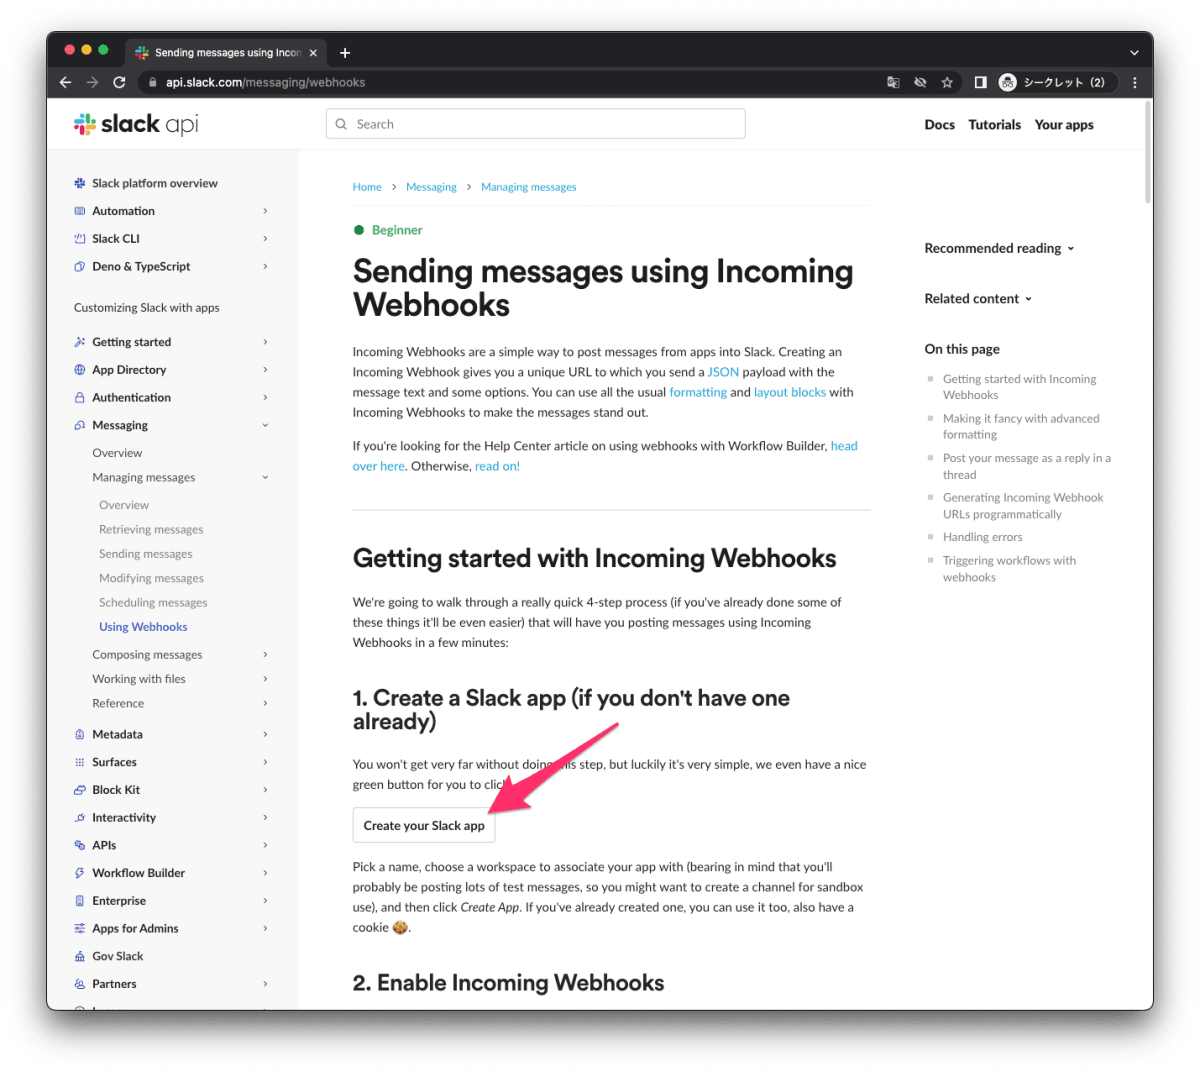
Slack App を作成します。
https://api.slack.com/messaging/webhooks の「Create your Slack app」をクリックします。
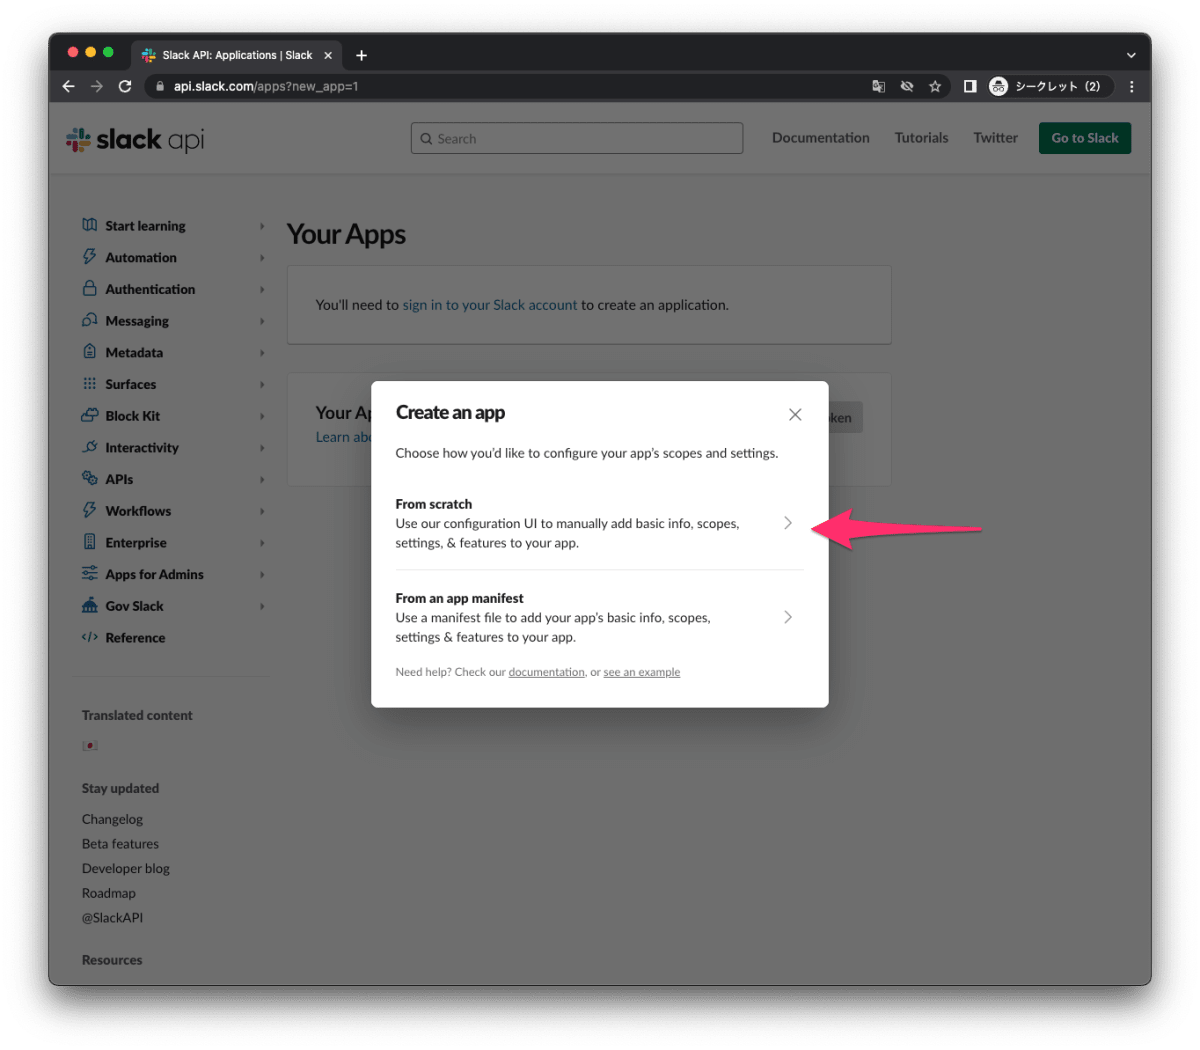
「From scratch」をクリックします。
アプリ名を入力し、ワークスペースに通知を飛ばすワークスペースを選択し「Create App」をクリックします。

これで Slack App の作成が完了しました。
ステップ3:Incoming Webhookの有効化
「Incoming Webhook」を選択します。
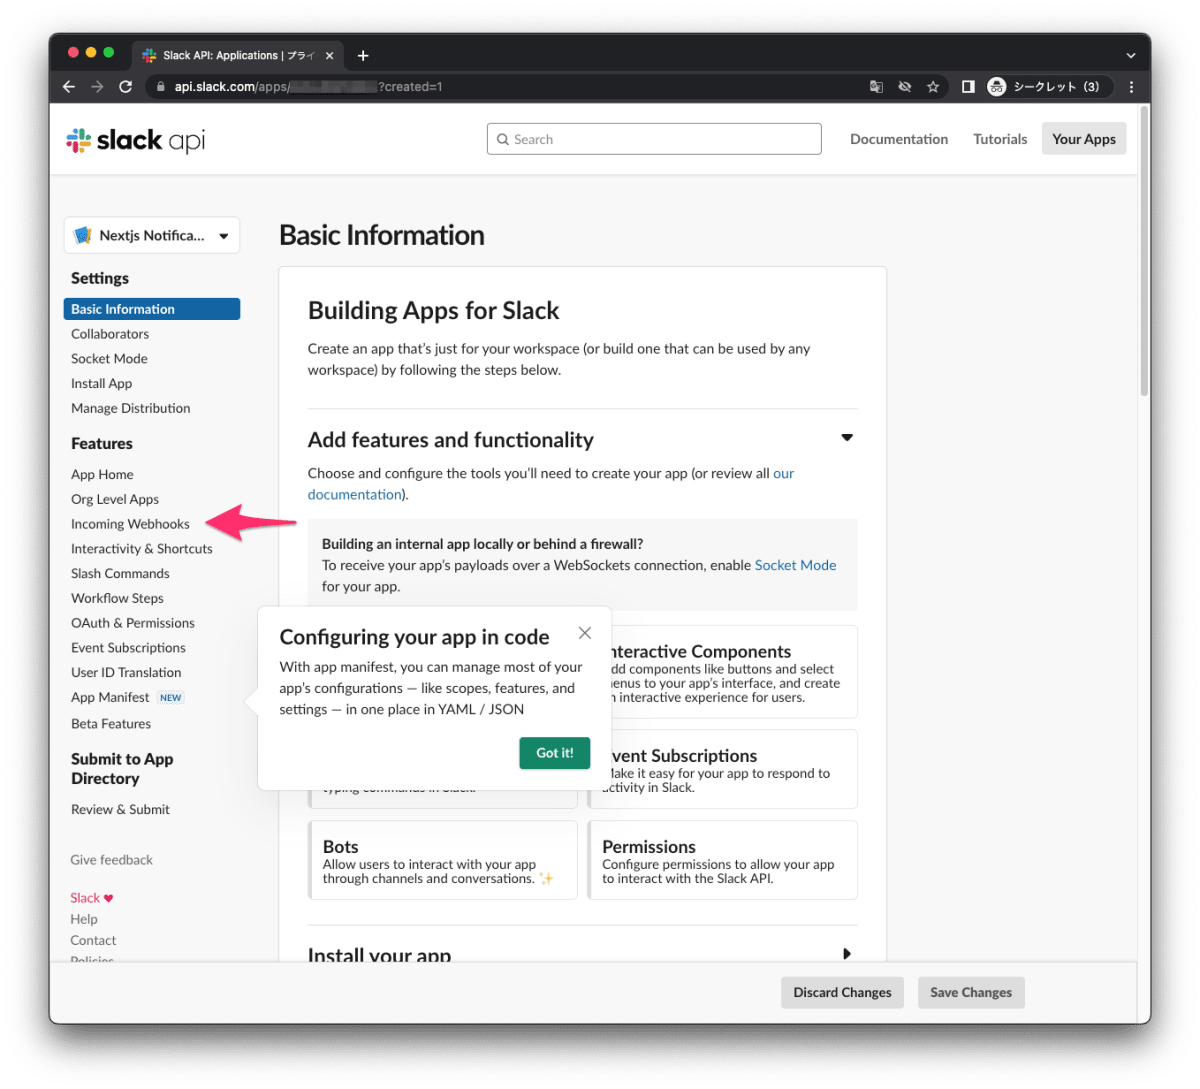
チェックボックスをクリックし有効化します。
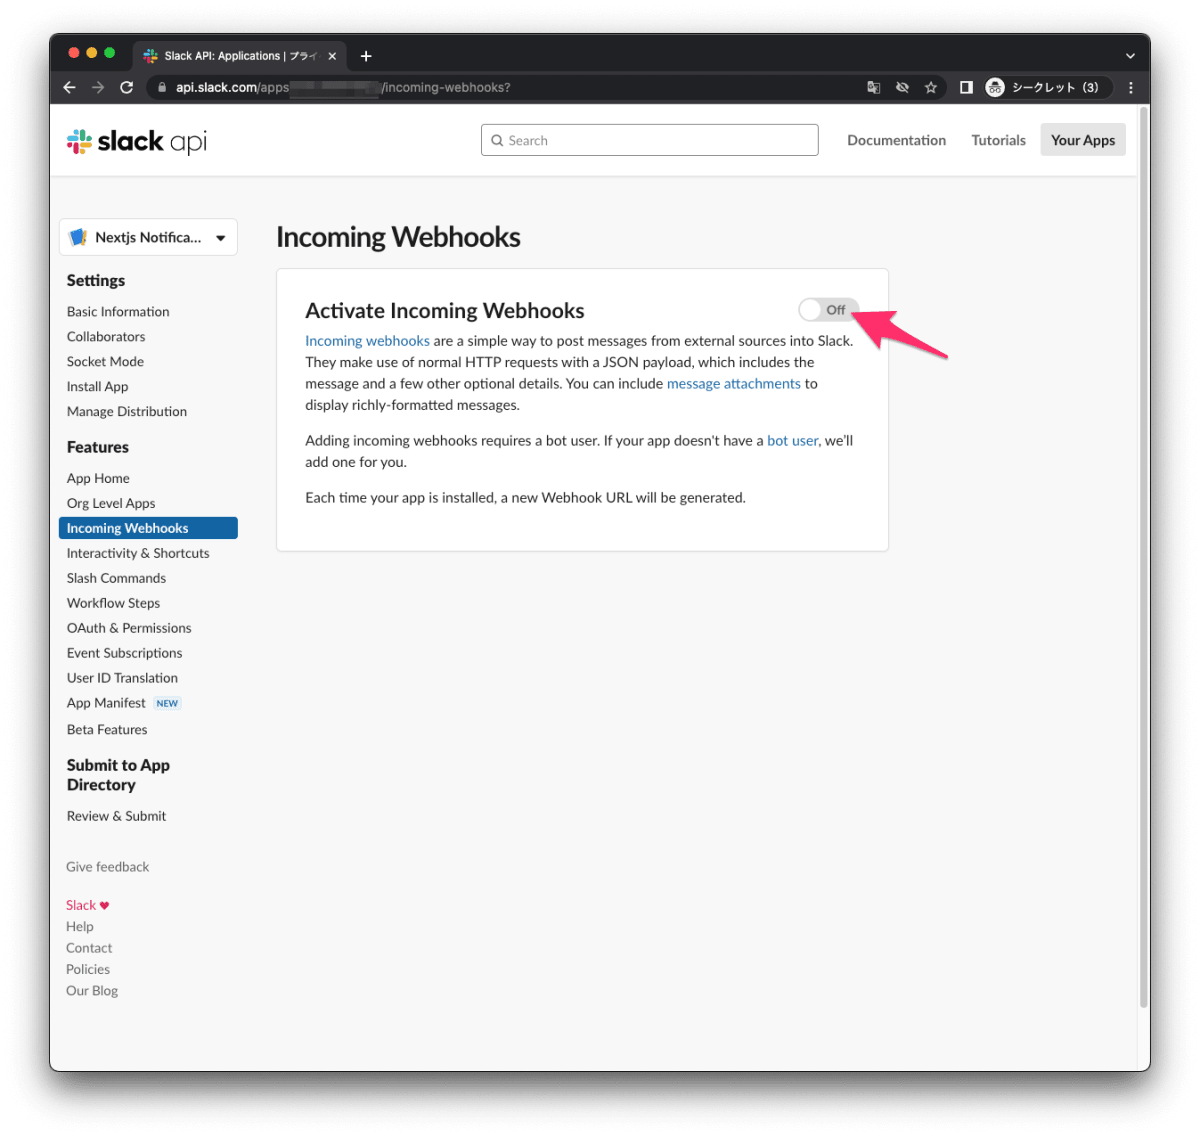
これで、Incoming Webhook が有効化されました。
ステップ4:Webhookをワークスペースに追加
作成した Incoming Webhook をワークスペースに追加します。
「Add New Webhook to Workspace」をクリックします。
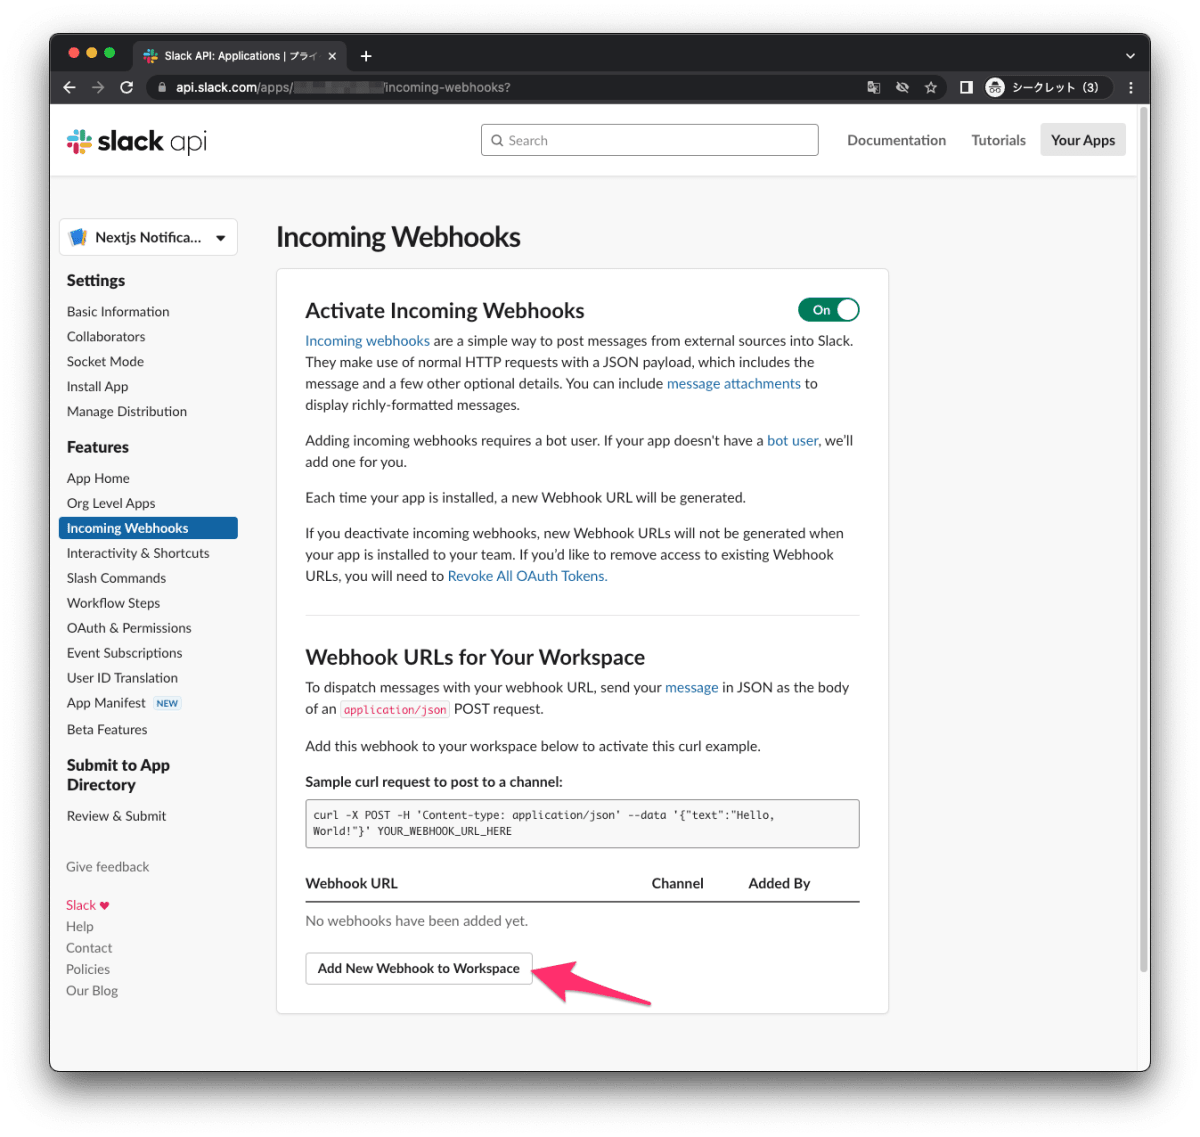
チャンネルを選択し「許可する」をクリックします。
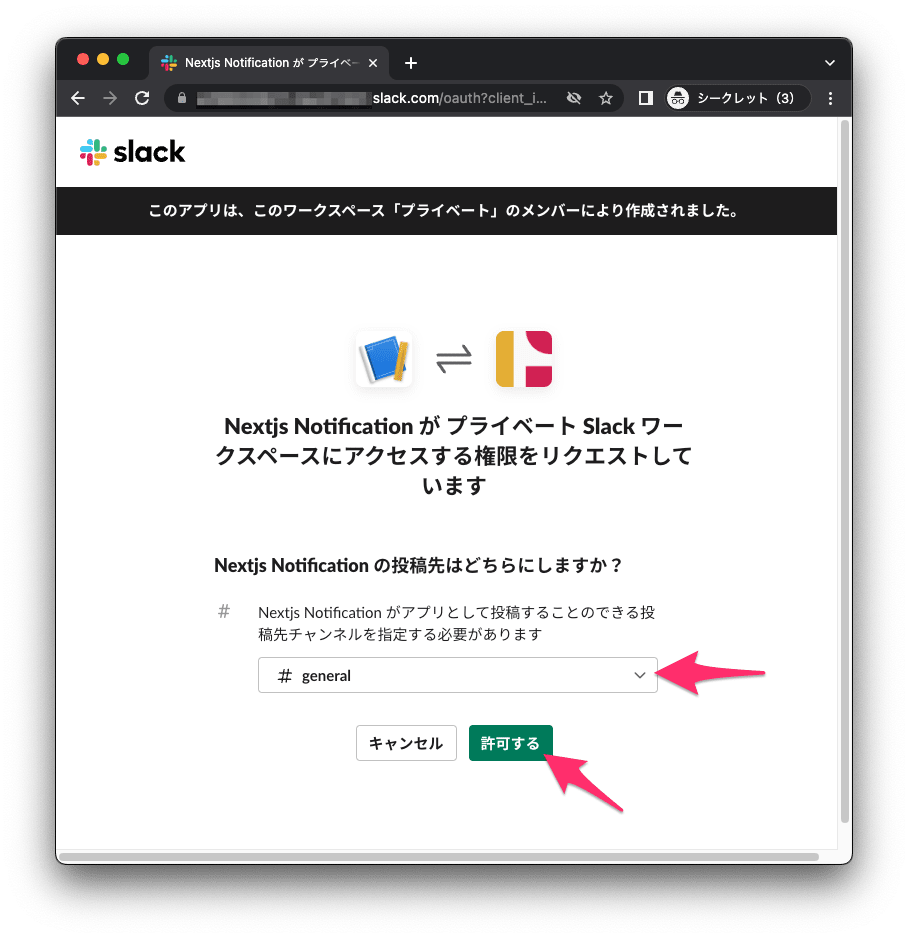
これで Incoming Webook がワークスペースに連携されました。先程設定したチャンネルに Incoming Webhook とチャンネルが連携された趣旨のメッセージが見えるはずです。

設定画面に戻ると、先程まで出ていなかった Webhook URL が表示されています。

以下のようなフォーマットの URL が表示されているはずです。
https://hooks.slack.com/services/T00000000/B00000000/XXXXXXXXXXXXXXXXXXXXXXXX
ステップ5:Incoming Webhook URLを利用しメッセージを投稿
Incoming Webhook URL を利用しメッセージを投稿し、Slack チャンネルにメッセージを飛ばします。
ターミナルに以下のように入力し実行します。
curl -X POST -H 'Content-type: application/json' --data '{"text":"Hello, World!"}' https://hooks.slack.com/services/XXXXXXXXXXXX/XXXXXXXXXXX/XXXXXXXXXXXXXXXXX
チャンネルに通知が飛んでいれば成功です。

Next.jsから通知を飛ばす
それでは、以降は、Next.js のプロジェクトを作り、ウェブアプリから Slack のチャンネルに通知を飛ばします。
実施内容は以下になります。
- ボタンを配置します。
- ボタンをクリックすると、Slack に通知が飛びます。
- Slack への通知処理は、Server Actions を利用し、サーバサイドで実行されます。
Next.jsプロジェクトの新規作成
作業するプロジェクトを新規に作成していきます。
長いので、折りたたんでおきます。
新規プロジェクト作成と初期環境構築の手順詳細
$ pnpm create next-app@latest nextjs-slack-incoming-webhook-sample --typescript --eslint --import-alias "@/*" --src-dir --use-pnpm --tailwind --app
$ cd nextjs-slack-incoming-webhook-sample
以下の通り不要な設定を削除し、プロジェクトの初期環境を構築します。
$ mkdir src/styles
$ mv src/app/globals.css src/styles/globals.css
@tailwind base;
@tailwind components;
@tailwind utilities;
export default function Home() {
  return (
    <main className="text-lg">
      テストページ
    </main>
  )
}
import '@/styles/globals.css'

export const metadata = {
  title: "Create Next App",
  description: "Generated by create next app",
};

export default function RootLayout({
  children,
}: {
  children: React.ReactNode;
}) {
  return (
    <html lang="ja">
      <body className="">{children}</body>
    </html>
  );
}
/** @type {import('tailwindcss').Config} */
module.exports = {
  content: [
    "./src/components/**/*.{js,ts,jsx,tsx,mdx}",
    "./src/app/**/*.{js,ts,jsx,tsx,mdx}",
  ],
  plugins: [],
};
{
  "compilerOptions": {
    "target": "es5",
    "lib": ["dom", "dom.iterable", "esnext"],
    "allowJs": true,
    "skipLibCheck": true,
    "strict": true,
    "forceConsistentCasingInFileNames": true,
    "noEmit": true,
    "esModuleInterop": true,
    "module": "esnext",
    "moduleResolution": "node",
    "resolveJsonModule": true,
    "isolatedModules": true,
    "jsx": "preserve",
    "incremental": true,
    "plugins": [
      {
        "name": "next"
      }
    ],
+   "baseUrl": ".",
    "paths": {
      "@/*": ["./src/*"],
    }
  },
  "include": ["next-env.d.ts", "**/*.ts", "**/*.tsx", ".next/types/**/*.ts"],
  "exclude": ["node_modules"]
}
コミットします。
$ pnpm build
$ git add .
$ git commit -m "新規にプロジェクトを作成し, 作業環境を構築"
パッケージの追加
Slack へ通知するために必要なパッケージを追加します。
$ pnpm add @slack/webhook
環境変数を設定
環境変数を設定します。サーバサイドで利用するため、NEXT_PUBLIC_ は不要です。
$ touch .env.local
SLACK_WEBHOOK_URL=https://hooks.slack.com/services/T00000000/B00000000/XXXXXXXXXXXXXXXXXXXXXXXX
この環境変数は Slack へ通知を出すときに利用します。
Server Actionsを導入
続いて、Server Actions を導入します。Server Actions を利用して、サーバサイドから Slack へ通知を飛ばします。
Server Actions を利用するには、next.config.js に experimental.serverActions を追加します。Server Actions を利用するには、App Router を利用する必要があります。
next.config.js を修正します。
/** @type {import('next').NextConfig} */
const nextConfig = {
+  experimental: {
+    serverActions: true,
+  },
};

module.exports = nextConfig;
Server Actions のコードを記述します。
$ mkdir src/server-actions
$ touch src/server-actions/send-slack-message-action.ts
"use server";

import { IncomingWebhook } from "@slack/webhook";

interface paramType {
  message: string;
}

export async function sendSlackMessage({ message }: paramType) {
  // get time in format yyyy/mm/dd hh:mm:ss in one line
  const date = new Date();
  const time = `${date.getFullYear()}/${
    date.getMonth() + 1
  }/${date.getDate()} ${date.getHours()}:${date.getMinutes()}:${date.getSeconds()}`;

  // 入力値の検証
  const url = process.env.SLACK_WEBHOOK_URL as string;
  const webhook = new IncomingWebhook(url);
  const payload = {
    blocks: [
      {
        type: "header",
        text: {
          type: "plain_text",
          text: "新規メッセージだよ",
          emoji: true,
        },
      },
      {
        type: "section",
        fields: [
          {
            type: "mrkdwn",
            text: `:book:*メッセージ:*\n${message}`,
          },
          {
            type: "mrkdwn",
            text: `:clock1:*日時:*\n${time}`,
          },
        ],
      },
    ],
  };
  await webhook.send(payload);
}
ポイントを説明します。
Slackへの通知
以下のコードで Slack のチェンネルに通知します。
  const webhook = new IncomingWebhook(url);
  const payload = {
    blocks: [
      {
        type: "header",
        text: {
          type: "plain_text",
          text: "新規メッセージだよ",
          emoji: true,
        },
      },
      {
        type: "section",
        fields: [
          {
            type: "mrkdwn",
            text: `:book:*メッセージ:*\n${message}`,
          },
          {
            type: "mrkdwn",
            text: `:clock1:*日時:*\n${time}`,
          },
        ],
      },
    ],
  };
  await webhook.send(payload);
メッセージのフォーマット
Slack へのメッセージはフォーマットをあてることができます。payload を以下のように変更することで、メッセージの装飾を変更できます。emoji を追加できます。今回は :book: と :clock1: の2つの絵文字を利用しています。
  const payload = {
    blocks: [
      {
        type: "header",
        text: {
          type: "plain_text",
          text: "新規メッセージだよ",
          emoji: true,
        },
      },
      {
        type: "section",
        fields: [
          {
            type: "mrkdwn",
            text: `:book:*メッセージ:*\n${message}`,
          },
          {
            type: "mrkdwn",
            text: `:clock1:*日時:*\n${time}`,
          },
        ],
      },
    ],
  };
フォーマットの詳しい情報はこちらを確認ください。
ボタンコンポーネントの作成
単純なボタンコンポーネントを作成します。
-
propsで受け取ったmessageを Slack のチャンネルに送信します。 - Server Actions の
useTransitionを利用することで、サーバ側で処理中かステータスを判断できるisPendingが利用できます。 - 処理中の場合は、「送信中」と表示させます。
$ mkdir src/components
$ touch src/components/button.tsx
"use client";

import { sendSlackMessage } from "@/server-actions/send-slack-message-action";
import { FC, useTransition } from "react";

interface ButtonProps {
  message: string;
}

const Button:FC<ButtonProps> = (props) => {
  let [isPending, startTransition] = useTransition();
  return (
    <>
      {isPending ? (
        <button onClick={() => startTransition(() => sendSlackMessage({message:`${props.message}`}))} className="border-2 py-2 px-3 bg-slate-400 text-white rounded-lg w-[250px]" disabled={true}>
        {props.message} を送信中
        </button>
      ) : (
        <button onClick={() => startTransition(() => sendSlackMessage({message:`${props.message}`}))} className="border-2 py-2 px-3 bg-slate-800 text-white rounded-lg w-[250px]">
          {props.message} を送信
        </button>
      )}
    </>
  );
};

export default Button;
ページを修正
ページに先程作成したボタンコンポーネントを追加します。
下記の通り上書きします。
import Button from "@/components/button";

export default function Home() {
  return (
    <main className="text-lg">
      <Button message="Hello World" />
      <Button message="Hello Universe" />
    </main>
  )
}
動作確認
ローカルサーバで動作確認します。
$ pnpm dev

コミットします。
$ pnpm build
$ git add .
$ git commit -m "ボタンをクリックするとSlackのチャンネルに通知機能を追加"
まとめ
- Slack のチャンネルに通知を飛ばす方法をまとめました。
- Incoming Webhooksを利用し通知を飛ばしました。
- Server Actions を利用し、サーバサイドから Slack のチャンネルに通知を飛ばしました。
- 作業したコードはこちらにあります。
Discussion