Blazor Web App + ASP.NET Core Identity にカスタムユーザークレームを使用した認証と認可を実装する
概要
Blazor Web Appプロジェクトを認証ありで作成した後に、デフォルトの内容に対して以下のカスタマイズを行います。
- データベースをPostgreSQLに変更します。
- ユーザー登録時に従業員IDと氏名のユーザークレームも登録できるようにします。
- 登録した氏名をBlazorのページに表示できるようにします。
- 従業員IDを使用したポリシーベースの認可をデモンストレーションします。
開発環境
- .NET 8.0
- Microsoft Visual Studio 2022 Community (64ビット) Version 17.9.1
- C# 12.0
- Windows 11 Pro 24H2
- PostgreSQL 15.3
- Npgsql.EntityFrameworkCore.PostgreSQL 8.0.2
プロジェクトの作成
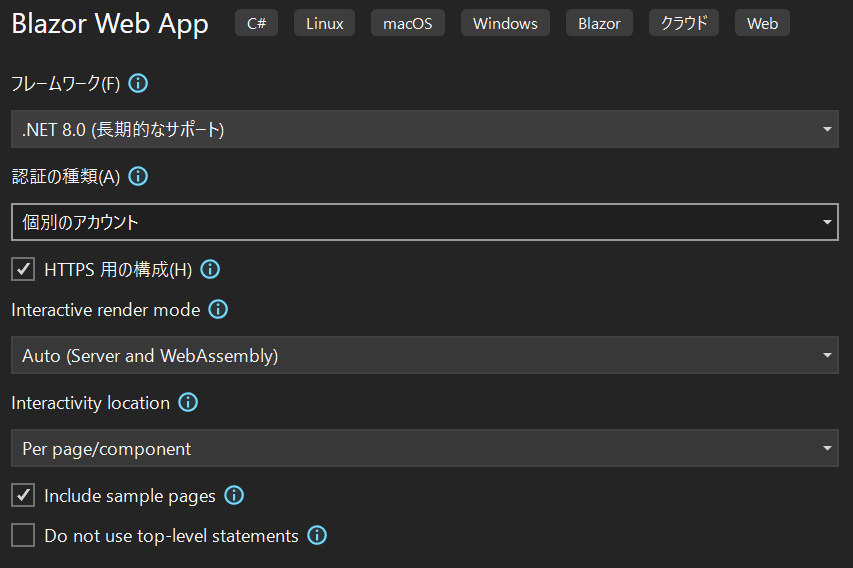
認証の種類を個別のアカウントにしてBlazor Web Appを作成します。プロジェクト名はIdentityDemoにしました。
- サーバー側プロジェクト:IdentityDemo
- クライアント側プロジェクト:IdentityDemo.Client
データベースをPostgreSQLに変更する
デフォルトで作成されているMigrationを削除します。
Remove-Migration
NuGetからNpgsql.EntityframeworkCore.PostgreSQLパッケージをインストールします。

PostgreSQLにデータベースを構築する為に、データベース接続文字列の情報をシークレット マネージャーで管理します。プロジェクトファイルのあるディレクトリに移動してシークレット ストレージを初期化します。
dotnet user-secrets init
プロジェクト名を右クリックしてユーザー シークレットの管理からデータベース接続文字列の情報を保存します。
{
  "Db:Username": "postgres",
  "Db:Password": "{パスワード}",
  "Db:Host": "localhost",
  "Db:Database": "IdentityDemo"
}
サーバー側プロジェクトのProgram.csを変更して、ユーザーシークレットを使用してコンテキストを生成するようにします。
using IdentityDemo.Client.Pages;
using IdentityDemo.Components;
using IdentityDemo.Components.Account;
using IdentityDemo.Data;
using Microsoft.AspNetCore.Components.Authorization;
using Microsoft.AspNetCore.Identity;
using Microsoft.EntityFrameworkCore;
+ using Npgsql;

var builder = WebApplication.CreateBuilder(args);

// Add services to the container.
builder.Services.AddRazorComponents()
    .AddInteractiveServerComponents()
    .AddInteractiveWebAssemblyComponents();

builder.Services.AddCascadingAuthenticationState();
builder.Services.AddScoped<IdentityUserAccessor>();
builder.Services.AddScoped<IdentityRedirectManager>();
builder.Services.AddScoped<AuthenticationStateProvider, PersistingRevalidatingAuthenticationStateProvider>();

builder.Services.AddAuthentication(options =>
    {
        options.DefaultScheme = IdentityConstants.ApplicationScheme;
        options.DefaultSignInScheme = IdentityConstants.ExternalScheme;
    })
    .AddIdentityCookies();

- var connectionString = builder.Configuration.GetConnectionString("DefaultConnection") ?? throw new InvalidOperationException("Connection string 'DefaultConnection' not found.");
- builder.Services.AddDbContext<ApplicationDbContext>(options =>
-     options.UseSqlServer(connectionString));
+ var connStringBuilder = new NpgsqlConnectionStringBuilder
+ {
+     Host = builder.Configuration["Db:Host"],
+     Username = builder.Configuration["Db:Username"],
+     Password = builder.Configuration["Db:Password"],
+     Database = builder.Configuration["Db:Database"]
+ };
var connectionString = connStringBuilder.ToString();
builder.Services.AddDbContext<ApplicationDbContext>(options =>
options.UseNpgsql(connectionString, o => o.UseQuerySplittingBehavior(QuerySplittingBehavior.SplitQuery)));
builder.Services.AddDatabaseDeveloperPageExceptionFilter();

builder.Services.AddIdentityCore<ApplicationUser>(options => options.SignIn.RequireConfirmedAccount = true)
    .AddEntityFrameworkStores<ApplicationDbContext>()
    .AddSignInManager()
    .AddDefaultTokenProviders();

builder.Services.AddSingleton<IEmailSender<ApplicationUser>, IdentityNoOpEmailSender>();

var app = builder.Build();

// Configure the HTTP request pipeline.
if (app.Environment.IsDevelopment())
{
    app.UseWebAssemblyDebugging();
    app.UseMigrationsEndPoint();
}
else
{
    app.UseExceptionHandler("/Error", createScopeForErrors: true);
    // The default HSTS value is 30 days. You may want to change this for production scenarios, see https://aka.ms/aspnetcore-hsts.
    app.UseHsts();
}

app.UseHttpsRedirection();

app.UseStaticFiles();
app.UseAntiforgery();

app.MapRazorComponents<App>()
    .AddInteractiveServerRenderMode()
    .AddInteractiveWebAssemblyRenderMode()
    .AddAdditionalAssemblies(typeof(IdentityDemo.Client._Imports).Assembly);

// Add additional endpoints required by the Identity /Account Razor components.
app.MapAdditionalIdentityEndpoints();

app.Run();
サーバー側プロジェクトのDataフォルダにIDesignTimeDbContextFactoryインターフェースを実装したApplicationDbContextFactoryクラスを作成します。Entity Framework Coreのパッケージ マネージャー コンソール (PMC) ツールを使用するときに本ファクトリークラスがユーザーシークレットを使用してコンテキストを生成します。
using Microsoft.EntityFrameworkCore.Design;
using Microsoft.EntityFrameworkCore;
using Npgsql;

namespace IdentityDemo.Data
{
    public class ApplicationDbContextFactory : IDesignTimeDbContextFactory<ApplicationDbContext>
    {
        public ApplicationDbContext CreateDbContext(string[] args)
        {
            //ユーザーシークレットを取得する
            var configuration = new ConfigurationBuilder()
                .AddUserSecrets<ApplicationDbContextFactory>()
                .Build();

            //DB接続文字列を取得する
            var connStringBuilder = new NpgsqlConnectionStringBuilder
            {
                Host = configuration["Db:Host"],
                Username = configuration["Db:Username"],
                Password = configuration["Db:Password"],
                Database = configuration["Db:Database"]
            };

            var optionBuilder = new DbContextOptionsBuilder<ApplicationDbContext>();
            optionBuilder.UseNpgsql(connStringBuilder.ConnectionString);

            return new ApplicationDbContext(optionBuilder.Options);
        }
    }
}
パッケージマネージャーからマイグレーションの作成とデータベース更新を行います。
Add-Migration InitialCreate
Update-Database
ユーザー登録画面に従業員ID、氏名を追加する
ユーザー登録画面を変更して従業員ID、氏名を登録できるようにします。
サーバー側プロジェクトのComponents/Account/Pages/Register.razorファイルを変更します。
InputModelクラスに従業員ID(EmployeeID)プロパティと氏名(FullName)プロパティを追加します。
    private sealed class InputModel
    {
+        [Required]
+        [Display(Name = "EmployeeID")]
+        public string EmployeeID { get; set; } = "";

+        [Required]
+        [Display(Name = "Full Name")]
+        public string FullName { get; set; } = "";

        [Required]
        [EmailAddress]
        [Display(Name = "Email")]
        public string Email { get; set; } = "";

        [Required]
        [StringLength(100, ErrorMessage = "The {0} must be at least {2} and at max {1} characters long.", MinimumLength = 6)]
        [DataType(DataType.Password)]
        [Display(Name = "Password")]
        public string Password { get; set; } = "";

        [DataType(DataType.Password)]
        [Display(Name = "Confirm password")]
        [Compare("Password", ErrorMessage = "The password and confirmation password do not match.")]
        public string ConfirmPassword { get; set; } = "";
    }
入力フォームに従業員IDと氏名の入力欄を追加します。
+            <div class="form-floating mb-3">
+                <InputText @bind-Value="Input.EmployeeID" class="form-control" autocomplete="off" aria-required="true" placeholder="Please enter your employee id." />
+                <label for="employeeId">Employee ID</label>
+                <ValidationMessage For="() => Input.EmployeeID" class="text-danger" />
+            </div>
+            <div class="form-floating mb-3">
+                <InputText @bind-Value="Input.FullName" class="form-control" autocomplete="name" aria-required="true" placeholder="Please enter your full name." />
+                <label for="fullName">Name</label>
+                <ValidationMessage For="() => Input.FullName" class="text-danger" />
+            </div>
RegisterUserメソッドに従業員IDと氏名のClaimを登録する処理を追加します。
    public async Task RegisterUser(EditContext editContext)
    {
        var user = CreateUser();

        await UserStore.SetUserNameAsync(user, Input.Email, CancellationToken.None);
        var emailStore = GetEmailStore();
        await emailStore.SetEmailAsync(user, Input.Email, CancellationToken.None);
        var result = await UserManager.CreateAsync(user, Input.Password);

        if (!result.Succeeded)
        {
            identityErrors = result.Errors;
            return;
        }

        Logger.LogInformation("User created a new account with password.");

+        result = await UserManager.AddClaimsAsync(user,
+            new[]
+            {
+                new Claim("employeeID",Input.EmployeeID),
+                new Claim("fullName",Input.FullName),
+                    });

+        if (!result.Succeeded)
+        {
+            identityErrors = result.Errors;
+            return;
+        }

+        Logger.LogInformation("UserCrames created.");

以下省略
    }
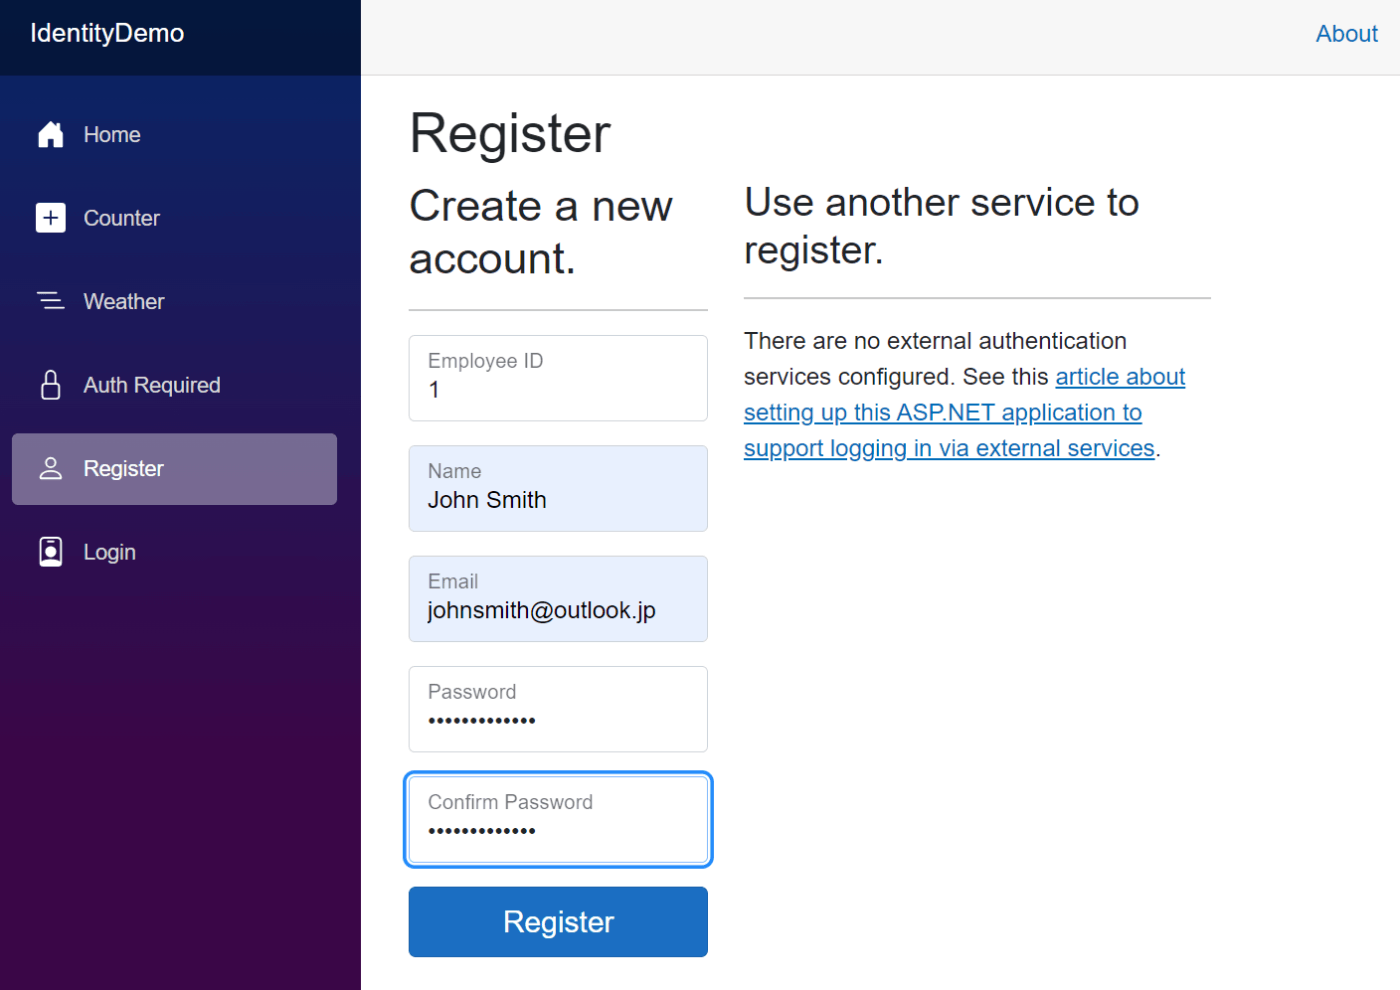
これでユーザー登録時に従業員IDと氏名を追加で登録できるようになります。Register.razorは下記の通りになります。
@page "/Account/Register"

@using System.ComponentModel.DataAnnotations
@using System.Text
@using System.Text.Encodings.Web
@using Microsoft.AspNetCore.Identity
@using Microsoft.AspNetCore.WebUtilities
@using IdentityDemo.Data
@using System.Security.Claims

@inject UserManager<ApplicationUser> UserManager
@inject IUserStore<ApplicationUser> UserStore
@inject SignInManager<ApplicationUser> SignInManager
@inject IEmailSender<ApplicationUser> EmailSender
@inject ILogger<Register> Logger
@inject NavigationManager NavigationManager
@inject IdentityRedirectManager RedirectManager

<PageTitle>Register</PageTitle>

<h1>Register</h1>

<div class="row">
    <div class="col-md-4">
        <StatusMessage Message="@Message" />
        <EditForm Model="Input" asp-route-returnUrl="@ReturnUrl" method="post" OnValidSubmit="RegisterUser" FormName="register">
            <DataAnnotationsValidator />
            <h2>Create a new account.</h2>
            <hr />
            <ValidationSummary class="text-danger" role="alert" />
+            <div class="form-floating mb-3">
+                <InputText @bind-Value="Input.EmployeeID" class="form-control" autocomplete="off" aria-required="true" placeholder="Please enter your employee id." />
+                <label for="employeeId">Employee ID</label>
+                <ValidationMessage For="() => Input.EmployeeID" class="text-danger" />
+            </div>
+            <div class="form-floating mb-3">
+                <InputText @bind-Value="Input.FullName" class="form-control" autocomplete="name" aria-required="true" placeholder="Please enter your full name." />
+                <label for="fullName">Name</label>
+                <ValidationMessage For="() => Input.FullName" class="text-danger" />
+            </div>
            <div class="form-floating mb-3">
                <InputText @bind-Value="Input.Email" class="form-control" autocomplete="username" aria-required="true" placeholder="name@example.com" />
                <label for="email">Email</label>
                <ValidationMessage For="() => Input.Email" class="text-danger" />
            </div>
            <div class="form-floating mb-3">
                <InputText type="password" @bind-Value="Input.Password" class="form-control" autocomplete="new-password" aria-required="true" placeholder="password" />
                <label for="password">Password</label>
                <ValidationMessage For="() => Input.Password" class="text-danger" />
            </div>
            <div class="form-floating mb-3">
                <InputText type="password" @bind-Value="Input.ConfirmPassword" class="form-control" autocomplete="new-password" aria-required="true" placeholder="password" />
                <label for="confirm-password">Confirm Password</label>
                <ValidationMessage For="() => Input.ConfirmPassword" class="text-danger" />
            </div>
            <button type="submit" class="w-100 btn btn-lg btn-primary">Register</button>
        </EditForm>
    </div>
    <div class="col-md-6 col-md-offset-2">
        <section>
            <h3>Use another service to register.</h3>
            <hr />
            <ExternalLoginPicker />
        </section>
    </div>
</div>

@code {
    private IEnumerable<IdentityError>? identityErrors;

    [SupplyParameterFromForm]
    private InputModel Input { get; set; } = new();

    [SupplyParameterFromQuery]
    private string? ReturnUrl { get; set; }

    private string? Message => identityErrors is null ? null : $"Error: {string.Join(", ", identityErrors.Select(error => error.Description))}";

    public async Task RegisterUser(EditContext editContext)
    {
        var user = CreateUser();

        await UserStore.SetUserNameAsync(user, Input.Email, CancellationToken.None);
        var emailStore = GetEmailStore();
        await emailStore.SetEmailAsync(user, Input.Email, CancellationToken.None);
        var result = await UserManager.CreateAsync(user, Input.Password);

        if (!result.Succeeded)
        {
            identityErrors = result.Errors;
            return;
        }

        Logger.LogInformation("User created a new account with password.");

+        result = await UserManager.AddClaimsAsync(user,
+            new[]
+            {
+                new Claim("employeeID",Input.EmployeeID),
+                new Claim("fullName",Input.FullName),
+                    });

+        if (!result.Succeeded)
+        {
+            identityErrors = result.Errors;
+            return;
+        }

+        Logger.LogInformation("UserCrames created.");


        var userId = await UserManager.GetUserIdAsync(user);
        var code = await UserManager.GenerateEmailConfirmationTokenAsync(user);
        code = WebEncoders.Base64UrlEncode(Encoding.UTF8.GetBytes(code));
        var callbackUrl = NavigationManager.GetUriWithQueryParameters(
            NavigationManager.ToAbsoluteUri("Account/ConfirmEmail").AbsoluteUri,
            new Dictionary<string, object?> { ["userId"] = userId, ["code"] = code, ["returnUrl"] = ReturnUrl });

        await EmailSender.SendConfirmationLinkAsync(user, Input.Email, HtmlEncoder.Default.Encode(callbackUrl));

        if (UserManager.Options.SignIn.RequireConfirmedAccount)
        {
            RedirectManager.RedirectTo(
                "Account/RegisterConfirmation",
                new() { ["email"] = Input.Email, ["returnUrl"] = ReturnUrl });
        }

        await SignInManager.SignInAsync(user, isPersistent: false);
        RedirectManager.RedirectTo(ReturnUrl);
    }

    private ApplicationUser CreateUser()
    {
        try
        {
            return Activator.CreateInstance<ApplicationUser>();
        }
        catch
        {
            throw new InvalidOperationException($"Can't create an instance of '{nameof(ApplicationUser)}'. " +
                $"Ensure that '{nameof(ApplicationUser)}' is not an abstract class and has a parameterless constructor.");
        }
    }

    private IUserEmailStore<ApplicationUser> GetEmailStore()
    {
        if (!UserManager.SupportsUserEmail)
        {
            throw new NotSupportedException("The default UI requires a user store with email support.");
        }
        return (IUserEmailStore<ApplicationUser>)UserStore;
    }

    private sealed class InputModel
    {
+        [Required]
+        [Display(Name = "EmployeeID")]
+        public string EmployeeID { get; set; } = "";

+        [Required]
+        [Display(Name = "Full Name")]
+        public string FullName { get; set; } = "";

        [Required]
        [EmailAddress]
        [Display(Name = "Email")]
        public string Email { get; set; } = "";

        [Required]
        [StringLength(100, ErrorMessage = "The {0} must be at least {2} and at max {1} characters long.", MinimumLength = 6)]
        [DataType(DataType.Password)]
        [Display(Name = "Password")]
        public string Password { get; set; } = "";

        [DataType(DataType.Password)]
        [Display(Name = "Confirm password")]
        [Compare("Password", ErrorMessage = "The password and confirmation password do not match.")]
        public string ConfirmPassword { get; set; } = "";
    }
}
AuthenticationStateから従業員ID、氏名を取得できるようにする
認証情報に項目を追加する手順は以下の通りです。
- 認証情報の受け皿となる
UserInfoクラスに従業員ID、氏名を追加します。 - サーバー側の認証状態プロバイダーである
PersistingRevalidatingAuthenticationStateProviderクラスにあるOnPersistingAsyncメソッドを変更してClaimから従業員IDと氏名をUserInfoオブジェクトに格納するようにします。 - クライアント側の認証状態プロバイダー
PersistentAuthenticationStateProviderクラスのコンストラクタにPersistentComponentState(永続的コンポーネント状態)として認証情報UserInfoがコンストラクタインジェクションされますので、ここで従業員IDと氏名を受け取るようにします。
認証状態を管理する仕組みについては公式サイトを参照してください。
まず、認証情報の受け皿となるUserInfoクラスに従業員IDと氏名のプロパティを追加します。クライアント側プロジェクトのUserInfo.csを変更します。
namespace IdentityDemo.Client
{
    // Add properties to this class and update the server and client AuthenticationStateProviders
    // to expose more information about the authenticated user to the client.
    public class UserInfo
    {
        public required string UserId { get; set; }
        public required string Email { get; set; }
+        public required string EmployeeId { get; set; }
+        public required string FullName { get; set; }
    }
}
サーバー側プロジェクトのPersistingRevalidatingAuthenticationStateProviderにあるOnPersistingAsyncメソッドを変更して従業員IDと氏名のクレームを認証情報UserInfoに加えるようにます。これでサーバー側ではAuthenticationStateから従業員IDと氏名を取得できるようになります。
        private async Task OnPersistingAsync()
        {
            if (authenticationStateTask is null)
            {
                throw new UnreachableException($"Authentication state not set in {nameof(OnPersistingAsync)}().");
            }

            var authenticationState = await authenticationStateTask;
            var principal = authenticationState.User;

            if (principal.Identity?.IsAuthenticated == true)
            {
                var userId = principal.FindFirst(options.ClaimsIdentity.UserIdClaimType)?.Value;
                var email = principal.FindFirst(options.ClaimsIdentity.EmailClaimType)?.Value;
+                var employeeId = principal.FindFirst("employeeID")?.Value;
+                var fullName = principal.FindFirst("fullName")?.Value;

-                if (userId != null && email != null)
+                if (userId != null && email != null && employeeId != null && fullName != null)
                {
                    state.PersistAsJson(nameof(UserInfo), new UserInfo
                    {
                        UserId = userId,
                        Email = email,
+                        EmployeeId = employeeId,
+                        FullName = fullName
                    });
                }
            }
        }
クライアント側プロジェクトのPersistentAuthenticationStateProviderクラスのコンストラクタを変更して従業員IDと氏名のクレームを認証情報UserInfoから取得するようにします。これでクライアント側でもAuthenticationStateから従業員IDと氏名を取得できるようになります。
        public PersistentAuthenticationStateProvider(PersistentComponentState state)
        {
            if (!state.TryTakeFromJson<UserInfo>(nameof(UserInfo), out var userInfo) || userInfo is null)
            {
                return;
            }

            Claim[] claims = [
                new Claim(ClaimTypes.NameIdentifier, userInfo.UserId),
                new Claim(ClaimTypes.Name, userInfo.Email),
                new Claim(ClaimTypes.Email, userInfo.Email),
+                new Claim("employeeID", userInfo.EmployeeId),
+                new Claim("fullName", userInfo.FullName)];

            authenticationStateTask = Task.FromResult(
                new AuthenticationState(new ClaimsPrincipal(new ClaimsIdentity(claims,
                    authenticationType: nameof(PersistentAuthenticationStateProvider)))));
        }
ClaimsPrincipalの拡張メソッドを作成して追加したクレームにアクセスしやすくします。
using System.Security.Claims;

namespace IdentityDemo.Client.Authentication
{
    public static class ClaimsPrincipalExtensions
    {
        public static string GetCustomClaim(this ClaimsPrincipal principal, string type)
        {
            if (principal == null)
                throw new ArgumentNullException(nameof(principal));

            return principal.Claims
                .Where(x => x.Type == type)
                .Select(x => x.Value)
                .FirstOrDefault()!;
        }

        public static string GetUserName(this ClaimsPrincipal principal)
            => principal.GetCustomClaim("employeeID");

        public static string GetFullName(this ClaimsPrincipal principal)
            => principal.GetCustomClaim("fullName");
    }
}
氏名をページに表示する
サーバー側プロジェクトに氏名を表示します。NavMenuコンポーネントのユーザーアカウント管理メニューを、氏名を表示するように変更します。
+ @using IdentityDemo.Client.Authentication

中略...

            <Authorized>
                <div class="nav-item px-3">
                    <NavLink class="nav-link" href="Account/Manage">
-                        <span class="bi bi-person-fill-nav-menu" aria-hidden="true"></span> @context.User.Identity?.Name
+                        <span class="bi bi-person-fill-nav-menu" aria-hidden="true"></span> @context.User.GetFullName()
                    </NavLink>
                </div>
                <div class="nav-item px-3">
                    <form action="Account/Logout" method="post">
                        <AntiforgeryToken />
                        <input type="hidden" name="ReturnUrl" value="@currentUrl" />
                        <button type="submit" class="nav-link">
                            <span class="bi bi-arrow-bar-left-nav-menu" aria-hidden="true"></span> Logout
                        </button>
                    </form>
                </div>
            </Authorized>
次にクライアント側プロジェクトに氏名を表示します。Counterページに氏名を表示します。
+ <AuthorizeView>
+    <Authorized>
+        <p>Hello! @context.User.GetFullName()</p>
+    </Authorized>
+ </AuthorizeView>
ポリシー ベースの認証(クレーム ベースの認証)を実装する
従業員IDが"1","2","3"のいずれかに一致するポリシーを作成して、Counterページにポリシーを適用します。
サーバー側プロジェクトのProgram.csにMyPolicyポリシーを追加します。承認サービスを構成するAddAuthorizationCoreメソッドからポリシーを登録できます。
builder.Services.AddAuthorizationCore(options =>
{
    options.AddPolicy("MyPolicy", policy => policy.RequireClaim("employeeID", "1", "2", "3"));
});
Counterページを変更してポリシーを満たす場合のみカウンターを表示するようにします。
<AuthorizeView Policy="MyPolicy">
    <Authorized>
        <p role="status">Current count: @currentCount</p>

        <button class="btn btn-primary" @onclick="IncrementCount">Click me</button>
    </Authorized>
</AuthorizeView>
動作確認をする
ここまで実装出来たらユーザーを登録して動作を確認しましょう。
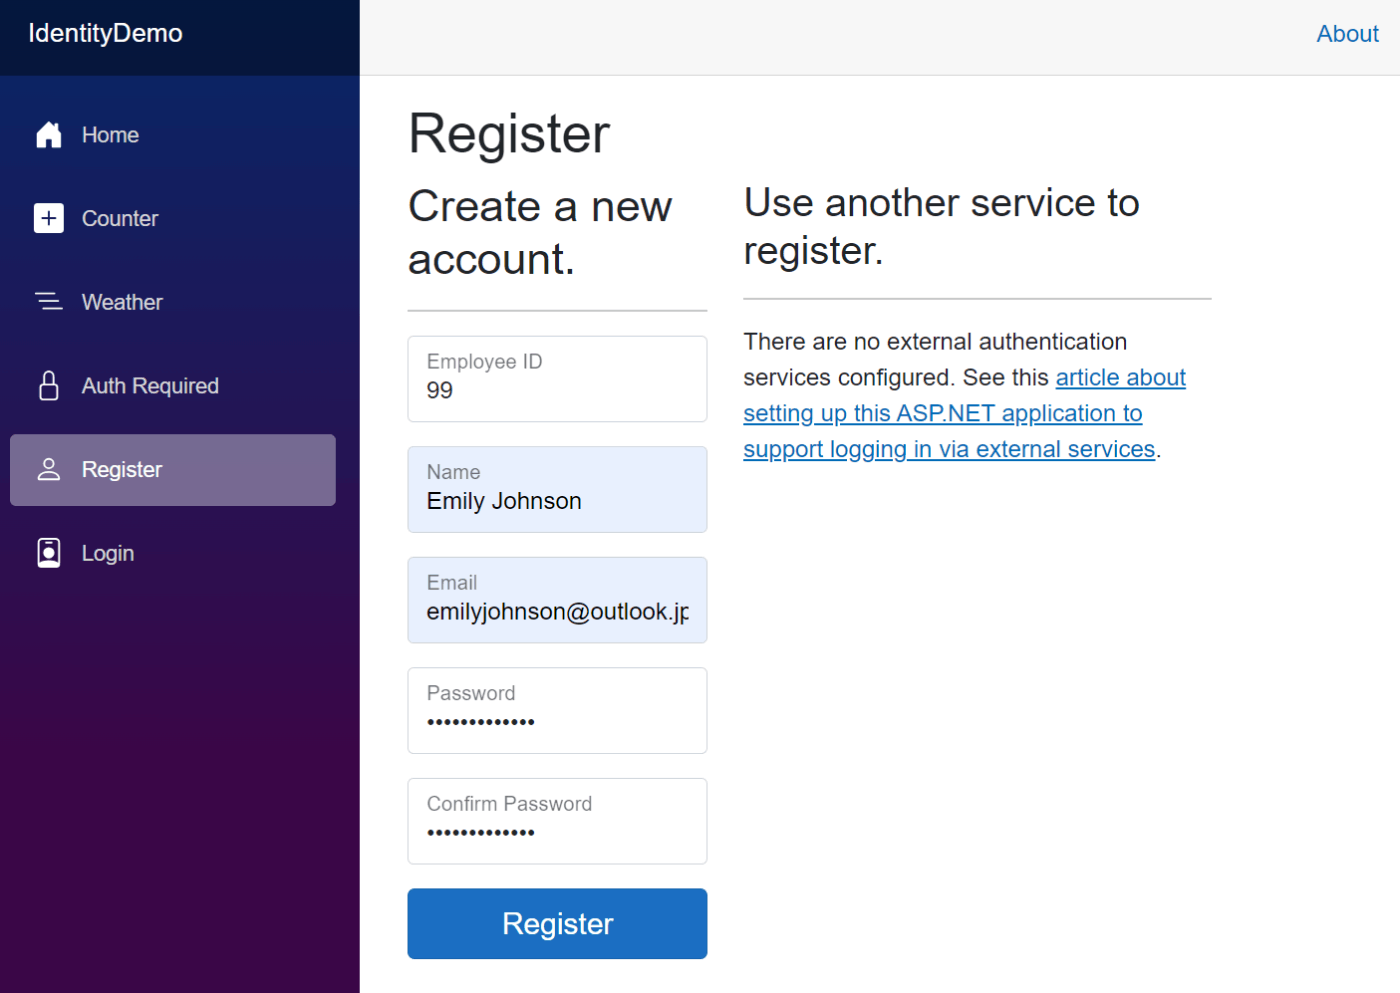
まず、従業員IDが"1"のユーザーを登録します。
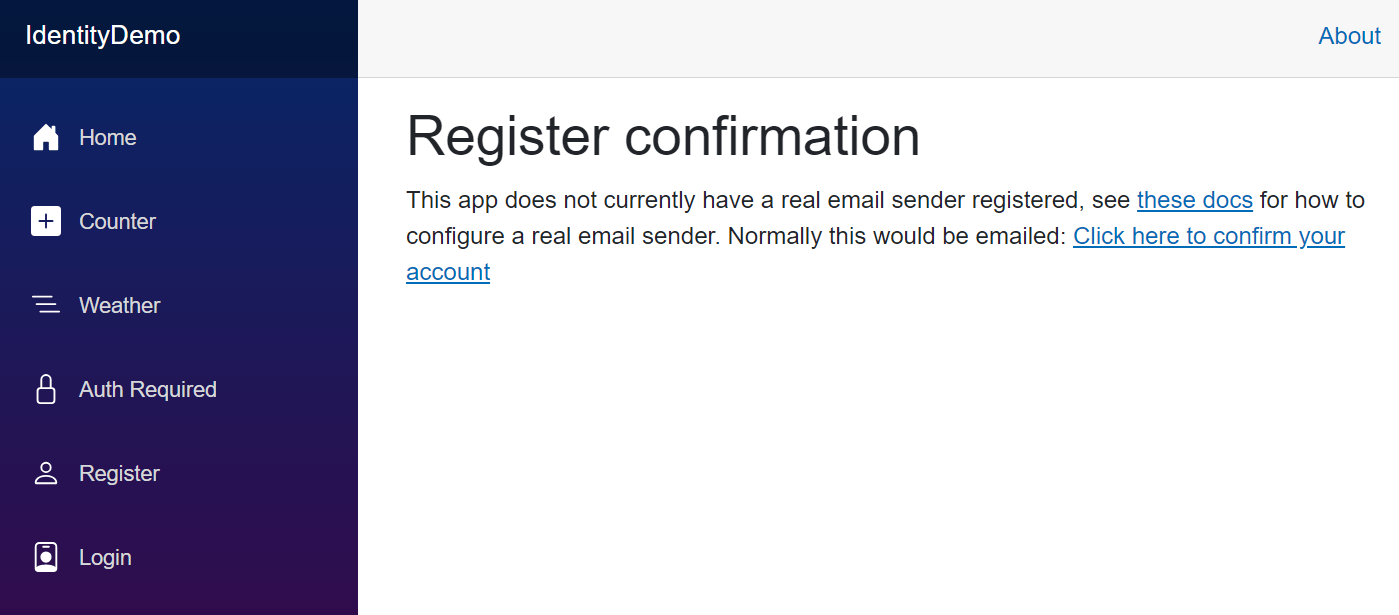
Click here to confirm your accountをクリックしてメールアドレス確認済みにします。
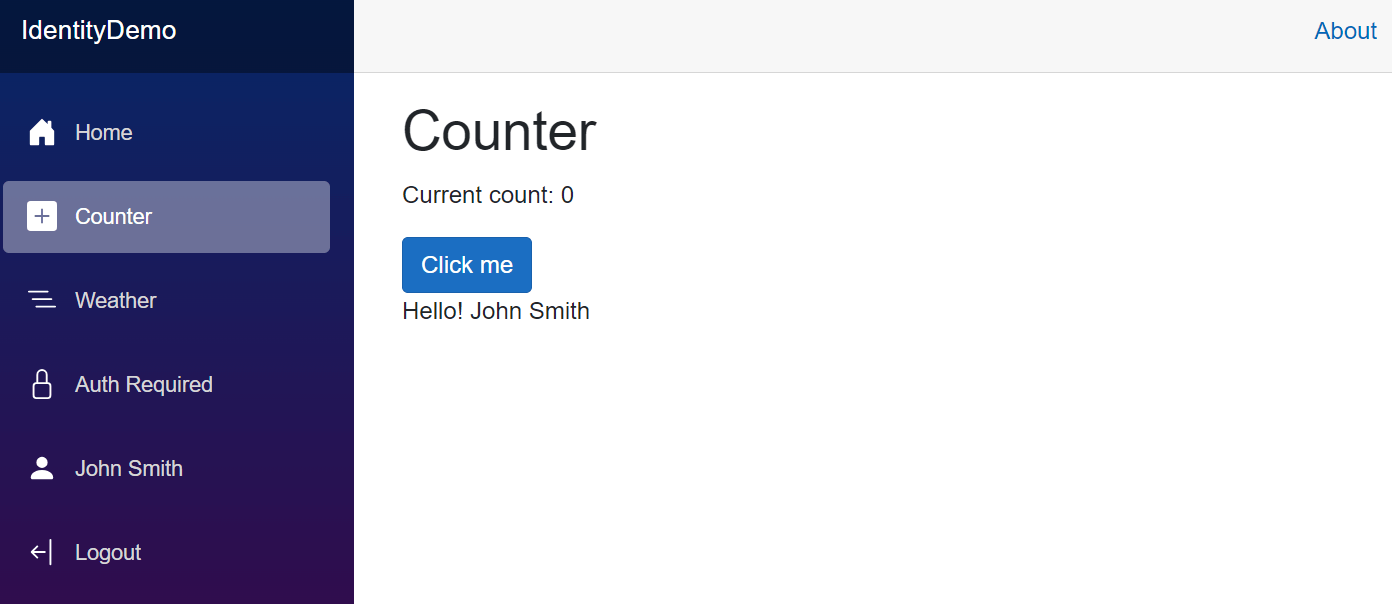
登録したユーザーでログインすると、左側のナビゲーションに氏名が表示されました。
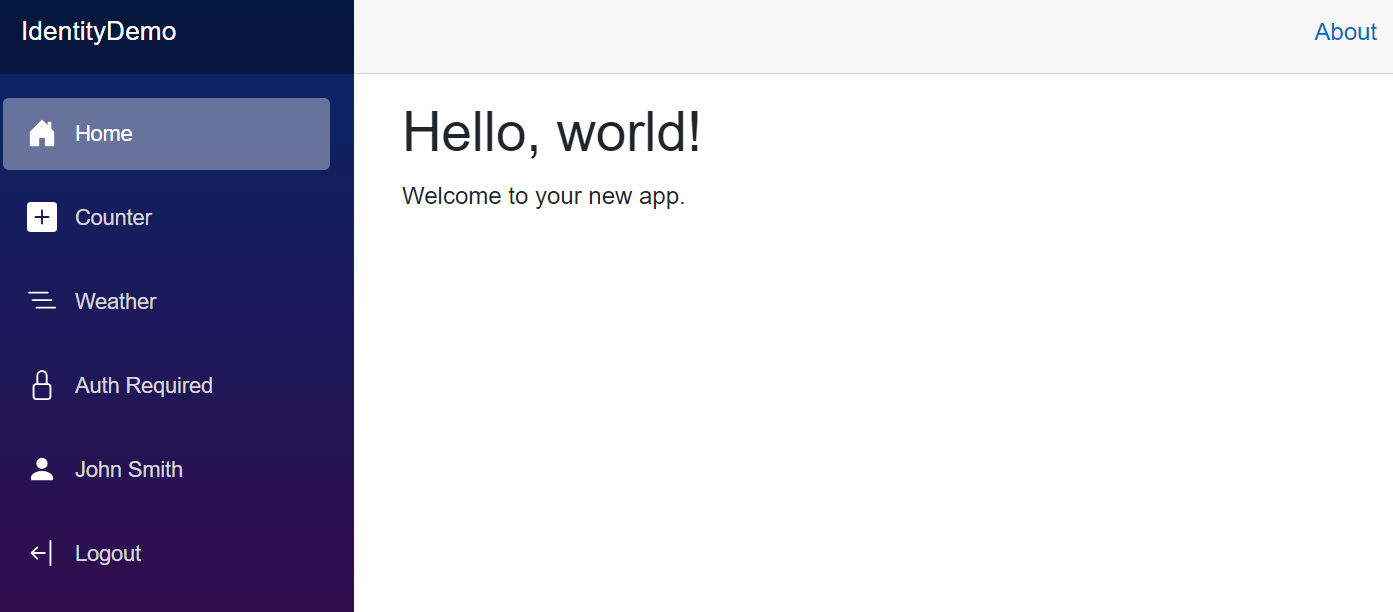
Counterページに移動すると同様に氏名が表示されます。また、従業員IDが"1"であるため、カウンターも表示されています。
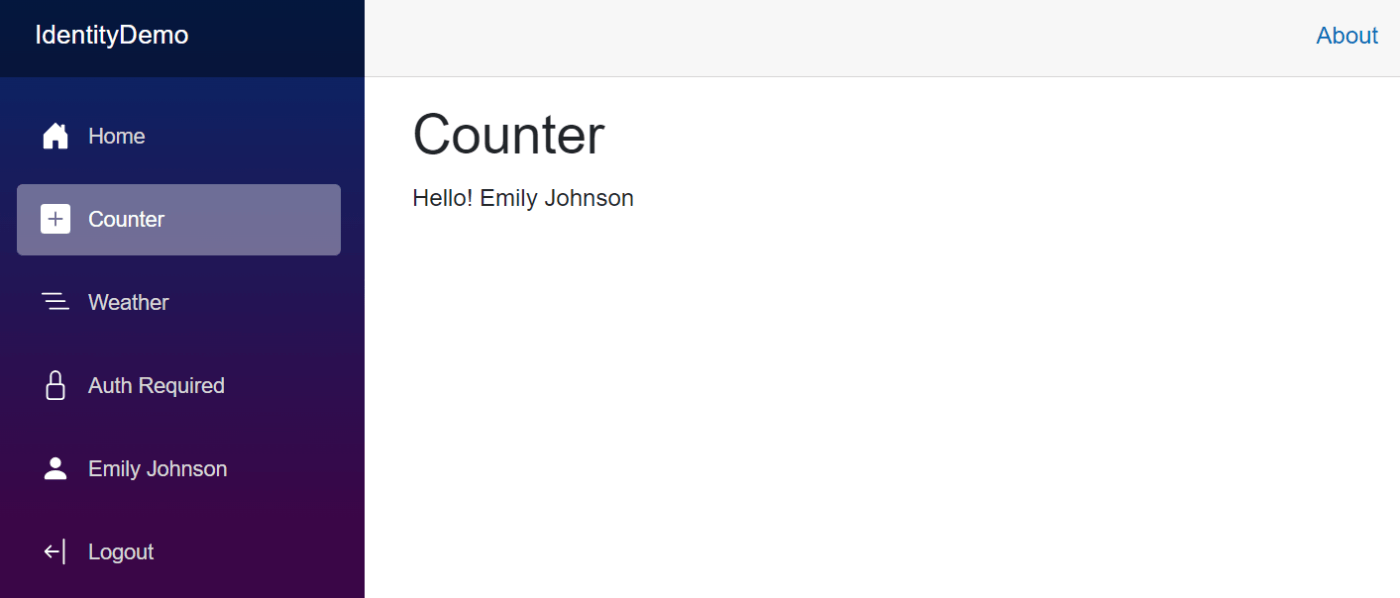
今度は従業員IDが"99"のユーザーを登録し、ログインしてから動作確認をします。
Counterページに移動すると氏名は表示されますが、従業員IDがMyPolicyポリシーに合致しないためカウンターは表示されません。
GitHubにソースコードを公開します。参考になれば幸いです。
Discussion