Salesforce開発するまでの導入
ダウンロードとインストール
最初のネタは「SalesforceAPIの連携方法」とかを書こうとしたけど、それを調べてる最中
Salesforce のローカル開発ができるという記事があったが、skdcコマンドがもう古いっぽいので、新しくなったsfコマンドというのがあるとのことなので導入から初めて見る


こちらから 各環境用のsfコマンドを導入してみる

$ sf -v
@salesforce/cli/2.68.6 darwin-arm64 node-v22.10.0
はいった
設定
plugin
Lightning Web コンポーネントのローカル開発による生産性の向上 (ベータ)
こちらをためしてみる、sfコマンドで代用できるか?
$ sf plugins:install @salesforce/lwc-dev-server
(node:95242) [DEP0040] DeprecationWarning: The `punycode` module is deprecated. Please use a userland alternative instead.
(Use `node --trace-deprecation ...` to show where the warning was created)
You acknowledge and agree that the CLI tool may collect usage information, user environment, and crash reports for the purposes of providing services or functions that are relevant to use of the CLI tool and product improvements.
(色々パスがあるので省略)..
npm error gyp info spawn args '-Dnode_engine=v8',
npm error gyp info spawn args '--depth=.',
npm error gyp info spawn args '--no-parallel',
npm error gyp info spawn args '--generator-output',
npm error gyp info spawn args 'build',
npm error gyp info spawn args '-Goutput_dir=.'
npm error gyp info spawn args ]
npm error gyp info spawn make
npm error gyp info spawn args [ 'BUILDTYPE=Release', '-C', 'build' ]
npm error ../src/fibers.cc:27:65: error: no member named 'kFinalizer' in 'v8::WeakCallbackType'
npm error                 handle.SetWeak(val, WeakCallbackShim<F, P>, WeakCallbackType::kFinalizer);
npm error                                                             ~~~~~~~~~~~~~~~~~~^
npm error 1 error generated.
npm error make: *** [Release/obj.target/fibers/src/fibers.o] Error 1
npm error gyp ERR! build error
npm error gyp ERR! stack Error: `make` failed with exit code: 2
npm error gyp ERR! stack at ChildProcess.<anonymous> (/usr/local/lib/sf/node_modules/npm/node_modules/node-gyp/lib/build.js:216:23)
npm error gyp ERR! System Darwin 23.6.0
npm error gyp ERR! command "/usr/local/lib/sf/bin/node" "/usr/local/lib/sf/node_modules/npm/node_modules/node-gyp/bin/node-gyp.js" "rebuild" "--release"
npm error gyp ERR! cwd /Users/hiroyuki.miyashita/.local/share/sf/node_modules/fibers
npm error gyp ERR! node -v v22.10.0
npm error gyp ERR! node-gyp -v v10.2.0
npm error gyp ERR! not ok
npm error node-gyp exited with code: 1
npm error Please make sure you are using a supported platform and node version. If you
npm error would like to compile fibers on this machine please make sure you have setup your
npm error build environment--
npm error Windows + OS X instructions here: https://github.com/nodejs/node-gyp
npm error Ubuntu users please run: `sudo apt-get install g++ build-essential`
npm error RHEL users please run: `yum install gcc-c++` and `yum groupinstall 'Development Tools'`
npm error Alpine users please run: `sudo apk add python make g++`
npm error sh: nodejs: command not found
npm error A complete log of this run can be found in: /Users/hiroyuki.miyashita/.npm/_logs/2024-12-07T09_50_21_648Z-debug-0.log
@salesforce/cli: Installing plugin @salesforce/lwc-dev-server@latest... failed
 ›   Error: /usr/local/lib/sf/node_modules/npm/bin/npm-cli.js install @salesforce/lwc-dev-server@latest --omit dev --no-audit --loglevel=notice --no-fund exited with code 127
 ›   Try this: Run with DEBUG=@oclif/plugin-plugins* to see debug output.
一度アンインストールする
$ sudo rm -rf ~/.local/share/sfdx ~/.config/sfdx ~/.cache/sfdx
$ sudo rm -rf ~/Library/Caches/sfdx
$ sudo rm -rf /usr/local/sf
$ sudo rm -rf /usr/local/bin/sf
$ sudo rm -rf ~/.local/share/sf ~/.config/sf ~/.cache/sf
$ sudo rm -rf ~/Library/Caches/sf
だめっぽい、
いい記事がありました
$ brew install nvm
brewコマンドだけではnvmいれることができないので後処理設定をしないといけません
※インストール内容に従って設定をすることをおすすめします(brewのバージョンによってパスなどが違ってることがあります)
$ mkdir $HOME/.nvm
$ cat ~/.zshrc|grep nvm
export NVM_DIR="$HOME/.nvm"
[ -s "/opt/homebrew/opt/nvm/nvm.sh" ] && \. "/opt/homebrew/opt/nvm/nvm.sh"  # This loads nvm
[ -s "/opt/homebrew/opt/nvm/etc/bash_completion.d/nvm" ] && \. "/opt/homebrew/opt/nvm/etc/bash_completion.d/nvm"  # This loads nvm bash_completion

$ source ~/.zshrc
$ nvm install 20.15.1
$ nvm use 20.15.1
$ npm install -g @salesforce/cli@latest
$ sf plugins install @salesforce/sfdx-scanner
# java17いれる
$ brew install --cask zulu@17
こっから先はLightning Web コンポーネントのローカル開発による生産性の向上 (ベータ)
にもどって再設定
だめっぽそう
VSCOdeからいれる
create

標準

プロジェクト名いれる

組織を認証

Sandboxにする

かとおもったらカスタムURL

エイリアス
組織に接続

アカウント作る
カスタムURL
shokunincom-dev-ed.develop.my.salesforce.com


12:55:37.918 sf org:login:web --alias vscodeOrg --instance-url https://xxxxxxxxxx-dev-ed.develop.my.salesforce.com --set-default
Successfully authorized xxx@xxx.com with org ID 00DGA000XXXXXXXXXX
12:56:08.451 sf org:login:web --alias vscodeOrg --instance-url https://xxxxxxxxxx-dev-ed.develop.my.salesforce.com --set-default
 が終了コード 0 で終了しました。
とりあえずテストデータを作ってみましょう
「オブジェクトマネージャ」から「新規オブジェクト」


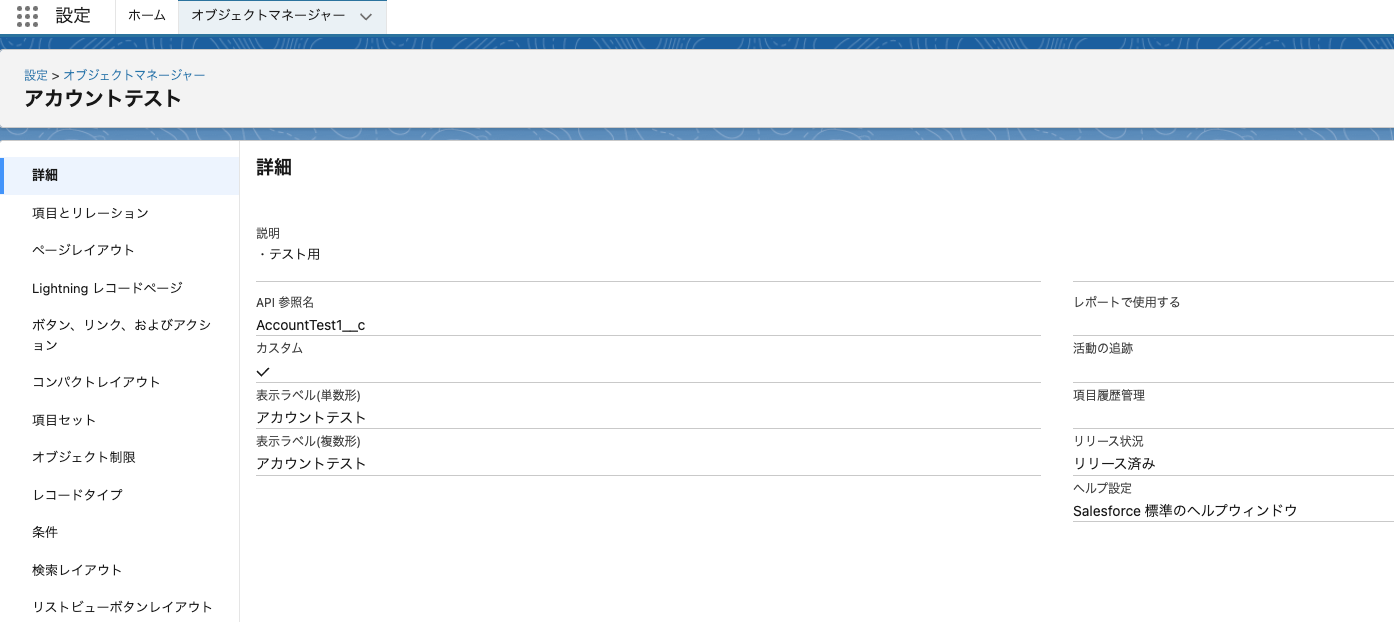
アカウントテストっていうオブジェクトを作りましょう
いってみればこれが、DBのテーブルに当たります
概念的にはテーブルと同義なのでカラムの追加などします
こんな感じにテストデータを作りましょう

設定からクイック検索を利用してタブを探す

カスタムオブジェクトタブの「新規」を押す

新規カスタムタブで先程作った「アカウントテスト」を選択

設定からアプリケーションマネージャーを選択

Lightning Experience アプリケーションマネージャー
から
LightningSalesConsole選択

ナビゲーションでアカウントテストを移動させて保存

ホーム画面にもどってアプリケーションランチャーからアカウントテストを選択

これでレコード登録ができます
新規ボタンで登録のダイアログが出ます

これで1レコード出来上がりました

つぎにアプリケーションランチャー

APIを有効に指せる設定
Lightning Experience アプリケーションマネージャー

新規接続アプリケーション
「接続アプリケーションを作成」

設定は以下のように
callbackは https://login.salesforce.com/services/oauth2/callback とする

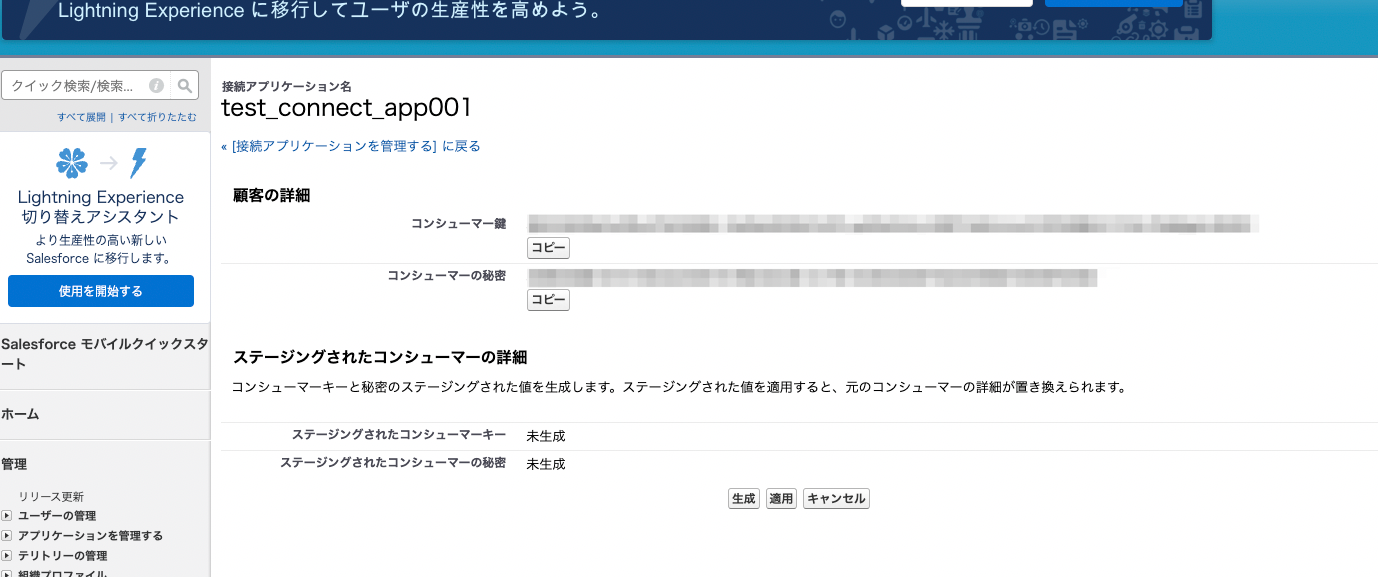
コンシューマーの詳細を管理を選択
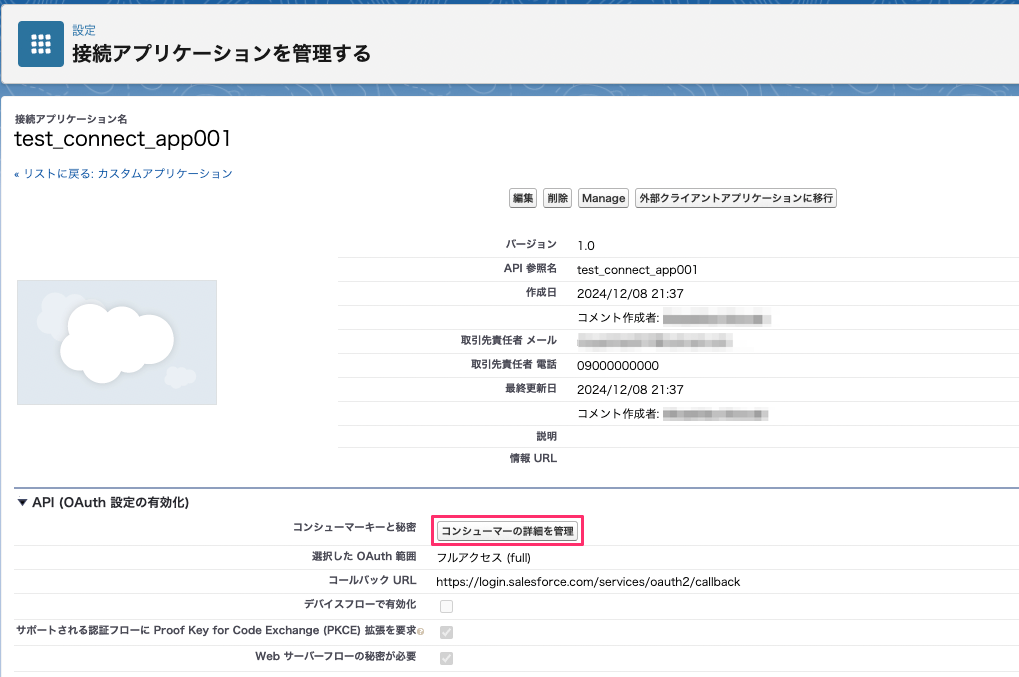
コンシューマーキーとコンシューマーシークレットが出る
これらを控えておく
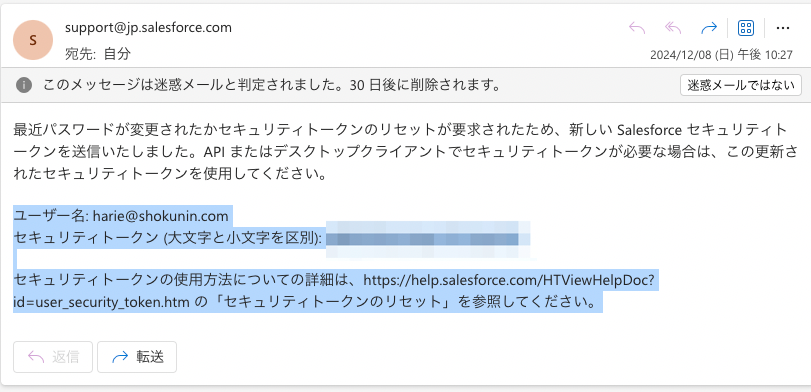
セキュリティトークンの取得:
a. ユーザーの個人設定から「私のセキュリティトークンをリセット」をクリックします。
-
画面右上の自分の設定パネルから「設定」を選択
-
私の個人情報 → 私のセキュリティトークンのリセット
-
セキュリテートークンのリセットボタンを押す

b. 新しいセキュリティトークンがメールで送信されます。
「設定」から検索ボックスで「OAuth および OpenID Connect 設定」を検索
OAuth および OpenID Connect 設定画面で「OAuth ユーザー名パスワードフローを許可」をON

これらの手順を完了すると、Salesforce REST APIを使用する準備が整います。
API呼び出しを行う際には、以下の情報が必要になります:
- クライアントID(コンシューマーキー)
- クライアントシークレット(コンシューマーシークレット)
- ユーザー名
- パスワード
- セキュリティトークン
こんなかんじに「アカウントテスト」のレコードが2件あってこれを取得するAPIを実装します
