uGUI の Image に BaseMeshEffect でグラデーションをかけてみる。
「Happy Elements Advent Calendar 2023」 12月13日の記事です。
はじめに
『メルクストーリア』グループ所属のゲームエンジニアの岸本と申します。
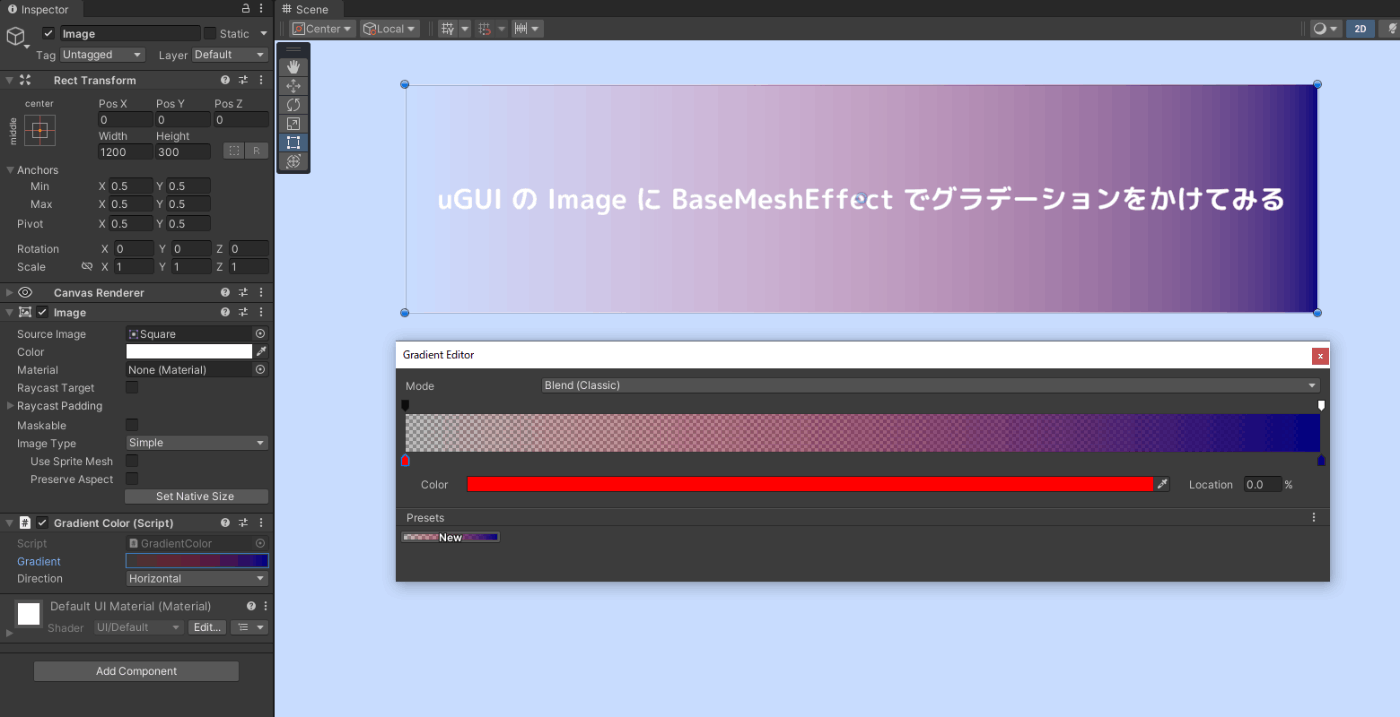
本記事では、uGUI の Image に対して BaseMeshEffect を用いてグラデーションをかける方法についてお話します。
BaseMeshEffect 自体は、uGUI のリリース当初からあり、特段目新しいものでもありませんが、uGUI でメッシュに手を加える方法の一例としてご紹介したいと思います。

注意事項
-
Unity 2022.3.10f1を使用しています。 -
Simple、Sliced、Tiledには対応していますが、Filledには対応していません。 - 記事中のコードについて、簡略化のため LINQ を多用していたり、必要な考慮を省略していたりするため、実用する場合は別途修正が必要な部分もあります。
uGUI の Image のメッシュ
まず、メッシュに手を加える前に、uGUI の Image がどのようなメッシュになっているか、シーンビューの Shading Mode - Shaded Wireframe で見てみたいと思います。

Image Type: Simple
Simple の場合、頂点x6(三角面x2)で一番単純なメッシュになります。
Image Type: Sliced
Sliced の場合、頂点x54(三角面x18)で9スライスに対応したメッシュになります。
Fill Center が false の場合、中央部分のメッシュが非表示になり、頂点x48(三角面x16)のメッシュになります。
また、サイズ的に可変部分が見えず頂点数を減らせそうな場合でも、頂点が減ることはないようです。
Image Type: Tiled
Tiled の場合、サイズに応じてタイリングされるため、頂点数が動的に増減するメッシュになります。
Fill Center が false の場合、中央部分のメッシュが非表示になり、その分頂点が減ります。
実装
上記のようなメッシュに対して、BaseMeshEffect で頂点情報を変更し、グラデーションをかけたいと思います。
ここでは、Sliced な Image をベースに実装を進めていきますが、Simple や Tiled でもそのまま対応できます。
SerializeField
今回は、Inspector から設定できるパラメーターとして下記のものを用意します。
private enum Direction
{
    Horizontal = 0,
    Vertical = 1
}

[SerializeField]
private Gradient gradient = default;

[SerializeField]
private Direction direction = default;

Gradient
Unity 標準の Gradient を使用し、Image にかけるグラデーションを設定できるようにします。
Direction
enum を用意して、Image にかけるグラデーションの方向を 横方向 (Horizontal) か 縦方向 (Vertical) かで設定できるようにします。
BaseMeshEffect の継承
基本的な部分として、BaseMeshEffect を継承した class を作り、ModifyMesh() を実装できるようにします。
[RequireComponent(typeof(Image))]
public sealed class GradientColor : BaseMeshEffect
{
    [SerializeField]
    // ~ 省略 ~

    public override void ModifyMesh(VertexHelper vertexHelper)
    {
    }
}
変更前の頂点情報取得
ModifyMesh() で受け取った VertexHelper から変更前の頂点情報 (UIVertex) を取り出します。
var baseVertices = new List<UIVertex>();
vertexHelper.GetUIVertexStream(baseVertices);
このタイミングの UIVertex からそれぞれの頂点位置などがわかるため、実装を進める上で参考になるかと思います。
1: (-300.00, -300.00, 0.00)
2: (-300.00, -100.00, 0.00)
3: (-100.00, -100.00, 0.00)
~
54: (100.00, 100.00, 0.00)
必要な頂点位置計算
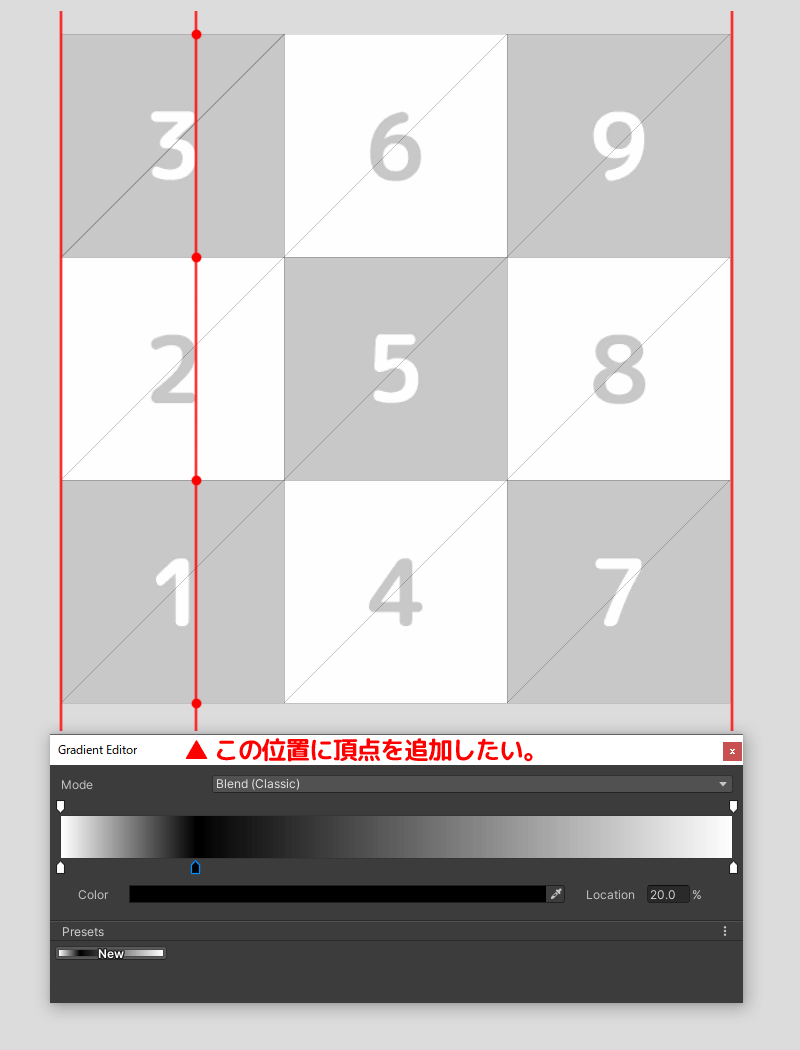
単純なグラデーションであれば不要ですが、グラデーションの中間にキーがある場合は、メッシュ上で対応する位置に頂点カラーを設定したいため、追加が必要な頂点位置を計算します。

上記の場合、グラデーション上の 0% や 100% の位置にはすでに頂点があるため大丈夫ですが、20% の位置に頂点カラーを設定したいため、下記のようなロジックで追加が必要な頂点位置を計算してみます。
// 最小頂点位置/最大頂点位置
var minVertexPosition = direction is Direction.Horizontal ? baseVertices.Min(x => x.position.x) : baseVertices.Min(x => x.position.y);
var maxVertexPosition = direction is Direction.Horizontal ? baseVertices.Max(x => x.position.x) : baseVertices.Max(x => x.position.y);

// グラデーション位置 (time => position 変換)
var gradientKeyTimes = gradient.colorKeys.Select(x => x.time).Concat(gradient.alphaKeys.Select(x => x.time)).Concat(new[] { 0.0F, 1.0F }).OrderBy(x => x).ToHashSet();
var gradientVertexPositions = gradientKeyTimes.Select(x => Mathf.Lerp(minVertexPosition, maxVertexPosition, x)).OrderBy(x => x).ToHashSet();

// 重複頂点位置削除
foreach (var vertexPosition in baseVertices.Select(x => x.position))
{
    gradientVertexPositions.Remove(direction is Direction.Horizontal ? vertexPosition.x : vertexPosition.y);
}
頂点変更
計算した頂点位置を基に、頂点を追加していきます。
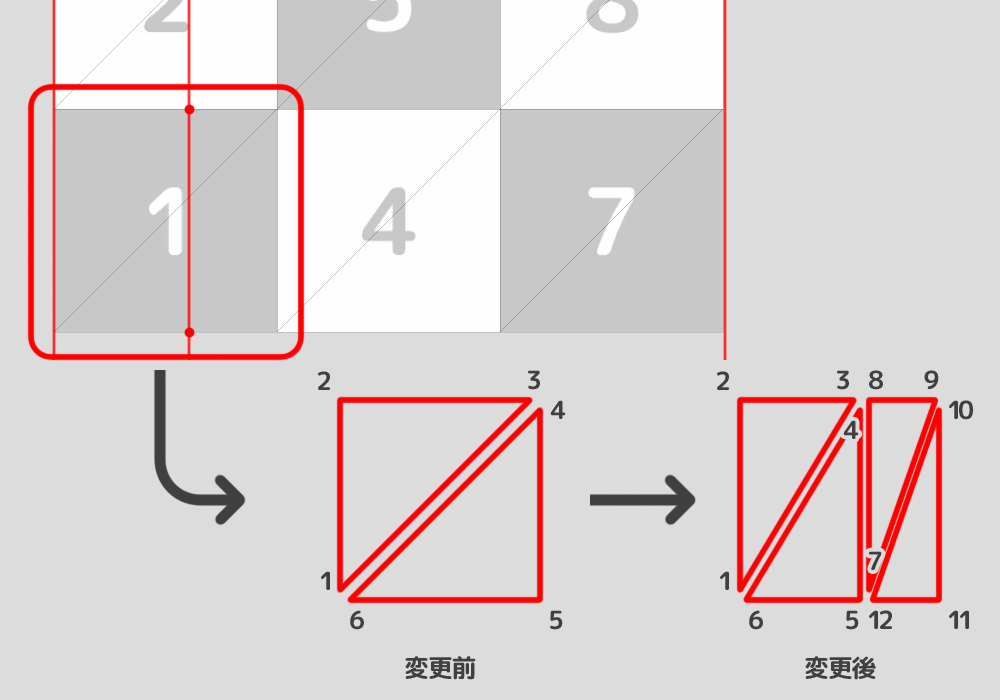
ここでは、頂点x6(三角面x2)の四角形のグループに分割し、グループ単位に頂点追加の要否を判定して、頂点を追加していきます。

頂点の追加が必要な場合、元々の四隅の頂点はそのまま流用し、中間地点に新しい頂点を追加してメッシュを再構築するロジックを用意してみます。
追加した頂点に設定する UV も、このタイミングで計算して設定しておきます。
private static UIVertex[] ModifyVertices(UIVertex[] source, Direction direction, float gradientVertexPosition)
{
    var positionX = (min: source[0].position.x, max: source[3].position.x);
    var positionY = (min: source[0].position.y, max: source[3].position.y);
    var uvX = (min: source[0].uv0.x, max: source[3].uv0.x);
    var uvY = (min: source[0].uv0.y, max: source[3].uv0.y);

    var result = new UIVertex[12];

    result[0] = source[0];  // 左下頂点 1 => 1
    result[5] = source[5];  // 左下頂点 6 => 6
    result[8] = source[2];  // 右上頂点 3 => 9
    result[9] = source[3];  // 右上頂点 4 => 10

    if (direction is Direction.Horizontal)
    {
        result[1] = source[1];   // 左上頂点 2 => 2
        result[10] = source[4];  // 右下頂点 5 => 11

        var uvPosition = Mathf.InverseLerp(positionX.min, positionX.max, gradientVertexPosition);
        var uv = Mathf.Lerp(uvX.min, uvX.max, uvPosition);

        var topVertex = new UIVertex();
        topVertex.position = new Vector3(gradientVertexPosition, positionY.max, 0.0F);
        topVertex.uv0 = new Vector4(uv, uvY.max, 0.0F, 0.0F);
        result[2] = topVertex;  // 上側追加頂点 3
        result[3] = topVertex;  // 上側追加頂点 4
        result[7] = topVertex;  // 上側追加頂点 8

        var bottomVertex = new UIVertex();
        bottomVertex.position = new Vector3(gradientVertexPosition, positionY.min, 0.0F);
        bottomVertex.uv0 = new Vector4(uv, uvY.min, 0.0F, 0.0F);
        result[4] = bottomVertex;   // 下側追加頂点 5
        result[6] = bottomVertex;   // 下側追加頂点 7
        result[11] = bottomVertex;  // 下側追加頂点 12
    }
    else
    {
        // 縦方向の場合も同様に実装する。
    }

    return result;
}
続けて、頂点x6(三角面x2)単位のグループに分割し、上記メソッドを利用して頂点の追加をできるようにします。
for (var index = 0; index < baseVertices.Count; index += 6)
{
    // 変更前の頂点を6頂点単位でグループ化する。
    var targetVertices = baseVertices.Skip(index).Take(6).ToArray();

    // 左下と右上の頂点位置からグラデーション用頂点の追加要否を判定する。
    var targetMinVertexPosition = direction is Direction.Horizontal ? targetVertices[0].position.x : targetVertices[0].position.y;
    var targetMaxVertexPosition = direction is Direction.Horizontal ? targetVertices[3].position.x : targetVertices[3].position.y;
    var targetGradientVertexPositions = gradientVertexPositions.Where(x => x > targetMinVertexPosition && x < targetMaxVertexPosition).OrderBy(x => x).ToArray();
    if (targetGradientVertexPositions.Length > 0)
    {
	var temporary = new List<UIVertex>();

	// 頂点追加が必要な場合、グループに対して頂点を追加する。
	for (var target = 0; target < targetGradientVertexPositions.Length; target++)
	{
	    // 複数の頂点追加が必要な場合は、ひとつ前の頂点情報を基に再度グループ化して処理していく。
	    if (target > 0)
	    {
		targetVertices = temporary.Skip(target * 6).Take(6).ToArray();

		foreach (var _ in Enumerable.Range(0, 6))
		{
		    temporary.RemoveAt(temporary.Count - 1);
		}
	    }

	    var modifiedVertices = ModifyVertices(targetVertices, direction, targetGradientVertexPositions[target]);
	    temporary.AddRange(modifiedVertices);
	}

	vertices.AddRange(temporary);
    }
    else
    {
	// 頂点追加がない場合は、そのまま流用する。
	vertices.AddRange(targetVertices);
    }
}
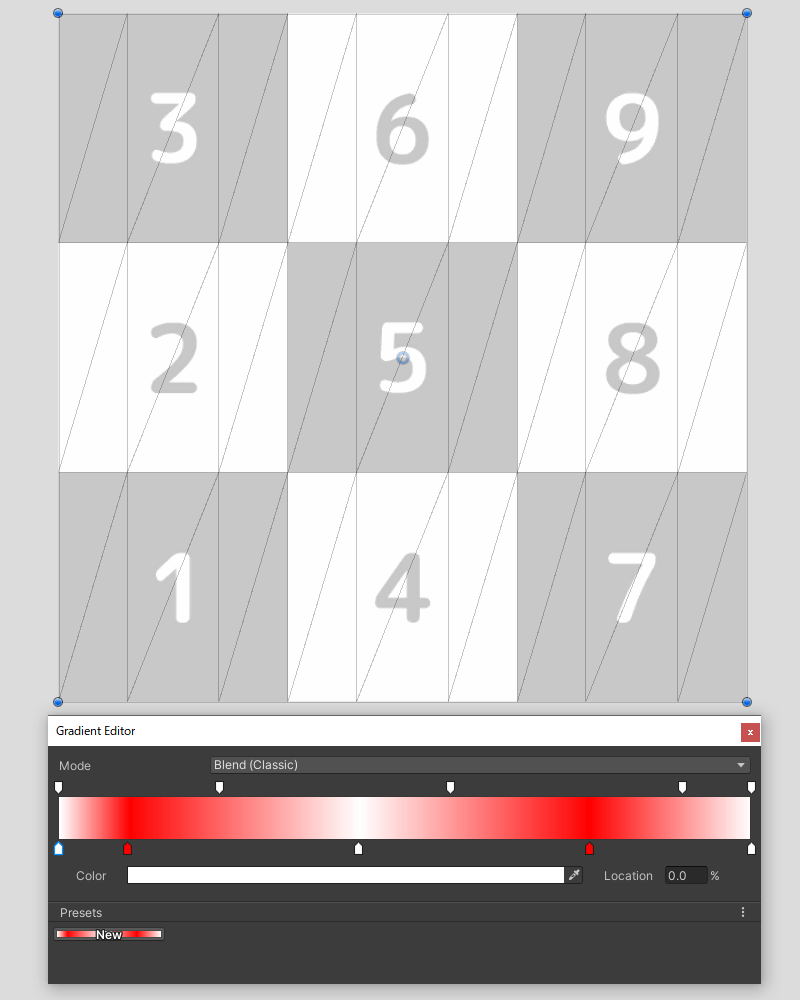
ここまでのロジックで、適当なグラデーションに対して、必要な頂点の追加が行えていることを確認します。

頂点カラー設定
ここまでの処理で必要な頂点位置が確定したので、それぞれの頂点に対して頂点カラーを再設定していきます。
Gradient.Evaluate() を利用することでグラデーション上の任意の位置(0%~100%)のカラーを取得できるため、頂点位置から割合を計算し、カラーを設定していきます。
for (var index = 0; index < vertices.Count; index++)
{
    var vertexPosition = direction is Direction.Horizontal ? vertices[index].position.x : vertices[index].position.y;
    var vertexPositionTime = (vertexPosition - minVertexPosition) / (maxVertexPosition - minVertexPosition);

    var vertex = new UIVertex();
    vertex.position = vertices[index].position;
    vertex.uv0 = vertices[index].uv0;
    vertex.color = gradient.Evaluate(vertexPositionTime);

    vertices[index] = vertex;
}
頂点情報更新
最後に変更後の頂点情報を VertexHelper に流し込み、反映します。
vertexHelper.Clear();
vertexHelper.AddUIVertexTriangleStream(vertices);
サンプルコード
GradientColor.cs
using System.Collections.Generic;
using System.Linq;
using UnityEngine;
using UnityEngine.UI;

[RequireComponent(typeof(Image))]
public sealed class GradientColor : BaseMeshEffect
{
    private enum Direction
    {
        Horizontal = 0,
        Vertical = 1
    }

    [SerializeField]
    private Gradient gradient = default;

    [SerializeField]
    private Direction direction = default;

    public override void ModifyMesh(VertexHelper vertexHelper)
    {
        // 変更前頂点取得
        var baseVertices = new List<UIVertex>();
        vertexHelper.GetUIVertexStream(baseVertices);

        // 最小頂点位置/最大頂点位置
        var minVertexPosition = direction is Direction.Horizontal ? baseVertices.Min(x => x.position.x) : baseVertices.Min(x => x.position.y);
        var maxVertexPosition = direction is Direction.Horizontal ? baseVertices.Max(x => x.position.x) : baseVertices.Max(x => x.position.y);

        // グラデーションのキー位置
        var gradientKeyTimes = gradient.colorKeys.Select(x => x.time).Concat(gradient.alphaKeys.Select(x => x.time)).Concat(new[] { 0.0F, 1.0F }).OrderBy(x => x).ToHashSet();
        var gradientVertexPositions = gradientKeyTimes.Select(x => Mathf.Lerp(minVertexPosition, maxVertexPosition, x)).OrderBy(x => x).ToHashSet();

        // 重複頂点位置削除
        foreach (var vertexPosition in baseVertices.Select(x => x.position))
        {
            gradientVertexPositions.Remove(direction is Direction.Horizontal ? vertexPosition.x : vertexPosition.y);
        }

        // 頂点変更
        var vertices = new List<UIVertex>();

        for (var index = 0; index < baseVertices.Count; index += 6)
        {
            var targetVertices = baseVertices.Skip(index).Take(6).ToArray();
            var targetMinVertexPosition = direction is Direction.Horizontal ? targetVertices[0].position.x : targetVertices[0].position.y;
            var targetMaxVertexPosition = direction is Direction.Horizontal ? targetVertices[3].position.x : targetVertices[3].position.y;
            var targetGradientVertexPositions = gradientVertexPositions.Where(x => x > targetMinVertexPosition && x < targetMaxVertexPosition).OrderBy(x => x).ToArray();
            if (targetGradientVertexPositions.Length > 0)
            {
                var temporary = new List<UIVertex>();

                for (var target = 0; target < targetGradientVertexPositions.Length; target++)
                {
                    if (target > 0)
                    {
                        targetVertices = temporary.Skip(target * 6).Take(6).ToArray();

                        foreach (var _ in Enumerable.Range(0, 6))
                        {
                            temporary.RemoveAt(temporary.Count - 1);
                        }
                    }

                    var modifiedVertices = ModifyVertices(targetVertices, direction, targetGradientVertexPositions[target]);
                    temporary.AddRange(modifiedVertices);
                }

                vertices.AddRange(temporary);
            }
            else
            {
                vertices.AddRange(targetVertices);
            }
        }

        // 頂点カラー設定
        for (var index = 0; index < vertices.Count; index++)
        {
            var vertexPosition = direction is Direction.Horizontal ? vertices[index].position.x : vertices[index].position.y;
            var vertexPositionTime = (vertexPosition - minVertexPosition) / (maxVertexPosition - minVertexPosition);

            var vertex = new UIVertex();
            vertex.position = vertices[index].position;
            vertex.uv0 = vertices[index].uv0;
            vertex.color = gradient.Evaluate(vertexPositionTime);

            vertices[index] = vertex;
        }

        // 頂点情報更新
        vertexHelper.Clear();
        vertexHelper.AddUIVertexTriangleStream(vertices);
    }

    private static UIVertex[] ModifyVertices(UIVertex[] source, Direction direction, float gradientVertexPosition)
    {
        var positionX = (min: source[0].position.x, max: source[3].position.x);
        var positionY = (min: source[0].position.y, max: source[3].position.y);
        var uvX = (min: source[0].uv0.x, max: source[3].uv0.x);
        var uvY = (min: source[0].uv0.y, max: source[3].uv0.y);

        var result = new UIVertex[12];

        result[0] = source[0];  // 左下頂点 1 => 1
        result[5] = source[5];  // 左下頂点 6 => 6
        result[8] = source[2];  // 右上頂点 3 => 9
        result[9] = source[3];  // 右上頂点 4 => 10

        if (direction is Direction.Horizontal)
        {
            result[1] = source[1];   // 左上頂点 2 => 2
            result[10] = source[4];  // 右下頂点 5 => 11

            var uvPosition = Mathf.InverseLerp(positionX.min, positionX.max, gradientVertexPosition);
            var uv = Mathf.Lerp(uvX.min, uvX.max, uvPosition);

            var topVertex = new UIVertex();
            topVertex.position = new Vector3(gradientVertexPosition, positionY.max, 0.0F);
            topVertex.uv0 = new Vector4(uv, uvY.max, 0.0F, 0.0F);
            result[2] = topVertex;  // 上側追加頂点 3
            result[3] = topVertex;  // 上側追加頂点 4
            result[7] = topVertex;  // 上側追加頂点 8

            var bottomVertex = new UIVertex();
            bottomVertex.position = new Vector3(gradientVertexPosition, positionY.min, 0.0F);
            bottomVertex.uv0 = new Vector4(uv, uvY.min, 0.0F, 0.0F);
            result[4] = bottomVertex;   // 下側追加頂点 5
            result[6] = bottomVertex;   // 下側追加頂点 7
            result[11] = bottomVertex;  // 下側追加頂点 12
        }
        else
        {
            result[7] = source[1];  // 左上頂点 2 => 8
            result[4] = source[4];  // 右下頂点 5 => 5

            var uvPosition = Mathf.InverseLerp(positionY.min, positionY.max, gradientVertexPosition);
            var uv = Mathf.Lerp(uvY.min, uvY.max, uvPosition);

            var leftVertex = new UIVertex();
            leftVertex.position = new Vector3(positionX.min, gradientVertexPosition, 0.0F);
            leftVertex.uv0 = new Vector4(uvX.min, uv, 0.0F, 0.0F);
            result[1] = leftVertex;   // 左側追加頂点 2
            result[6] = leftVertex;   // 左側追加頂点 7
            result[11] = leftVertex;  // 左側追加頂点 12

            var rightVertex = new UIVertex();
            rightVertex.position = new Vector3(positionX.max, gradientVertexPosition, 0.0F);
            rightVertex.uv0 = new Vector4(uvX.max, uv, 0.0F, 0.0F);
            result[2] = rightVertex;   // 右側追加頂点 3
            result[3] = rightVertex;   // 右側追加頂点 4
            result[10] = rightVertex;  // 右側追加頂点 11
        }

        return result;
    }
}
動作確認
適当な Image を用意して、適当なグラデーションかけてみると、それっぽく描画されているので大丈夫そうですね。

おわりに
ということで、uGUI の Image に対して BaseMeshEffect を用いてグラデーションをかける方法のご紹介でした。
UI のデザインでグラデーションを使いたい場合、テクスチャ素材で解決できれば理想ですが、グラデーション素材は大きくなりがちで悩ましいケースもありますし、動的にグラデーションを変化させたいようなケースなどもあるため、解決方法のひとつとしてこんな感じのコンポーネントを用意することで対応することができます。
ただし、グラデーションの設定次第では頂点数も増えてしまうため、どこまで許容するのかトレードオフな部分もありますし、冒頭でも触れていますが、サンプルコードでは必要な考慮などを簡略化している部分もあるのでそのあたりはご注意ください!
今回はグラデーションをかけてみましたが、他にも uGUI の Graphic コンポーネントに対して変形などの加工を行いたいケースもあるかと思いますので、何かしらの参考になれば幸いです。
Discussion