Cloud Functions for Firebase と nodemailer を使って定期的にリマインドメールを飛ばしてみる
はじめに
Cloud Functions for Firebase と nodemailer を使って1日ごとにリマインドメールを飛ばします。
Firestore にメールの宛先、およびメールの内容が記載されているので、Firestore からデータを持ってきて、それを元にメールを作成し送ります。

さらに、メールを 1 日ごとに送りつづけるよう設定します。
前提
以下の状態となっていることを前提とします。
- Firebase の Cloud Functions および Firestore の設定が終わっている
- Firebase の エミュレーターを立てることができる
要件
今回必要な機能を記載します。
- nodemailer の認証
- Cloud Functions for Firebase の
functions.pubsub.schedule().onRun()関数を用いて 1 日ごとに関数を実行する - Admin SDK を使って、Firestore のデータを取ってきて、メールの内容を動的に変更する
一つ一つサクッとやっていきます。
nodemailer の認証
nodemailer 公式ドキュメントを読みます。
Even though Gmail is the fastest way to get started with sending emails, it is by no means a preferable solution unless you are using OAuth2 authentication.
Gmail を使う場合は、OAuth2.0 を使って認証するのがいいそうです。
こちらの記事を参考に、OAuth2.0 の設定を行います。
メール確認編については、Firebase を使用することが決まっているので、firebase init コマンドによって作成した functions フォルダの中の index.js に記載しました。
const nodemailer = require('nodemailer');
const functions = require('firebase-functions');

//認証情報
const auth = {
  type: "OAuth2",
  user: "ユーザ名@gmail.com",
  clientId: 'クライアントID',
  clientSecret: "クライアントシークレット",
  refreshToken: "リフレッシュトークン",
};

const transport = {
  service: "gmail",
  auth,
};

const transporter = nodemailer.createTransport(transport);

const mailOptions = {
  from: 'from mail address',
  to: auth.user,
  subject: "メール送信確認テスト",
  text: `メール送信確認テスト
  \nです。`,
};

// とりあえず、呼び出し可能関数として定義
exports.sendMail = functions.https.onCall((data, context) => {
  transporter.sendMail(mailOptions, (err, response) => {
    console.log(err || response);
  });
})
その後、functions ディレクトリで npm run shell を用いて Cloud Functions シェルを立ち上げ、関数を実行しました。
関数の実行の際に引数に何か文字を入れなきゃいけないことに注意してください。
firebase > sendMail()
firebase > sendMail("")
これで nodemailer の設定が完了しました。
1 日ごとに関数を実行する
Firebase の公式ドキュメントを読みます。
時間ごとにトリガーしたい場合は、functions.pubsub.schedule().onRun()関数を用いるのが良いそうです。
// 今まで (呼び出し可能関数として定義)
exports.sendMail = functions.https.onCall((data, context) => {
  transporter.sendMail(mailOptions, (err, response) => {
    console.log(err || response);
  });
})

// これから (schedule().onRun() を用いて定義)
exports.sendMail = functions.pubsub.schedule("every 1 days").onRun((context) => {
  transporter.sendMail(mailOptions, (err, response) => {
    console.log(err || response);
  });
})
これで 1 日ごとに関数がトリガーされるようになりました。
Firestore のデータにより、メールの内容を動的に変更する
まず、Firestore からデータを持ってくるので、Firestore と近い位置に functions のリージョンも指定します。
// region を追加
exports.sendMail = functions.region("asia-northeast1").pubsub.schedule("every 1 days").onRun((context) => {
  transporter.sendMail(mailOptions, (err, response) => {
    console.log(err || response);
  });
})
リージョン指定について詳しくは Firebase の公式をご覧下さい。
次に、Firestore からデータを持ってくるようにします。
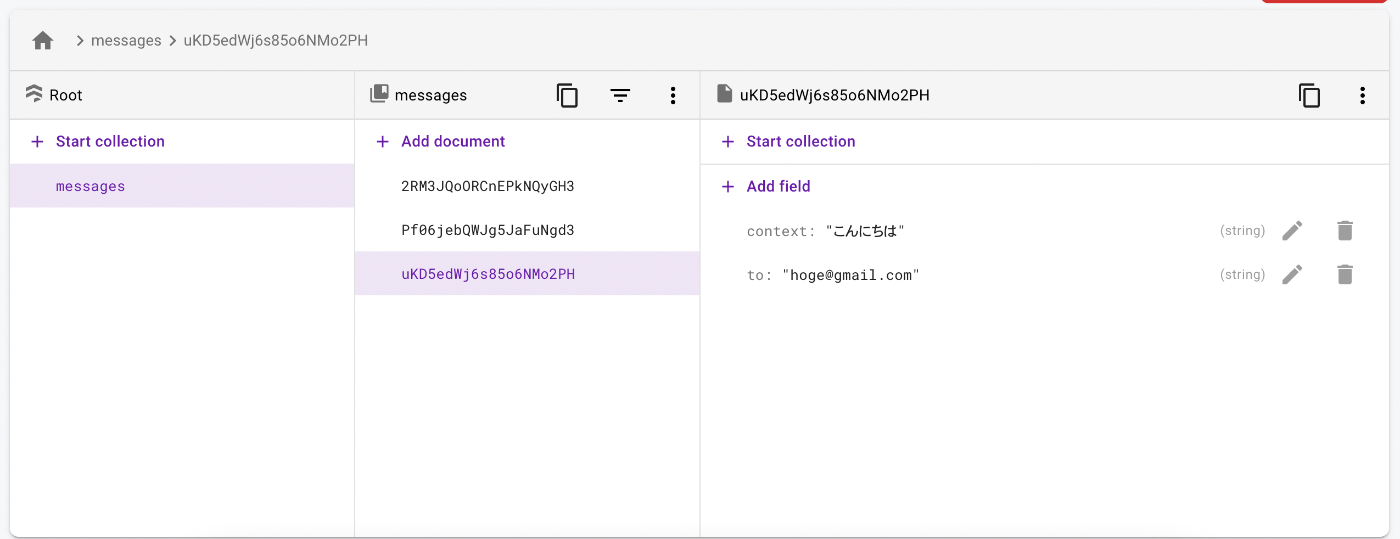
Firestore は図のような構造になっているとします。

// firebase-admin を使えるようにする
const admin = require("firebase-admin");
const app = admin.initializeApp();

// 中略

exports.sendMail = functions
  .region("asia-northeast1")
  .pubsub.schedule("every 1days")
  .onRun(async (context) => {
    // まず、Firestore からデータを持ってくる
    const snapshot = await app.firestore().collection("messages").get()
    // それぞれに対してメールを送る
    snapshot.forEach((doc) => {
      const mailOptions = {
        from: 'from mail address',
        to: doc.data().to,
        subject: "メール送信確認テスト",
        text: doc.data().context,
      }
      transporter.sendMail(mailOptions, (err, response) => {
        console.log(err || response);
      });
    })
    return null
  })
これで完成です。お疲れ様でした。
Discussion