GoでWASMに入門してみた
はじめに
Goでwasmに入門してみたので、その備忘録を残しておきます。
実際に試した手順ごとに、学んだ点や躓いた点を記録していこうと思います。
したいこと
少し前に作った、Goでboidsアルゴリズムを実装したアプリをwebで遊べるように移植してみようと思います。
この記事のアプリではただ単に眺めるだけです。マウスイベントなどを追加したかったのですが、そのままでは大変そうだったので、多少慣れているJavaScripで実装しようと思いました。boidsアルゴリズム自体をJavaScriptで書いても良かったのですが、せっかくなのでwasmを利用して、Goのプログラムを再利用することにしました。
完成品はここで遊べます。
GitHubリポジトリ:
実装
Hello World
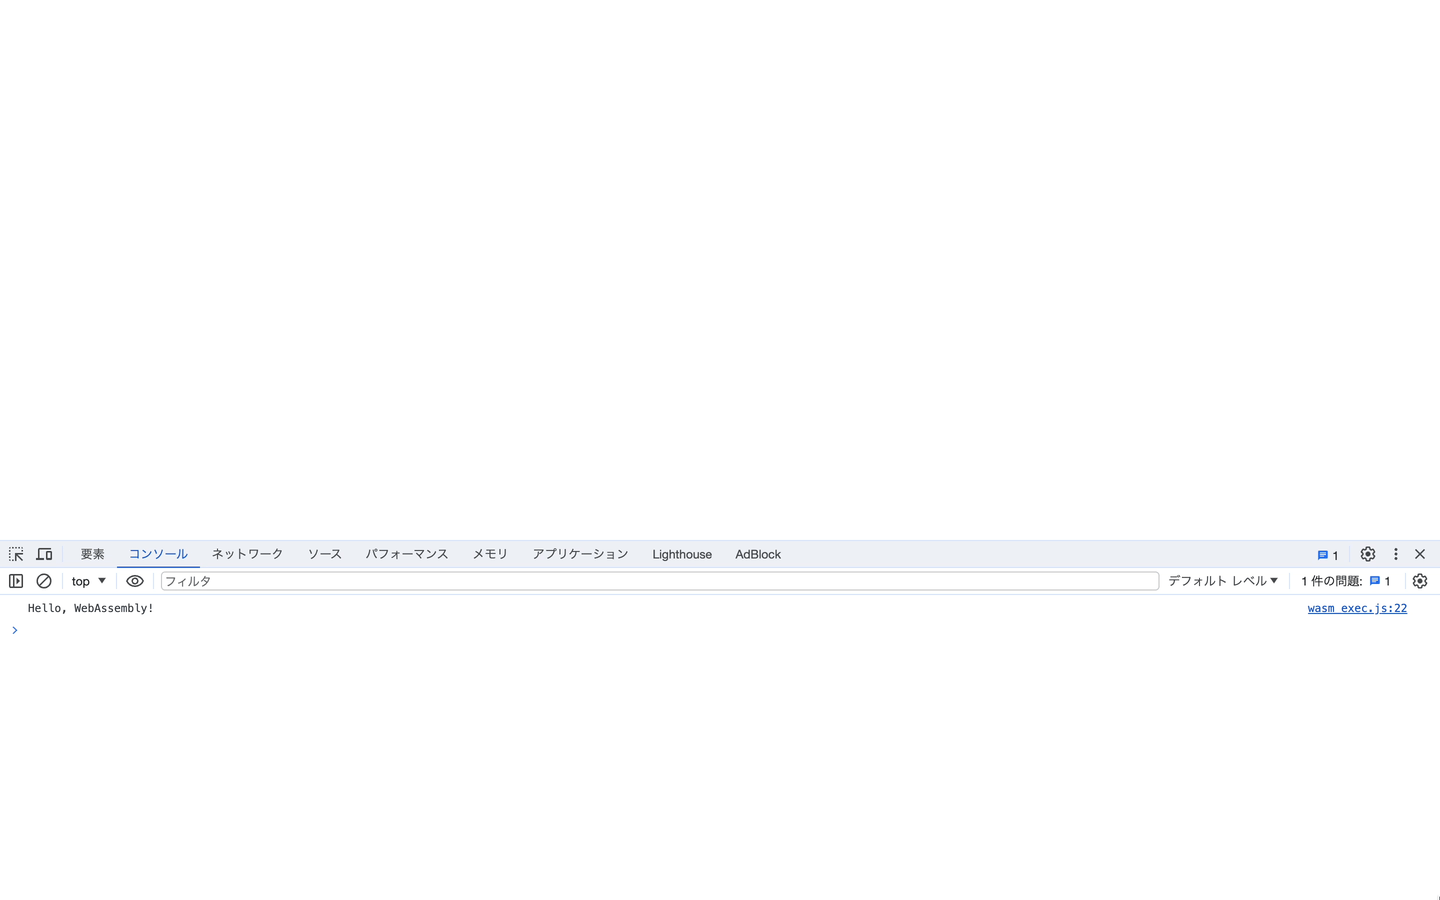
まずはconsoleに"hello world"を出力する一番シンプルなプログラムを書いてみます。
Goはシンプルに標準出力をするだけのプログラムです。
func main() {
	fmt.Println("Hello, WebAssembly!")
}
wasmへのcompileは以下のコマンドで行います。
GOOS=js GOARCH=wasm go build -o main.wasm main.go
これで、ディレクトリにmain.wasmが作成されます。
このwasmファイルをHTML側で実行するために、wasm_exec.jsとwasm_exec.htmlをディレクトリに追加します。 これらのファイルは、
cp "$(go env GOROOT)/misc/wasm/wasm_exec.js" .
cp "$(go env GOROOT)/misc/wasm/wasm_exec.js" .
を実行することで追加することもできます。また、今回はブラウザのコンソールに出力するだけなので、HTMLは以下のように変更しています。ファイル名もindex.htmlに変更しました。
<!DOCTYPE html>
<html lang="ja">
  <head>
    <title>go webassembly</title>
    <script src="wasm_exec.js"></script>
    <script>
      const go = new Go();
      WebAssembly.instantiateStreaming(
        fetch("main.wasm"),
        go.importObject
      ).then((res) => {
        go.run(res.instance);
      });
    </script>
  </head>
  <body>
  </body>
</html>
実際に表示してみると、確かに動いています。
図形の描画する
今回のアプリはCanvasに表示しようと思っているので、その手始めに、Canvasに図形を描画してみようと思います。
Canvasのサイズを変更する
まずは、HTMLにcanvasを設置します。style.cssも追加しておきます。
<body>
  <canvas id="canvas"></canvas>
</body>
body {
  margin: 0;
  padding: 0;
}

#canvas {
  position: fixed;
  top: 0;
  left: 0;
}
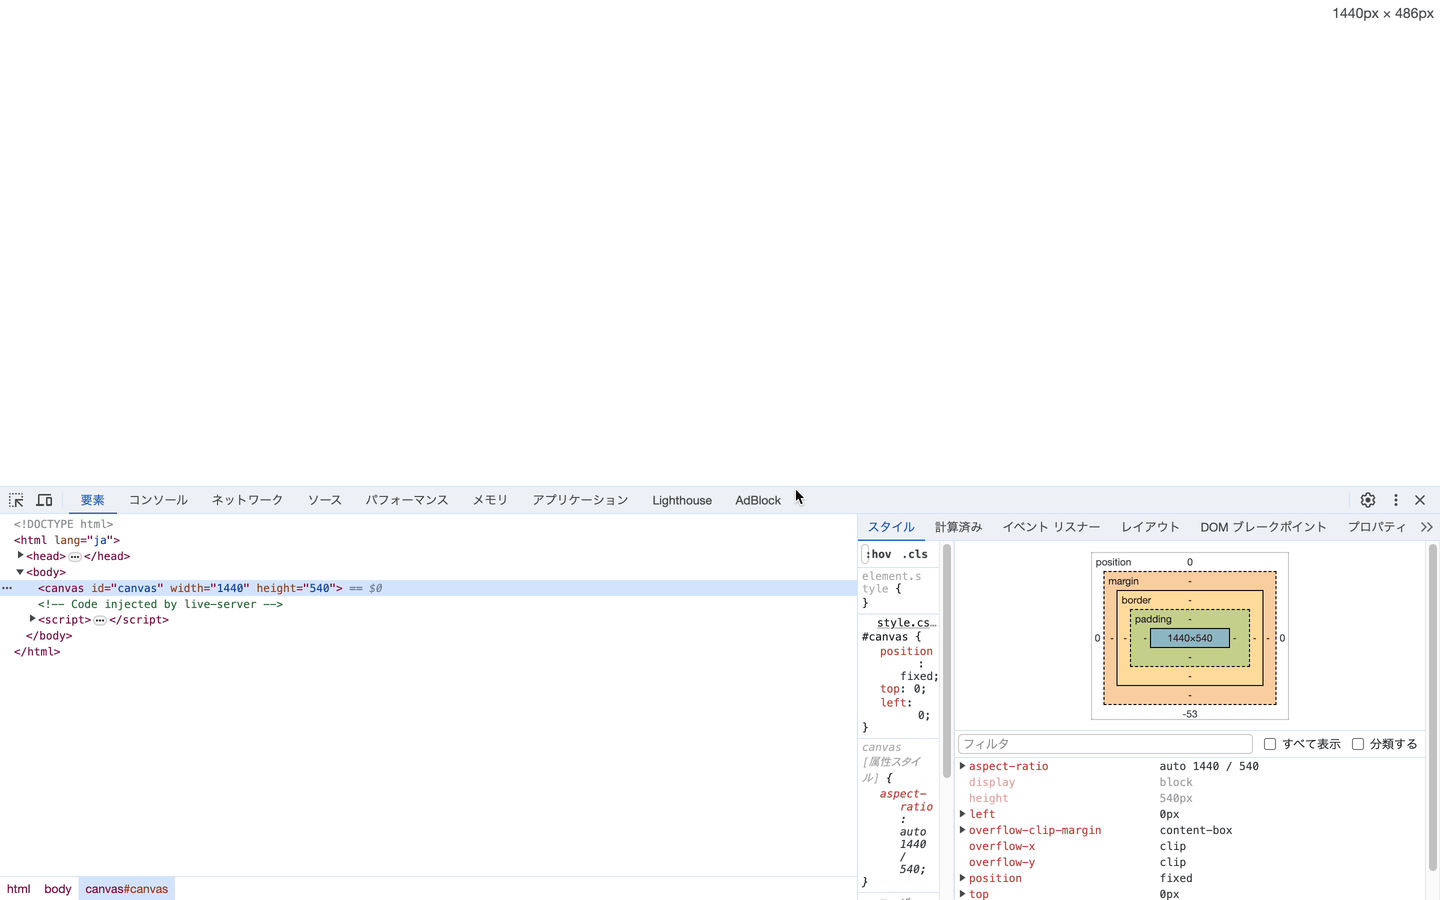
次にcanvasを画面のサイズに合わせて拡大します。
js.Global()でwindowを取得して、JavaScriptにおけるプロパティはそれぞれGetメソッドで取得することができます。
package main

import (
	"syscall/js"
)

func main() {
	window := js.Global()
	document := window.Get("document")
	canvasEl := document.Call("getElementById", "canvas")

	bodyW := window.Get("innerWidth").Float()
	bodyH := window.Get("innerHeight").Float()
	canvasEl.Set("width", bodyW)
	canvasEl.Set("height", bodyH)
}
画面サイズを取得して、canvasのサイズを変更することができました。
動的にサイズを変更する
今のままでは、画面読み込み時のみcanvasのサイズが変わるので、windowにresizeイベントを追加して、動的にcanvasのサイズを変更できるようにします。
windowのCallメソッドでaddEventListenerを呼び出します。
window.Call("addEventListener", "resize", js.FuncOf(func(this js.Value, args []js.Value) interface{} {
	bodyW := window.Get("innerWidth").Float()
	bodyH := window.Get("innerHeight").Float()
	canvasEl.Set("width", bodyW)
	canvasEl.Set("height", bodyH)
	return nil
}))
これをmain.goに追加して動かしてみます。
すると、Uncaught Error: Go program has already exitedというエラーが発生します。これは、イベントリスナー内の処理が実行される際には、もうすでにGoのプログラムが終了しているために発生するようです。
そこで、Goのプログラムを終了させないために、channelを使用します。
func main() {
	c := make(chan struct{})
	window := js.Global()
	document := window.Get("document")
	canvasEl := document.Call("getElementById", "canvas")

	bodyW := window.Get("innerWidth").Float()
	bodyH := window.Get("innerHeight").Float()
	fmt.Println(bodyW, bodyH)
	canvasEl.Set("width", bodyW)
	canvasEl.Set("height", bodyH)
	window.Call("addEventListener", "resize", js.FuncOf(func(this js.Value, args []js.Value) interface{} {
		bodyW = window.Get("innerWidth").Float()
		bodyH = window.Get("innerHeight").Float()
		canvasEl.Set("width", bodyW)
		canvasEl.Set("height", bodyH)
		return nil
	}))

	<-c
}
こうすることで、イベントリスナー内の処理を実行することができるようになります。
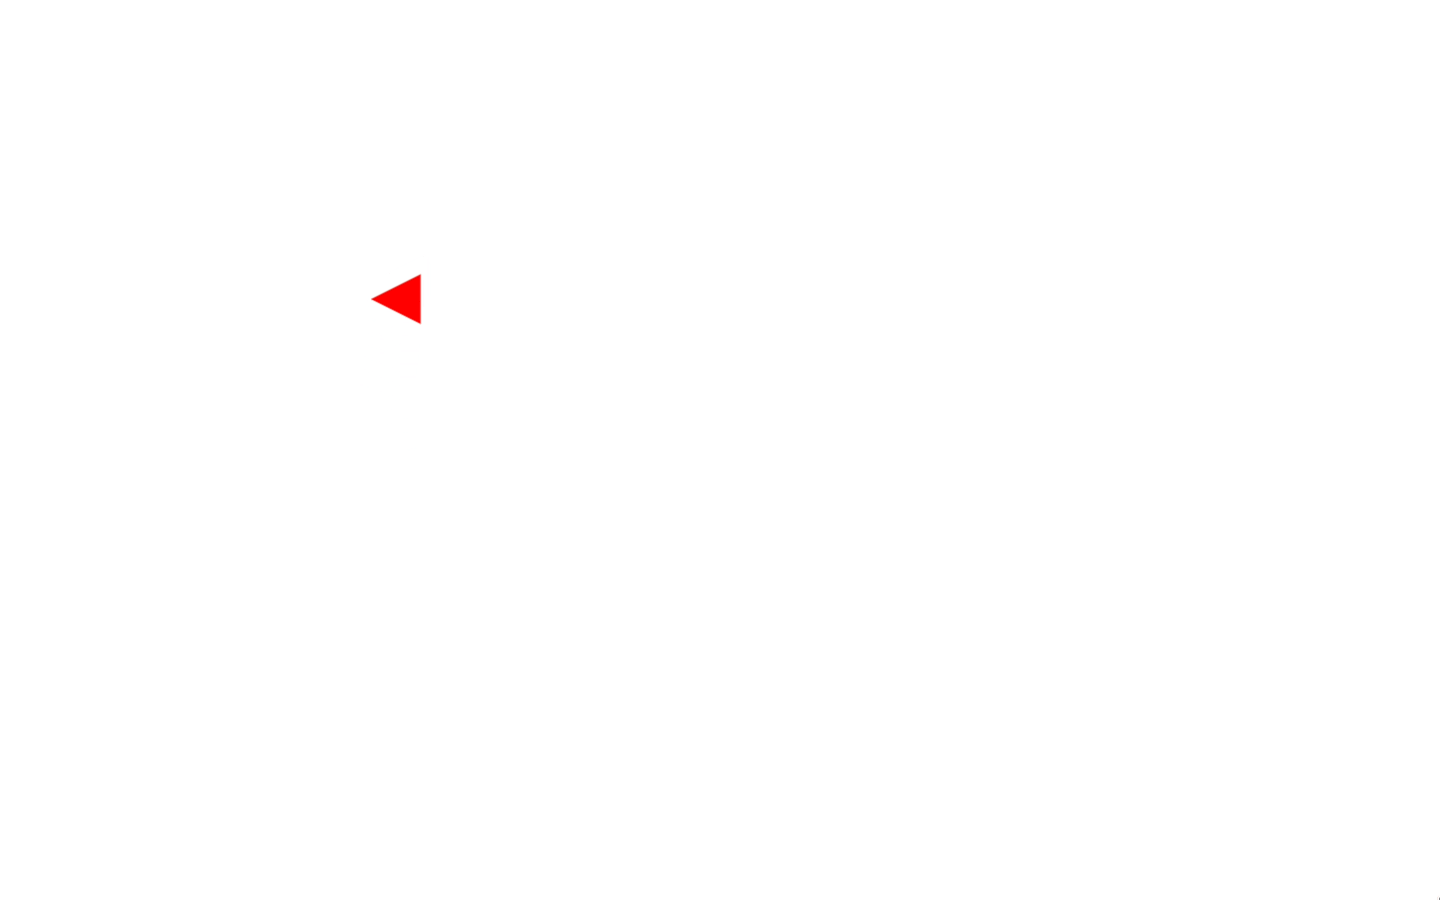
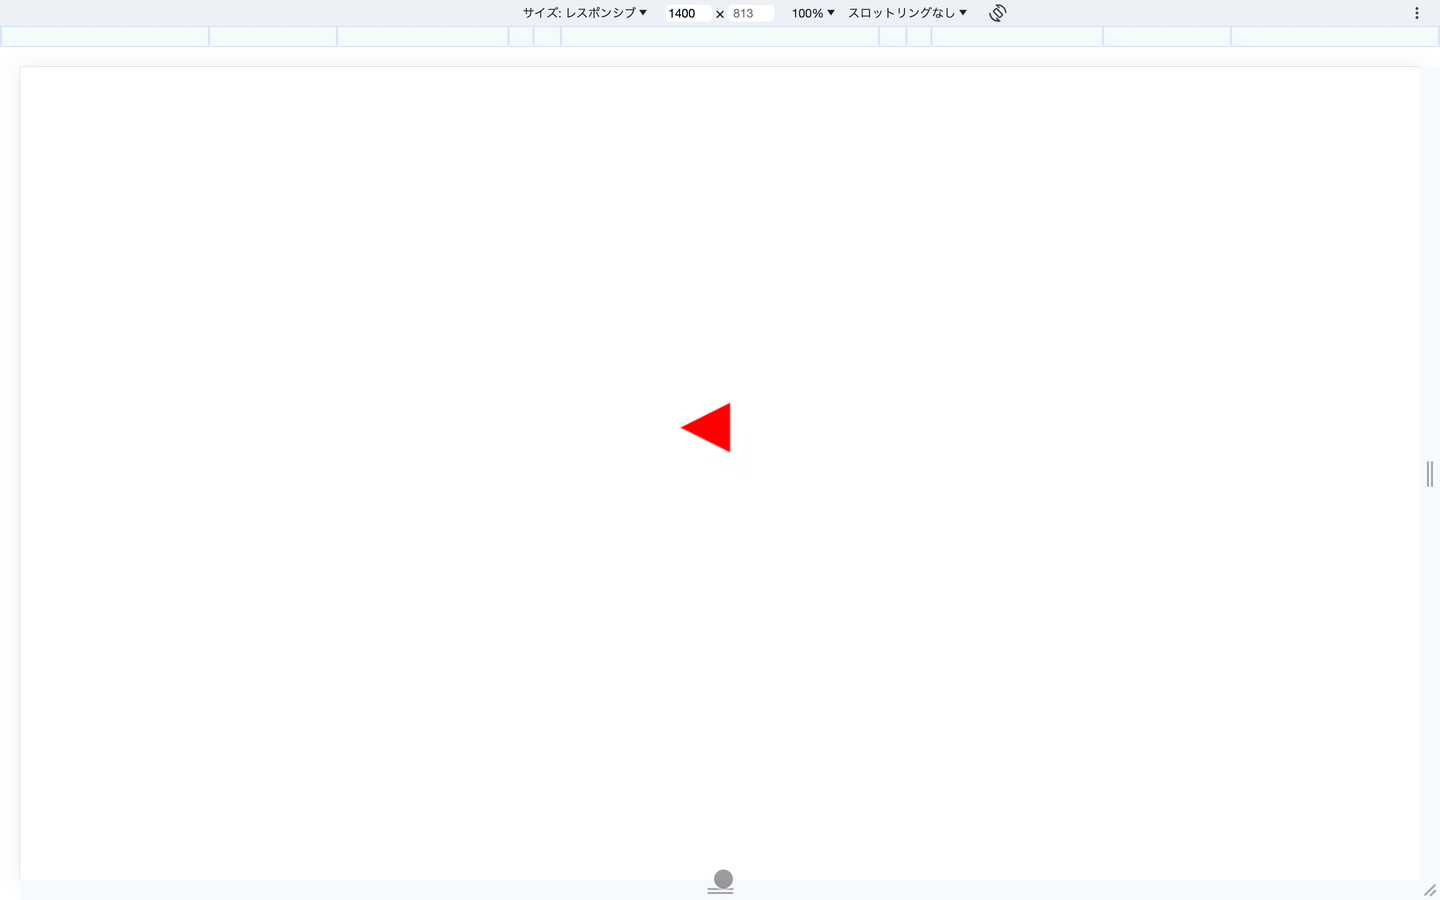
三角形を描画する
次のコードを追加します。
ctx := canvasEl.Call("getContext", "2d")
ctx.Call("beginPath")
ctx.Call("moveTo", 75, 50)
ctx.Call("lineTo", 100, 75)
ctx.Call("lineTo", 100, 25)
ctx.Set("fillStyle", "#ff0000")
ctx.Call("fill")
ctx.Call("closePath")
赤色の三角形を描画できました。

マウスイベントを受け取る
func main() {
	c := make(chan struct{})
	/*
	...
	*/
	renderTriangle := func(x, y float64) {
		ctx := canvasEl.Call("getContext", "2d")
		ctx.Call("beginPath")
		ctx.Call("moveTo", x, y)
		ctx.Call("lineTo", x+50, y+25)
		ctx.Call("lineTo", x+50, y-25)
		ctx.Set("fillStyle", "#ff0000")
		ctx.Call("fill")
		ctx.Call("closePath")
	}

	clearCanvas := func() {
		ctx := canvasEl.Call("getContext", "2d")
		ctx.Call("clearRect", 0, 0, bodyW, bodyH)
	}

	canvasEl.Call("addEventListener", "click", js.FuncOf(func(this js.Value, args []js.Value) interface{} {
		clearCanvas()
		x := args[0].Get("clientX").Float()
		y := args[0].Get("clientY").Float()
		renderTriangle(x, y)
		return nil
	}))

	<-c
}
clickイベントをmouseoverイベントに変更することで次のようなことも可能です。

アニメーションの描画
requestAnimationFrameを使用してアニメーションを表示してみます。
次のコードをmain関数内に追加します。
t := 0.0
var animation js.Func
animation = js.FuncOf(func(this js.Value, args []js.Value) interface{} {
	t += 1
	t = math.Mod(t, 360)
	clearCanvas()
	x := bodyW/4*math.Sin(t*math.Pi/180) + bodyW/2
	y := bodyH/4*math.Sin(2*t*math.Pi/180) + bodyH/2
	renderTriangle(x, y)
	window.Call("requestAnimationFrame", animation)
	return nil
})
defer animation.Release()

window.Call("requestAnimationFrame", animation)
三角形を8の字に動かすことができました。
アニメーション中にリサイズ
上の実装のままだとアニメーション中に画面サイズを変更すると、周期は同じため画面が小さくなるにつれて動きがゆっくりになってしまいます。画面サイズによらずに速度を一定にするために、vを定義しました。
animation = js.FuncOf(func(this js.Value, args []js.Value) interface{} {
	t += 1
	t = math.Mod(t, 360)
	clearCanvas()
-       x := bodyW/4*math.Sin(t*math.Pi/180) + bodyW/2
-       y := bodyH/4*math.Sin(2*t*math.Pi/180) + bodyH/2
+       v := math.Sqrt(bodyW*bodyW + 4*bodyH*bodyH) / 4
+       x := bodyW/4*math.Sin(t*math.Pi/180)*500/v + bodyW/2
+       y := bodyH/4*math.Sin(2*t*math.Pi/180)*500/v + bodyH/2
	renderTriangle(x, y)
	window.Call("requestAnimationFrame", animation)
	return nil
})
画像の描画
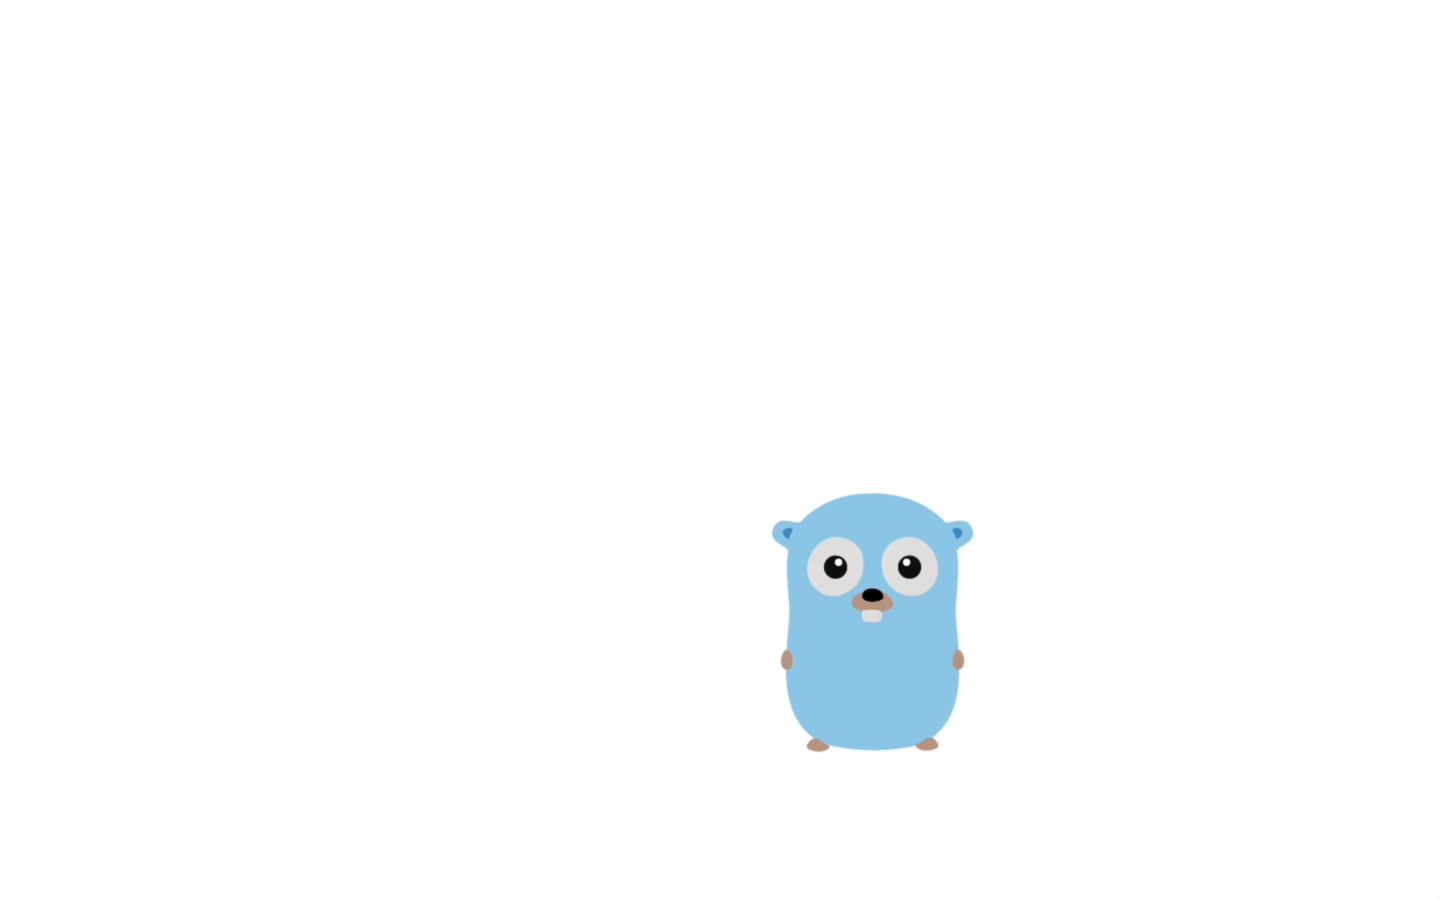
図形やそのアニメーションの描画は問題なくできました。次は、画像を描画してみようと思います。
ImageなどのJavaScriptの標準のクラスは, js.Global().Get("className").New()で呼び出せるようです。
ctx := canvasEl.Call("getContext", "2d")
img := window.Get("Image").New()
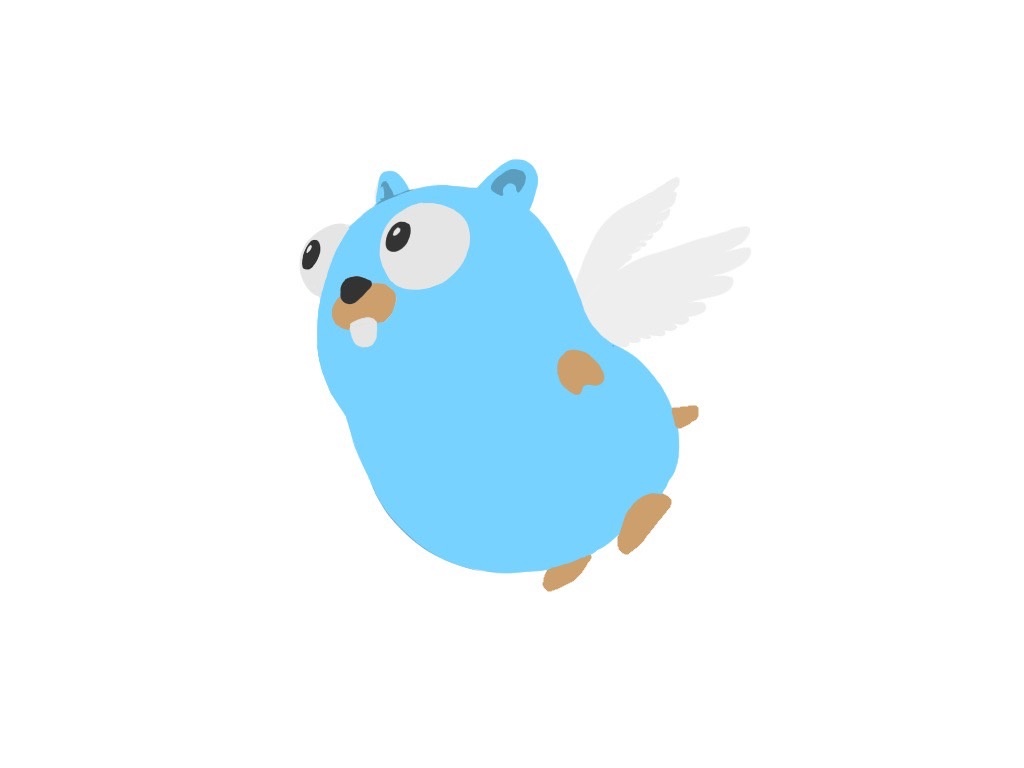
img.Set("src", "images/gopher-front.png")
img.Call("addEventListener", "load", js.FuncOf(func(this js.Value, args []js.Value) interface{} {
imageWidth := img.Get("width").Float()
imageHeight := img.Get("height").Float()
ctx.Call("drawImage", img, bodyW/2-imageWidth/2, bodyH/2-imageHeight/2)
return nil
}))

また、ImageDataを使って表示することも可能です。
//go:embed images/gopher-front.png
var gopherFront []byte

func main() {

	ctx := canvasEl.Call("getContext", "2d")
	src, _, err := image.Decode(bytes.NewReader(gopherFront))
	if err != nil {
		panic(err)
	}

	size := src.Bounds().Size()
	width, height := size.X, size.Y

	canvas := js.Global().Get("Uint8ClampedArray").New(width * height * 4)
	for y := 0; y < height; y++ {
		for x := 0; x < width; x++ {
			r, g, b, a := src.At(x, y).RGBA()
			canvas.SetIndex((y*width+x)*4+0, r/257)
			canvas.SetIndex((y*width+x)*4+1, g/257)
			canvas.SetIndex((y*width+x)*4+2, b/257)
			canvas.SetIndex((y*width+x)*4+3, a/257)
		}
	}

	imageData := js.Global().Get("ImageData").New(canvas, width, height)
	ctx.Call("putImageData", imageData, bodyW/2-float64(width)/2, bodyH/2-float64(height)/2)
}
しかし、この方法だと画像の縁が綺麗に描画されないことがあるので、一つ目の方法を使っていくことにします。

画像のアニメーション
図形のアニメーションと同様に画像を動かしてみます。
ctx := canvasEl.Call("getContext", "2d")

drawImage := func(x, y float64) {
	img := window.Get("Image").New()
	img.Set("src", "images/gopher-front.png")
	imageWidth := img.Get("width").Float()
	imageHeight := img.Get("height").Float()
	ctx.Call("drawImage", img, x-imageWidth/2, y-imageHeight/2)
	img.Call("addEventListener", "load", js.FuncOf(func(this js.Value, args []js.Value) interface{} {
		return nil
	}))
}

t := 0.0
var animation js.Func
animation = js.FuncOf(func(this js.Value, args []js.Value) interface{} {
	t += 1
	t = math.Mod(t, 360)
	clearCanvas()
	x := bodyW/4*math.Sin(t*math.Pi/180) + bodyW/2
	y := bodyH/4*math.Sin(2*t*math.Pi/180) + bodyH/2
	drawImage(x, y)
	window.Call("requestAnimationFrame", animation)
	return nil
})
defer animation.Release()

window.Call("requestAnimationFrame", animation)
goidsを表示
goidsの処理は前回作ったものをコピーしました。
基本的にはrender周りの関数をcanvasに描画する処理に置き換えて、time.TickをrequestAnimationFrameに変更しただけです。
e := goids.CreateEnv(bodyW, bodyH, 30, 4, 2, 100)
var animation js.Func
animation = js.FuncOf(func(this js.Value, args []js.Value) interface{} {
	clearCanvas()
	e.SetHeight(bodyH)
	e.SetWidth(bodyW)
	e.Update()
	for _, goid := range e.Goids() {
		drawImage(goid.Position().X, goid.Position().Y, goid.ImageType())
	}

	window.Call("requestAnimationFrame", animation)
	return nil
})
defer animation.Release()
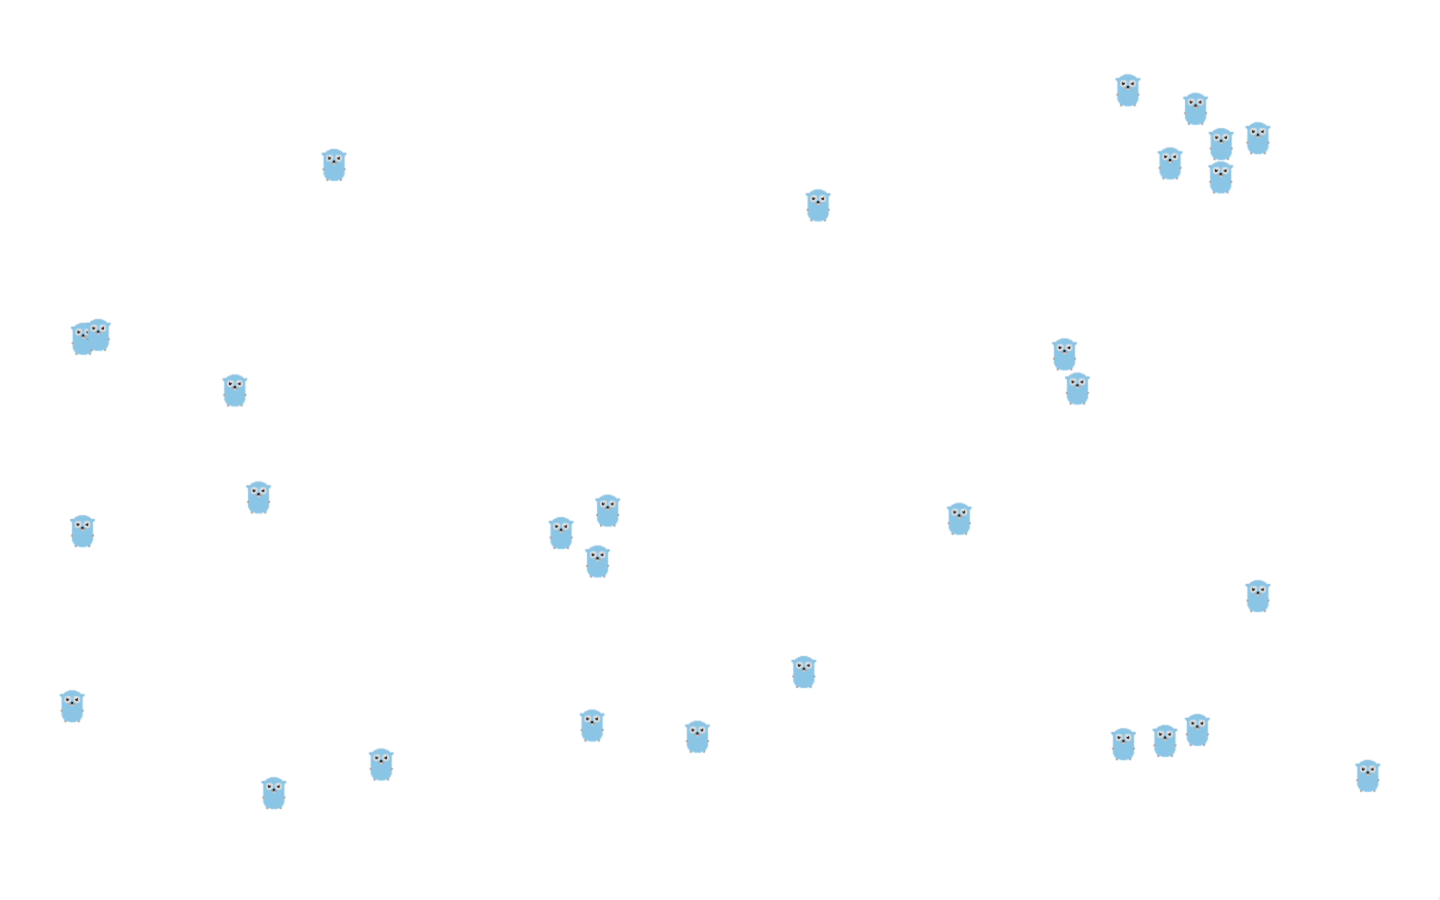
詳しくは、レポジトリをご覧ください。
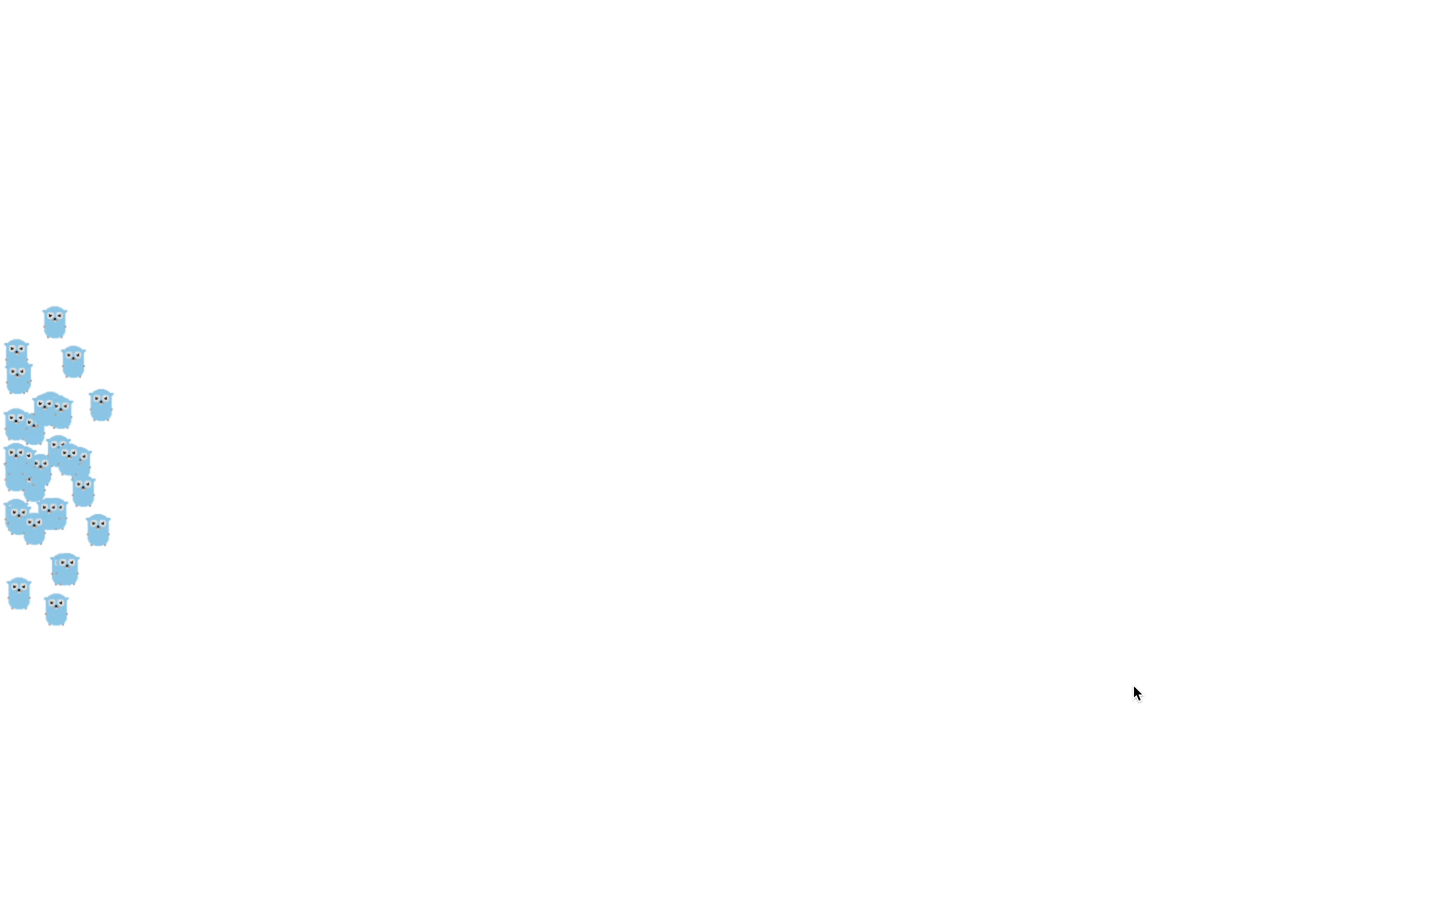
gopherを増やす
クリックした場所に新しくgopherくんを追加するようにしました。
canvasEl.Call("addEventListener", "click", js.FuncOf(func(this js.Value, args []js.Value) interface{} {
	x := args[0].Get("clientX").Float()
	y := args[0].Get("clientY").Float()
	e.AddGoid(goids.NewGoid(goids.CreateVector(x, y), e.GoidsNum(), 4, 2, 100))
	return nil
}))
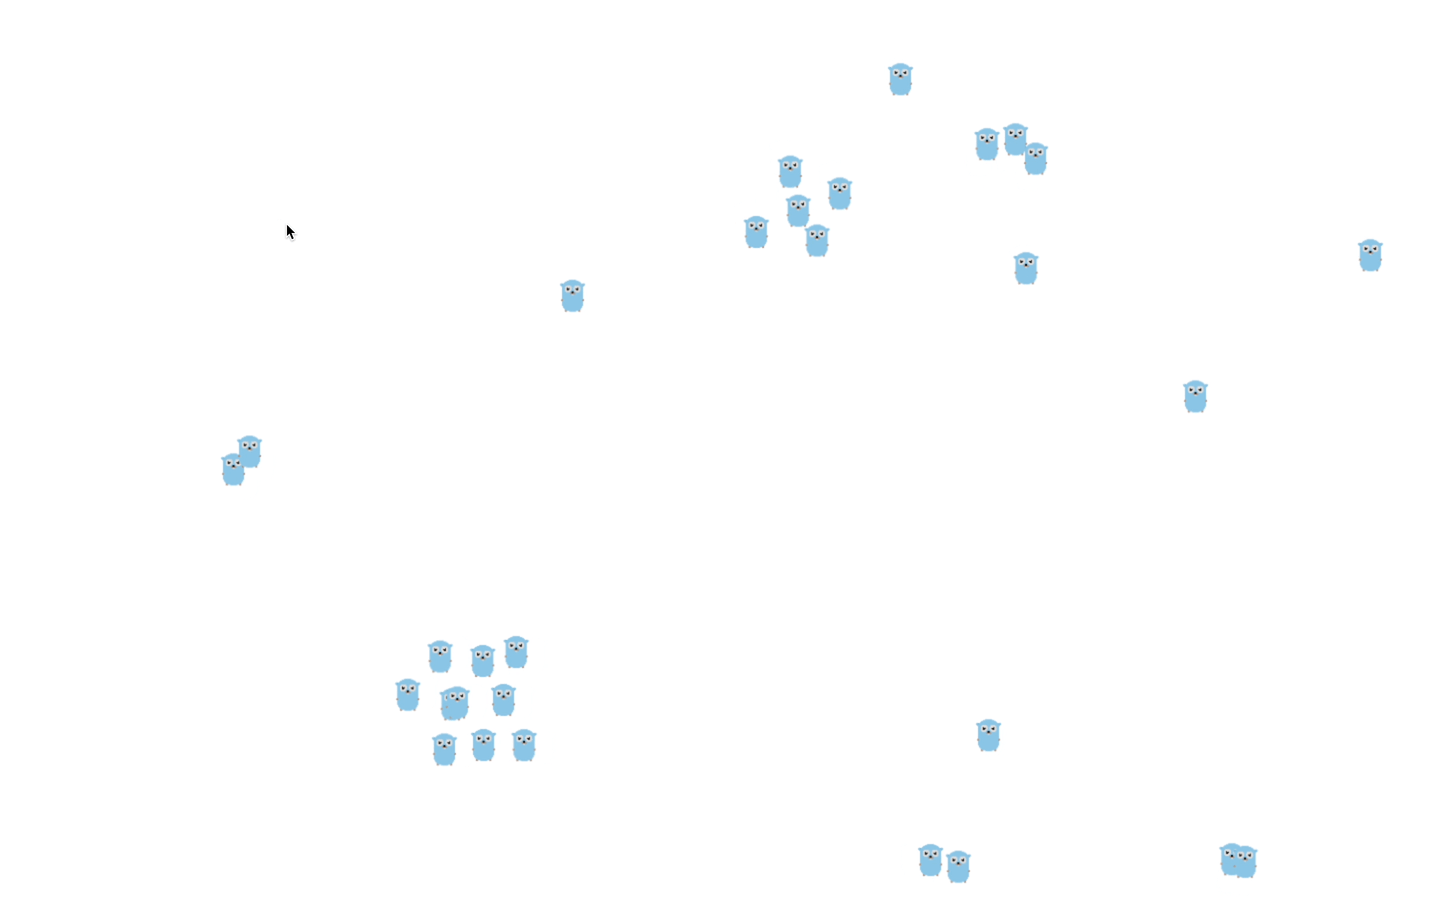
マウスを避ける
mousemoveイベントを追加して、マウスを避けるようにしました。
var mouse goids.Vector
canvasEl.Call("addEventListener", "mousemove", js.FuncOf(func(this js.Value, args []js.Value) interface{} {
	x := args[0].Get("clientX").Float()
	y := args[0].Get("clientY").Float()
	mouse = goids.CreateVector(x, y)
	return nil
}))
URLパラメータを受け取る
goidsはflagでいくつかのパラメータを受け取ることができるようになっています。今回は、代わりに、URLパラメータを使用します。location.hrefでURLを取得した後、net/urlパッケージでURLをperseします。
import (
	"net/url"
	"syscall/js"
)

func getURL() string {
	return js.Global().Get("location").Get("href").String()
}

func getQuery() url.Values {
	u, _ := url.Parse(getURL())
	return u.Query()
}
それぞれの使用できるパラメータとそれぞれの説明は以下です。
| パラメータ | 説明 |
|---|---|
| num | gopherくんの数(int)(default: 30) |
| speed | 最大のスピード(float)(default: 4) |
| force | 力のベクトルの最大の大きさ(float)(default: 2) |
| sight | 視野の範囲(float)(default: 100) |
デプロイ
公開は、GitHubのリポジトリに.wasmファイルを追加するだけで、GitHub Pagesで公開できました。
特別な設定やビルド等は必要ありませんでした。
ぜひ遊んでみてください。
まとめ
Goのwasmに入門してみました。
ただのCanvasの操作などは、ほとんどJavaScriptの実装をGoで書くような形になってしまい、あまりGoを使う利点は感じられなかったです。次はJavaScriptでは難しい処理などをGoで書いてみたいです。今回のように、既存のアプリをwebで遊べるようにできることには、可能性を感じました。
Discussion