ポケモンAPIアプリの解説【Angular】
本記事について
先日Reactで作成したポケモンAPIアプリをAngularで再作成したので紹介します。
・Angularを勉強していて何か作りたい人
・AngularとReactのコードの違いを知りたい人
対象者がニッチですが自分の勉強のために残します。
ポケモンAPIについては先日の記事と併せて見てもらえれば幸いです。
自分もAngularのチュートリアルを終えたばかりなので、参考にならないかもしれません。
Angularとは?
AngularはJavaScriptのフレームワークです。
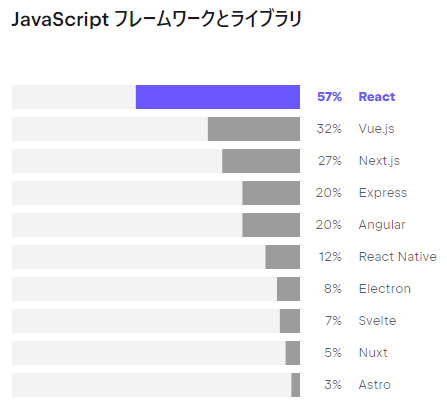
参考として、JETBRAINSの調査した2023年のJavaScriptのフレームワーク&ライブラリのトレンドは下記のようになってます。

記事を読んだ感じでは、Reactよりも玄人向けという印象でした。
全機能を理解する必要はないとのことなので一歩ずつ進んでいこうと思います。
完成品
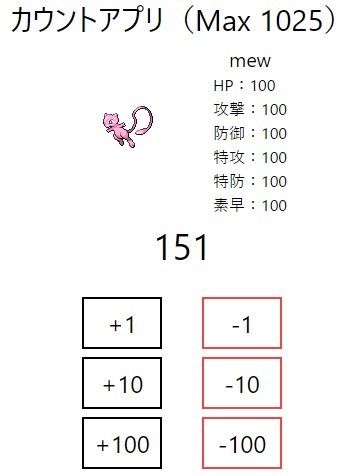
カウントアプリ

現在のカウントに対応するポケモンの「画像・名前・種族値」をポケモンAPIから取得します。
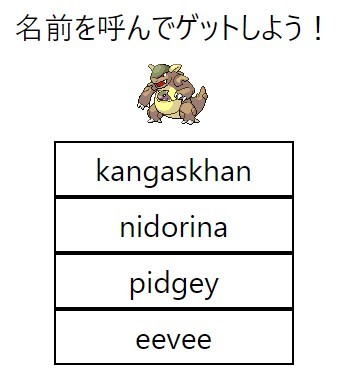
クイズアプリ

ランダムに選択されたポケモンの「画像・名前」を利用して英語名を当てるクイズです。
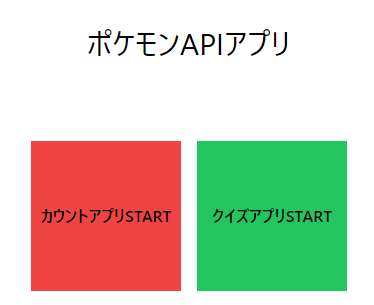
TOPページ

import { Component } from '@angular/core';
import { RouterOutlet } from '@angular/router';
import { CountComponent } from './count/count.component';
import { QuizComponent } from './quiz/quiz.component';
import { CommonModule } from '@angular/common';

@Component({
  selector: 'app-root',
  standalone: true,
  imports: [RouterOutlet , CountComponent, QuizComponent , CommonModule],
  templateUrl: './app.component.html',
})
export class AppComponent {
  showCount = false;
  showQuiz = false;

  handleToggleCount() {
    this.showCount = !this.showCount;
  }

  handleToggleQuiz() {
    this.showQuiz = !this.showQuiz;
  }
}
<!DOCTYPE html>
<html lang="ja">
  <head>
    <meta charset="UTF-8" />
    <meta name="viewport" content="width=device-width, initial-scale=1.0" />
    <title>Document</title>
  </head>

  <body>
    <div *ngIf="!showCount && !showQuiz" class="flex flex-col items-center">
      <p class="text-3xl mt-20">ポケモンAPIアプリ</p>
      <div class="flex justify-center items-center mt-20 font-bold">
        <button
          class="bg-red-500 w-[150px] h-[150px] mr-4"
          (click)="handleToggleCount()"
        >
          カウントアプリSTART
        </button>
        <button
          class="bg-green-500 w-[150px] h-[150px]"
          (click)="handleToggleQuiz()"
        >
          クイズアプリSTART
        </button>
      </div>
    </div>

    <app-count
      *ngIf="showCount"
      [onClick]="handleToggleCount.bind(this)"
    ></app-count>
    <app-quiz
      *ngIf="showQuiz"
      [onClick]="handleToggleQuiz.bind(this)"
    ></app-quiz>
  </body>
</html>
ReactとAngularはともにJavascriptのフレームワークなのでそこまで苦戦することはありませんでした。
Reactと同じようにbooleanでコンポーネントの表示を切り替えています。
細かいところでは className が class、onClick が click になってます。
それとuseStateにあたるものがクラスプロパティというものでshowCountをthis.showCountで状態管理するようです。
 <app-count
      *ngIf="showCount"
      [onClick]="handleToggleCount.bind(this)"
    ></app-count>
これはReactのようにコンポーネントを呼び出していて、 [onClick]="handleToggleCount.bind(this)"がpropsにあたるものです。
[onClick]という関数名でhandleToggleCountを渡してます。
*ngIfは「trueならば」というangularのツールみたいなものです。
(ng は Angularの略)
これは便利そうです。
カウントアプリ

import { Component, Input } from '@angular/core';
import { PokemonComponent } from '../pokemon/pokemon.component';
import { PokemonStatusComponent } from '../pokemon-status/pokemon-status.component';

@Component({
  selector: 'app-count',
  standalone: true,
  imports: [PokemonComponent,PokemonStatusComponent],
  templateUrl: './count.component.html',
})
export class CountComponent {
  @Input() onClick: (() => void) | undefined;

  count = 1;

  increment(amount: number) {
    this.count += amount;
  }
  decrement(amount: number) {
    this.count -= amount;
  }

  handleClick() {
    if (this.onClick) {
      this.onClick();
    }
  }
}
<!DOCTYPE html>
<html lang="ja">
  <head>
    <meta charset="UTF-8" />
    <meta name="viewport" content="width=device-width, initial-scale=1.0" />
    <title>Document</title>
  </head>

  <body>
    <button
      (click)="handleClick()"
      class="text-2xl border-2 border-black p-1 w-30 mt-4 ml-4"
    >
      TOPへ
    </button>

    <div class="flex flex-col items-center">
      <h1 class="text-3xl mt-4">カウントアプリ(Max 1025)</h1>
      <div class="flex items-center">
        <app-pokemon [count]="count"></app-pokemon>
        <app-pokemon-status [count]="count"></app-pokemon-status>
      </div>

      <h1 class="text-4xl m-8 mt-2">{{ count }}</h1>
      <div class="flex flex-none">
        <div class="flex flex-col items-start gap-2 mr-10">
          <button
            type="button"
            class="text-2xl border-2 border-black p-2 w-20"
            (click)="increment(1)"
          >
            +1
          </button>
          <button
            class="text-2xl border-2 border-black p-2 w-20"
            (click)="increment(10)"
          >
            +10
          </button>
          <button
            class="text-2xl border-2 border-black p-2 w-20"
            (click)="increment(100)"
          >
            +100
          </button>
        </div>
        <div class="flex flex-col items-start gap-2">
          <button
            class="text-2xl border-2 border-red-500 p-2 w-20"
            (click)="decrement(1)"
          >
            -1
          </button>
          <button
            class="text-2xl border-2 border-red-500 p-2 w-20"
            (click)="decrement(10)"
          >
            -10
          </button>
          <button
            class="text-2xl border-2 border-red-500 p-2 w-20"
            (click)="decrement(100)"
          >
            -100
          </button>
        </div>
      </div>
    </div>
  </body>
</html>
 @Input() onClick: (() => void) | undefined;

 handleClick() {
    if (this.onClick) {
      this.onClick();
    }
  }
先ほど渡したonClickを呼び出し、ボタンを押したときにhandleClickとして呼び出します。
<h1 class="text-4xl m-8 mt-2">{{ count }}</h1>
この{{}}というダブル波カッコで関数名を囲うのもAngular独特な気がします。
慣れるまで忘れそう。
ポケモンAPIの取得(カウントアプリ)
pokemon.component.ts
import { Component, Input, SimpleChanges } from '@angular/core';
import { CommonModule } from '@angular/common';

@Component({
  selector: 'app-pokemon',
  standalone: true,
  imports: [CommonModule],
  template: `
    <p
      class="w-[96px] h-[96px] flex items-center justify-center"
      *ngIf="!loading && !pokemon"
    >
      No Pokemon found
    </p>
    <img
      class="w-[96px] h-[96px] flex items-center justify-center"
      *ngIf="pokemon && !loading"
      [src]="pokemon"
    />
    <p
      class="w-[96px] h-[96px] flex items-center justify-center"
      *ngIf="loading"
    >
      Loading...
    </p>
  `,
})
export class PokemonComponent {
  @Input() count = 1;
  pokemon: string | null = null;
  loading: boolean = false;

  ngOnChanges(changes: SimpleChanges) {
    if (changes['count']) {
      this.getPokemonImg();
    }
  }

  async getPokemonImg() {
    this.loading = true;
    const url = `https://pokeapi.co/api/v2/pokemon/${this.count}`;
    try {
      const response = await fetch(url);
      const data = await response.json();
      this.pokemon = data.sprites.front_default;
    } catch (error) {
      this.pokemon = null;
    } finally {
      this.loading = false;
    }
  }
}
Reactのfetchにあたる部分ですね。
公式ページとgptで作ったので自信ないですが、とりあえずうまくいきました。
基本はReactと同じでURLを取ってきてJSONに変えてるだけですね。
@Input() count = 1;
これは先ほどと同様もらって来たcountなのでcount.componentに合わせて変わります。
  ngOnChanges(changes: SimpleChanges) {
    if (changes['count']) {
      this.getPokemonImg();
    }
  }
これがuseEffectの第二引数にあたるものですね。
countの値が変わったらgetPokemonImg関数を発動させます。
クイズアプリ

import { Component , Input } from '@angular/core';
import { PokemonComponent } from '../pokemon/pokemon.component';
import { PokemonNameComponent } from "../pokemon-name/pokemon-name.component";


@Component({
  selector: 'app-quiz',
  standalone: true,
  imports: [PokemonComponent, PokemonNameComponent],
  templateUrl: './quiz.component.html',

})
export class QuizComponent {
  @Input() onClick: (() => void) | undefined;

  quiz1 = 1;
  quiz2 = 1;
  quiz3 = 1;
  quiz4 = 1;
  answer = 1;
  correct = '';

  ngOnInit() {
    this.restQuiz();
  }

  restQuiz() {
    const shuffledArray = this.shuffleArray([...Array(151).keys()].map(i => i + 1));
    this.quiz1 = shuffledArray[0];
    this.quiz2 = shuffledArray[1];
    this.quiz3 = shuffledArray[2];
    this.quiz4 = shuffledArray[3];
    const randomCorrect = Math.floor(Math.random() * 4);
    this.answer = shuffledArray[randomCorrect];
    this.correct = '';
  }

  answerClick(number: number) {
    if (number === this.answer) {
      this.correct = 'ゲット!';
    } else {
      this.correct = '逃げられた...';
    }
  }

  shuffleArray(array: number[]): number[] {
    for (let i = array.length - 1; i > 0; i--) {
      const randomIndex = Math.floor(Math.random() * (i + 1));
      [array[i], array[randomIndex]] = [array[randomIndex], array[i]];
    }
    return array;
  }


  handleClick() {
    if (this.onClick) {
      this.onClick();
    }
  }
}
<!DOCTYPE html>
<html>
    <button
      (click)="handleClick()"
      class="text-2xl border-2 border-black p-1 w-30 mt-4 ml-4"
    >
      TOPへ
    </button>

    <div class="flex flex-col items-center">
        <p class="text-3xl mt-10">名前を呼んでゲットしよう!</p>
        <app-pokemon [count]="answer"></app-pokemon>
        <app-pokemon-name [count]="quiz1" (click)="answerClick(quiz1)"></app-pokemon-name>
        <app-pokemon-name [count]="quiz2" (click)="answerClick(quiz2)"></app-pokemon-name>
        <app-pokemon-name [count]="quiz3" (click)="answerClick(quiz3)"></app-pokemon-name>
        <app-pokemon-name [count]="quiz4" (click)="answerClick(quiz4)"></app-pokemon-name>

        <p class="text-3xl pt-10">{{ correct }}</p>
        <button (click)="restQuiz()" class="text-2xl border-2 border-black p-1 w-30 mt-4 ml-4">
          次のポケモンに進む
        </button>
      </div>
</html>
 ngOnInit() {
    this.restQuiz();
  }
これがuseEffectの初回読み込み時です。
読み込み時にrestQuizを発動させます。
次のポケモンに進むボタンでも発動させます。
あとは先日作った関数をコピペしただけです。
ロジックは前回記事参照。
まとめ
以上になります。
Angularを学ぶにあたりかなり身構えていましたが、チュートリアルも1日で終わり、簡単なアプリが作れる自信もつきました。
まぁまだAngularの1%も理解していないと思いますが・・・
今までJavascriptとReactしか触ったことがなかったので初めて違う言語(フレームワーク)に触れました。
知識がつながっていく感じがして無駄にならないのがいいですよね。
これから何年エンジニアとして仕事が出来るかわかりませんが、楽しんでやれたらいいな。
ご覧いただきありがとうございました。
Discussion