【Cognito】ユーザープールとIDプールをCDKで管理する
はじめに
Cognitoを触っていると、コンソールから変更してそのままなことも多いのではないでしょうか?コンソールから変更しても問題ない場合はいいのですが、ステージング環境や本番環境をちゃんと分離しているようなアプリではなるべくコードで管理することが望ましいです。
そのため、本記事ではCDKでCognitoの管理をすることを目指します。
背景・やりたいこと・目的
背景・やりたいこと・目的は以下の通りです。
- 【背景】サービス/アプリの前提
- 単一のユーザープールに複数のアプリを紐付けて管理する
- アプリごとにユーザープールとIDプールを管理するのが煩雑・または意図を持って同じユーザープールとIDプールを使いたい
- アプリが増えるにつれてアプリクライアント・Cognitoグループ・IAMロールが増える
- 単一のユーザープールに複数のアプリを紐付けて管理する
- 【やりたいこと】
- 以下のCognitoのリソースをCDKで管理する
- Cognitoのユーザープール(Cognitoのグループ・アプリクライアント)
- IDプール
- IAMロール
- 以下のCognitoのリソースをCDKで管理する
- 【目的】
- アプリを追加した場合でも修正・管理しやすい状態を保つこと

AWSリソースへのアクセス権を持つような複数のアプリを追加するようなサービス
構成
拙作などでは、1つのファイルのStackにまとめて定義していました。
上記の記事のCDKの以下のような状態になります。これだと単一ファイルのコードが多くなって修正・管理づらく、特にアプリを追加したい場合は大変です。

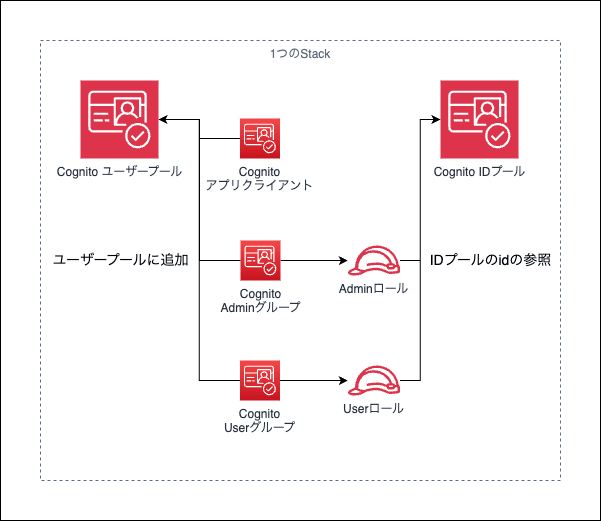
単一のStackに、複数のAWSリソースが管理されている
そのため、CDKのConstructを用いてアプリの追加・管理をしやすいように修正します。

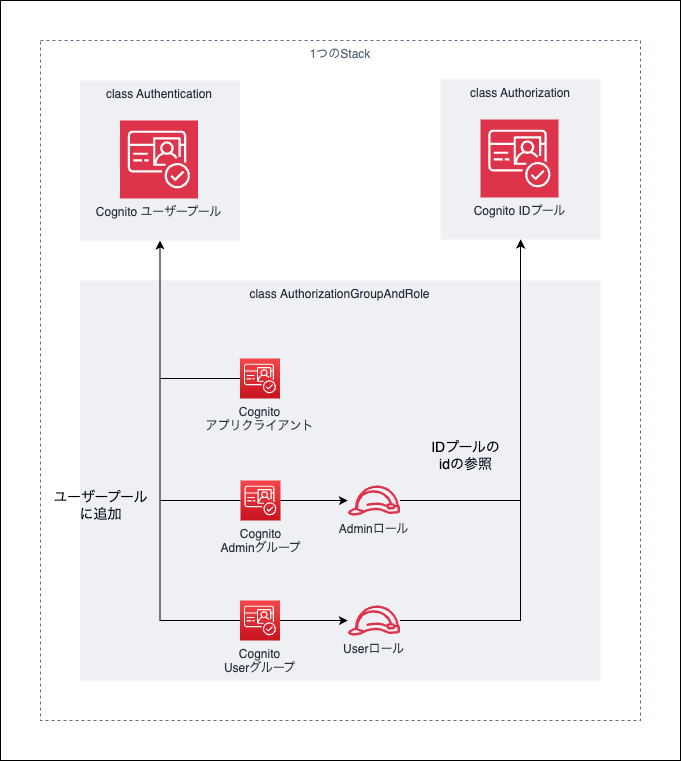
単一のStackではあるが、複数のAWSリソースがコンストラクトを1つの単位としてまとめられている
デプロイ環境
デプロイを実施した環境は以下のようになります。
- macOS: 14.2
- Node.js: 20.11.0
- AWS CDK: 2.127.0
コード
コードは以下のリポジトリにおいてあります。
ディレクトリ構成
.
├── bin
│  └── index.ts
├── cdk.json
├── lib
│  ├── auth-stack.ts 👈 ユーザープールとIDプール、CognitoグループなどをデプロイするStack
│  ├── constructs
│  │  ├── authentication.ts 👈 ユーザープールのConstruct
│  │  ├── authorization.ts 👈 IDプールのConstruct / Cognitoグループなどをまとめて管理するConstruct
│  │  └── common.ts
│  ├── index.ts
│  └── paramsExample.ts 👈 デプロイに必要なパラメータのサンプルファイル
├── package-lock.json
├── package.json
└── tsconfig.json
Constructs
まずはCognitoのユーザープールを作成するConstructのclass Authenticationです。ユーザープールを作成して、外部から参照できるようにuserPoolという変数を持っています。
ちなみに以下の記事を参考にして、CDKのidは全てパスカルケースにしています。
import { Duration, RemovalPolicy, aws_cognito } from "aws-cdk-lib";
import { Construct } from "constructs";
import { environment } from "./common";

interface AuthProps {
  environment: environment;
  servicePrefix: string;
  domainPrefix: string;
}

export class Authentication extends Construct {
  readonly userPool: aws_cognito.UserPool;

  constructor(scope: Construct, id: string, props: AuthProps) {
    super(scope, id);

    const { servicePrefix, environment } = props;
    const userPool = new aws_cognito.UserPool(this, "UserPool", {
      userPoolName: `${servicePrefix}-user-pool-${environment}`,
      // signUp
      // By default, self sign up is disabled. Otherwise use userInvitation
      selfSignUpEnabled: false,
      userVerification: {
        emailSubject: "Verify email message",
        emailBody: "Thanks for signing up! Your verification code is {####}",
        emailStyle: aws_cognito.VerificationEmailStyle.CODE,
        smsMessage: "Thanks for signing up! Your verification code is {####}",
      },
      // sign in
      signInAliases: {
        username: true,
        email: true,
      },
      // user attributes
      standardAttributes: {
        email: {
          required: true,
          mutable: true,
        },
      },
      // role, specify if you want
      mfa: aws_cognito.Mfa.OPTIONAL,
      mfaSecondFactor: {
        sms: true,
        otp: true,
      },
      passwordPolicy: {
        minLength: 8,
        requireLowercase: true,
        requireUppercase: true,
        requireDigits: true,
        requireSymbols: true,
        tempPasswordValidity: Duration.days(3),
      },
      // emails, by default `no-reply@verificationemail.com` used
      accountRecovery: aws_cognito.AccountRecovery.EMAIL_ONLY,
      removalPolicy: RemovalPolicy.DESTROY,
    });

    userPool.addDomain("CognitoDomain", {
      cognitoDomain: {
        domainPrefix: props.domainPrefix,
      },
    });

    this.userPool = userPool;
  }
}
次はIDプールを作成するコンストラクトclass Authorizationです。
初回デプロイ時には、IDプールのみを生成するだけのあまり意味を成さないコンストラクトになっています。次に紹介するコンストラクトclass AuthorizationGroupAndRoleと併用すると、IAMロールの紐付けなどができ意味が出てくるコンストラクトになっています。
import { aws_cognito, aws_iam } from "aws-cdk-lib";
import {
  IdentityPool,
  IdentityPoolProviderUrl,
  RoleMappingMatchType,
  RoleMappingRule,
  UserPoolAuthenticationProvider,
  IUserPoolAuthenticationProvider,
  IdentityPoolRoleMapping,
} from "@aws-cdk/aws-cognito-identitypool-alpha";
import { Construct } from "constructs";
import { environment } from "./common";

interface AuthorizationProps {
  environment: environment;
  servicePrefix: string;
  userPools?: IUserPoolAuthenticationProvider[];
  roleMappings?: IdentityPoolRoleMapping[];
}

export class Authorization extends Construct {
  constructor(scope: Construct, id: string, props: AuthorizationProps) {
    super(scope, id);

    const { environment, servicePrefix, userPools, roleMappings } = props;

    /** ID POOL */
    new IdentityPool(this, "IdentityPool", {
      identityPoolName: `${servicePrefix}-identity-pool-${environment}`,
      allowUnauthenticatedIdentities: false,
      authenticationProviders: {
        userPools,
      },
      roleMappings,
    });
  }
}
(後略)
最後に本記事で一番重要なコンストラクトclass AuthorizationGroupAndRoleの説明をします。このコンストラクトはあるアプリのアプリクライアントとCognitoグループ・IAMロールをまとめて作成しています。これまで出てきたclass Authenticationとclass AuthorizationはStackの中で1回だけ生成される想定ですが、このコンストラクトは追加するアプリの個数に合わせて生成することを想定しています。
プライベートクライアントは追加したアプリごとに利用する想定です。${servicePrefix}-PrivateClientのIDを付与している理由は、2回以上class AuthorizationGroupAndRoleのコンストラクを利用すると、IDが重複してデプロイできないためです。
付与しているポリシーは、API Gatewayへの特定のリソースへのアクセスと、S3の特定のディレクトリ以下のみアクセスを付与する権限になっています。アクセスを許可しているリソースなどは前回の記事などをそのまま流用しています。
(前略)
interface AuthorizationGroupAndRoleProps {
  environment: environment;
  servicePrefix: string;
  userPool: aws_cognito.UserPool;
  callbackUrls: string[];
  logoutUrls: string[];
  idPool: {
    adminRoleResources: string[];
    userRoleResources: string[];
    s3Bucket: string;
    idPoolId: `ap-northeast-1:${string}`;
  };
}

export class AuthorizationGroupAndRole extends Construct {
  readonly userPool: IUserPoolAuthenticationProvider;
  readonly roleMapping: IdentityPoolRoleMapping;

  constructor(scope: Construct, id: string, props: AuthorizationGroupAndRoleProps) {
    super(scope, id);

    const { environment, servicePrefix, userPool, callbackUrls, logoutUrls } = props;

    // App Clients
    const privateClient = userPool.addClient(`${servicePrefix}-PrivateClient`, {
      userPoolClientName: `${servicePrefix}-private-client`,
      generateSecret: true,
      authFlows: {
        userPassword: true,
        userSrp: true,
        adminUserPassword: true,
      },
      oAuth: {
        callbackUrls,
        logoutUrls,
        flows: {
          authorizationCodeGrant: true,
        },
        scopes: [aws_cognito.OAuthScope.OPENID, aws_cognito.OAuthScope.EMAIL],
      },
      preventUserExistenceErrors: true,
    });

    // IdentityPoolからassumeできるIAM Role
    const federatedPrincipal = new aws_iam.FederatedPrincipal(
      "cognito-identity.amazonaws.com",
      {
        StringEquals: {
          "cognito-identity.amazonaws.com:aud": props.idPool.idPoolId,
        },
        "ForAnyValue:StringLike": {
          "cognito-identity.amazonaws.com:amr": "authenticated",
        },
      },
      "sts:AssumeRoleWithWebIdentity",
    );
    const adminRole = new aws_iam.Role(this, "AdminRole", {
      roleName: `${servicePrefix}-api-gateway-admin-role-${environment}`,
      assumedBy: federatedPrincipal,
      inlinePolicies: {
        executeApi: new aws_iam.PolicyDocument({
          statements: [
            // API Gatewayのリソースへのアクセス
            new aws_iam.PolicyStatement({
              effect: aws_iam.Effect.ALLOW,
              resources: props.idPool.adminRoleResources,
              actions: ["execute-api:Invoke"],
            }),
            // S3のリソースへのアクセス
            new aws_iam.PolicyStatement({
              effect: aws_iam.Effect.ALLOW,
              actions: ["s3:ListBucket"],
              resources: [`arn:aws:s3:::${props.idPool.s3Bucket}`],
              conditions: { StringLike: { "s3:prefix": ["cognito-test"] } },
            }),
            new aws_iam.PolicyStatement({
              effect: aws_iam.Effect.ALLOW,
              resources: [
                `arn:aws:s3:::${props.idPool.s3Bucket}/cognito-test/\${cognito-identity.amazonaws.com:sub}`,
                `arn:aws:s3:::${props.idPool.s3Bucket}/cognito-test/\${cognito-identity.amazonaws.com:sub}/*`,
              ],
              actions: ["s3:GetObject", "s3:PutObject", "s3:DeleteObject"],
            }),
          ],
        }),
      },
    });

    const userRole = new aws_iam.Role(this, "UserRole", {
      roleName: `${servicePrefix}-api-gateway-user-role-${environment}`,
      assumedBy: federatedPrincipal,
      inlinePolicies: {
        executeApi: new aws_iam.PolicyDocument({
          statements: [
            new aws_iam.PolicyStatement({
              effect: aws_iam.Effect.ALLOW,
              resources: props.idPool.userRoleResources,
              actions: ["execute-api:Invoke"],
            }),
            new aws_iam.PolicyStatement({
              effect: aws_iam.Effect.ALLOW,
              actions: ["s3:ListBucket"],
              resources: [`arn:aws:s3:::${props.idPool.s3Bucket}`],
              conditions: { StringLike: { "s3:prefix": ["cognito-test"] } },
            }),
            new aws_iam.PolicyStatement({
              effect: aws_iam.Effect.ALLOW,
              resources: [
                `arn:aws:s3:::${props.idPool.s3Bucket}/cognito-test/\${cognito-identity.amazonaws.com:sub}`,
                `arn:aws:s3:::${props.idPool.s3Bucket}/cognito-test/\${cognito-identity.amazonaws.com:sub}/*`,
              ],
              actions: ["s3:GetObject", "s3:PutObject", "s3:DeleteObject"],
            }),
          ],
        }),
      },
    });

    // Cognitoのグループ作成
    new aws_cognito.CfnUserPoolGroup(this, "AdminGroup", {
      userPoolId: userPool.userPoolId,
      description: "description",
      groupName: `${servicePrefix}-admin-group`,
      precedence: 0,
      roleArn: adminRole.roleArn,
    });
    new aws_cognito.CfnUserPoolGroup(this, "UserGroup", {
      userPoolId: userPool.userPoolId,
      description: "description",
      groupName: `${servicePrefix}-user-group`,
      precedence: 100,
      roleArn: userRole.roleArn,
    });

    const adminRMR: RoleMappingRule = {
      claim: "cognito:groups",
      claimValue: "admin",
      mappedRole: adminRole,
      matchType: RoleMappingMatchType.CONTAINS,
    };
    const userRMR: RoleMappingRule = {
      claim: "cognito:groups",
      claimValue: "user",
      mappedRole: userRole,
      matchType: RoleMappingMatchType.CONTAINS,
    };

    // Authorizationで利用しやすくするための変数定義
    this.userPool = new UserPoolAuthenticationProvider({
      userPool,
      userPoolClient: privateClient,
    });
    this.roleMapping = {
      providerUrl: IdentityPoolProviderUrl.userPool(
        `cognito-idp.ap-northeast-1.amazonaws.com/${userPool.userPoolId}:${privateClient.userPoolClientId}`,
      ),
      useToken: false,
      mappingKey: servicePrefix,
      resolveAmbiguousRoles: false,
      // 新しいアプリを追加する場合は、ここにmappingを追加すること
      rules: [adminRMR, userRMR],
    };
  }
}
デプロイ
ユーザープールとIDプールを作成したStackをデプロイ
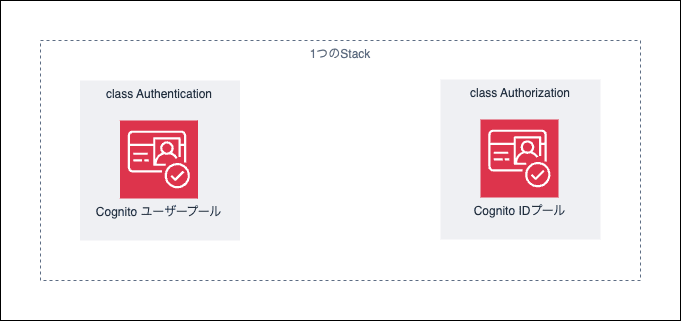
最初に、ユーザープールとIDプールのみを記述したStackをデプロイします。紹介する構成ではデプロイを2回に分ける必要があり、まずコンストラクトのclass Authenticationとclass Authorizationをデプロイします。2回に分けてデプロイする理由は後述します。

以下のAuthStackをデプロイすると作成されるAWSリソース
import { Stack, StackProps } from "aws-cdk-lib";
import { Construct } from "constructs";

import { Authentication } from "./constructs/authentication";
import { Authorization, AuthorizationGroupAndRole } from "./constructs/authorization";

export interface AuthStackProps {
  domainPrefix: string;
  idPoolId: `ap-northeast-1:${string}`;
  app1: {
    apigwId: string;
    s3Bucket: string;
  };
}

export class AuthStack extends Stack {
  constructor(scope: Construct, id: string, params: AuthStackProps, props: StackProps) {
    super(scope, id, props);

    const { domainPrefix } = params;
    const servicePrefix = "zenn-nextjs-authjs-cognito";
    const environment = "prod";
    const accountId = Stack.of(this).account;

    // 1: 認証
    const authentication = new Authentication(this, "Authentication", {
      environment,
      servicePrefix,
      domainPrefix,
    });

    // 2: 認可
    new Authorization(this, "Authorization", {
      environment,
      servicePrefix,
      // 以下の`userPools`と`roleMappings`は[]でOK
      userPools: [],
      roleMappings: [],
    });
  }
}
上記のStackを以下のコマンドで1回目のデプロイします。
$ cdk deploy zenn-example-auth
CognitoのグループやIAMロールを追加したStackのデプロイ
次に2回目のデプロイを実施し、CognitoのグループやIAMロールを作成します。2回に分けてデプロイするのは2つの理由があります。どちらもデプロイ時のリソースの有無によって起こるエラーを回避するためです。
1つ目は、Cognitoのユーザープールが存在しないとアプリクライアントの作成ができないためです。これは依存関係を追加してあげれば解決しそうなのですが2つ目の理由はどうしても回避できないためこのままの状態にしています。
2つ目は、IDプールのidであるidPoolIdがclass AuthorizationGroupAndRoleの引数に必要なのですが、IDプール作成後にしか取得できないためです。加えて、class Authorizationの引数にclass AuthorizationGroupAndRoleの結果が必要という循環参照が発生しているため2回デプロイしています。
import { Stack, StackProps } from "aws-cdk-lib";
import { Construct } from "constructs";

import { Authentication } from "./constructs/authentication";
import { Authorization, AuthorizationGroupAndRole } from "./constructs/authorization";

export interface AuthStackProps {
  domainPrefix: string;
  idPoolId: `ap-northeast-1:${string}`;
  app1: {
    apigwId: string;
    s3Bucket: string;
  };
}

export class AuthStack extends Stack {
  constructor(scope: Construct, id: string, params: AuthStackProps, props: StackProps) {
    super(scope, id, props);

    const { domainPrefix } = params;
    const servicePrefix = "zenn-nextjs-authjs-cognito";
    const environment = "prod";
    const accountId = Stack.of(this).account;

    // 1: 認証
    const authentication = new Authentication(this, "Authentication", {
      environment,
      servicePrefix,
      domainPrefix,
    });

+   // アプリ1
+   const app1AdminOnlyResource = (apigwRestApiId: string): string[] => {
+     return [
+       `arn:aws:execute-api:ap-northeast-1:${accountId}:${apigwRestApiId}/v1/GET/admin`,
+       `arn:aws:execute-api:ap-northeast-1:${accountId}:${apigwRestApiId}/v1/GET/read-file`,
+     ];
+   };
+   const app1UserOnlyResource = (apigwRestApiId: string): string[] => {
+     return [
+       `arn:aws:execute-api:ap-northeast-1:${accountId}:${apigwRestApiId}/v1/GET/user`,
+       `arn:aws:execute-api:ap-northeast-1:${accountId}:${apigwRestApiId}/v1/GET/read-file`,
+     ];
+   };
+   const app1Groups = new AuthorizationGroupAndRole(this, "App1", {
+     environment,
+     servicePrefix,
+     userPool: authentication.userPool,
+     callbackUrls: ["https://localhost:3000/api/auth/callback/cognito"],
+     logoutUrls: ["https://localhost:3000"],
+     idPool: {
+       adminRoleResources: app1AdminOnlyResource(params.app1.apigwId),
+       userRoleResources: app1UserOnlyResource(params.app1.apigwId),
+       s3Bucket: params.app1.s3Bucket,
+       idPoolId: params.idPoolId,
+     },
+   });

    // 2: 認可
    new Authorization(this, "Authorization", {
      environment,
      servicePrefix,
+     userPools: [app1Groups.userPool],
+     roleMappings: [app1Groups.roleMapping],
    });
  }
}
上記のStackを以下のコマンドで2回目のデプロイします。
$ cdk deploy zenn-example-auth
このデプロイが完了すると以下の図のようになります。

(再掲)
別のアプリを追加した場合のStackのデプロイ
アプリを増やす場合のコードは以下のようになります。
import { Stack, StackProps } from "aws-cdk-lib";
import { Construct } from "constructs";

import { Authentication } from "./constructs/authentication";
import { Authorization, AuthorizationGroupAndRole } from "./constructs/authorization";

export interface AuthStackProps {
  domainPrefix: string;
  idPoolId: `ap-northeast-1:${string}`;
  app1: {
    apigwId: string;
    s3Bucket: string;
  };
+ app2: {
+   apigwId: string;
+   s3Bucket: string;
+ };
}

export class AuthStack extends Stack {
  constructor(scope: Construct, id: string, params: AuthStackProps, props: StackProps) {
    super(scope, id, props);

    const { domainPrefix } = params;
    const servicePrefix = "zenn-nextjs-authjs-cognito";
    const environment = "prod";
    const accountId = Stack.of(this).account;

    // 1: 認証
    const authentication = new Authentication(this, "Authentication", {
      environment,
      servicePrefix,
      domainPrefix,
    });

    // アプリ1
    const app1AdminOnlyResource = (apigwRestApiId: string): string[] => {
      return [
        `arn:aws:execute-api:ap-northeast-1:${accountId}:${apigwRestApiId}/v1/GET/admin`,
        `arn:aws:execute-api:ap-northeast-1:${accountId}:${apigwRestApiId}/v1/GET/read-file`,
      ];
    };
    const app1UserOnlyResource = (apigwRestApiId: string): string[] => {
      return [
        `arn:aws:execute-api:ap-northeast-1:${accountId}:${apigwRestApiId}/v1/GET/user`,
        `arn:aws:execute-api:ap-northeast-1:${accountId}:${apigwRestApiId}/v1/GET/read-file`,
      ];
    };
    const app1Groups = new AuthorizationGroupAndRole(this, "App1", {
      environment,
      servicePrefix,
      userPool: authentication.userPool,
      callbackUrls: ["https://localhost:3000/api/auth/callback/cognito"],
      logoutUrls: ["https://localhost:3000"],
      idPool: {
        adminRoleResources: app1AdminOnlyResource(params.app1.apigwId),
        userRoleResources: app1UserOnlyResource(params.app1.apigwId),
        s3Bucket: params.app1.s3Bucket,
        idPoolId: params.idPoolId,
      },
    });

+   // アプリ2
+   const app2AdminOnlyResource = (apigwRestApiId: string): string[] => {
+     return [
+       `arn:aws:execute-api:ap-northeast-1:${accountId}:${apigwRestApiId}/v1/GET/admin`,
+       `arn:aws:execute-api:ap-northeast-1:${accountId}:${apigwRestApiId}/v1/GET/read-file`,
+     ];
+   };
+   const app2UserOnlyResource = (apigwRestApiId: string): string[] => {
+     return [
+       `arn:aws:execute-api:ap-northeast-1:${accountId}:${apigwRestApiId}/v1/GET/user`,
+       `arn:aws:execute-api:ap-northeast-1:${accountId}:${apigwRestApiId}/v1/GET/read-file`,
+     ];
+   };
+   const app2Groups = new AuthorizationGroupAndRole(this, "App2", {
+     environment,
+     servicePrefix: "app2",
+     userPool: authentication.userPool,
+     callbackUrls: ["https://localhost:3000/api/auth/callback/cognito"],
+     logoutUrls: ["https://localhost:3000"],
+     idPool: {
+       adminRoleResources: app2AdminOnlyResource(params.app2.apigwId),
+       userRoleResources: app2UserOnlyResource(params.app2.apigwId),
+       s3Bucket: params.app2.s3Bucket,
+       idPoolId: params.idPoolId,
+     },
+   });

    // 2: 認可
    new Authorization(this, "Authorization", {
      environment,
      servicePrefix,
+     userPools: [app1Groups.userPool, app2Groups.userPool],
+     roleMappings: [app1Groups.roleMapping, app2Groups.roleMapping],
    });
  }
}
このStackをデプロイすると以下のAWSリソースの状態になります。

2つのアプリを追加した状態
動作確認
IAMロールなどの動作確認は、本記事では実施しません。以下の記事などをご覧ください。
- API Gatewayの認可の動作確認
- S3への認可の動作確認
おわりに
IDプールとIAMロールの紐付けの関係上、Stackを修正して2回のデプロイが必要になってしまいます。デプロイが2回必要な点は微妙な点ですが、CognitoのグループやIAMロールは以前のよりかは増やしやすい構成です(もし、2回デプロイしなくてもいい方法があればコメントで教えてもらえると嬉しいです)。
また、現時点ではAPI GatewayとS3への認可を使ったアクセス制御をしましたが、DynamoDBでも細かく制御ができるみたいなのでそれに関しても触ってみたいです。
Discussion