CloudFrontで画像をリサイズしつつ配信する
はじめに
みなさん画像などの配信はCloudFrontを使っていますでしょうか?
様々な画像サイズのものをあらかじめ用意しておくのは大変だったりしないでしょうか?
AWSが公式に、動的に様々なサイズの画像を作成・配信する方法を公開しています。
元記事ではCloudFormationを利用していますが、CDKで書き直してみました。
提供されている関数も、リサイズ処理に関して修正しました。
利用時のイメージ
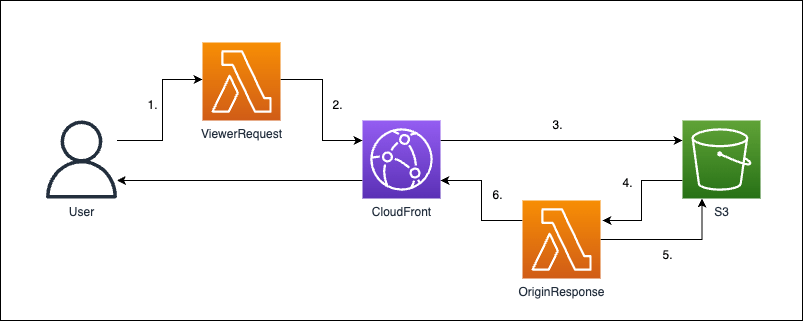
- サーバーに
https://your.domain.com/images/some_file.jpg?w=1280&h=960でアクセスし、S3へは/images/some_file.jpg?w=1280&h=960というURIを取得しに行く -
Lambda@EdgeにてURIが/images/w=1280&h=960&quality=50&ext=webp&fit=inside/webp/some_file.jpgに変換される - 変換されたURIでS3にアクセスする
- S3にファイルが存在した場合6.に飛び、存在しない場合は5.の処理を実施する
- 元々のアクセス先である
/images/some_file.jpgの画像を変換し、/images/w=1280&h=960&quality=50&ext=webp&fit=inside/webp/some_file.jpgへ保存する - 取得したファイルか、変換したファイルを返す
画像をリサイズした後に保存しておくことで、2回目以降のリサイズ処理は無くせます。
環境・料金
環境
- macOS: 13.4
- Node.js: 18.16
- AWS CDK: 2.85.0
料金
利用するCloudFrontとS3は余程のことがない限り0円で実行できます。
唯一、Route 53でドメインを利用する必要があり、そこだけ料金がかかります。
取得するドメインによっても変わりますが、年額で1500円〜程度です。
準備
Route 53とACMを設定する必要があります。
ドメインとACMは、以下の内容が設定されていれば大丈夫です。
詳しくはこちらの記事と同じ内容にしてください。
また、本記事では説明しませんが、環境にCDKv2を利用する準備も必要です。
コード
プログラムはGitHub: zenn-cloudfront-resize-imageにて公開してあります。
実際に動かしたい場合はcloneして実行してみてください。
ディレクトリ構成
ディレクトリ構成は以下のようになっています。
utils.jsとviewer_request.jsとorigin_response.jsが重要なファイルです。
XRegionParamの動作についてはこちらの記事をご覧ください。
/infrastructure/lib
├── lambda/
│  └── image_resize_node/
│     ├── origin_response.js 👈 変換後の画像がない場合に、リサイズ・保存を実施して画像を返す
│     ├── package.json
│     ├── utils.js 👈 querystringやURIの処理を実施するファイル
│     └── viewer_request.js 👈 リクエストのURIをパラメータを元に変更する
├── CloudFrontAssetsStack.ts
├── LambdaEdgeStack.ts
├── common.ts
├── index.ts
├── params.example.ts
├── params.ts
└── XRegionParam.ts
utils.jsとviewer_request.jsとorigin_response.jsのうちの重要な箇所を説明します。
AWSの元記事のコードからはかなり修正を加えています。
utils.jsについて
コード全体は長いので隠します。
実装されている3つの関数とその役割についてざっくり解説します。
decodeViewerRequestUri = (uri) => object
ユーザーがリクエストした/images/image.jpgなどのURIを以下のobjectに変換します。
変換したobjectはdecodeQuerystringの引数として利用されます。
{
  "prefix": "images",
  "imageName": "image",
  "extension": "jpg"
}
decodeQuerystring = (requestQuerystring, decodedUriObj) -> [object, object]
付与されたw=1280&h=960やw=1280&h=960&quality=50&ext=webp&fit=insideなどのクエリストリングにはバリデーションをします。
また、存在しない値はデフォルト値を付与した以下のようなobjectに変換します。
パラメータの意味としては、以下の通りです。
- widthとheight:画像の幅と高さ
- quality:画像変換時の品質
- targetExtension:画像変換時のフォーマット
- fit:画像変換時の方法
- パラメータは
cover, contain, fill, inside, outsideがある - 参考:Node.js の画像変換モジュール sharp の使い方(リサイズ)
- パラメータは
- querystring:デフォルト値などを含んだクエリストリングで、S3のパスとしても利用する
{
  "width": 1280,
  "height": 960,
  "quality": 50,
  "targetExtension": "webp",
  "fit": "inside",
  "querystring": "w=1280&h=960&quality=50&ext=webp&fit=inside"
}
decodeOriginResponseUri = (uri) => object
VierwerRequestで変換された/images/w=1280&h=960&quality=50&ext=webp&fit=inside/image.jpgなどのURIを元に、
正規表現を使って元のS3のパスやパラメータを取得するための関数です。
返り値としては、以下のようになります。
重要なのはoriginalKeyで、初回アクセス時のリサイズ後の画像がない場合にはその値を使ってオリジナルの画像を取得します。
{
  "prefix": "images",
  "imageName": "image",
  "extension": "jpg",
  "width": 1280,
  "height": 960,
  "quality": 50,
  "targetExtension": "webp",
  "fit": "inside",
  "originalKey": "images/image.jpg"
}
utils.jsのコード全体。
'use strict';
const querystring = require('querystring');

const MAX_WIDTH = 1280;
const MAX_HEIGHT = 960;
const SKIP_EXTENSION = ["svg"];
const limitations = {
  allowed: {
    dimensions: [{w: 150, h: 210}, {w: 320, h: 240}, {w: 1280, h: 960}],
    quality: [50, 100],
    extension: ["jpg", "jpeg", "png", "JPG", "webp"],
    fit: ["fill", "inside"]
  },
  default: {
    dimension: {w: 320, h: 240},
    quality: 100,
  },
  webpExtension: 'webp'
};


const decodeQuerystring = (requestQuerystring, decodedUriObj) => {
  const params = querystring.parse(requestQuerystring);
  const paramFit = params.fit ? params.fit : "inside"
  const paramWidth = (isNaN(parseInt(params.w)) || parseInt(params.w) <= 0) ? MAX_WIDTH : Math.min(parseInt(params.w), MAX_WIDTH);
  const paramHeight = (isNaN(parseInt(params.h)) || parseInt(params.h) <= 0) ? MAX_HEIGHT : Math.min(parseInt(params.h), MAX_HEIGHT);
  const paramQuality = (isNaN(parseInt(params.quality)) || parseInt(params.quality) <= 0 || parseInt(params.quality) > 100) ? limitations.default.quality : Math.min(parseInt(params.quality), limitations.default.quality);
  const paramExtension = params.ext ? params.ext : "webp"

  // リサイズ対応しない画像フォーマット
  if (SKIP_EXTENSION.includes(decodedUriObj.extension)) {
    // pass
    return [null, null];
  }
  // リサイズ対応画像チェック
  if (!limitations.allowed.extension.includes(decodedUriObj.extension)) {
    // pass
    return [null, null];
  }

  // Qualityの確認
  if (!limitations.allowed.quality.includes(paramQuality)) {
    const errorResponse = {
      status: "500",
      headers: {
        "content-type": [{key: 'Content-Type', value: 'text/plain'}]
      },
      body: `${paramQuality} is not allowed`
    };
    return [null, errorResponse];
  }

  // リサイズ方法チェック
  if (!limitations.allowed.fit.includes(paramFit)) {
    const errorResponse = {
      status: "500",
      headers: {
        "content-type": [{key: 'Content-Type', value: 'text/plain'}]
      },
      body: `${paramFit} is not allowed`
    };
    return [null, errorResponse];
  }

  let width = paramWidth;
  let height = paramHeight;

  let matchFound = false;
  for (let dimension of limitations.allowed.dimensions) {
    if (width === dimension.w && height === dimension.h) {
      matchFound = true;
      break;
    }
  }
  if (!matchFound) {
    width = limitations.default.dimension.w;
    height = limitations.default.dimension.h;
  }

  // 変換後のURI: /images/w=1280&h=960&quality=50&ext=webp&fit=inside/image.jpg
  const updatedQuerystring = `w=${width}&h=${height}&quality=${paramQuality}&ext=${paramExtension}&fit=${paramFit}`
  const decodeSuccessData = {
    width,
    height,
    quality: paramQuality,
    targetExtension: paramExtension,
    fit: paramFit,
    querystring: updatedQuerystring
  }
  console.log(`width: ${paramWidth} -> ${width}`)
  console.log(`height: ${paramHeight} -> ${height}`)
  console.log(`extension: ${paramExtension} -> fixed`)
  console.log(`quality: ${paramQuality} -> fixed`)
  console.log(`fit: ${paramFit} -> fixed`)
  console.log(`querystring: ${requestQuerystring} -> ${updatedQuerystring}`)

  // 成功した場合
  return [decodeSuccessData, null]
}

const decodeViewerRequestUri = (uri) => {
  // parse the prefix, image name and extension from the uri.
  // In our case /images/image.jpg
  const match = uri.match(/(.*)\/(.*)\.(.*)/);

  const prefix = match[1];
  const imageName = match[2];
  const extension = match[3];
  console.log(`prefix: ${prefix}, imageName: ${imageName}, extension: ${extension}`)

  return {
    prefix,
    imageName,
    extension,
  }
}

const decodeOriginResponseUri = (uri) => {
  // URIをデコードする
  // 例: images/w=${width}&h=${height}&quality=${paramQuality}&ext=webp&fit=${paramFit}/image.jpg
  try {
    const match = uri.match(/(.*)\/w=(\d+)&h=(\d+)&quality=(\d+)&ext=(.*)&fit=(.*)\/(.*)\.(.*)/);
    const prefix = match[1];
    const width = parseInt(match[2], 10);
    const height = parseInt(match[3], 10);
    const quality = parseInt(match[4], 10);
    const targetExtension = match[5];
    const fit = match[6];
    const imageName = match[7];
    const extension = match[8];
    console.log(`prefix: ${prefix}, imageName: ${imageName}, extension: ${extension}`)

    return {
      prefix,
      imageName,
      extension,
      width,
      height,
      quality,
      targetExtension,
      fit,
      originalKey: `${prefix}/${imageName}.${extension}`
    }

  } catch (err) {
    // no prefix exist for image
    console.log("no prefix present..");
    const match = uri.match(/w=(\d+)&h=(\d+)&quality=(\d+)&ext=(.*)&fit=(.*)\/(.*)\.(.*)/);
    const prefix = ""
    const width = parseInt(match[1], 10);
    const height = parseInt(match[2], 10);
    const quality = parseInt(match[3], 10);
    const targetExtension = match[4];
    const fit = match[5];
    const imageName = match[7];
    const extension = match[8];

    return {
      prefix,
      imageName,
      extension,
      width,
      height,
      quality,
      targetExtension,
      fit,
      originalKey: `${imageName}.${extension}`
    }
  }
}

module.exports = {
  decodeQuerystring,
  decodeViewerRequestUri,
  decodeOriginResponseUri,
}
viewer_request.jsについて
viewer_request.jsでは、アクセスするURIを変更しています。
例えば、/images/some_file.jpg?w=1280&h=960のURIへアクセスする場合を考えます。
この場合は、/images/w=1280&h=960&quality=50&ext=webp&fit=inside/some_file.jpgというURIに変換して
CloudFrontへリクエストを投げるようにします。
変換されたURIには、アクセス時に付与したw=1280&h=960というパラメータ以外にも、
ext=webpやfit=insideなどのパラメータが付与されるようになっています。
これらは、画像変換時のパラメータでOriginResponseにて利用されます。
viewer_request.jsのコードは短く比較的わかりやすいのでそのまま全て載せます。
'use strict';

const utils = require('utils')

exports.handler = (event, context, callback) => {
  const request = event.Records[0].cf.request;

  // 変換前のURIはここで取得している
  // 例:/images/some_file.jpg
  let fwdUri = request.uri;
  console.log(`requestUri: ${fwdUri}`)

  // 上記の関数を利用して、URIとquerystringのデコードを実施
  const decodedUriObj = utils.decodeViewerRequestUri(fwdUri)
  const [decodeSuccessData, errorResponse] = utils.decodeQuerystring(request.querystring, decodedUriObj)
  if (errorResponse) {
    callback(null, errorResponse);
    return;
  }
  if (!decodeSuccessData && !errorResponse) {
    callback(null, request);
    return;
  }

  // 変換後のURIはここで組み立てている
  // 例:/images/w=1280&h=960&quality=50&ext=webp&fit=inside/some_file.jpg
  const convertedUri = `${decodedUriObj.prefix}/${decodeSuccessData.querystring}/${decodedUriObj.imageName}.${decodedUriObj.extension}`
  request.uri = convertedUri;
  request.querystring = decodeSuccessData.querystring
  console.log(`converted: ${convertedUri}`)
  callback(null, request);
};
origin_response.jsについて
origin_response.jsでは、S3からの画像の取得状況に応じて以下のような挙動をします。
- ファイルが存在した場合(
response.statusが200の場合)- 何もせずに結果をそのまま返す
- ファイルが存在しない場合(
response.statusが403や404の場合)- 元のURIにアクセスして画像を取得
- 取得した画像のリサイズ
- リサイズした画像の保存
- 結果を返す
これによって、画像をリサイズしつつ画像を保存し結果を返すということができています。
origin_response.jsのコード全体。
'use strict';

const AWS = require('aws-sdk');
const S3 = new AWS.S3({region: "ap-northeast-1"});
const Sharp = require('sharp');
const utils = require('utils')

// Lambda@Edgeでは環境変数が利用できないためハードコードする
const BUCKET = 'your-bucket-here';

exports.handler = (event, context, callback) => {
  const response = event.Records[0].cf.response;

  console.log(`Response status code: ${response.status}`);

  // 画像が存在しない場合
  if (response.status === 403 || response.status === 404 || response.status === "403" || response.status === "404") {

    const request = event.Records[0].cf.request;
    const requestQuerystring = request.querystring;
    console.log(`querystring: ${request.querystring}`)
    // クエリストリングがない場合には、そのままレスポンスを返す(リサイズ処理をしないため)
    if (requestQuerystring === "") {
      callback(null, response);
      return;
    }

    // 以下のようなパスを取得する
    // 例:/images/w=${width}&h=${height}&quality=${paramQuality}&ext=webp&fit=${paramFit}/image.jpg
    const requestUri = request.uri;
    // 先頭の/を削除する
    // 例:images/w=${width}&h=${height}&quality=${paramQuality}&ext=webp&fit=${paramFit}/image.jpg
    const subRequestUri = requestUri.substring(1);
    console.log(`requestUri: ${requestUri} -> subRequestUri: ${subRequestUri}`)

    const decodedUriObj = utils.decodeOriginResponseUri(subRequestUri)
    const {
      prefix,
      originalKey,
      imageName,
      extension,
      width,
      height,
      quality,
      targetExtension,
      fit,
    } = decodedUriObj
    console.log(`w=${width}, h=${height}, originalKey: ${originalKey}, requiredFormat: ${targetExtension}, imageName: ${imageName}`)

    // 元ファイルを取得する
    S3.getObject({Bucket: BUCKET, Key: originalKey}).promise()
      .then(data => Sharp(data.Body)
        .resize({width: width, height: height, fit: fit})
      )
      .then(image => {
        if (targetExtension === "webp") {
          return image.webp({quality: quality}).toBuffer();
        } else if (targetExtension === "png") {
          return image.png().toBuffer();
        } else if (targetExtension === "jpg" || targetExtension === "jpeg") {
          return image.jpeg({quality: quality}).toBuffer();
        } else {
          callback(null, request);
        }
      })
      .then(buffer => {
        // 変換後の画像ファイルをS3に保存する
        S3.putObject({
          Body: buffer,
          Bucket: BUCKET,
          ContentType: 'image/' + targetExtension,
          CacheControl: 'max-age=31536000',
          Key: subRequestUri,
          StorageClass: 'STANDARD'
        }).promise()
          .catch(() => {
            console.log("Exception while writing resized image to bucket")
          });

        // 変換後の画像ファイルをそのままCloudFrontからのレスポンスとして利用する
        response.status = 200;
        response.body = buffer.toString('base64');
        response.bodyEncoding = 'base64';
        response.headers['content-type'] = [{key: 'Content-Type', value: 'image/' + targetExtension}];
        callback(null, response);
      })
      .catch(err => {
        console.log("Exception while reading source image :%j", err);
      });
  }
  else {
    // 画像が存在する場合
    callback(null, response);
  }
};
デプロイ
コードの説明は終わったのでデプロイして挙動を確かめてみます。
デプロイに必要なパラメータの付与
デプロイの前にパラメータの設定します。
infrastructure/lib/に保存されているparamsExample.tsをコピーしてparams.tsを作成します。
$ cd infrastructure/lib
$ cp paramsExample.ts params.ts
以下のparams.tsにある項目を更新します。
import { IAssetsLambdaEdgeStack } from './LambdaEdgeStack'
import { ICfAssetsStack } from './CloudFrontAssetsStack';
import { Environment } from 'aws-cdk-lib';

- const accountId: string = "000011112222"
- const s3BucketName: string = "your-buket"
+ const accountId: string = "777788889999"
+ const s3BucketName: string = "assets-bucket"

export const cfAssetsParams: ICfAssetsStack = {
  cloudfront: {
-   certificate: "arn:aws:acm:us-east-1:000011112222:certificate/aaaabbbb-cccc-dddd-eeee-ffffgggghhhh",
+   certificate: "arn:aws:acm:us-east-1:777788889999:certificate/iiiijjjj-kkkk-llll-mmmm-ooooppppqqqq",
-   route53DomainName: "your.domain.com",
-   route53RecordName: "record.your.domain.com",
+   route53DomainName: "example.com",
+   route53RecordName: "assets.example.com",
    s3BucketName,
  }
}

export const assetsLambdaEdgeParams: IAssetsLambdaEdgeStack = {
  s3BucketName
}

export const envApNortheast1: Environment = {
  account: accountId,
  region: "ap-northeast-1"
}

export const envUsEast1: Environment = {
  account: accountId,
  region: "us-east-1"
}
加えて、利用する言語に応じてBucketの名前を直接記述してください。
Lambda@Edgeでは環境変数が利用できないためです。
以下のファイルを変更してください。
~~ 前略 ~~

const Sharp = require('sharp');

// set the S3 endpoints
- const BUCKET = 'your-bucket-here';
+ const BUCKET = 'assets-bucket';

exports.handler = (event, context, callback) => {

~~ 後略 ~~
デプロイ実行
上記の準備が終わったら、デプロイをします。
デプロイは以下のコマンドを実行するだけです。
# /infrastructureディレクトリにて実行
$ cdk deploy zenn-cf-resize-cloudfront
上記のコマンドで、addDependencyでnodeのLambda@Edgeもデプロイされます。
デプロイが完了したら、CloudFrontの画面に行き「オリジン」→「編集」を押下します。

「はい、バケットポリシーを自動で更新します」を選択して「変更を保存」を押下してください。

こうすることで、CloudFrontからS3へのアクセスをOAIを介してアクセスできます。
挙動の確認
挙動の確認方法としては、適当な画像をS3にアップロードしてアクセスしてみてください。
その際に、URLの末尾に?w=1280&h=960などとするとリサイズ処理をかけることができます。
そして、S3にも変換後のファイルが保存されているかの確認もしてください。
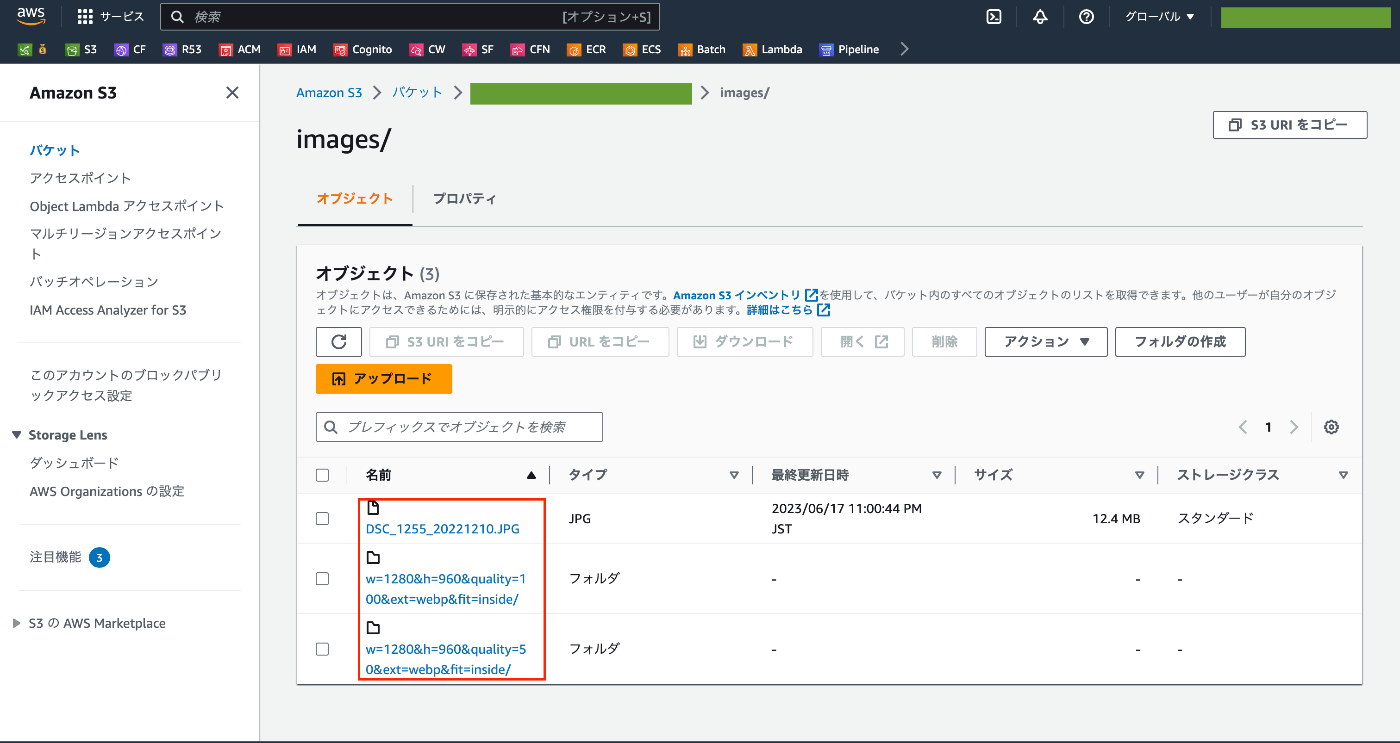
以下が実際にリサイズ画像が保存されたS3になります。
赤枠で囲われたフォルダが新規作成されてその下にリサイズ画像が保存されています。
リソースの削除
テストなどで作成する場合は、以下のコマンドを実行してリソースを削除してください。
削除時には、Lambda@Edgeを利用している関係で、少し時間がかかります。
$ cdk destroy
おわりに
画像のリクエスト時にリサイズして保存して、配信する仕組みを紹介しました。色々と制約もあって完全に全てのケースを網羅できるわけではないですが、誰かの役に立てれば幸いです。
余談ですが、元々はnode版だけではなくPython版のLambda@Edgeも作成していました。ただ、PythonのPillowがJSのSharpに比べると使いづらかったので、Python版は削除しました。
世の中に、JS版の同じような記事をよく見かける理由がなんとなくわかりました。
Discussion