Cloud Runの通信をSecure Web Proxy経由にしてみた
今年、Secure Web Proxy(SWP)というマネージドサービスがGAとなりました。
これを使用することでGoogle Cloudからの下り(外向き)の通信を保護することが可能です。
公式ドキュメントのクイックスタートではVPC内のComputeEngineからSWP経由で外部とアクセスする手順が紹介されています。
本記事ではサーバーレス製品(Cloud Run)からのSWPを使用する手順を試してみます。
SWPを構成する
既にSWPを構築済みの方はSkipしてください。
実施する内容は初期設定のステップとSecure Web Proxyインスタンスをデプロイするの内容と同一ですが本記事ではTerraformで構成してみます。
SSL証明書を作成する
SSL 証明書を作成してアップロードするの手順通りに鍵と証明書を作成します。
なおCertificate ManagerへのアップロードはTerraformにて実施するのでここでは不要です。
Terraformの準備
Terraformのバージョンは以下のとおりです。
$ terraform version
Terraform v1.6.5
on linux_amd64
tfファイルの作成
provider.tfでGoogle Cloudの環境を設定します。
provider "google" {
  project     = "プロジェクトIDに書き換えてください"
}
main.tfで以下のことを実施します。
- Certificate Managerへ鍵と証明書をアップロード
- VPCの作成
- サブネットワークの作成
- プロキシ専用サブネットの作成
- Secure Web Proxyポリシーの作成
- Secure Web Proxyルールを作成
- Secure Web Proxyの作成
- GCEにSSHするためのファイアーウォールのルール
こうして作成されるSWPでは以下のような挙動を期待しています。
- SWPを経由するifconfig.co宛の通信は許可されているので通信が可能
- SWPを経由するifconfig宛以外(例えばexample.com)の通信は許可されていないので拒否される
resource "google_certificate_manager_certificate" "default" {
  name     = "my-certificate"
  location = "us-central1"
  self_managed {
    pem_certificate = file("cert.pem")
    pem_private_key = file("key.pem")
  }
}

resource "google_compute_network" "default" {
  name                    = "my-network"
  routing_mode            = "REGIONAL"
  auto_create_subnetworks = false
}

resource "google_compute_subnetwork" "default" {
  name          = "my-subnetwork"
  purpose       = "PRIVATE"
  ip_cidr_range = "10.128.0.0/20"
  region        = "us-central1"
  network       = google_compute_network.default.id
  role          = "ACTIVE"
}

resource "google_compute_subnetwork" "proxyonlysubnet" {
  name          = "my-proxy-only-subnetwork"
  purpose       = "REGIONAL_MANAGED_PROXY"
  ip_cidr_range = "192.168.0.0/23"
  region        = "us-central1"
  network       = google_compute_network.default.id
  role          = "ACTIVE"
}

resource "google_network_security_gateway_security_policy" "default" {
  name     = "my-policy-name"
  location = "us-central1"
}

resource "google_network_security_gateway_security_policy_rule" "default" {
  name                    = "my-policyrule-name"
  location                = "us-central1"
  gateway_security_policy = google_network_security_gateway_security_policy.default.name
  enabled                 = true
  priority                = 1
  session_matcher         = "host() == 'ifconfig.co'"
  basic_profile           = "ALLOW"
}

resource "google_network_services_gateway" "default" {
  name                                 = "myswp"
  location                             = "us-central1"
  addresses                            = ["10.128.0.99"]
  type                                 = "SECURE_WEB_GATEWAY"
  ports                                = [443]
  scope                                = "my-default-scope1"
  certificate_urls                     = [google_certificate_manager_certificate.default.id]
  gateway_security_policy              = google_network_security_gateway_security_policy.default.id
  network                              = google_compute_network.default.id
  subnetwork                           = google_compute_subnetwork.default.id
  delete_swg_autogen_router_on_destroy = true
  depends_on                           = [google_compute_subnetwork.proxyonlysubnet]
}

resource "google_compute_firewall" "ssh" {
  name = "allow-ssh"
  allow {
    ports    = ["22"]
    protocol = "tcp"
  }
  direction     = "INGRESS"
  network       = google_compute_network.default.id
  priority      = 1000
  source_ranges = ["0.0.0.0/0"]
}
Terraformを実行する
terraformを初期化したのち、terraformを実行します。
実行結果を全て記載すると長くなるため、ここでは割愛します。
$ terraform init
$ terraform plan
$ terraform apply
成功すると以下のようなメッセージが出力されます。
Apply complete! Resources: 8 added, 0 changed, 0 destroyed.
GCEによる確認
GCEをmy-subnetに作成してください。
sshで接続してcurlで接続確認を行います。
$ curl -x https://10.128.0.99:443 https://ifconfig.co --proxy-insecure
34.171.254.109
一方、許可されていないexample.comへの通信は拒否されます。
$ curl -x https://10.128.0.99:443 https://example.com --proxy-insecure
curl: (56) Received HTTP code 403 from proxy after CONNECT
SWPが期待通りの動作をしていることが確認できました。
サーバーレス環境からのSecure Web Proxy
SWPを利用するにはサーバーレス環境からプロキシ専用サブネットに到達できるように設定する必要があります。
サーバーレス環境からVPCにアクセスするには2つの方法があります。
- サーバーレスVPCアクセスを使用する
- Direct VPC egressを使用する
それぞれの機能の概要や違いについては以下の記事で解説されていますので、未読の方はぜひご覧ください。
改めて学ぶ Cloud Run の認証とネットワーク
よくわかる Cloud Run の VPC 接続の基本
今回はCloud Runから上記それぞれの方法でSWPを利用する方法を確認します。
サーバーレスVPCアクセスを使用する
サーバーレス VPC アクセスの作成からCloud Runでの疎通まで順を追って構成していきます。
サーバーレスVPCアクセスの構成
サーバーレスVPCアクセス用のサブネットの作成と、コネクタの作成を行うために以下のコードをmain.tfに追記します。
resource "google_compute_subnetwork" "connector" {
  name          = "vpc-con-sub"
  purpose       = "PRIVATE"
  ip_cidr_range = "10.10.10.0/28"
  region        = "us-central1"
  network       = google_compute_network.default.id
  role          = "ACTIVE"
}

resource "google_vpc_access_connector" "connector" {
  name          = "vpc-con"
  subnet {
    name = google_compute_subnetwork.connector.name
  }
  region        = "us-central1"
}
$ terraform plan
$ terraform apply
成功すると以下のようなメッセージが出力されます。
Apply complete! Resources: 2 added, 0 changed, 0 destroyed.
Cloud Runの構成
Cloud RunはGo言語で作成します。
適当なディレクトリを作成し、以下のコードをmain.goとして作成してください。
以下のコードでは2つのエンドポイントを作成しており、それぞれ以下のような処理を行っています。
| パス | メソッド | 処理 |
|---|---|---|
| /allow | GET | ifconfig.co/ipにアクセスして結果を返す |
| /deny | GET | example.comにアクセスして結果を返す |
/allowはSWPで許可されているので問題なく通信できますが、/denyはSWPで許可されていないので拒否される想定です。
package main

import (
	"fmt"
	"io"
	"log"
	"net/http"
	"os"
)

func main() {
	http.HandleFunc("/allow", handler1)
	http.HandleFunc("/deny", handler2)

	port := os.Getenv("PORT")
	if port == "" {
		port = "8080"
		log.Printf("defaulting to port %s", port)
	}

	log.Printf("listening on port %s", port)
	if err := http.ListenAndServe(":"+port, nil); err != nil {
		log.Fatal(err)
	}

}

func handler1(w http.ResponseWriter, r *http.Request) {
	res, err := http.Get("https://ifconfig.co/ip")
	if err != nil {
		log.Fatal(err)
	}

	body, _ := io.ReadAll(res.Body)
	fmt.Fprint(w, string(body))
}

func handler2(w http.ResponseWriter, r *http.Request) {
	res, err := http.Get("https://example.com")
	if err != nil {
		log.Fatal(err)
	}

	body, _ := io.ReadAll(res.Body)
	fmt.Fprint(w, string(body))
}
main.goが格納されたディレクトリで以下のコマンドを実行してCloud Runにデプロイを行います。
gcloud run deploy swp-test \
--allow-unauthenticated \
--vpc-connector=vpc-con \
--region=us-central1 \
--set-env-vars HTTP_PROXY=http://10.128.0.99:443,HTTPS_PROXY=http://10.128.0.99:443 \
--source=.
ここでのポイントは--set-env-varsオプションで環境変数としてSecure Web Proxyの値を設定していることです。
(10.128.0.99はTerraformで設定したSWPのIPアドレスです)
Go言語のnet/httpではHTTP_PROXY, HTTPS_PROXYの環境変数を設定すると、そのプロキシを経由して通信を行うためです。
動作確認
デプロイしたCloud Runにcurlを実行して動作確認を行います。
$ curl https://swp-test-a2izthvhta-uc.a.run.app/allow
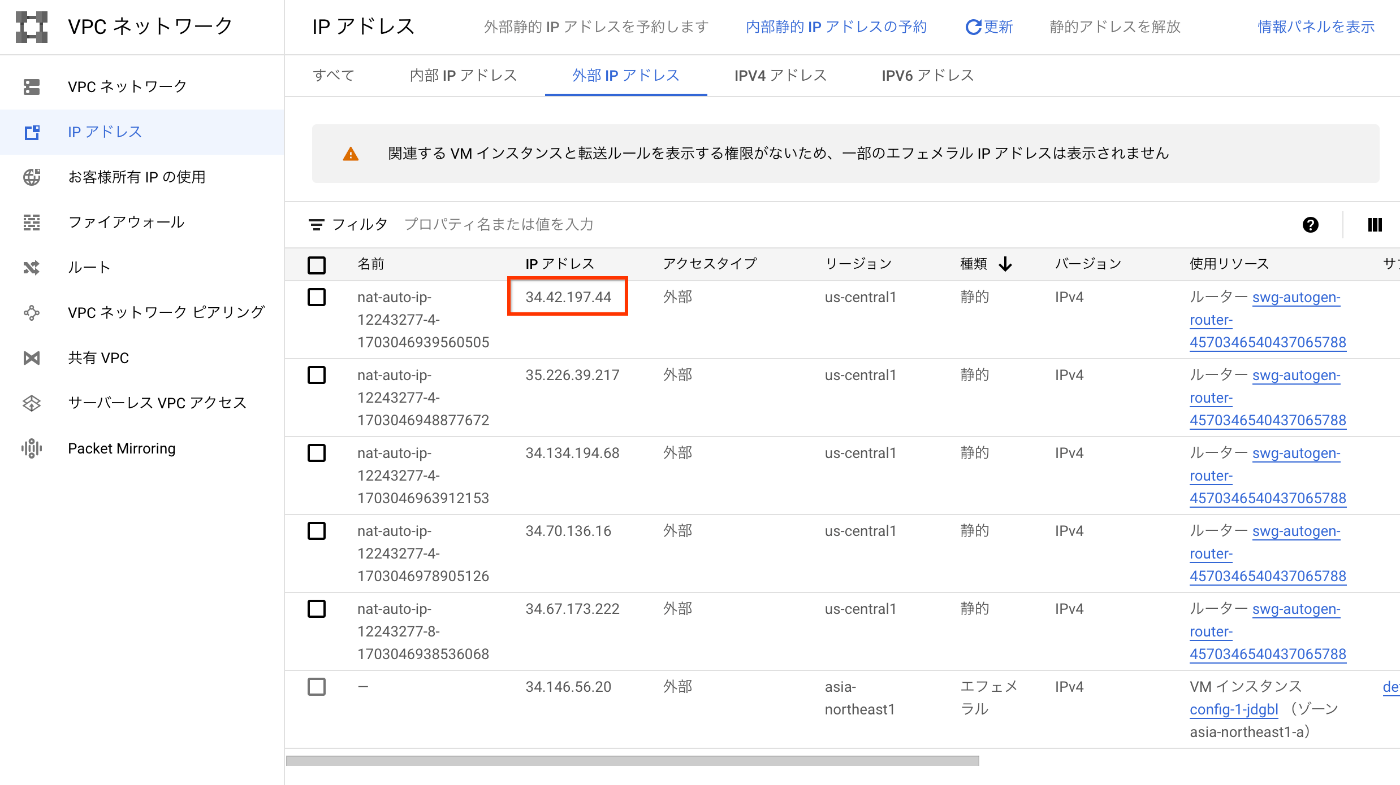
34.42.197.44
/allowの場合はSWPで許可されているのでIPアドレスが返ってきました。
SWPはCloud NAT, Cloud Routerを自動作成し、NATされるIPアドレスは「VPCネットワーク」->「IPアドレス」のページで確認することができます。

一方、/denyの場合はSWPで通信が拒否されるのでService Unavailableとなります。
$ curl https://swp-test-a2izthvhta-uc.a.run.app/deny
Service Unavailable
ログエクスプローラーで以下を実行するとexample.comがSWPによって拒否されていることがわかります。
(プロジェクトIDは書き換えてください)
resource.type="networkservices.googleapis.com/Gateway"
resource.labels.gateway_type="SECURE_WEB_GATEWAY"
resource.labels.network_name="projects/<プロジェクトID>/global/networks/my-network"
resource.labels.gateway_name="myswp"
severity=WARNING
{
  "insertId": "bds5p4ezvux4",
  "jsonPayload": {
    "enforcedGatewaySecurityPolicy": {
      "matchedRules": [
        {
          "name": "default_denied",
          "action": "DENIED"
        }
      ],
      "hostname": "example.com:443"
    },
    "@type": "type.googleapis.com/google.cloud.loadbalancing.type.LoadBalancerLogEntry"
  },
  "httpRequest": {
    "requestMethod": "CONNECT",
    "requestSize": "91",
    "status": 403,
    "responseSize": "141",
    "userAgent": "Go-http-client/1.1",
    "remoteIp": "10.10.10.3:56682",
    "latency": "0.000101s",
    "protocol": "HTTP/1.1"
  },
  "resource": {
    "type": "networkservices.googleapis.com/Gateway",
    "labels": {
      "resource_container": "",
      "network_name": "projects/<プロジェクトID>/global/networks/my-network",
      "location": "us-central1",
      "gateway_type": "SECURE_WEB_GATEWAY",
      "gateway_name": "myswp"
    }
  },
  "timestamp": "2023-12-20T06:43:13.268068Z",
  "severity": "WARNING",
  "logName": "projects/<プロジェクトID>/logs/networkservices.googleapis.com%2Fgateway_requests",
  "receiveTimestamp": "2023-12-20T06:43:18.859812345Z"
}
Direct VPC egressを使用する
Direct VPC egressでSWPを利用するように順を追って構成していきます。
Cloud Runの構成
サーバーレスVPCアクセスと同じGo言語を利用します。
main.goが格納されたディレクトリで以下のコマンドを実行してCloud Runにデプロイを行います。
Cloud Runのサービス名をswp-directに変更しています。
Direct VPC egressを使用するようにCloud Runを作成するにはオプションで--networkと--subnetを指定してください。
(--subnetはTerraformで作成したmy-subnetworkを使用します)
gcloud beta run deploy swp-direct \
--allow-unauthenticated \
--network=my-network \
--subnet=my-subnetwork \
--region=us-central1 \
--set-env-vars HTTP_PROXY=http://10.128.0.99:443,HTTPS_PROXY=http://10.128.0.99:443 \
--source=.
動作確認
デプロイしたCloud Runにcurlを実行して動作確認を行います。
$ curl https://swp-direct-a2izthvhta-uc.a.run.app/allow
34.42.197.44
/allowの場合はSWPで許可されているのでIPアドレスが返ってきました。
一方、/denyの場合はSWPで通信が拒否されるのでService Unavailableとなります。
$ curl https://swp-direct-a2izthvhta-uc.a.run.app/deny
Service Unavailable
ログエクスプローラーで以下を実行するとexample.comがSWPによって拒否されていることがわかります。
(プロジェクトIDは書き換えてください)
resource.type="networkservices.googleapis.com/Gateway"
resource.labels.gateway_type="SECURE_WEB_GATEWAY"
resource.labels.network_name="projects/<プロジェクトID>/global/networks/my-network"
resource.labels.gateway_name="myswp"
severity=WARNING
{
  "insertId": "jpgmx5eh9qfk",
  "jsonPayload": {
    "@type": "type.googleapis.com/google.cloud.loadbalancing.type.LoadBalancerLogEntry",
    "enforcedGatewaySecurityPolicy": {
      "matchedRules": [
        {
          "action": "DENIED",
          "name": "default_denied"
        }
      ],
      "hostname": "example.com:443"
    }
  },
  "httpRequest": {
    "requestMethod": "CONNECT",
    "requestSize": "91",
    "status": 403,
    "responseSize": "141",
    "userAgent": "Go-http-client/1.1",
    "remoteIp": "10.128.0.16:16220",
    "latency": "0.000101s",
    "protocol": "HTTP/1.1"
  },
  "resource": {
    "type": "networkservices.googleapis.com/Gateway",
    "labels": {
      "location": "us-central1",
      "gateway_type": "SECURE_WEB_GATEWAY",
      "network_name": "projects/<プロジェクトID>/global/networks/my-network",
      "gateway_name": "myswp",
      "resource_container": ""
    }
  },
  "timestamp": "2023-12-20T06:57:06.957659Z",
  "severity": "WARNING",
  "logName": "projects/<プロジェクトID>/logs/networkservices.googleapis.com%2Fgateway_requests",
  "receiveTimestamp": "2023-12-20T06:57:08.621860735Z"
}
クリーンアップ
検証が終わったら作成したものを削除しましょう。
特にSecure Web Proxyは$1.25/hourの料金が発生するので不要な方は確実に削除しましょう。
まとめ
このようにサーバーレス環境からSecure Web Proxyを利用することができるので、ぜひ積極的にSecure Web Proxyを利用してみてください!
Discussion