Next.jsをFirebase Hostingで使う
Next.jsをFirebase Hostingにホストする方法を説明します。
Setup Next.js & Firebase Hosting
Next.jsのexamplesのwith-firebase-hostingを使います。
npx create-next-app --example with-firebase-hosting with-firebase-hosting-app
Next.jsのプロジェクトが出来たら、firebase loginでFirebaseにログインします。
さらにテスト用のプロジェクトをFirebase Consoleで作成します。
Firebaseのプロジェクトを作ったら、firebase projects:listでProject IDを確認します。
ここで確認したIDを.firebasercに記述します。
{
  "projects": {
    "default": "your-project-id"
  }
}
以下のコマンドを実行して、ローカルでテストします。
npm run serve
http://localhost:5000にアプリがホストされます。
http://localhost:4000でエミュレータの管理画面が見られます。
動作が確認できたら以下のコマンドでFirebase Hostingにデプロイします。
npm run deploy
ここで、Error: Your project your-project-id must be on the Blaze (pay-as-you-go) plan to complete this command.が出る場合はプロジェクトをBlazeプランにしてください。詳細はこちら。
デプロイが完了すると、ホスト先のURLが表示されるので、このURLをブラウザで開きます。
もしページにYour client does not have permission to get URL /nextjsFunc/ from this server.が表示されるなら、この手順に従って、CloudFunctionsへのアクセス許可を追加してください。
TypeScript Settings
TypeScript化に当たって、Firebase Hosting特有の操作は必要ありません。公式の手順に従うのみです。
ただし、firebaseFunctions.jsはJavaScriptのままなので注意してください。
Usage
ここからはNext.jsの各機能をFirebase Hosting上での使い方や性能を説明します。基本的にはVercelにデプロイする場合と変わりませんが、Firebase Hosting特有の現象(Cold Start)やpublicディレクトリの扱いなどが異なります。
ざっくりとした内容を表にまとめました。
| Next.js関連機能 | 動作チェック | 備考 |
|---|---|---|
| SSG | ○ | |
| ISR | ☓ | ほぼ機能しない |
| SSR | △ | Cold Startで6秒待たされる |
| SWR | ○ | |
| Dynamic Routes | ○ | |
| next/image | ○ | publicフォルダの扱いに注意が必要 |
| next-pwa | ○ | publicフォルダの扱いに注意が必要 |
SSG
SSGはFirebase Hostingでも通常通り機能します
import React from 'react';
import { GetStaticProps } from 'next';
import Header from '@/components/Header';

const SSG = (props) => {
  return (
    <>
      <Header />
      {props.isStatic ? <p>SSG working</p> : <p>SSG not works</p>}
      <p>{`Build at: ${props.now}`}</p>
    </>
  );
};

export default SSG;

export const getStaticProps: GetStaticProps = async () => {
  return {
    props: {
      isStatic: true,
      now: new Date().toISOString(),
    },
  };
};
ISR
ISRは機能しません。以下のコードでデプロイしてもデプロイ時にしかビルドが実行されていないことが時刻から確認できます。
import React from 'react';
import { GetStaticProps } from 'next';
import Header from '@/components/Header';

const ISR = (props) => {
  return (
    <>
      <Header />
      {props.isStatic ? <p>SSG working</p> : <p>SSG not works</p>}
      <p>{`Build at: ${props.now}`}</p>
    </>
  );
};

export default ISR;

export const getStaticProps: GetStaticProps = async () => {
  return {
    props: {
      isStatic: true,
      now: new Date().toISOString(),
    },
    revalidate: 10,
  };
};
この問題に関しては多くの方が挑戦されています。現状はstale-while-revalidate対応のCDNでISRのような挙動を模すのが限界のようです。ISRが必須要件であるなら、素直にVercelを使ったほうが良いです。
以下、偉大なる先人方の記録です。
SSR
SSRは問題なく実行できます。しかし、server側でJavaScriptを実行する都合上、Cloud FunctionsのCold Startによって応答までに数秒待たされるといった現象が発生します。
import React from 'react';
import { GetServerSideProps } from 'next';
import Header from '@/components/Header';

const SSR = (props) => {
  return (
    <>
      <Header />
      {props.isSSR ? <p>SSR working</p> : <p>SSR not works</p>}
      <p>{`Build at: ${props.now}`}</p>
    </>
  );
};

export default SSR;

export const getServerSideProps: GetServerSideProps = async () => {
  return {
    props: {
      isSSR: true,
      now: new Date().toISOString(),
    },
  };
};
下の画像はCold Startが発生した時にLighthouseを実行した結果です。

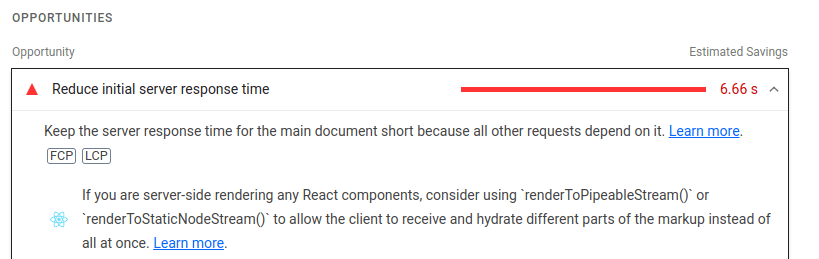
サーバーからの応答に6秒以上かかっているのが分かります。
ちなみにCold Startが発生していない時は以下のようなスコアです。


SSRでの安定したレスポンスを期待しているならば、Firebase Hostingは避けたほうが良さそうです。
もし更新頻度が高いコンポーネントだけを抜き出せるなら、SSGとSWRを組み合わせる方法の方が安定しそうです。
SWR
SWRに関しては特殊な設定の必要なく正常に動作しました。
以下、検証に使ったコードを残します。
SWR検証用コード
import React from 'react';
import useSWR from 'swr';
import Header from '@/components/Header';

interface AnimechanQuoteType {
  anime: string;
  character: string;
  quote: string;
}

const fetcher = async (
  input: RequestInfo,
  init?: RequestInit
): Promise<AnimechanQuoteType> => {
  const res = await fetch(input, init);
  return res.json();
};

const SWR = () => {
  const { data, error } = useSWR('/api/animechan', fetcher, {
    refreshInterval: 10000,
  });

  return (
    <>
      <Header />
      <div>SWR</div>
      <div>{data?.anime}</div>
      <div>{data?.character}</div>
      <div>{data?.quote}</div>
    </>
  );
};

export default SWR;
import { NextApiRequest, NextApiResponse } from 'next';
export default async function animechan(
  req: NextApiRequest,
  res: NextApiResponse
) {
  const response = await fetch(`https://animechan.vercel.app/api/random`);
  const quote = await response.json();
  res.json({
    ...quote,
  });
}
Dynamic Routes
Dynamic Routesでも使い方は変わりません。ただし、上の例で示したようにISRは機能せず、Cold Startによって引き起こされるSSRの遅延も同様に発生します。
next/image
next/imageを使う場合はデプロイ前に/src/publicの内容を/publicへ移動しておく必要があります。それ以外はVercelにデプロイする場合と変わりありません。
package.jsonのscriptに以下のように追加します。
{
  // ...
  "scripts": {
    // ...
    "copy": "rm -rf public/* && cp -r src/public/* public/",
    "serve": "npm run build && npm run copy && firebase emulators:start --only functions,hosting",
  },
}
firebase.jsonにも以下のように追加します
{
  //...
  "functions": {
    "source": ".",
    "predeploy": [
      "npm --prefix \"$PROJECT_DIR\" install",
      "npm --prefix \"$PROJECT_DIR\" run build",
      "npm --prefix \"$PROJECT_DIR\" run copy"
    ],
    "runtime": "nodejs16"
  }
}
この設定にすれば以下のように/foo.jpgで画像へのパスが通ります。
import React from 'react';
import Image from 'next/image';
import Header from '@/components/Header';

const NextImage = () => {
  return (
    <>
      <Header />
      <div>NextImage</div>
      <Image
        src="/foo.jpg"
        alt="test image"
        layout="responsive"
        width={500}
        height={500}
      />
    </>
  );
};

export default NextImage;
next-pwa
next-pwaを使ってPWAの設定を行う方法を解説します。/src/public/に生成されるsw.js, workbox-*.jsを/public/へコピーする点以外は通常のnext-pwaの設定と変わりません。
以下のコマンドでnext-pwaをインストールします。
npm install next-pwa
next.config.jsに設定を加えます。
/** @type {import('next').NextConfig} */
const runtimeCaching = require('next-pwa/cache');
const withPWA = require('next-pwa')({
  dest: 'public',
  runtimeCaching,
});

module.exports = withPWA({
  distDir: '../.next',
});
/src/public/manifest.jsonを追加します。
{
  "name": "Firebase Hosting test",
  "short_name": "FH test",
  "theme_color": "#ffffff",
  "background_color": "#7cc5fe",
  "display": "fullscreen",
  "orientation": "portrait",
  "scope": "/",
  "start_url": "/",
  "icons": [
    {
      "src": "icons/icon_x48.png",
      "sizes": "48x48",
      "type": "image/png",
      "purpose": "maskable any"
    },
    {
      "src": "icons/icon_x72.png",
      "sizes": "72x72",
      "type": "image/png",
      "purpose": "maskable any"
    },
    {
      "src": "icons/icon_x96.png",
      "sizes": "96x96",
      "type": "image/png",
      "purpose": "maskable any"
    },
    {
      "src": "icons/icon_x128.png",
      "sizes": "128x128",
      "type": "image/png",
      "purpose": "maskable any"
    },
    {
      "src": "icons/icon_x192.png",
      "sizes": "192x192",
      "type": "image/png",
      "purpose": "maskable any"
    },
    {
      "src": "icons/icon_x384.png",
      "sizes": "384x384",
      "type": "image/png",
      "purpose": "maskable any"
    },
    {
      "src": "icons/icon_x512.png",
      "sizes": "512x512",
      "type": "image/png",
      "purpose": "maskable any"
    },
    {
      "src": "icons/icon_x930.png",
      "sizes": "930x930",
      "type": "image/png",
      "purpose": "maskable any"
    }
  ],
  "splash_pages": null
}
maskable iconがない場合は以下のサイトで生成できます。
/src/pages/_app.tsxにnext/headでmanifest.jsonへのパスやアイコンを設定します。
import type { AppProps } from 'next/app';
import Head from 'next/head';
export default function MyApp({ Component, pageProps }: AppProps) {
return (
<>
<Head>
<meta charSet="utf-8" />
<meta
name="viewport"
content="width=device-width,initial-scale=1,minimum-scale=1,maximum-scale=1,user-scalable=no"
/>
<meta name="description" content="Description" />
<meta name="keywords" content="Keywords" />
<title>Next.js PWA Example</title>
{/* settings for PWA */}
<link rel="manifest" href="/manifest.json" />
<link
href="/icons/icon_x48.png"
rel="icon"
type="image/png"
sizes="48x48"
/>
<link
href="/icons/icon_x72.png"
rel="icon"
type="image/png"
sizes="72x72"
/>
<link
href="/icons/icon_x96.png"
rel="icon"
type="image/png"
sizes="96x96"
/>
<link
href="/icons/icon_x128.png"
rel="icon"
type="image/png"
sizes="128x128"
/>
<link
href="/icons/icon_x192.png"
rel="icon"
type="image/png"
sizes="192x192"
/>
<link
href="/icons/icon_x384.png"
rel="icon"
type="image/png"
sizes="384x384"
/>
<link
href="/icons/icon_x512.png"
rel="icon"
type="image/png"
sizes="512x512"
/>
<link
href="/icons/icon_x930.png"
rel="icon"
type="image/png"
sizes="930x930"
/>
<meta name="theme-color" content="#7cc5fe" />
{/* settings for apple */}
<link
rel="apple-touch-icon"
href="/icons/icon_x384.png"
sizes="384x384"
/>
</Head>
<Component {...pageProps} />
</>
);
}
最後にserveやdeploy時に/src/public/の中身を/public/にコピーするスクリプト(npm run copy)をpackage.jsonとfirebase.jsonに書きます。
"scripts": {
    "dev": "next src/",
    "build": "next build src/",
    "start": "next start src/",
    "lint": "next lint src/",
    "copy": "rm -rf public/* && cp -r src/public/* public/",
    "serve": "npm run build && npm run copy && firebase emulators:start --only functions,hosting",
    "shell": "npm run build && npm run copy && firebase functions:shell",
    "deploy": "firebase deploy --only functions,hosting",
    "logs": "firebase functions:log"
  },
"functions": {
    "source": ".",
    "predeploy": [
      "npm --prefix \"$PROJECT_DIR\" install",
      "npm --prefix \"$PROJECT_DIR\" run build",
      "npm --prefix \"$PROJECT_DIR\" run copy"
    ],
    "runtime": "nodejs16"
  }
GitHub Integration
GitHubにPRしたり、PRをmainにマージしたりした時に自動的にFirebase Hostingにデプロイするための設定をします。
とは言え、yamlファイルを直接編集して設定する必要はほぼ無く、firebaseのCLIを使っていくつかの質問に答えれば、自動的に.github/workflowsに必要なyamlファイルが生成されます。
すでにFirebase Hostingをリポジトリに設定している場合は以下のコマンドを実行します。
firebase init hosting:github
そうでない場合は以下を実行してhostingの設定をしてください。
firebase init hosting
ブラウザで以下の画面が表示されるので、Authorize firebaseをクリックします。
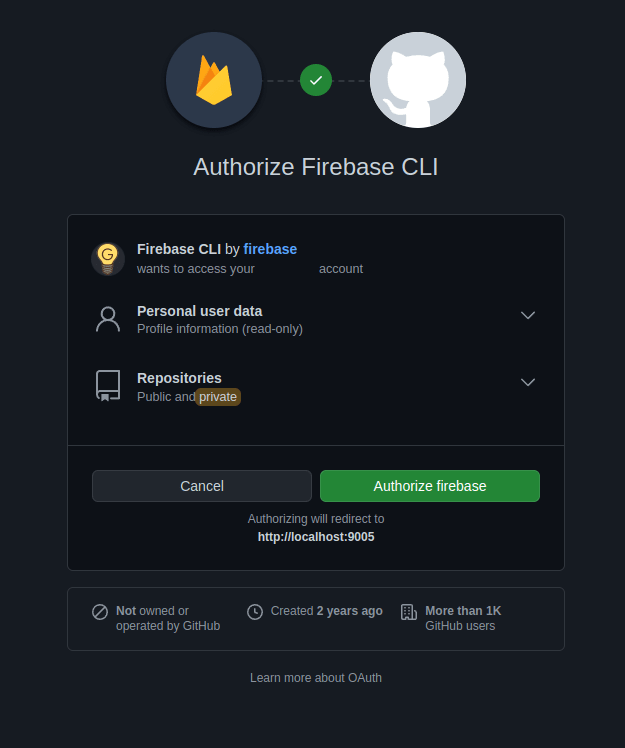
問題なく認証されれば以下の画面が表示されます。

ここからはCLI上での質問に答えながら設定します。
連携するリポジトリを選択します → username/with-firebase-hosting-app
For which GitHub repository would you like to set up a GitHub workflow? (format: user/repository) username/with-firebase-hosting-app
デプロイ毎にビルドするか? → Yes
Set up the workflow to run a build script before every deploy? Yes
デプロイ前に実行するコマンドは何か? → npm ci && npm run build && npm run copy
What script should be run before every deploy? npm ci && npm run build && npm run copy
PRがマージされた時に自動的に本番サイトにデプロイするか? → Yes
Set up automatic deployment to your site's live channel when a PR is merged? Yes
本番サイトの対象ブランチ名は? → main
What is the name of the GitHub branch associated with your site's live channel? main
問題なければ.github/workflows下にfirebase-hosting-pull-request.ymlとfirebase-hosting-merge.ymlが作られます。
あとはコミットして、プッシュして、PRを作ればGitHub Actionsが動作していることを確認できます。
Issues
Next.jsをFirebase Hostingで使う上で問題になった点やエラーなどで詰まった点を書きます。
Cloud Functionsのリージョンをus-central1から動かせない
ホスティングしているリージョンとCloud Functionsのリージョンを合わせたいですが、現在、この機能は提供されていません。
firebase.jsonでpublicをsrc/publicに変更しても、正常に動作しない
上で解説した例では Firebase Hosting に Next.js の public フォルダをホストさせるために、src/publicのファイルをpublicにコピーしています。
こんなことをせずに直接firebase.jsonでホストするフォルダとしてsrc/publicを指定してしまえば良いでは?と思った方もいるはずです。
やってみたのですが、結果的には上手く動作しませんでした。next/image の最適化された画像へのパスが上手く通らないらしく、以下のようなエラーが出ます。
GET http://localhost:5000/_next/image?url=%2Ffoo.jpg&w=2048&q=75 400 (Bad Request)
image:1          GET http://localhost:5000/_next/image?url=%2Ffoo.jpg&w=3840&q=75 400 (Bad Request)
image:1          GET http://localhost:5000/_next/image?url=%2Ffoo.jpg&w=2048&q=75 400 (Bad Request)
他にもトライされた方がいるようですが、この方も上手くいかなかったようです。
next/image のパス解決の方法や Firebase Hosting のホスト時のディレクトリ構造への理解が深まればもう少しマシな方法を取れるかもしれません。どなたかご存知でしたらコメントで教えていただければと思います。
[Solved] Your project with-firebase-hosting-app must be on the Blaze
firebase deployを実行すると以下のようなエラーが発生します。
Error: Your project with-firebase-hosting-app must be on the Blaze (pay-as-you-go) plan to complete this command. Required API artifactregistry.googleapis.com can't be enabled until the upgrade is complete. To upgrade, visit the following URL:
Cloud Functionsは無料プラン(Spark)では使えません。利用するには従量課金プラン(Blaze)にする必要があります。
従量課金と聞いただけで恐れ慄きそうですが、よほどのことが無い限り無料枠を超えることは無いので心配する必要はありません。参考までにこの記事に使ったリポジトリのプロジェクト費用を載せておきます。
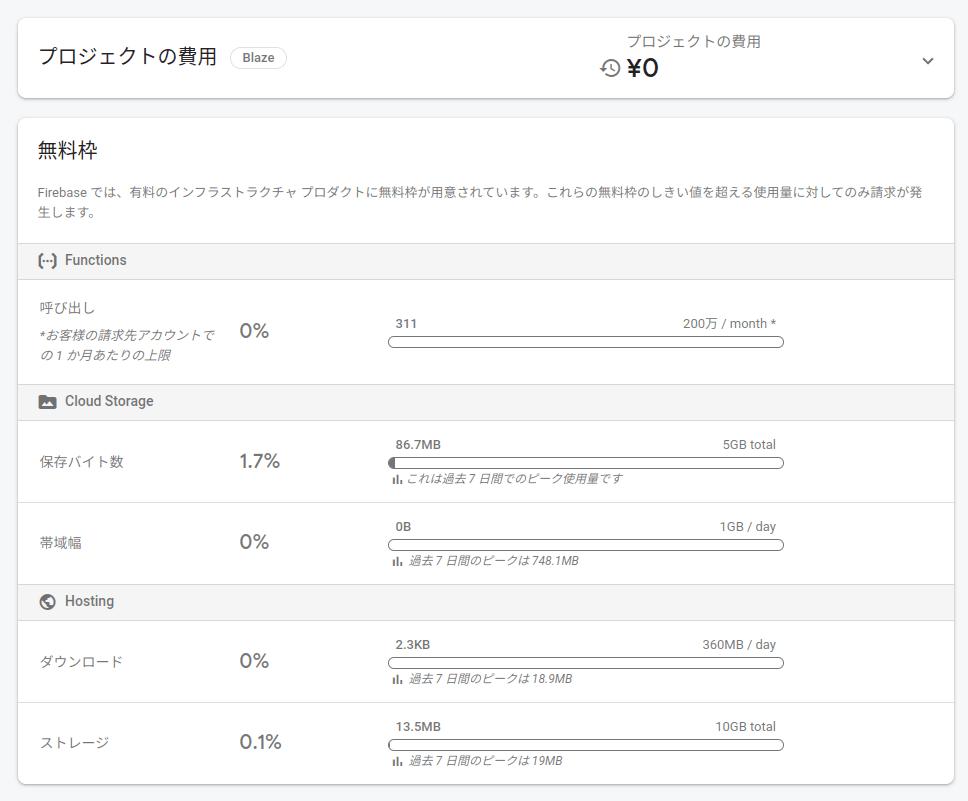
本格的な運用をして、相当数のユーザーを獲得しない限りは従量課金に移行する基準にかすりもしないことが分かるかと思います。
[Solved] Functions deploy had errors with the following functions: nextjsFunc(us-central1)
firebase deployを実行時に以下のようなエラーが表示される場合の対処方を説明します。
i functions: creating Node.js 14 function nextjsFunc(us-central1)...
Functions deploy had errors with the following functions:
nextjsFunc(us-central1)
i functions: cleaning up build files...
Error: There was an error deploying functions
このエラーだけではnextjsFuncのビルドに失敗した以外に分かることが無いので、ルートフォルダにあるfirebase-debug.logも一緒に確認してみてください。もしその内容が以下のようなものであれば、これから紹介する方法が有効かもしれません。
[debug] [2022-07-06T02:18:44.661Z] Could not find image for function projects/with-firebase-hosting-app/locations/us-central1/functions/nextjsFunc
[debug] [2022-07-06T02:18:44.663Z] Error: Failed to update function nextjsFunc in region us-central1
    at /home/username/workspace/with-firebase-hosting-app/node_modules/firebase-tools/lib/deploy/functions/release/fabricator.js:38:11
    at runMicrotasks (<anonymous>)
    at processTicksAndRejections (node:internal/process/task_queues:96:5)
    at async Fabricator.updateV1Function (/home/username/workspace/with-firebase-hosting-app/node_modules/firebase-tools/lib/deploy/functions/release/fabricator.js:255:32)
    at async Fabricator.updateEndpoint (/home/username/workspace/with-firebase-hosting-app/node_modules/firebase-tools/lib/deploy/functions/release/fabricator.js:136:13)
    at async handle (/home/username/workspace/with-firebase-hosting-app/node_modules/firebase-tools/lib/deploy/functions/release/fabricator.js:75:17)
[error]
[error] Error: There was an error deploying functions
firebase.jsonのfunctions.runtimeをnodejs16に変更することで解決します。
{
        // ...
  "functions": {
    // ...
    "runtime": "nodejs16"
  }
}
詳細はこちらをご確認ください。
[Solved] Your client does not have permission to get URL /nextjsFunc/ from this server.
Firebase Hostingにデプロイした後、デプロイ先のURLで上記のメッセージが表示されます。これはCloud Functionsがデフォルトで未認証のユーザーのHTTP関数の実行を許可していないためです。
このままでは初めてサイトを訪れたユーザーはページが表示できないため、全てのユーザーに実行権限を与えます。
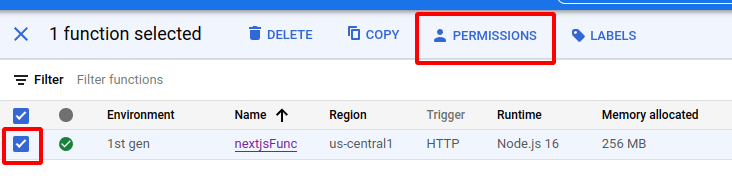
GCPのCloud Functionsの管理画面に移動して、対象のプロジェクトを選択します。
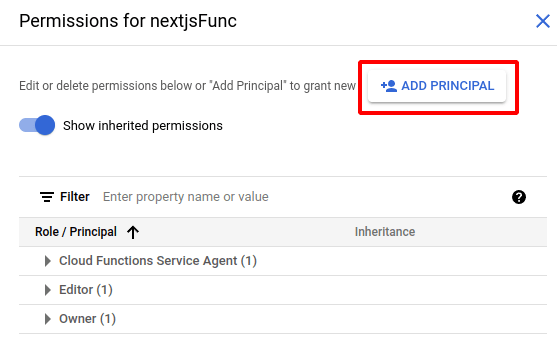
nextjsFuncを選択してPERMISSIONSをクリックします。
ダイアログが開くので、ADD PRINCIPALをクリックします。
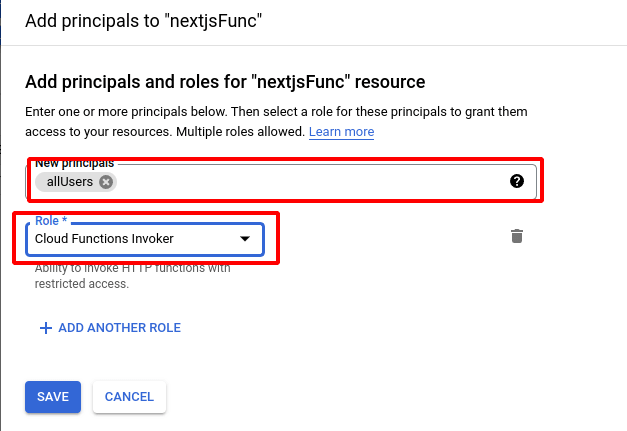
New principalsとしてallUsersを選択、RoleにCloud Functions Invokerを選択します。
ALLOW PUBLIC ACCESSをクリックして、パブリックアクセスを許可します。
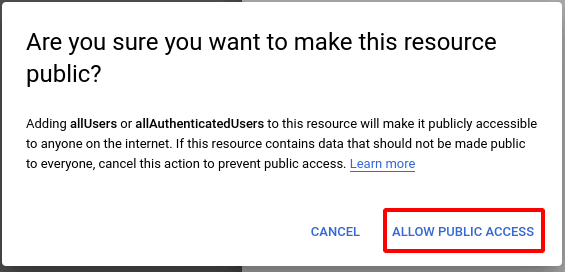
これで認証されていないユーザーでもnextjsFuncを実行できるようになり、ページが表示されます。
詳細はこちらをご確認ください。
[Solved] Permission 'cloudfunctions.functions.list' denied on 'projects/foo/-/functions'
GitHub ActionsでFirebase Hostingへのデプロイをしようとした際に発生しました。こちらのIssueによれば、firebase-toolsの10.9.0から発生するようになったエラーとのことです。
GCPのIAMでGitHub ActionsにCloud Functions ViewerのRoleを追加することで解決します。
まずはIAMにアクセスします。
プロジェクトを指定して、Principalsの中から、GitHub Actionsを選択します。
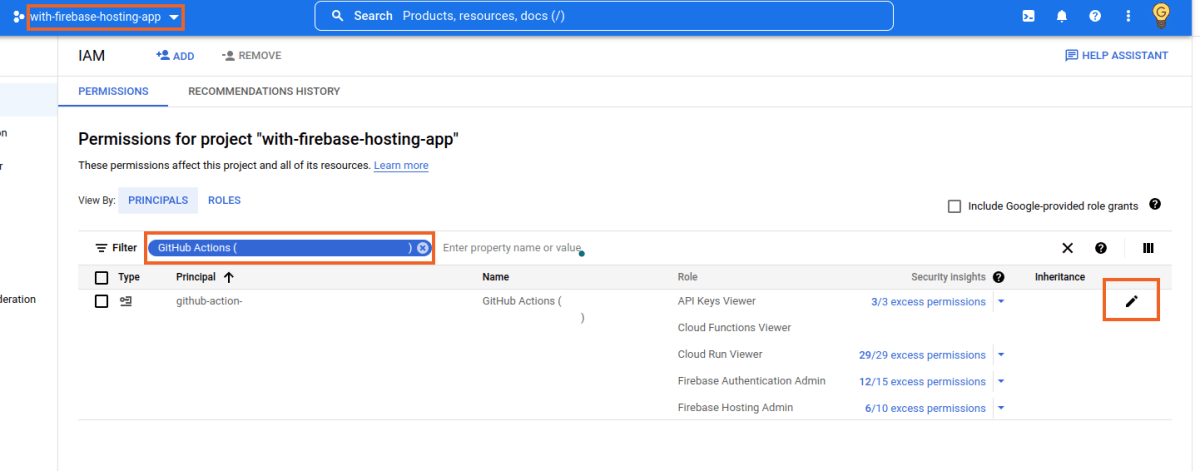
ADD ANOTHER ROLEをクリックし、Cloud Functions Viewerを検索して追加します。
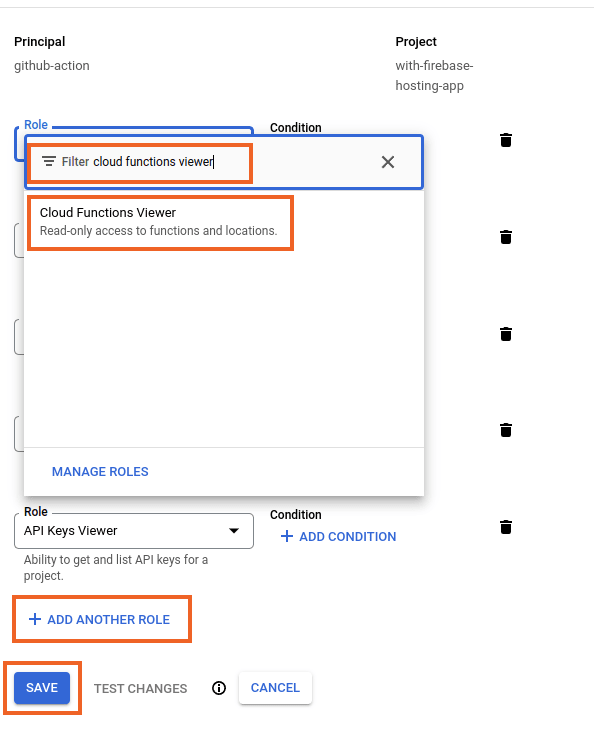
GitHub Actionsに戻り、Rerun Jobをすれば再度デプロイのプロセスを実行できます。
Conclusion
ISRが機能しなかったり、Cold Startのために一時的に応答が遅くなったりするため、ZennやMediumのような記事が中心のサイトをFirebase Hostingにデプロイするのはオススメしません。
逆にクライアントサイドで実行することが主なWebアプリケーションで、ランディングページやブログ、リリースノートなどが静的コンテンツであるならば、Firebase Hostingは候補の1つになりうると思います。
Discussion
わかりやすい記事にて参考になりました、ありがとうございます。
さて、
これは、
firebase.jsonではなく、.firebasercかと思いますがいかがでしょうか?(私の勘違いでしたら、恐縮です。)
ご指摘ありがとうございます!
修正しました。
ありがとうございます😊👍