[Azure]TerraformでWindows Virtual Machineでデプロイするまでにおこなったこと
0. はじめに
こんにちは。都内でエンジニアをしている、@gkzvoiceです。
1. そもそもTerraformとは
- https://github.com/hashicorp/terraform
- IaCの思想にのっとり、インフラのコード管理をリソースという単位でおこなうツール
- 詳しい説明は 実践Terraform AWSにおけるシステム設計とベストプラクティス (技術の泉シリーズ(NextPublishing)) を参考にしてほしい
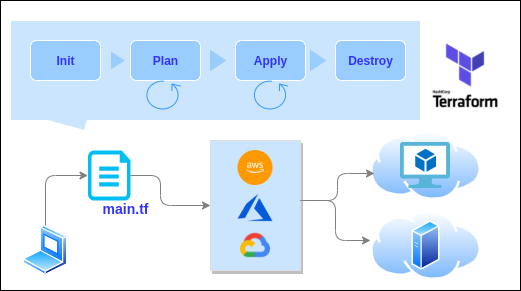
画像は Terraform by HashiCorp を参考に筆者作成。アイコンの取得先は 「x. 参考資料」 にて記載。
2. 本記事における問題点の共有
- できあがったtfファイルはGithubに転がっているが、サンプルコードのmain.tfに手を加えていく過程が紹介されている資料が少ない。
- 本記事では、terraform applyするまでにやったこと、main.tfに手を加えていく過程を残したい
- Terraformのバージョンを引き上げなくちゃいけなくなった場合の対処もしたのでそれも(引き上げる前のバージョンに戻すことも出来るようにする
3. 環境/バージョン情報
- Ubuntu 20.04.2 LTS (Terraform, azure-cliを使った実行環境)
  - Terraform v1.0.0
  - azure-cli 2.61.0
※Azureサブスクリプションはすでに作成しているものとします。サブスクリプション自体もTerraformで作れればよかったのですが、チカラ及ばず。。
参考:追加 Azure サブスクリプションの作成 | Microsoft Docs
4. Terraform applyするまでに必要なやることリスト
- Terraformのインストール
- Terraformのバージョンをアップグレード
- Azure CLIのインストール
- azコマンドに認証情報を渡す
- terraform init (Azure Provider Pluginのインストール)
- terraform plan (デプロイ、applyすることで生じる差分を確認)
- terraform apply (デプロイ)
5. Terraformのインストール
僕は公式ドキュメントをたよりにおこないましたが、やり方は忘れました、、。
Install Terraform | Terraform - HashiCorp Learn
5-1. tfenvを使ってTerraformのバージョンをアップグレード
後述する terraform init でAzure Provider Pluguinをダウンロードするためには、terraformのバージョンを0.12.x以上に引き上げる必要があります。
Version 2.x of the AzureRM Provider requires Terraform 0.12.x and later.
参考:terraform-providers/terraform-provider-azurerm: Terraform provider for Azure Resource Manager
指定されたterraformのバージョンより下位のバージョンを使うと、以下のようなエラーを引きます。
Warning: Provider source not supported in Terraform v0.12
$ terraform init
Initializing the backend...
Initializing provider plugins...
Warning: Provider source not supported in Terraform v0.12
  on main.tf line 6, in terraform:
   6:     azurerm = {
   7:       source = "hashicorp/azurerm"
   8:       version = "=2.46.0"
   9:     }
ここでは、バージョンを引き上げる前のバージョンに戻す選択肢も残しておきたいので、tfenvを使ってバージョンを0.12.x以上に切り替える方法を採用します。
## 切り替え前=引き上げ前のバージョンを確認
$ tfenv list
* 0.15.4 (set by /home/gkz/.tfenv/version)
  0.12.28
  0.12.5

## 引き上げ候補はv1.0.xとする
$ tfenv list-remote | grep -E "^1.0"
1.0.0

## v1.0.0にする
$ tfenv install 1.0.0
[INFO] Installing Terraform v1.0.0
[INFO] Downloading release tarball from https://releases.hashicorp.com/terraform/1.0.0/terraform_1.0.0_linux_amd64.zip
################################################################################################## 100.0%
[INFO] Downloading SHA hash file from https://releases.hashicorp.com/terraform/1.0.0/terraform_1.0.0_SHA256SUMS
tfenv: tfenv-install: [WARN] No keybase install found, skipping OpenPGP signature verification
Archive:  tfenv_download.2j32di/terraform_1.0.0_linux_amd64.zip
  inflating: $HOME/.tfenv/versions/1.0.0/terraform
[INFO] Installation of terraform v1.0.0 successful
[INFO] Switching to v1.0.0
[INFO] Switching completed

## 無事、引き上げることができた
$ tfenv list
* 1.0.0 (set by $HOME/.tfenv/version)
  0.15.4
  0.12.28
  0.12.5

## terraform initしてから以下のコマンドを実行すると、Azure Provider Pluguinのバージョン(ここではv2.46.0)も表示される
$ terraform version
Terraform v1.0.0
on linux_amd64
+ provider registry.terraform.io/hashicorp/azurerm v2.46.0

## バージョンを戻してみる
$ tfenv use 0.12.5
[INFO] Switching to v0.12.5
[INFO] Switching completed
$ tfenv list
  1.0.0
  0.15.4
  0.12.28
* 0.12.5 (set by /home/gkz/.tfenv/version)

## 無事に戻すことが出来た
$ terraform version
Terraform v0.12.5

## 改めて今回使うv1.0.0にする
$ tfenv use 1.0.0
[INFO] Switching to v1.0.0
[INFO] Switching completed
6. Azure CLIのインストール
Azure cliをインストールするとazコマンドを使うことができます。このazコマンドがTerraformを介してAzureのサービスを操作するためには必要です。azコマンドはGCPの gcloud コマンド、AWSの aws-cli と同じようなものと言ってよいでしょう。
$ curl -sL https://aka.ms/InstallAzureCLIDeb | sudo bash
参考:Install the Azure CLI for Linux manually | Microsoft Docs
続いて、Azure CLIをインストールして使えるようになったazコマンドに認証情報を渡していきます。ここでは2種類ご紹介します。
6-1. azコマンドに認証情報を渡す方法その1(az loginコマンド)
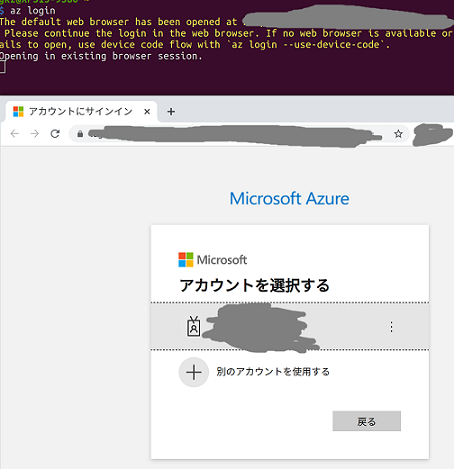
$ az login
The default web browser has been opened at 略

上記のようにターミナルに表示された後、ブラウザが起動します。
AzureにログインするMicorsoft Accountを作成するか、既存のアカウントから選択したりと、淡々と認証手続きを進めます。
画面の指示に従えば、認証手続きを終えることが出来るはずなので、具体的なやり方は割愛します。
参考:Sign in with the Azure CLI | Microsoft Docs
※以下のスクリーンショットの画面上部は az login コマンドを実行したときのターミナル、画面下部は同コマンドを実行してからブラウザが起動したときのものです。
az loginは何をしているの?
Azureの公式ドキュメントの Sign in with the Azure CLI | Microsoft Docs を参照してみましょう。参考までにGoogle翻訳で日本語にしたものを抜粋します。
Azure CLI にはいくつかの認証の種類があります。 開始する最も簡単な方法は、自動的にログインする Azure Cloud Shell を使用することです。ローカルでは、az login コマンドを使用して、ブラウザーから対話的にサインインできます。
6-2. azコマンドに認証情報を渡す方法その2(az account set --subscription="SUBSCRIPTION_ID")
az login 以外にもazコマンドに認証情報を渡す方法はあります。それはazコマンドに紐づけたいサブスクリプションを指定するというものです。こちらを採用する場合、事前にAzure PortalなどでサブスクリプションIDを調べる必要がありますが、以下のケースでは重宝される方法ではないでしょうか。
- ブラウザを立ち上げることが難しい環境下で認証情報を渡す必要がある
- たとえば、JenkinsやGitlab Runner、Circle CIらCI Executorのjobのなかで実行されるコマンド
$ az account set --subscription="SUBSCRIPTION_ID"
参考:Azure Provider: Authenticating via the Azure CLI | Guides | hashicorp/azurerm | Terraform Registry
6-3. azコマンドに認証情報を渡したかどうか確認する方法
左記のドキュメントで紹介されていた、az account show を実行してサブスクリプション名が返ってくれば、azコマンドに認証情報を渡すことができています。
$ az account show | jq -r '. | {environmentName: .environmentName, name: .name}'{
  "environmentName": "AzureCloud",
  "name": "<サブスクリプション名>"
}
無事azコマンドをゲットして認証もできましたね。これでTerraformからAzureのサービスを操作するための下準備は終わりました。それではTerraformでVMをデプロイしてみましょう。
7. VMをデプロイするmain.tfを作る
7-1. 下記のサンプルコードを使ってmain.tfを作る
- https://registry.terraform.io/providers/hashicorp/azurerm/latest/docs/guides/azure_cli#configuring-azure-cli-authentication-in-terraform を参考にAzure Provider Pluginのバージョン要件を以下のように記載
terraform {
  required_providers {
    azurerm = {
      source  = "hashicorp/azurerm"
      version = "=2.46.0"
    }
  }
}

provider "azurerm" {
  features {}
}
- 続いて、https://registry.terraform.io/providers/hashicorp/azurerm/latest/docs/guides/azure_cli#configuring-azure-cli-authentication-in-terraform を参考にデプロイするVMのresourceを書いていく
- resourceの意味についてはTerraformの公式ドキュメントに説明があったのでそちらをあたってほしい
- VMや仮想ネットワークなどAzureやAWSが提供するサービス群やそれらを構成する要素のことを指していると言ってよいと思う
- 参考:Resources Overview - Configuration Language - Terraform by HashiCorp
-
resource??という方にはこちらを。AWSでTerraformに入門 | DevelopersIO
さて、ここまでで書いたものをまとめると以下のようになります。なお、サブスクリプションIDやパスワードなどは次に取り上げるvariable.tfやterraform.tfvarsで変数化しています。
main.tf
## 「Azure Provider Plugin」のバージョンを指定しておく
## すると,"terraform init"した際、指定したバージョンが以下の".terraform/providers/registry.terraform.io/"配下にインストールされる
## https://registry.terraform.io/providers/hashicorp/azurerm/latest/docs/guides/azure_cli#configuring-azure-cli-authentication-in-terraform
terraform {

  required_providers {
    azurerm = {
      source  = "hashicorp/azurerm"
      version = "=2.46.0"
    }
  }
}

provider "azurerm" {
  features {}

  ## 事前にazコマンドやAzureポータルで確認しておく
  subscription_id = var.subscription_id
  tenant_id       = var.tenant_id
}

resource "azurerm_resource_group" "main" {
  name     = "${var.prefix}-resources"
  location = var.location

  tags = {
    environment = "${var.environment}"
  }
}

resource "azurerm_virtual_network" "main" {
  name                = "${var.prefix}-network"
  address_space       = ["10.0.0.0/16"]
  location            = azurerm_resource_group.main.location
  resource_group_name = azurerm_resource_group.main.name

  tags = {
    environment = "${var.environment}"
  }
}

resource "azurerm_subnet" "internal" {
  name                 = "internal"
  resource_group_name  = azurerm_resource_group.main.name
  virtual_network_name = azurerm_virtual_network.main.name
  address_prefixes     = ["10.0.2.0/24"]

  # ココに書いてはダメ
  # tags = {
  #  environment = "${var.environment}"
  # }
}

resource "azurerm_network_interface" "main" {
  name                = "${var.prefix}-nic"
  resource_group_name = azurerm_resource_group.main.name
  location            = azurerm_resource_group.main.location

  ip_configuration {
    name                          = "ipconfig"
    subnet_id                     = azurerm_subnet.internal.id
    private_ip_address_allocation = "Dynamic"
  }

  tags = {
    environment = "${var.environment}"
  }
}

resource "azurerm_windows_virtual_machine" "main" {
  name                = "${var.prefix}-vm"
  resource_group_name = azurerm_resource_group.main.name
  location            = azurerm_resource_group.main.location
  size                = "Standard_F2"
  admin_username      = "${var.admin_username}"
  admin_password      = "${var.admin_password}"
  network_interface_ids = [
    azurerm_network_interface.main.id,
  ]

  source_image_reference {
    publisher = "MicrosoftWindowsServer"
    offer     = "WindowsServer"
    sku       = "2019-Datacenter"
    version   = "latest"
  }

  os_disk {
    storage_account_type = "Standard_LRS"
    caching              = "ReadWrite"
  }

  tags = {
    environment = "${var.environment}"
  }
}
- 変数化したい値はvariable.tf、あるいはterraform.tfvars
variable.tf
variable "prefix" {
  default = "tf"
}

variable "environment" {
  default = "dev"
}

variable "hostname" {
  default = "tf-vm"
}

variable "subscription_id" {

}

variable "tenant_id" {

}

variable "location" {
  default = "eastus"
}

variable "admin_username" {

}

variable "admin_password" {

}
- variable.tfにdefault値として定義するのもアリだけど、terraform.tfvarsに書いておいてterraform.tfvarsはgitの管理下から外すこともできる
- "fix_me"と書いてあるところをazコマンドやAzureポータルで確認して修正
- なお、admin_usernameとadmin_passwordは、デプロイしたVMにログインする際に使うユーザー名とパスワードであり、こちらは任意
terraform.tfvars
subscription_id="fix_me"
tenant_id="fix_me"
location="fix_me"
admin_username="fix_me"
admin_password="fix_me"
- terraform plan/applyを実行後に確認したい値をoutput.tfに書く
output.tf
data "azurerm_subscription" "main" {
}

output "environment" {
  value = var.environment
}

## https://registry.terraform.io/providers/hashicorp/azurerm/latest/docs/data-sources/subscription
output "azurerm_subscription_name" {
  value = data.azurerm_subscription.main.display_name
}

output "hostname" {
  value = var.hostname
}

# ref: https://github.com/Azure/terraform-azurerm-compute/blob/master/outputs.tf
output "public_ip_id" {
  description = "id of the public ip address provisoned."
  value       = azurerm_public_ip.main.*.id
}

output "admin_username" {
  value = var.admin_username
}

output "admin_password" {
  value = var.admin_password
}
これでデプロイする準備は整いました! terraform apply しましょう!、、、といきたいところですが、もうひとつやらなければならないことがありました。それが terraform init です。Azureにかぎらず、applyするProviderのバイナリを手元にダウンロードする必要があります。
[閑話休題]Providerのバイナリってどこにあるの?
-
.terraform/providersのサブディレクトリ
Terraform は、受け入れ可能な最新バージョンを Terraform レジストリからダウンロードし、.terraform/providers/ の下のサブディレクトリに保存します。
参考:Extending Terraform - Terraform by HashiCorp (Google翻訳使用)
$ tree -L 6 .terraform/providers/registry.terraform.io
.terraform/providers/registry.terraform.io
└── hashicorp
    └── azurerm
        └── 2.46.0
            └── linux_amd64
                └── terraform-provider-azurerm_v2.46.0_x5

4 directories, 1 file
7-2. terraform init (Azure Provider Pluginのインストール)
$ terraform init
$ terraform init

Initializing the backend...

Initializing provider plugins...
- Finding hashicorp/azurerm versions matching "2.46.0"...
- Installing hashicorp/azurerm v2.46.0...
- Installed hashicorp/azurerm v2.46.0 (signed by HashiCorp) ## <--- tfファイルで指定したAzure Provider Pluginのバージョンがインストールされました

Terraform has created a lock file .terraform.lock.hcl to record the provider
selections it made above. Include this file in your version control repository
so that Terraform can guarantee to make the same selections by default when
you run "terraform init" in the future.

Terraform has been successfully initialized!  ## <--- うまくいきました!

You may now begin working with Terraform. Try running "terraform plan" to see
any changes that are required for your infrastructure. All Terraform commands
should now work.

If you ever set or change modules or backend configuration for Terraform,
rerun this command to reinitialize your working directory. If you forget, other
commands will detect it and remind you to do so if necessary.
7-3. terraform plan (デプロイ、applyすることで生じる差分を確認)
$ terraform plan

Terraform used the selected providers to generate the following execution plan. Resource actions are indicated with the following symbols:
  + create

Terraform will perform the following actions:

略

Plan: 5 to add, 0 to change, 0 to destroy.

Changes to Outputs:
  + admin_password            = "<your_password>"
  + admin_username            = "<your_username>"
  + azurerm_subscription_name = "<your_subcriptioname>"
  + environment               = "dev"
  + hostname                  = "tf-vm"

Note: You didn't use the -out option to save this plan, so Terraform can't guarantee to take exactly these actions if you run "terraform apply" now.
7-4. terraform plan (デプロイ)
$ terraform apply

Plan: 5 to add, 0 to change, 0 to destroy.

Changes to Outputs:
  + admin_password            = "<your_password>"
  + admin_username            = "<your_username>"
  + azurerm_subscription_name = "<your_subcriptioname>"
  + environment               = "dev"
  + hostname                  = "tf-vm"

Do you want to perform these actions?
  Terraform will perform the actions described above.
  Only 'yes' will be accepted to approve.

## "yes" と入力してapplyを続ける
  Enter a value: <yes>

Apply complete! Resources: 5 added, 0 changed, 0 destroyed.

Outputs:

admin_password = "<your_password>"
admin_username = "<your_username>"
azurerm_subscription_name = "<your_subcriptioname>"
environment               = "dev"
hostname = "tf-vm"
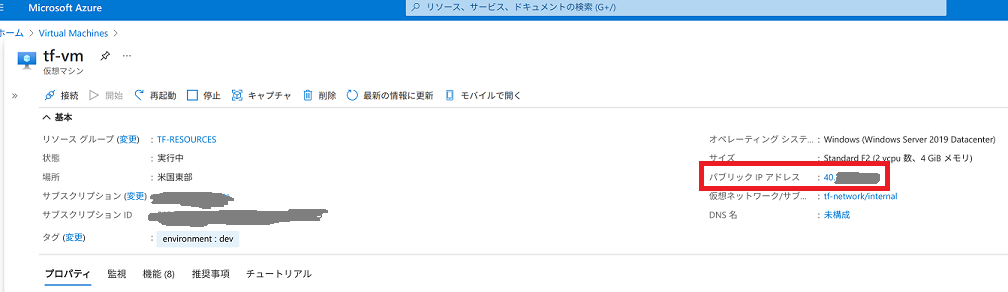
デプロイできた!?
無事デプロイ出来たか、Azureのポータル画面で確認してみましょう。下記のように「パブリックIPアドレス」がVMに付与されていないのではないでしょうか?
それでは、パブリックIPアドレスとRDPポートが追加されるようにtfファイルを修正しましょう。
7-5. パブリックIPアドレスの付与とRDPポートの開放をするようにtfファイルを修正
- 先ほどapplyする際に使ったtfファイル(main.tf)azurerm_public_ipとazurerm_network_security_groupを追加
main.tf抜粋
resource "azurerm_network_interface" "main" {
  name                = "${var.prefix}-nic"
  resource_group_name = azurerm_resource_group.main.name
  location            = azurerm_resource_group.main.location

  ip_configuration {
    name                          = "ipconfig"
    subnet_id                     = azurerm_subnet.internal.id
    private_ip_address_allocation = "Dynamic"

    ## 追加
    public_ip_address_id          = azurerm_public_ip.main.id

  }

  tags = {
    environment = "${var.environment}"
  }
}


## 以下を参考に追加
## https://github.com/terraform-providers/terraform-provider-azurerm/blob/master/examples/virtual-machines/virtual_machine/multiple-network-interfaces/main.tf#L35
resource "azurerm_public_ip" "main" {
  name                = "${var.prefix}-pip"
  location            = azurerm_resource_group.main.location
  resource_group_name = azurerm_resource_group.main.name
  allocation_method   = "Dynamic"
  sku                 = "Basic"

  tags = {
    environment = "${var.environment}"
  }
}

## 以下を参考に追加
## https://github.com/terraform-providers/terraform-provider-azurerm/blob/master/examples/virtual-machines/virtual_machine/multiple-network-interfaces/main.tf#L60
resource "azurerm_network_security_group" "main" {
  name                = "${var.prefix}-nsg"
  location            = azurerm_resource_group.main.location
  resource_group_name = azurerm_resource_group.main.name

  ### RDPポートを開放する
  security_rule {
    name                       = "allow_RDP"
    description                = "Allow RDP access"
    priority                   = 110
    direction                  = "Inbound"
    access                     = "Allow"
    protocol                   = "Tcp"
    source_port_range          = "*"
    destination_port_range     = "3389"
    source_address_prefix      = "*"
    destination_address_prefix = "*"
  }

  tags = {
    environment = "${var.environment}"
  }
}
7-6. 再度terraform planとterraform apply
- terraform planで差分を確認
- 実行結果:
Apply complete! Resources: 2 added, 1 changed, 0 destroyed.
- 実行結果:
- 差分の内訳
- add: azurerm_public_ipリソースとazurerm_network_security_groupリソースで2点
- change: azurerm_network_interfaceリソースのpublic_ip_address_idで1点
※実行結果はterraform applyと対して変わらないので割愛
- もういちどterraform apply
-
Apply complete! Resources: 2 added, 1 changed, 0 destroyed.とplanと同じであればok
-
$ terraform apply

略

Plan: 2 to add, 1 to change, 0 to destroy.

Changes to Outputs:
  + public_ip_id = [
      + (known after apply),
    ]

Do you want to perform these actions?
  Terraform will perform the actions described above.
  Only 'yes' will be accepted to approve.

## "yes" と入力してapplyを続ける
  Enter a value: <yes>


Apply complete! Resources: 2 added, 1 changed, 0 destroyed.

Outputs:

admin_password = "<your_password>"
admin_username = "<your_username>"
azurerm_subscription_name = "<your_subcriptioname>"
environment               = "dev"
hostname = "tf-vm"
public_ip_address = [
  "",
]
public_ip_id = [
  "/subscriptions/xxxxxxxxx/resourceGroups/tf-resources/providers/Microsoft.Network/publicIPAddresses/tf-pip",
]
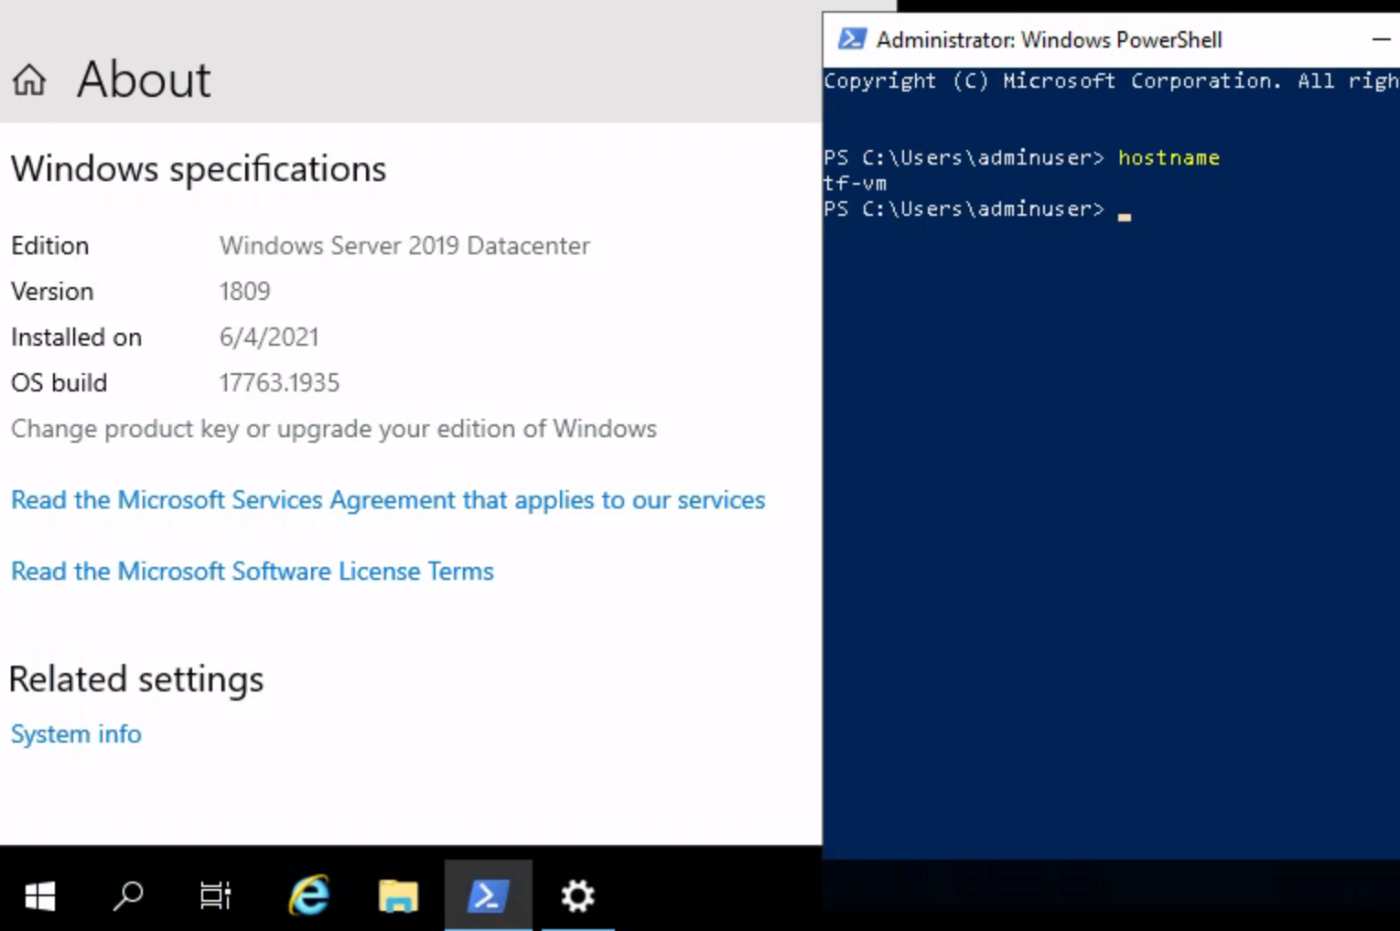
無事にパブリックIPアドレスが付与されましたね!
RDPポートも開放されていたので無事にローカルからVMに接続することが出来ました。(画面左がVMのWindowsのスペック詳細画面、右がVMのPowershellでコマンドを叩いている様子)
8. お片付け
$ terraform destroy

略

Terraform used the selected providers to generate the following execution plan. Resource actions are indicated with the following symbols:
  - destroy

Terraform will perform the following actions:

略

Plan: 0 to add, 0 to change, 7 to destroy.

Changes to Outputs:
  - admin_password = "<your_password>" -> null
  - admin_username = "<your_username>" -> null
  - azurerm_subscription_name = "<your_subcriptioname>" -> null
  - environment               = "dev" -> null
  - hostname                  = "tf-vm" -> null
  - public_ip_id = [
      "/subscriptions/xxxxxxxxx/resourceGroups/tf-resources/providers/Microsoft.Network/publicIPAddresses/tf-pip",] -> null

略

hostname = "tf-vm"name = "Azure for Students"
hostname = "tf-vm"
public_ip_id = [
  "/subscriptions/xxxxxxxxx/resourceGroups/tf-resources/providers/Microsoft.Network/publicIPAddresses/tf-pip",
]


Do you really want to destroy all resources?
  Terraform will destroy all your managed infrastructure, as shown above.
  There is no undo. Only 'yes' will be accepted to confirm.

## "yes" と入力してdestroyを続ける
  Enter a value:

略

Destroy complete! Resources: 7 destroyed.
9.[小ネタ1]変数をterraform planやterraform applyを実行するときに上書きしたい
-
-var オプションを渡せばok
$ terraform plan -var 'environment=dev2'

Changes to Outputs:
  + admin_password            = "xxxxxxxxx"
  + admin_username            = "xxxxxxxxx"
  + azurerm_subscription_name = "xxxxxxxxx"
  + environment               = "dev2"
  + hostname                  = "tf-vm"
  + public_ip_id              = [
      + (known after apply),
    ]
参考:Pragmatic Terraform on AWS - KOS-MOS - BOOTH
10.[小ネタ2]WindowsServerのイメージの名前を取得したい
-
az vm image listを使えばok
$  az vm image list -l japaneast --offer WindowsServer | \
> jq -r '.[]  | {offer: .offer, urnAlias: .urnAlias}'
WARNING: You are viewing an offline list of images, use --all to retrieve an up-to-date list
{
  "offer": "WindowsServer",
  "urnAlias": "Win2019Datacenter"
}
{
  "offer": "WindowsServer",
  "urnAlias": "Win2016Datacenter"
}
{
  "offer": "WindowsServer",
  "urnAlias": "Win2012R2Datacenter"
}
{
  "offer": "WindowsServer",
  "urnAlias": "Win2012Datacenter"
}
{
  "offer": "WindowsServer",
  "urnAlias": "Win2008R2SP1"
}
参考:How to search all VM images in Azure
10. 接続元のIP指定(課題
手元はフルオープンのはずなので、こんな具合に動的の接続元のipを指定して絞れれば多少マシにはなるかな
resource "azurerm_public_ip" "こんなぐあい" {
 ip="$(curl inet-ip.info)/32"
}
11. 参考資料
1. そもそもTerraformとは
- Pragmatic Terraform on AWS - KOS-MOS - BOOTH
- ※最新版はこちら。実践Terraform AWSにおけるシステム設計とベストプラクティス (技術の泉シリーズ(NextPublishing))
- 冒頭の図で使ったアイコンの取得先
3. 環境/バージョン情報
5. Terraformのインストール
- Install Terraform | Terraform - HashiCorp Learn
- terraform-providers/terraform-provider-azurerm: Terraform provider for Azure Resource Manager
6. Azure CLIのインストール
- Install the Azure CLI for Linux manually | Microsoft Docs
- Sign in with the Azure CLI | Microsoft Docs
- https://registry.terraform.io/providers/hashicorp/azurerm/latest/docs/guides/azure_cli
7. VMをデプロイするmain.tfを作る
- https://registry.terraform.io/providers/hashicorp/azurerm/latest/docs/guides/azure_cli#configuring-azure-cli-authentication-in-terraform
- Resources Overview - Configuration Language - Terraform by HashiCorp
- Extending Terraform - Terraform by HashiCorp
- AWSでTerraformに入門 | DevelopersIO
- https://github.com/terraform-providers/terraform-provider-azurerm/blob/master/examples/virtual-machines/virtual_machine/multiple-network-interfaces/main.tf#L35
- https://github.com/terraform-providers/terraform-provider-azurerm/blob/master/examples/virtual-machines/virtual_machine/multiple-network-interfaces/main.tf#L60
Discussion