Nest.js入門 docs.nestjs.comを読んだメモ
Overviewを順番に読んでいく
HINT
By default, if any error happens while creating the application your app will exit with the code 1. If you want to make it throw an error instead disable the option abortOnError (e.g., NestFactory.create(AppModule, { abortOnError: false })).
Deepl翻訳
ヒント
デフォルトでは、アプリケーションの作成中に何らかのエラーが発生した場合、アプリはコード1で終了します。代わりにエラーを投げるようにしたい場合は、abortOnErrorオプションを無効にしてください(例:NestFactory.create(AppModule, { abortOnError: false }))。
When you pass a type to the NestFactory.create() method, as in the example below, the app object will have methods available exclusively for that specific platform. Note, however, you don't need to specify a type unless you actually want to access the underlying platform API.
const app = await NestFactory.create<NestExpressApplication>(AppModule);
ExpressやFastifyそれぞれのAPIにアクセスしない限り、createで型を指定する必要はない。
つまり、express(かfastify)特有のAPIでしか設定できない何かを設定したくなったらcreateに型を指定すべし、ということらしい。
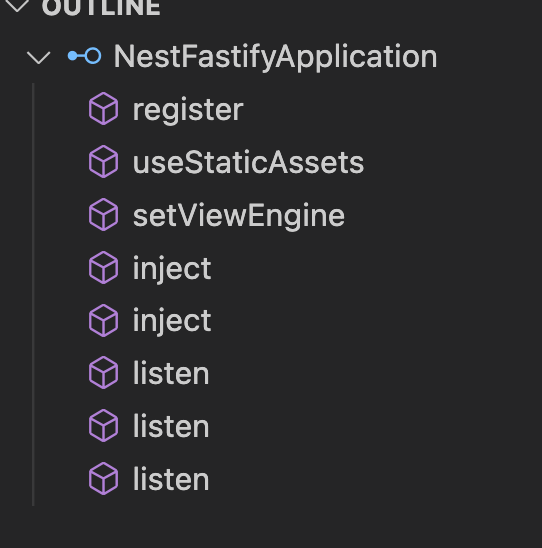
APIがサイトにないのでとりあえずvscodeで確認。ちょっとAPIが違うのがわかる
NestExpressApplication
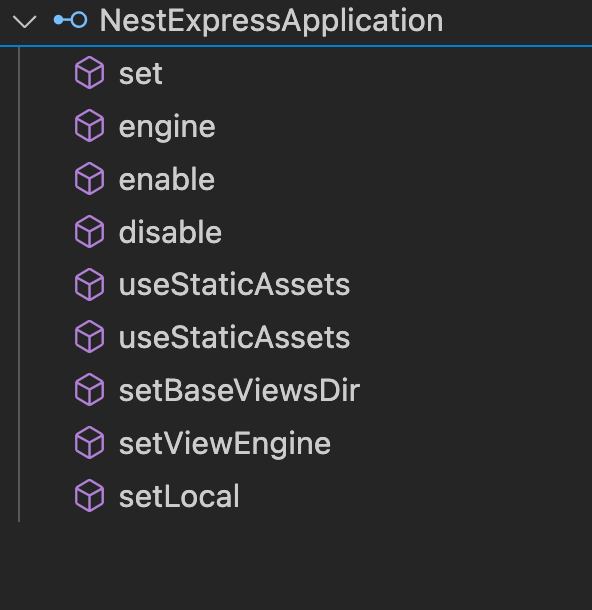
NestExpressApplication
Controller
1つ以上のパスに対応する。
import { Controller, Get } from '@nestjs/common';

@Controller('cats')    // '/cats'のURLパスに対応する
export class CatsController {
  @Get() // HTTPメソッド
  findAll(): string {
    return 'This action returns all cats';
  }
}
@Get('foo') にするとサブパスとして認識される。 GET /cats/foo
handlerメソッドからのレスポンスの返し方
StandardとLibrary-specificがある。Standardが推奨。
Standard
ObjectかArrayを返却すると、自動的にJSONにシリアライズしてからクライアントに返却される。
JSプリミティブな値の場合、シリアライズせずにそのままの値を返却する。
また、HTTPコードは200 (POSTの場合は201)が自動設定される。コードを変えたい場合は@HttpCode() デコレータで指定する。
Library-specific
handlerメソッドの定義に@Res デコレータを指定すると、内部で使われているplatform (expressなど)のレスポンスを完全に制御して応答できるようになる。
定義例:findAll(@Res() response)
返し方:response.status(200).send()
注意書きによるとlibrary-specificを使いながら、standardの動きもしてくれる設定もできる。
WARNING
Nest detects when the handler is using either @Res() or @Next(), indicating you have chosen the library-specific option. If both approaches are used at the same time, the Standard approach is automatically disabled for this single route and will no longer work as expected. To use both approaches at the same time (for example, by injecting the response object to only set cookies/headers but still leave the rest to the framework), you must set the passthrough option to true in the @Res({ passthrough: true }) decorator.
Deepl
警告
Nestは、ハンドラが@Res()または@Next()のいずれかを使用している場合、ライブラリ固有のオプションを選択したことを検出します。両方のアプローチを同時に使用した場合、標準のアプローチはこの単一のルートに対して自動的に無効となり、期待通りに動作しなくなります。両方の方式を同時に使用するには (たとえばレスポンスオブジェクトを注入してクッキーやヘッダを設定するだけで、 あとはフレームワークに任せるなど) @Res({ passthrough: true }) デコレータで passthrough オプションを true に設定しなければなりません。
handlerでリクエストを参照する場合
handlerメソッドの引数に@Req, @Requestデコレータを使うとリクエストインスタンスにアクセスできる。
が、bodyやqueryなどだけが欲しい場合、@Body, @Queryなどのデコレーターを使えばrequestインスタンスを引数に取る必要はなくなる。以下はhandlerメソッドに使えるデコレーター。resとnextは前述のレスポンス処理のstandard or library-specificに影響するので注意。
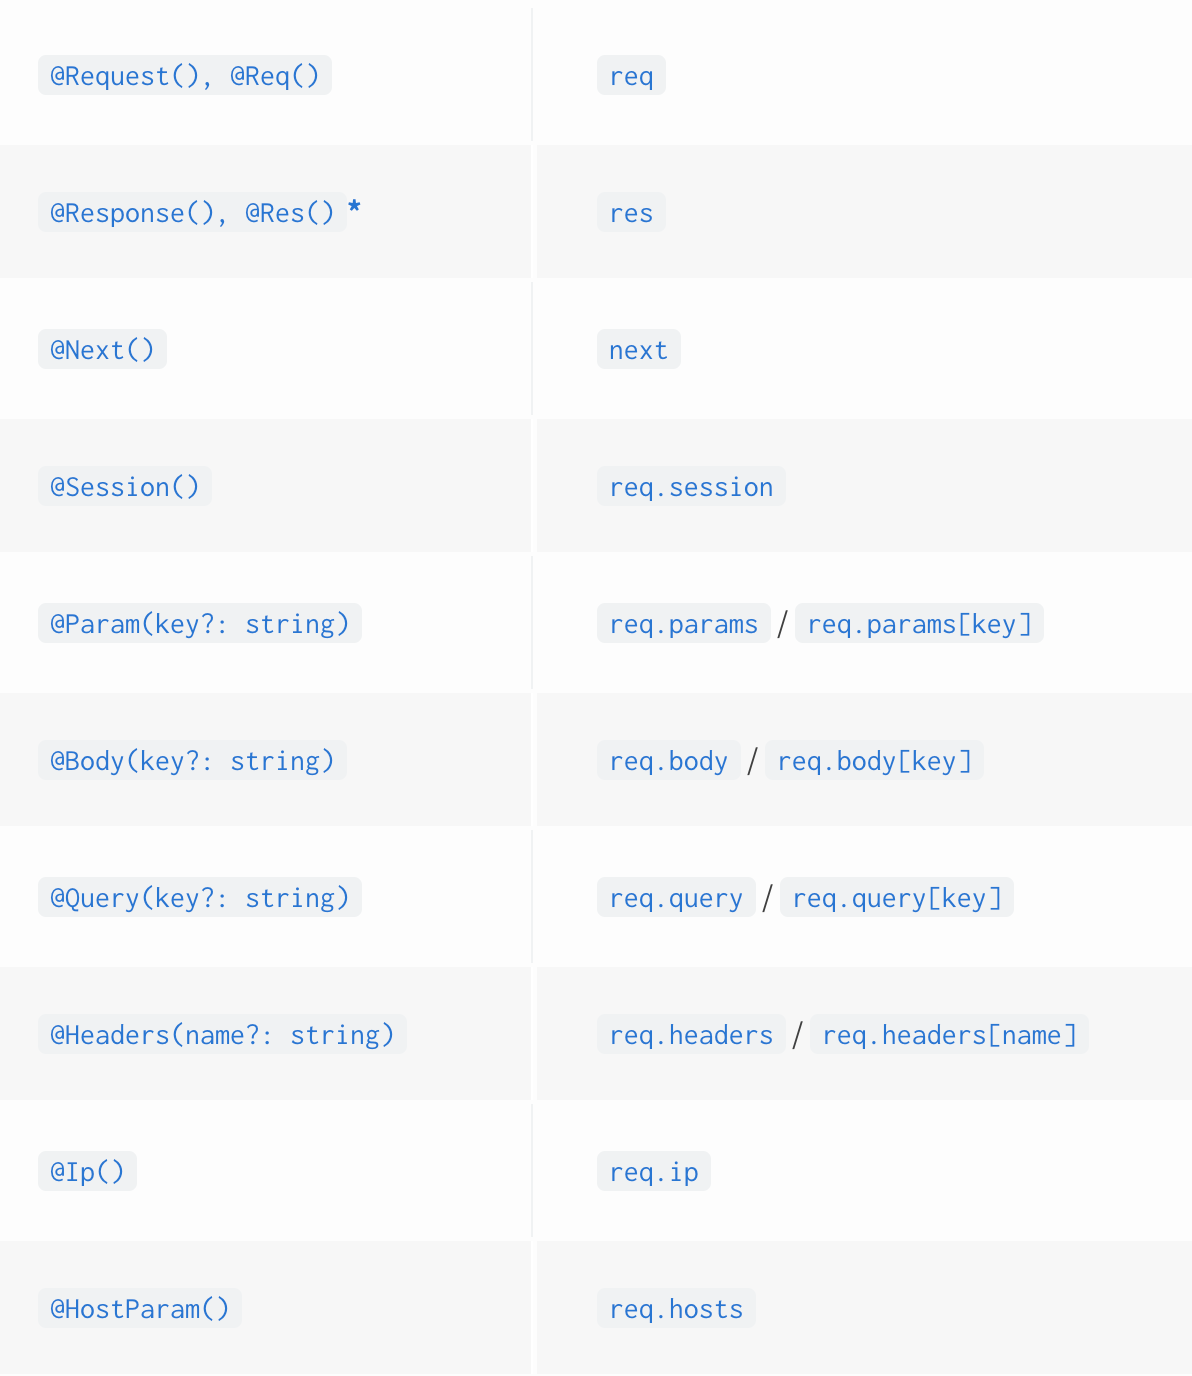
HTTP methodに対応するデコレーター
deleteとか色々あるが、methodに関係なく、とあるパスの処理を全て受け付ける場合は@Allを使う
ルート設定で使える正規表現
?, + , * , ()は正規表現として使える
handlerメソッドに付けられるデコレーターはHTTPメソッド以外は基本はレスポンスに影響するもの。
例えば
@Header('Cache-Control', 'none')
はレスポンスのヘッダーにこれを設定する、というもの。リクエストに対してはなにも影響がなく、ヘッダーにこれが設定されていたらhandlerが起動するという設定をしているわけではない。
他には
@Redirect('https://nestjs.com', 301)
HTTPリクエストを特定ホストからに絞る
@Controller({ host: 'admin.example.com' })
jsdoc
Specifies an optional HTTP Request host filter. When configured, methods within the controller will only be routed if the request host matches the specified value.
deepl
オプションのHTTPリクエストホストフィルターを指定します。 設定すると、コントローラ内のメソッドは、 リクエストホストが指定した値に一致する場合にのみルーティングされます。
この機能はFastifyでは使えない。
Scope
For people coming from different programming language backgrounds, it might be unexpected to learn that in Nest, almost everything is shared across incoming requests. We have a connection pool to the database, singleton services with global state, etc. Remember that Node.js doesn't follow the request/response Multi-Threaded Stateless Model in which every request is processed by a separate thread. Hence, using singleton instances is fully safe for our applications.
However, there are edge-cases when request-based lifetime of the controller may be the desired behavior, for instance per-request caching in GraphQL applications, request tracking or multi-tenancy. Learn how to control scopes here.
deepl
異なるプログラミング言語のバックグラウンドを持つ人々にとって、Nestでは受信するリクエスト間でほとんどすべてが共有されていることを知ることは予想外かもしれません。データベースへの接続プール、グローバルな状態を持つシングルトンサービスなどがあります。Node.jsは、リクエスト/レスポンスのマルチスレッドステートレスモデルに従わず、すべてのリクエストは別々のスレッドで処理されることを思い出してください。したがって、シングルトンインスタンスを使用することは、アプリケーションにとって完全に安全です。
しかし、例えばGraphQLアプリケーションにおけるリクエストごとのキャッシュ、リクエストトラッキング、マルチテナンシーなど、リクエストベースのコントローラの寿命が望ましい動作となるエッジケースも存在します。スコープを制御する方法については、こちらをご覧ください。
こちらの先はInjection scopesのセクション。
Stream
Nest route handlers are even more powerful by being able to return RxJS observable streams. Nest will automatically subscribe to the source underneath and take the last emitted value (once the stream is completed).
@Get()
findAll(): Observable<any[]> {
  return of([]);
}
これをうまいこと使うと、奥の方で非同期処理した値をstreamに流して、それ(あるいはそこから下流のstream)をobserveしてもらうと全部asyncメソッドにしないでもうまいこと応答を待たせることができる?
ただ、streamが別リクエストと共有されると危なそうな気がする。
DTO
generateするとDTOがクラスで作られるけどinterfaceでもいい。
A DTO is an object that defines how the data will be sent over the network. We could determine the DTO schema by using TypeScript interfaces, or by simple classes.
Provider
Nestのコアコンセプトのひとつ。ほとんどのコンポーネントはProvider。
Inject可能なインスタンスでいわゆるDIエンジンはNest.js自体が提供する。
Providers are plain JavaScript classes that are declared as providers in a module.
Moduleにproviderとして宣言されたプレーンなクラスはProviderである。
Moduleに宣言するためには @Injectable()を該当クラスに宣言する。
Injectionは基本的にModuleにInjectに必要な情報を登録し、Injectされる際には型をベースに実施される。(他の方法もあるが)
@Controller('cats')
export class CatsController {
  constructor(private catsService: CatsService) {} // Nest.jsがCatsServiceをinjestしようとする
 //略
}
@Optionalをつけるとその引数が解決できないときも許容するよう指示できる。
コンストラクタ引数でInjectを指示する方法とインスタンス変数で行う方法の2種類あるが、基本はコンストラクタベースのほうが良さそう。単体テストの時にmockを差し込みやすい
@Injectable()
export class HttpService<T> {
  @Inject('HTTP_OPTIONS')
  private readonly httpClient: T;
}
Module
Moduleは@Moduleデコレーターで各種設定を行う。
- providers
- serviceなどcontroller以外のproviderを登録する
- controllers
- controllerはこちらに登録
- imports
- 他のmoduleを設定すると、そのmoduleのexportsで宣言されたproviderをinjectできるようになる。
- exports
- providersの設定内容のサブセット。他でこのmoduleをimportsに記述されたときに使えるようにするproviderを設定する。
The module encapsulates providers by default. This means that it's impossible to inject providers that are neither directly part of the current module nor exported from the imported modules. Thus, you may consider the exported providers from a module as the module's public interface, or API.
deepl
このモジュールは、デフォルトでプロバイダをカプセル化します。これは、現在のモジュールの直接の一部でもなく、インポートモジュールからエクスポートされたものでもないプロバイダを注入することは不可能であることを意味します。したがって、あるモジュールからエクスポートされたプロバイダは、そのモジュールのパブリックインターフェイス、つまりAPIとみなすことができます。
Feature modules
moduleはドメイン(業務)ごとに作ってカプセル化しなさい、という推奨。
例ではroot moduleからexportsがないcat moduleをimportしている。
これはcat controllerで宣言したpathのhandlerは認識してHTTPリクエストをそちらに回すが、exportされていないのでCatCerviceはAppControllerやAppServiceでInjectすることができない。
Module re-exporting
importしたmoduleは再度exportすることができる。
@Module({
  imports: [CommonModule],
  exports: [CommonModule],
})
export class CoreModule {}
例のように共通処理をまとめたModuleを作ってその配下に共通処理の細分化したModuleを作る、利用する側は共通Moduleだけimportすれば良い、という使い方ができそう。
Global modules
多くのクラスでinjectionされる場合、それぞれのmoduleにimports宣言するせずに済むようグローバグmoduleにすることもできる。
@Global()    // これを追加
@Module({
  controllers: [CatsController],
  providers: [CatsService],
  exports: [CatsService],   // globalでもexportsは必要
})
export class CatsModule {}
ただし、乱用は推奨されておらず、
HINT
Making everything global is not a good design decision. Global modules are available to reduce the amount of necessary boilerplate. The imports array is generally the preferred way to make the module's API available to consumers.
deepl
HINT
すべてをグローバルにすることは、良い設計判断とは言えません。グローバルモジュールは、必要な定型句を減らすために用意されています。imports 配列は、一般的にモジュールの API を消費者が利用できるようにするために望ましい方法です。
真に全体で共有されるべきservice/moduleでない限りは最初は真面目にimportsした方が良さそう。
Dynamic modules
Databaseのprividerをdynamic moduleの仕組みを使って生成している例があるが、よくわからん。
別セクションで解説されているようなので一旦保留。
環境とかに応じてdbを切り替える、(localだったらsqlite, 本番はmysqlとか)の場合に使うのかな?と思うが例にEntityって書いてあるのが”?”
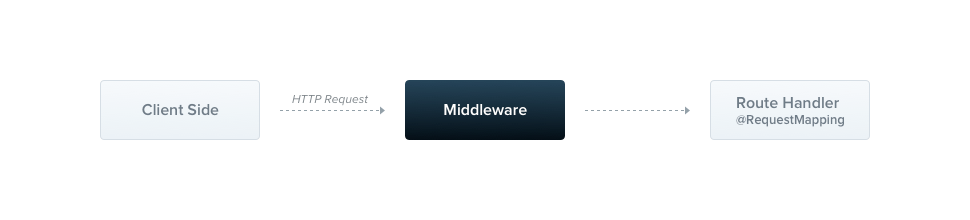
Middleware
expressのmiddlewareに相当し、routeのhandler(= controller)に処理が渡る前、処理が終わった後に何らかの処理を差し込める。
NestMiddlewareインターフェースを継承する
import { Injectable, NestMiddleware } from '@nestjs/common';
import { Request, Response, NextFunction } from 'express';

@Injectable()
export class LoggerMiddleware implements NestMiddleware {
  use(req: Request, res: Response, next: NextFunction) {
    console.log('Request...');
    next();
  }
}
provider, controller同様DIに必要なてインスタンスをmiddlewareにinjectできる。
middlewareを有効にするにはmoduleにNestModuleを継承させ、configure関数で設定する。
import { Module, NestModule, RequestMethod, MiddlewareConsumer } from '@nestjs/common';
import { LoggerMiddleware } from './common/middleware/logger.middleware';
import { CatsModule } from './cats/cats.module';

@Module({
  imports: [CatsModule],
})
export class AppModule implements NestModule {
  configure(consumer: MiddlewareConsumer) {
    consumer
      .apply(LoggerMiddleware)
      .forRoutes({ path: 'cats', method: RequestMethod.GET }); // pathとHTTP methodを条件指定することも可
      // .forRoutes({ path: 'ab*cd', method: RequestMethod.ALL }); こういうのや
      // .forRoutes(CatsController);  こういうのもあり
  }
}
excludes()で除外条件もつけれる
Functional middleware
middlewareになにも他への依存関係がない場合、単なるfunctionとしてexportすることでmiddlewareとして差し込める
import { Request, Response, NextFunction } from 'express';

export function logger(req: Request, res: Response, next: NextFunction) {
  console.log(`Request...`);
  next();
};
Global middleware
全体に共通で差し込みたい場合はINestApplicationインスタンスのuse()を使う。ただしDIはできなくなるのでloggerとかシンプルなものに限った方が良さそう。どうしてもDIが必要な場合はroot module (AppModule)に適用してpathを'*'にする。
Exception filters
例外が処理されない場合、デフォルトのglobal exception filterが対応する。
例外がHttpExceptionのインスタンス(または継承クラス)の場合はそれによるが、そうでない場合は
{
  "statusCode": 500,
  "message": "Internal server error"
}
となる。
例外がstatusCodeとmessageを含んでいる場合はその値が使われる。
Built-in HTTP exceptions
自分でHTTPExceptionを継承したexceptionクラスを実装することもできるが、nestで準備されているexceptionも色々ある
BadRequestException
UnauthorizedException
NotFoundException
ForbiddenException
NotAcceptableException
RequestTimeoutException
ConflictException
GoneException
HttpVersionNotSupportedException
PayloadTooLargeException
UnsupportedMediaTypeException
UnprocessableEntityException
InternalServerErrorException
NotImplementedException
ImATeapotException
MethodNotAllowedException
BadGatewayException
ServiceUnavailableException
GatewayTimeoutException
PreconditionFailedException
Exception filters
Exception filterを自作する場合、ExceptionFilterを継承し、かつ、@CatchデコレーターでどのExceptionを対象にするか明示する。
Exception filterで実装する関数ではArgumentsHostのインスタンスが渡されてそこからrequestやresponseにアクセスできる。直接request/responseが渡されないのは、HTTP以外を採用している場合でも対応できるようするために抽象化している。
Filterの設定
controllerの関数、controllerクラス自身、またはapp全体の3種類
ExceptionFilterを継承していれば上記3つのどこにでも設定できる。
注釈に
The useGlobalFilters() method does not set up filters for gateways or hybrid applications.
とあるがgatewaysとhybrid applicationsが何かわからないのでそこは保留。
defaultで実装されているexception filterを拡張する、ということも可能。
@Catch()
export class AllExceptionsFilter extends BaseExceptionFilter {
  catch(exception: unknown, host: ArgumentsHost) {
    super.catch(exception, host);
  }
}
その場合、bootstrap()でglobalfilterとして登録するか、appmoduleでAPP_FILTERに対応するproviderとして登録する。
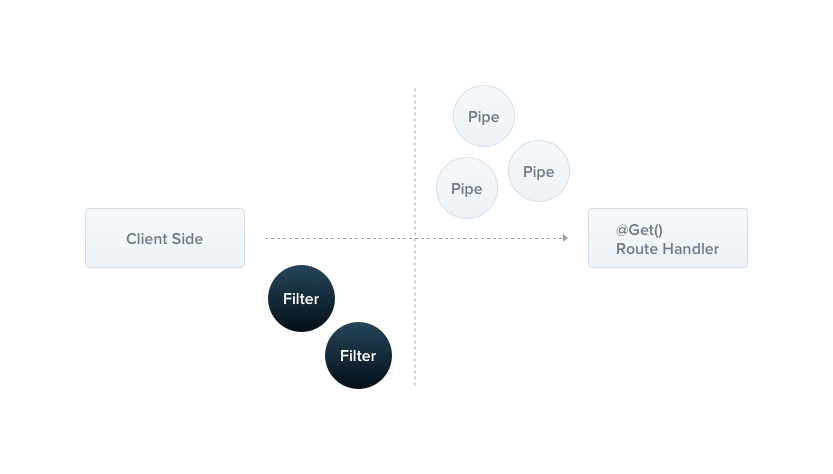
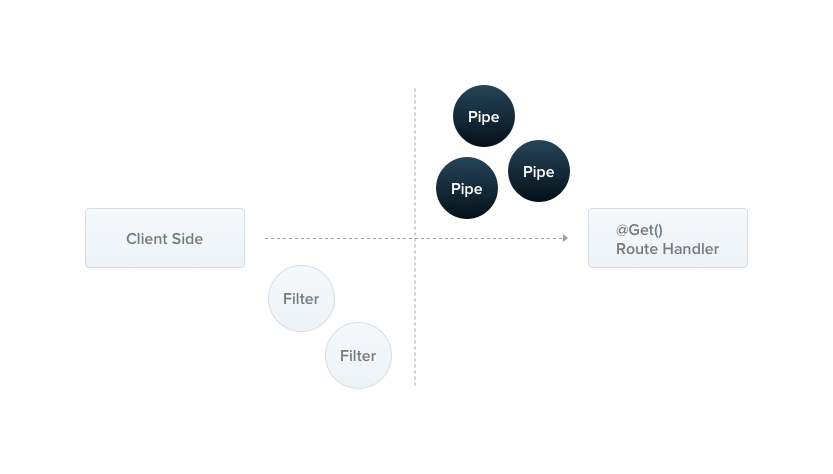
Pipes
利用シーン
- transformation
- 入力データを適切な値に変換する
- validation
- 入力データの検証。
controllerのルートhandlerに渡る前に処理される。
Pipeはexception zone内で実行される。つまりexception filterの補足範囲内。
builtin pipeは以下の通り
ValidationPipe
ParseIntPipe
ParseFloatPipe
ParseBoolPipe
ParseArrayPipe
ParseUUIDPipe
ParseEnumPipe
DefaultValuePipe
ParseFilePipe
pipesの設定方法
controllerのhandler引数にデコレーターを付けて使う。
ParseIntPipeはpathの文字列を数値にする。abcなどが入ってきた場合はvalidation errorに変換される。
@Queryなどを使えばクエリ文字列にも使える。
@Get(':id')
async findOne(@Param('id', ParseIntPipe) id: number) {
  return this.catsService.findOne(id);
}
validation
validaitonもpipesを使うシーンだが別セクションで説明されている
pipeの自作
PipeTransformインターフェースを実装する。
渡されるmetadataがちょっと特殊で、@Bodyや@Queryなどでリクエストデータから抽出を指示されたデータが渡されてくる
この時注意点
WARNING
TypeScript interfaces disappear during transpilation. Thus, if a method parameter's type is declared as an interface instead of a class, the metatype value will be Object.
deepl
警告
TypeScript のインターフェースはトランスパイル時に消滅する。したがって、メソッドパラメータの型がクラスではなくインターフェースとして宣言されている場合、メタタイプの値はObjectになる。
こういうのもあってinterfaceよりもクラスにしましょう、と言っていた様子。
DTOなどObjectベースのvalidation
方法1:Object schema validation
Joiが紹介されている
Joiの御作法に則ったschemaを定義してvalidationPipeのコンストラクタに渡してチェックする方式。
Joiの書き方がちょっとクセある。
方法2:Class validator
こちらはTypeScript利用前提。
class-validator class-transformerという2つのnpmパッケージを使う
DTOクラスのインスタンス変数に属性を表すデコレーターを追加し、それを利用してvalidateionする。
デコレーターは結構色々あるので、基本的なvalidationはこれで足りそうな気がする。
import { IsString, IsInt } from 'class-validator';

export class CreateCatDto {
  @IsString()
  name: string;

  @IsInt()
  age: number;

  @IsString()
  breed: string;
}
サンプルにある以下のvalidationPipeがそのまま使えそう
というかbuildinで提供されていた。
import { PipeTransform, Injectable, ArgumentMetadata, BadRequestException } from '@nestjs/common';
import { validate } from 'class-validator';
import { plainToInstance } from 'class-transformer';

@Injectable()
export class ValidationPipe implements PipeTransform<any> {
  // class-validatorの検証はasyncにできるものもあるのでここを意図的にasyncにしている
  async transform(value: any, { metatype }: ArgumentMetadata) {
    if (!metatype || !this.toValidate(metatype)) {
      return value;
    }
    const object = plainToInstance(metatype, value);  // DTOにつけたデコレーター情報付きのインスタンスに変換
    const errors = await validate(object); // デコレーター情報を元に検証
    if (errors.length > 0) {
      throw new BadRequestException('Validation failed');
    }
    return value;
  }

  // javascriptの下記の型だった場合、validationデコレーターを付けられないので処理をスキップさせる。
  private toValidate(metatype: Function): boolean {
    const types: Function[] = [String, Boolean, Number, Array, Object];
    return !types.includes(metatype);
  }
}
設定方法
@Post()
async create(
  @Body(new ValidationPipe()) createCatDto: CreateCatDto, // @Bodyの引数にセット
) {
  this.catsService.create(createCatDto);
}
Global scoped pipes
bootstrap()の中でapp.useGlobalPipesにValidationPipeを設定することで全てのリクエストに対して検証を差し込むことができる。
他でもあったが、useGlobalPiepesはDIコンテナの範囲外になるため、injectが使えない。
もしDIしたい場合はAppModuleにて、APP_PIPEに対応するクラスとしてprividersに設定する。
Transform pipe
使い道
- デフォルト値の設定
- user idからユーザ情報をEntityなどにしてcontrollerに渡す
- その場合PipeでserviceのDIが必要になる
デフォルト値の設定は引数に初期値設定しても動くことは動く。
ただし型が不安定になるからPipeを使った方が安全。
Pipeを使うと型が想定通り
  @Get()
  findAll(@Query('page', new DefaultValuePipe(0), ParseIntPipe) page: number) {
    console.log(`findall=${page}`);
    console.log(typeof page);  // クエリにpageがあってもなくても型はnumber
    return this.catService.findAll();
  }
デフォルト値だけに頼ると型がぶれる
  @Get()
  findAll(@Query('page') page = 5)
    console.log(`findall=${page}`);
    console.log(typeof page); // クエリにpageがない場合は5、つまりnumberだが、pageがあるとstringになる
    return this.catService.findAll();
  }
Guards
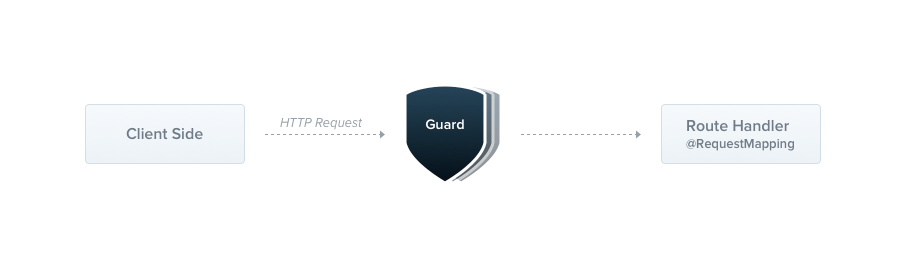
Guards have a single responsibility. They determine whether a given request will be handled by the route handler or not, depending on certain conditions (like permissions, roles, ACLs, etc.) present at run-time. This is often referred to as authorization. Authorization (and its cousin, authentication, with which it usually collaborates) has typically been handled by middleware in traditional Express applications. Middleware is a fine choice for authentication, since things like token validation and attaching properties to the request object are not strongly connected with a particular route context (and its metadata).
But middleware, by its nature, is dumb. It doesn't know which handler will be executed after calling the next() function. On the other hand, Guards have access to the ExecutionContext instance, and thus know exactly what's going to be executed next. They're designed, much like exception filters, pipes, and interceptors, to let you interpose processing logic at exactly the right point in the request/response cycle, and to do so declaratively. This helps keep your code DRY and declarative.
deepl
ガードは1つの責任を持ちます。それらは、実行時に存在する特定の条件 (パーミッション、ロール、ACL など) に応じて、与えられたリクエストがルートハンドラによって処理されるかどうかを決定します。これはしばしば認可 (authorization) と呼ばれます。認可は、従来の Express アプリケーションでは、ミドルウェアによって処理されてきました (認証は、通常これと連携しています)。トークンの検証やリクエストオブジェクトへのプロパティのアタッチなどは、特定のルートコンテキスト (およびそのメタデータ) に強く依存しないため、ミドルウェアは認証に適した選択です。
しかし、ミドルウェアはその性質上、頭が悪いのです。next()関数を呼び出した後にどのハンドラが実行されるかはわかりません。一方、Guard は ExecutionContext インスタンスにアクセスできるため、次に何が実行されるかを正確に知ることができます。例外フィルタやパイプ、インターセプターのように、リクエスト/レスポンスサイクルの適切なタイミングで処理ロジックを挿入できるように設計されており、それを宣言的に実行することができます。これは、あなたのコードをDRYかつ宣言的に保つのに役立ちます。
HINT
Guards are executed after all middleware, but before any interceptor or pipe.
典型的な使い方は認証だがそれ以外ってあるか?
ExecutionContextの使い方を理解すればもっと色々つけるよっていうことらしい。別セクションで解説されている様子。
利用する場合はcontrollerに
@UseGuards(RolesGuard)
として設定する。
controller, method, globalのそれぞれのスコープで設定する方法が提供されている。
roleなどをguard処理に利用したい場合はSetMetadataでコレーターを使う。
直接設定もできるが、キー名がいろんなところに分散して記述されるのを防ぐため、以下のように関数にするとよい、という説明。
export const Roles = (...roles: string[]) => SetMetadata('roles', roles);
@Post()
@Roles('admin') // これ。'roles'というキーが露出していない
async create(@Body() createCatDto: CreateCatDto) {
  this.catsService.create(createCatDto);
}
guardでfalseを返すと
{
  "statusCode": 403,
  "message": "Forbidden resource",
  "error": "Forbidden"
}
がデフォルトで返却される。裏ではUnauthorizedExceptionが使われている。
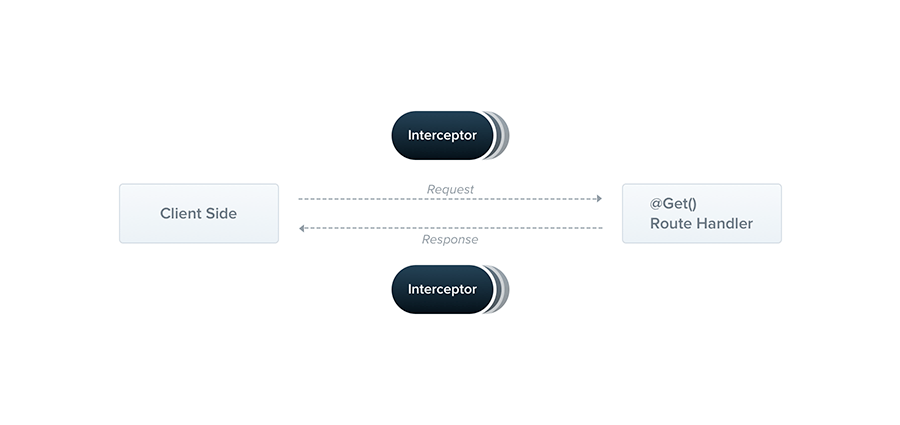
Interceptors
名前の通りインターセプトする。タイミングはcontrollerのroute handlerが呼ばれる前。
使い方として紹介されているのは
- 追加ロジックをroute handlerの実行前後に差し込む
- 関数(handlerのこと?)の応答を変換する
- 例外を変換する
- 基本的な関数の振る舞いを拡張する(?)
- 特定条件の時に関数を完全に上書きする(キャッシュ目的など)
とのこと。
intercept()メソッドがInterceptorのメイン処理になるが、引数のExceptionContextは前のセクションであったものと同じ。もう1つのCallHandlerが特徴的。
このhandlerのhandle()を呼び出すことでcontrollerのhandlerメソッドが実行される。これを呼び出さなければ実行されないので、別の処理で上書きできるというのはこれの動きを使う、ということだと思う。
CallHandlerのhandle()ではRxJSが使われていてObvervableが返される。これを(Rxの方の)pipe()で繋いであげて後続処理を入れることでhandle()後の処理を実装できる。
実装例がわかりやすい
import { Injectable, NestInterceptor, ExecutionContext, CallHandler } from '@nestjs/common';
import { Observable } from 'rxjs';
import { tap } from 'rxjs/operators';

@Injectable()
export class LoggingInterceptor implements NestInterceptor {
  intercept(context: ExecutionContext, next: CallHandler): Observable<any> {
    console.log('Before...');

    const now = Date.now();
    return next
      .handle() // 特定条件のときにこれを呼び出さずに別のObservableを返せばhandlerを完全に上書きできる、はず
      .pipe( // これはRxJSのやつ
        tap(() => console.log(`After... ${Date.now() - now}ms`)), // tapは処理をしたら流れてきたデータをそのまま後続に流す
      );
  }
}
使い方
@UseInterceptors(LoggingInterceptor)
export class CatsController {}
controller, method, globalそれぞれの設定の仕方がある。上記はcontroller。
面白い使い方としてcontrollerのhandlerレベルでtimeoutを設定することもできる。
import { Injectable, NestInterceptor, ExecutionContext, CallHandler, RequestTimeoutException } from '@nestjs/common';
import { Observable, throwError, TimeoutError } from 'rxjs';
import { catchError, timeout } from 'rxjs/operators';

@Injectable()
export class TimeoutInterceptor implements NestInterceptor {
  intercept(context: ExecutionContext, next: CallHandler): Observable<any> {
    return next.handle().pipe(
      timeout(5000),   // Rxのtimeout
      catchError(err => {  // RxのcatchError
        if (err instanceof TimeoutError) {
          return throwError(() => new RequestTimeoutException());
        }
        return throwError(() => err);
      }),
    );
  };
};
Overviewを読み終えて
基本的には
- 入力を受けるcontroller
- ビジネスロジックを行うservice
- DI設定を担当するmodule
となっている。
それ以降のセクションmiddleware〜intercepterは全部controllerの処理前、または処理後に差し込める機能になっている。
middlewares
exception filters
pipes
guards
interceptors
つまり、RESTとかgraphqlとかの世界は一旦controllerで受け止めて、serviceには純粋なTypeScript/JavaScriptのロジックを記述できるようにしたいののだと思う。
そうすると、serviceとか以外にcliのgenerateで作れるのってなんなの?
という点が気になる。この先のセクションで語られているのだろうか。。。
Usage: nest generate|g [options] <schematic> [name] [path]

Generate a Nest element.
  Schematics available on @nestjs/schematics collection:
    ┌───────────────┬─────────────┬──────────────────────────────────────────────┐
    │ name          │ alias       │ description                                  │
    │ application   │ application │ Generate a new application workspace         │
    │ class         │ cl          │ Generate a new class                         │
    │ configuration │ config      │ Generate a CLI configuration file            │
    │ controller    │ co          │ Generate a controller declaration            │
    │ decorator     │ d           │ Generate a custom decorator                  │
    │ filter        │ f           │ Generate a filter declaration                │
    │ gateway       │ ga          │ Generate a gateway declaration               │
    │ guard         │ gu          │ Generate a guard declaration                 │
    │ interceptor   │ itc         │ Generate an interceptor declaration          │
    │ interface     │ itf         │ Generate an interface                        │
    │ middleware    │ mi          │ Generate a middleware declaration            │
    │ module        │ mo          │ Generate a module declaration                │
    │ pipe          │ pi          │ Generate a pipe declaration                  │
    │ provider      │ pr          │ Generate a provider declaration              │
    │ resolver      │ r           │ Generate a GraphQL resolver declaration      │
    │ service       │ s           │ Generate a service declaration               │
    │ library       │ lib         │ Generate a new library within a monorepo     │
    │ sub-app       │ app         │ Generate a new application within a monorepo │
    │ resource      │ res         │ Generate a new CRUD resource                 │
    └───────────────┴─────────────┴──────────────────────────────────────────────┘
あ、Custom route decorators忘れてた
controllerのhandlerメソッドパラメタにつけるデコレーターはParamDecoratorという。
これらはcreateParamDecorator()を使うとオリジナルのParamDecoratorを作れる。
export const User = createParamDecorator(
  (data: unknown, ctx: ExecutionContext) => {
    const request = ctx.switchToHttp().getRequest();
    return request.user;
  },
);
@Get()
async findOne(@User() user: UserEntity) {
//以下略
既存デコレーターを組み合わせて1つのデコレーターにすることもできる。
公式の例にあるのが良いサンプル。
import { applyDecorators } from '@nestjs/common';

export function Auth(...roles: Role[]) {
  return applyDecorators(
    SetMetadata('roles', roles),
    UseGuards(AuthGuard, RolesGuard),
    ApiBearerAuth(),
    ApiUnauthorizedResponse({ description: 'Unauthorized' }),
  );
}
以下の宣言でmetadata, guard, buildt-in auth, respoinse設定の4つのデコレーターを1つで宣言できる。
@Auth('admin')
前述のgenerate cliでわからなかったgatewayはweb socketを扱う時にでてくる。
@WebSocketGateway()デコレーターが付いているとgatewayという扱いになる。