はじめに
こんにちは、Givery AIラボ所属AIエンジニアの楊(ヨウ)です。
Codex-CLIは、OpenAI社が4月17日に公開したオープンソースの軽量AIコーディングエージェントで、ターミナル上で動作し、ローカルのファイルを直接編集できます。自然言語を介してコードの提案や修正、さらにはプロジェクトの自律的な生成まで、多様な「Vibe Coding」支援を提供します。
前回の記事では、Codex-CLIツールを体験し、Azure OpenAIを経由してo4-miniモデルを基盤モデルとしてデプロイし、ローカル環境にCodex-CLIを導入する方法や使い方について詳しく説明しました。また、Codex-CLIを使っていくつかの小さなプロジェクトも生成しました(公式のGitHubリポジトリは現時点でOpenAI APIのみに対応していますが、Azure OpenAIに対応したコミュニティ版を利用しました)。
興味のある方や、すぐにCodex-CLIをローカル環境へ導入したい方は以下のリンクをご参照ください。
今回の記事では、さらに一歩踏み込んでCodex-CLIのソースコードのコア部分を掘り下げ、Codex-CLIがどのよう言語モデルを活用し、コーディング支援のエージェントへと進化しているのかを解説します。
特に今回は、コードの解説においてAIモデルの活用に重心を置くため、一部の機能やフロントエンドフレームワークなどアプリ開発に関する内容は省略させていただきますので、ご了承ください。
全体のコードをご覧になりたい方は、ぜひ公式リポジトリをご参照ください。
本文はやや長くなっていますが、今回のコードリーディングで得られたAIモデル活用のポイントや感想は、本文下部の「感想」章にまとめています。お急ぎの方はそちらをご参照ください。
全体像
まず、Codex-CLIのソースコード全体のシステム構成を見てみましょう。
ここでは便利なツールとして「deepwiki」をおすすめします。使い方は、GitHubのリポジトリURLの「github」の部分を「deepwiki」に書き換えるだけで、そのコードベースについてAIモデルが生成した詳細な解説ドキュメントを得ることができます。
たとえば今回は、https://github.com/openai/codex を https://deepwiki.com/openai/codex に変えれば良いです。
deepwiki上では、Codex-CLIプロジェクト全体のシステム構成図も確認できます。

Codex-CLIツールの実装は、
- 利用モード(例:インタラクティブモードやクワイエットモードなど)
- 利便性のための機能(例:ヘルプメニュー、コマンド補完、メッセージ通知など)
- 安全性の考慮(例:ログ、サンドボックスやエラーメッセージなど)
など、多くの工夫が凝らされています。その結果、ツール自体は使いやすくななりましたが、ソースコードは冗長になっています。したがって、全体を一通り解説しようとすると内容が分かりにくくなり、本記事の本来の目的(AIモデルの活用)から逸れてしまうと考えています。
想定される使用ループ
そこで、今回はCodex-CLIのもっともシンプルな使用ループに絞り、その際に関わるコードのみを抜粋し、UI設計やログ記録など、モデルの活用に直接関係しない部分は勝手に省略することにしました(もちろん、これらもプロジェクトにとっては非常に重要です!)。できるだけ読者の方に、Codex-CLIの利用の流れがどのように実装されているのかを分かりやすく伝えたいと考えています。
具体的には、次のような使用ループを想定しています。
- ターミナルで
codexというコマンドを入力し、Codex-CLIを起動する - 対話型の画面(UI)に切り替え、プロンプトを入力する
- モデルが返信を生成し、返信にシェルコマンドの提案が含まれる場、ユーザーに確認を求める
- ユーザーが提案を確認し、コマンドを実行する
- 3と4を繰り返し、生成が完了するまで続ける。
上述の操作と筆者自身の理解を踏まえ、本記事ではCodex-CLIのソースコードをCLIエントリポイント、エージェントループ、コマンド実行の3つの部分に分けて解説します。特に、エージェントループ、すなわちユーザーとAIモデルのやりとりを担当する部分に重点を置いて解説します。
CLIエントリポイント
CLIエントリポイントは、ユーザがcodex [option] <prompt>コマンドを入力してからUIがレンダリングされるまでの動作を指しています。
この動作は主にcli.tsx で定義されています。
主な実行順は以下の通りです。
今回は特に、codexというコマンドを入力した場合を想定します。
コマンドライン引数の解析
ユーザーからのターミナルコマンドを受け取り、meowライブラリのmeow()メソッドを使ってコマンドラインのオプション引数を解析します。また、デフォルト値の設定やヘルプ情報の編集なども可能です。
該当コード:meow()
const cli = meow(
  `
  Usage
    $ codex [options] <prompt>
    $ codex completion <bash|zsh|fish>

  Options
    --version                       Print version and exit

    -h, --help                      Show usage and exit
    -m, --model <model>             Model to use for completions (default: o4-mini)
    -p, --provider <provider>       Provider to use for completions (default: openai)
    -i, --image <path>              Path(s) to image files to include as input
    -v, --view <rollout>            Inspect a previously saved rollout instead of starting a session
    -q, --quiet                     Non-interactive mode that only prints the assistant's final output
    -c, --config                    Open the instructions file in your editor
    -w, --writable-root <path>      Writable folder for sandbox in full-auto mode (can be specified multiple times)
    -a, --approval-mode <mode>      Override the approval policy: 'suggest', 'auto-edit', or 'full-auto'

    --auto-edit                Automatically approve file edits; still prompt for commands
    --full-auto                Automatically approve edits and commands when executed in the sandbox

    --no-project-doc           Do not automatically include the repository's 'codex.md'
    --project-doc <file>       Include an additional markdown file at <file> as context
    --full-stdout              Do not truncate stdout/stderr from command outputs
    --notify                   Enable desktop notifications for responses

    --disable-response-storage Disable server‑side response storage (sends the
                               full conversation context with every request)

    --flex-mode               Use "flex-mode" processing mode for the request (only supported
                              with models o3 and o4-mini)

  Dangerous options
    --dangerously-auto-approve-everything
                               Skip all confirmation prompts and execute commands without
                               sandboxing. Intended solely for ephemeral local testing.

  Experimental options
    -f, --full-context         Launch in "full-context" mode which loads the entire repository
                               into context and applies a batch of edits in one go. Incompatible
                               with all other flags, except for --model.

  Examples
    $ codex "Write and run a python program that prints ASCII art"
    $ codex -q "fix build issues"
    $ codex completion bash
`,
  {
    importMeta: import.meta,
    autoHelp: true,
    flags: {
      // misc
      help: { type: "boolean", aliases: ["h"] },
      version: { type: "boolean", description: "Print version and exit" },
      view: { type: "string" },
      model: { type: "string", aliases: ["m"] },
      provider: { type: "string", aliases: ["p"] },
      image: { type: "string", isMultiple: true, aliases: ["i"] },
      quiet: {
        type: "boolean",
        aliases: ["q"],
        description: "Non-interactive quiet mode",
      },
      config: {
        type: "boolean",
        aliases: ["c"],
        description: "Open the instructions file in your editor",
      },
      dangerouslyAutoApproveEverything: {
        type: "boolean",
        description:
          "Automatically approve all commands without prompting. This is EXTREMELY DANGEROUS and should only be used in trusted environments.",
      },
      autoEdit: {
        type: "boolean",
        description: "Automatically approve edits; prompt for commands.",
      },
      fullAuto: {
        type: "boolean",
        description:
          "Automatically run commands in a sandbox; only prompt for failures.",
      },
      approvalMode: {
        type: "string",
        aliases: ["a"],
        description:
          "Determine the approval mode for Codex (default: suggest) Values: suggest, auto-edit, full-auto",
      },
      writableRoot: {
        type: "string",
        isMultiple: true,
        aliases: ["w"],
        description:
          "Writable folder for sandbox in full-auto mode (can be specified multiple times)",
      },
      noProjectDoc: {
        type: "boolean",
        description: "Disable automatic inclusion of project-level codex.md",
      },
      projectDoc: {
        type: "string",
        description: "Path to a markdown file to include as project doc",
      },
      flexMode: {
        type: "boolean",
        description:
          "Enable the flex-mode service tier (only supported by models o3 and o4-mini)",
      },
      fullStdout: {
        type: "boolean",
        description:
          "Disable truncation of command stdout/stderr messages (show everything)",
        aliases: ["no-truncate"],
      },
      reasoning: {
        type: "string",
        description: "Set the reasoning effort level (low, medium, high)",
        choices: ["low", "medium", "high"],
        default: "high",
      },
      // Notification
      notify: {
        type: "boolean",
        description: "Enable desktop notifications for responses",
      },

      disableResponseStorage: {
        type: "boolean",
        description:
          "Disable server-side response storage (sends full conversation context with every request)",
      },

      // Experimental mode where whole directory is loaded in context and model is requested
      // to make code edits in a single pass.
      fullContext: {
        type: "boolean",
        aliases: ["f"],
        description: `Run in full-context editing approach. The model is given the whole code
          directory as context and performs changes in one go without acting.`,
      },
    },
  },
);
ユーザーが入力したオプション引数の値はcli.flagに保存されます。特に、今回想定している使用ループにおいては、入力したコマンドに引数が一切含まれていないため、すべての値はデフォルトのままとなります。
ハンドラー
続いて、cli.tsxでは複数のハンドラー(handler)が定義されています。プログラムは、ユーザーから送信されたコマンドオプション引数を解析・取得した後、その内容に応じて異なる処理(利用モードの切り替え)を実行します。
今回の想定では、引数が空であるため、デフォルトの動作を実行し、AppというUIコンポーネントをレンダリングします。
// ...

const instance = render(
  <App
    prompt={prompt}
    config={config}
    rollout={rollout}
    imagePaths={imagePaths}
    approvalPolicy={approvalPolicy}
    additionalWritableRoots={additionalWritableRoots}
    fullStdout={Boolean(cli.flags.fullStdout)}
  />,
  {
    patchConsole: process.env["DEBUG"] ? false : true,
  },
);
特に、promptやrolloutなどの引数は入力されていないため、デフォルトで空の値が渡されます。
他のハンドラーの例
下記のハンドラーは、cli.flags.helpの値がtrue、つまりユーザーがcodex -hやcodex --helpコマンドを入力した場合に、ヘルプ情報を表示するように定義されています。
if (cli.flags.help) {
  cli.showHelp();
}
下記のハンドラーは、cli.flags.quietの値がtrue、つまりユーザーがcodex -qやcodex --quietコマンドを入力した場合に、クワイエットモードで起動するように定義されています。
if (cli.flags.quiet) {
  process.env["CODEX_QUIET_MODE"] = "1";
  if (!prompt || prompt.trim() === "") {
    // eslint-disable-next-line no-console
    console.error(
      'Quiet mode requires a prompt string, e.g.,: codex -q "Fix bug #123 in the foobar project"',
    );
    process.exit(1);
  }

  // Determine approval policy for quiet mode based on flags
  const quietApprovalPolicy: ApprovalPolicy =
    cli.flags.fullAuto || cli.flags.approvalMode === "full-auto"
      ? AutoApprovalMode.FULL_AUTO
      : cli.flags.autoEdit || cli.flags.approvalMode === "auto-edit"
        ? AutoApprovalMode.AUTO_EDIT
        : config.approvalMode || AutoApprovalMode.SUGGEST;

  await runQuietMode({
    prompt,
    imagePaths: imagePaths || [],
    approvalPolicy: quietApprovalPolicy,
    additionalWritableRoots,
    config,
  });
  onExit();
  process.exit(0);
}
UIツリー
Codex-CLIは、Reactフレームワークを用いてUIを構築しています。AppコンポーネントがそのUIツリーのルートとなり、渡された引数の値や内部状態に応じてさまざまな子コンポーネントを組み合わせます。
プロジェクト全体のUIツリー構造は以下の通りです。特に、今回の想定利用で実際にレンダリングされたコンポーネントは赤色で示されています。
ルートコンポーネントであるAppコンポーネントは、App.tsx内で定義されています。
該当コード:App
export default function App({
  prompt,
  config,
  rollout,
  imagePaths,
  approvalPolicy,
  additionalWritableRoots,
  fullStdout,
}: Props): JSX.Element {
  const app = useApp();
  const [accepted, setAccepted] = useState(() => false);
  const [cwd, inGitRepo] = useMemo(
    () => [process.cwd(), checkInGit(process.cwd())],
    [],
  );
  const { internal_eventEmitter } = useStdin();
  internal_eventEmitter.setMaxListeners(20);

  if (rollout) {
    return (
      <TerminalChatPastRollout
        session={rollout.session}
        items={rollout.items}
      />
    );
  }

  // ...

  return (
    <TerminalChat
      config={config}
      prompt={prompt}
      imagePaths={imagePaths}
      approvalPolicy={approvalPolicy}
      additionalWritableRoots={additionalWritableRoots}
      fullStdout={fullStdout}
    />
  );
}
実行ロジックに注目すると、--view <rollout>でrolloutが渡されていないため、デフォルトで空の値となり、TerminalChatコンポーネントをレンダリングします。これは、terminal-chat.tsx内で定義されています。
該当コード:TerminalChat
export default function TerminalChat({
  config,
  prompt: _initialPrompt,
  imagePaths: _initialImagePaths,
  approvalPolicy: initialApprovalPolicy,
  additionalWritableRoots,
  fullStdout,
}: Props): React.ReactElement {
  const notify = Boolean(config.notify);
  const [model, setModel] = useState<string>(config.model);
  const [provider, setProvider] = useState<string>(config.provider || "openai");
  const [lastResponseId, setLastResponseId] = useState<string | null>(null);
  const [items, setItems] = useState<Array<ResponseItem>>([]);
  const [loading, setLoading] = useState<boolean>(false);
  const [approvalPolicy, setApprovalPolicy] = useState<ApprovalPolicy>(
    initialApprovalPolicy,
  );
  const [thinkingSeconds, setThinkingSeconds] = useState(0);

  // ...

  const {
    requestConfirmation,
    confirmationPrompt,
    explanation,
    submitConfirmation,
  } = useConfirmation();
  const [overlayMode, setOverlayMode] = useState<OverlayModeType>("none");
  const [diffText, _setDiffText] = useState<string>("");
  const [initialPrompt, setInitialPrompt] = useState(_initialPrompt);
  const [initialImagePaths, setInitialImagePaths] =
    useState(_initialImagePaths);
  const PWD = React.useMemo(() => shortCwd(), []);

  const agentRef = React.useRef<AgentLoop>();
  const [, forceUpdate] = React.useReducer((c) => c + 1, 0); // trigger re‑render

  // ...

  useEffect(() => {
    if (confirmationPrompt != null) {
      log("skip AgentLoop recreation due to pending confirmationPrompt");
      return;
    }

    agentRef.current?.terminate();

    const sessionId = crypto.randomUUID();
    agentRef.current = new AgentLoop({
      model,
      provider,
      config,
      instructions: config.instructions,
      approvalPolicy,
      disableResponseStorage: config.disableResponseStorage,
      additionalWritableRoots,
      onLastResponseId: setLastResponseId,
      onItem: (item) => {
        log(`onItem: ${JSON.stringify(item)}`);
        setItems((prev) => {
          const updated = uniqueById([...prev, item as ResponseItem]);
          saveRollout(sessionId, updated);
          return updated;
        });
      },
      onLoading: setLoading,
      getCommandConfirmation: async (
        command: Array<string>,
        applyPatch: ApplyPatchCommand | undefined,
      ): Promise<CommandConfirmation> => {
        const commandForDisplay = formatCommandForDisplay(command);

        let { decision: review, customDenyMessage } = await requestConfirmation(
          <TerminalChatToolCallCommand commandForDisplay={commandForDisplay} />,
        );

        if (review === ReviewDecision.EXPLAIN) {
          const explanation = await generateCommandExplanation(
            command,
            model,
            Boolean(config.flexMode),
            config,
          );

          const confirmResult = await requestConfirmation(
            <TerminalChatToolCallCommand
              commandForDisplay={commandForDisplay}
              explanation={explanation}
            />,
          );

          review = confirmResult.decision;
          customDenyMessage = confirmResult.customDenyMessage;

          return { review, customDenyMessage, applyPatch, explanation };
        }

        return { review, customDenyMessage, applyPatch };
      },
    });

    forceUpdate();

    return () => {
      agentRef.current?.terminate();
      agentRef.current = undefined;
      forceUpdate(); // re‑render after teardown too
    };
    // eslint-disable-next-line react-hooks/exhaustive-deps
  }, [model, provider, config, requestConfirmation, additionalWritableRoots]);

  // ...

  return (
    <Box flexDirection="column">
      <Box flexDirection="column">
        // ... <TerminalMessageHistory>
        {overlayMode === "none" && agent && (
          <TerminalChatInput
            loading={loading}
            setItems={setItems}
            isNew={Boolean(items.length === 0)}
            setLastResponseId={setLastResponseId}
            confirmationPrompt={confirmationPrompt}
            explanation={explanation}
            submitConfirmation={(
              decision: ReviewDecision,
              customDenyMessage?: string,
            ) =>
              submitConfirmation({
                decision,
                customDenyMessage,
              })
            }
            contextLeftPercent={contextLeftPercent}
            openOverlay={() => setOverlayMode("history")}
            openModelOverlay={() => setOverlayMode("model")}
            openApprovalOverlay={() => setOverlayMode("approval")}
            openHelpOverlay={() => setOverlayMode("help")}
            openDiffOverlay={() => {
              const { isGitRepo, diff } = getGitDiff();
              let text: string;
              if (isGitRepo) {
                text = diff;
              } else {
                text = "`/diff` — _not inside a git repository_";
              }
              setItems((prev) => [
                ...prev,
                {
                  id: `diff-${Date.now()}`,
                  type: "message",
                  role: "system",
                  content: [{ type: "input_text", text }],
                },
              ]);
              // Ensure no overlay is shown.
              setOverlayMode("none");
            }}
            onCompact={handleCompact}
            active={overlayMode === "none"}
            interruptAgent={() => {
              if (!agent) {
                return;
              }
              log(
                "TerminalChat: interruptAgent invoked – calling agent.cancel()",
              );
              agent.cancel();
              setLoading(false);

              // Add a system message to indicate the interruption
              setItems((prev) => [
                ...prev,
                {
                  id: `interrupt-${Date.now()}`,
                  type: "message",
                  role: "system",
                  content: [
                    {
                      type: "input_text",
                      text: "⏹️  Execution interrupted by user. You can continue typing.",
                    },
                  ],
                },
              ]);
            }}
            submitInput={(inputs) => {
              agent.run(inputs, lastResponseId || "");
              return {};
            }}
            items={items}
            thinkingSeconds={thinkingSeconds}
          />
        )}

        // ... <other OverlayMode>

      </Box>
    </Box>
  );
}
TerminalChatコンポーネント内では、下記のReact hookが定義されており、コンポーネントが初めてレンダリングされたときや、modelやproviderなど特定の内部状態が再設定された際に、AgentLoopクラスのインスタンスが作成されます。
//...
useEffect(() => {
    //...
    agentRef.current = new AgentLoop({
      //...
    });
    //...
  }, [model, provider, config, ...
]);
//...
AgentLoopクラスは、AIモデルとのやりとりを定義しており、Codex-CLIのコアクラスと位置付けられます。ここではひとまず説明を省略し、「エージェントループ」で詳しく説明します。
また、TerminalChatコンポーネント内では、子コンポーネント間の切り替えを制御するための内部状態OverlayModeが定義されています。今回の想定利用では、この状態は常にOverlayMode == noneのままとなり、そのためさらにTerminalChatInputの子コンポーネントをレンダリングします。
//...

const [overlayMode, setOverlayMode] = useState<OverlayModeType>("none");

//...

return (
    <Box flexDirection="column">
      <Box flexDirection="column">
        // 省略されたレンダーリング <TerminalMessageHistory>
        {overlayMode === "none" && agent && (
          <TerminalChatInput
            loading={loading}
            setItems={setItems}
            isNew={Boolean(items.length === 0)}
            setLastResponseId={setLastResponseId}
            confirmationPrompt={confirmationPrompt}
            explanation={explanation}
            submitConfirmation={(
              decision: ReviewDecision,
              customDenyMessage?: string,
            ) =>
              submitConfirmation({
                decision,
                customDenyMessage,
              })
            }
            contextLeftPercent={contextLeftPercent}
            openOverlay={() => setOverlayMode("history")}
            openModelOverlay={() => setOverlayMode("model")}
            openApprovalOverlay={() => setOverlayMode("approval")}
            openHelpOverlay={() => setOverlayMode("help")}
            openDiffOverlay={() => {
              const { isGitRepo, diff } = getGitDiff();
              let text: string;
              if (isGitRepo) {
                text = diff;
              } else {
                text = "`/diff` — _not inside a git repository_";
              }
              setItems((prev) => [
                ...prev,
                {
                  id: `diff-${Date.now()}`,
                  type: "message",
                  role: "system",
                  content: [{ type: "input_text", text }],
                },
              ]);
              // Ensure no overlay is shown.
              setOverlayMode("none");
            }}
            onCompact={handleCompact}
            active={overlayMode === "none"}
            interruptAgent={() => {
              if (!agent) {
                return;
              }
              log(
                "TerminalChat: interruptAgent invoked – calling agent.cancel()",
              );
              agent.cancel();
              setLoading(false);

              // Add a system message to indicate the interruption
              setItems((prev) => [
                ...prev,
                {
                  id: `interrupt-${Date.now()}`,
                  type: "message",
                  role: "system",
                  content: [
                    {
                      type: "input_text",
                      text: "⏹️  Execution interrupted by user. You can continue typing.",
                    },
                  ],
                },
              ]);
            }}
            submitInput={(inputs) => {
              agent.run(inputs, lastResponseId || "");
              return {};
            }}
            items={items}
            thinkingSeconds={thinkingSeconds}
          />
        )}

        // ... <other OverlayMode>

      </Box>
    </Box>
  );
TerminalChatInput子コンポーネントはterminal-chat-input.tsx 内で定義されており、ユーザーがプロンプトを入力するためのUI画面を構成しています。
該当コード:TerminalChatInput
export default function TerminalChatInput({
isNew,
loading,
submitInput,
confirmationPrompt,
explanation,
submitConfirmation,
setLastResponseId,
setItems,
contextLeftPercent,
openOverlay,
openModelOverlay,
openApprovalOverlay,
openHelpOverlay,
openDiffOverlay,
onCompact,
interruptAgent,
active,
thinkingSeconds,
items = [],
}: {
isNew: boolean;
loading: boolean;
submitInput: (input: Array<ResponseInputItem>) => void;
confirmationPrompt: React.ReactNode | null;
explanation?: string;
submitConfirmation: (
decision: ReviewDecision,
customDenyMessage?: string,
) => void;
setLastResponseId: (lastResponseId: string) => void;
setItems: React.Dispatch<React.SetStateAction<Array<ResponseItem>>>;
contextLeftPercent: number;
openOverlay: () => void;
openModelOverlay: () => void;
openApprovalOverlay: () => void;
openHelpOverlay: () => void;
openDiffOverlay: () => void;
onCompact: () => void;
interruptAgent: () => void;
active: boolean;
thinkingSeconds: number;
// New: current conversation items so we can include them in bug reports
items?: Array<ResponseItem>;
}): React.ReactElement {
// Slash command suggestion index
const [selectedSlashSuggestion, setSelectedSlashSuggestion] =
useState<number>(0);
const app = useApp();
const [selectedSuggestion, setSelectedSuggestion] = useState<number>(0);
const [input, setInput] = useState("");
const [history, setHistory] = useState<Array<HistoryEntry>>([]);
const [historyIndex, setHistoryIndex] = useState<number | null>(null);
const [draftInput, setDraftInput] = useState<string>("");
const [skipNextSubmit, setSkipNextSubmit] = useState<boolean>(false);
const [fsSuggestions, setFsSuggestions] = useState<
Array<FileSystemSuggestion>
>([]);
const [selectedCompletion, setSelectedCompletion] = useState<number>(-1);
// Multiline text editor key to force remount after submission
const [editorState, setEditorState] = useState<{
key: number;
initialCursorOffset?: number;
}>({ key: 0 });
// Imperative handle from the multiline editor so we can query caret position
const editorRef = useRef<MultilineTextEditorHandle | null>(null);
// Track the caret row across keystrokes
const prevCursorRow = useRef<number | null>(null);
const prevCursorWasAtLastRow = useRef<boolean>(false);
// ...
const onSubmit = useCallback(
async (value: string) => {
const inputValue = value.trim();
// ...
// detect image file paths for dynamic inclusion
const images: Array<string> = [];
let text = inputValue;
// markdown-style image syntax: 
text = text.replace(/!\[[^\]]*?\]\(([^)]+)\)/g, (_m, p1: string) => {
images.push(p1.startsWith("file://") ? fileURLToPath(p1) : p1);
return "";
});
// quoted file paths ending with common image extensions (e.g. '/path/to/img.png')
text = text.replace(
/['"]([^'"]+?\.(?:png|jpe?g|gif|bmp|webp|svg))['"]/gi,
(_m, p1: string) => {
images.push(p1.startsWith("file://") ? fileURLToPath(p1) : p1);
return "";
},
);
// bare file paths ending with common image extensions
text = text.replace(
// eslint-disable-next-line no-useless-escape
/\b(?:\.[\/\\]|[\/\\]|[A-Za-z]:[\/\\])?[\w-]+(?:[\/\\][\w-]+)*\.(?:png|jpe?g|gif|bmp|webp|svg)\b/gi,
(match: string) => {
images.push(
match.startsWith("file://") ? fileURLToPath(match) : match,
);
return "";
},
);
text = text.trim();
// Expand @file tokens into XML blocks for the model
const expandedText = await expandFileTags(text);
const inputItem = await createInputItem(expandedText, images);
submitInput([inputItem]);
// Get config for history persistence.
const config = loadConfig();
// Add to history and update state.
const updatedHistory = await addToHistory(value, history, {
maxSize: config.history?.maxSize ?? 1000,
saveHistory: config.history?.saveHistory ?? true,
sensitivePatterns: config.history?.sensitivePatterns ?? [],
});
setHistory(updatedHistory);
setHistoryIndex(null);
setDraftInput("");
setSelectedSuggestion(0);
setInput("");
setFsSuggestions([]);
setSelectedCompletion(-1);
},
[
setInput,
submitInput,
setLastResponseId,
setItems,
app,
setHistory,
setHistoryIndex,
openOverlay,
openApprovalOverlay,
openModelOverlay,
openHelpOverlay,
openDiffOverlay,
history,
onCompact,
skipNextSubmit,
items,
],
);
if (confirmationPrompt) {
return (
<TerminalChatCommandReview
confirmationPrompt={confirmationPrompt}
onReviewCommand={submitConfirmation}
// allow switching approval mode via 'v'
onSwitchApprovalMode={openApprovalOverlay}
explanation={explanation}
// disable when input is inactive (e.g., overlay open)
isActive={active}
/>
);
}
return (
<Box flexDirection="column">
<Box borderStyle="round">
{loading ? (
<TerminalChatInputThinking
onInterrupt={interruptAgent}
active={active}
thinkingSeconds={thinkingSeconds}
/>
) : (
<Box paddingX={1}>
<MultilineTextEditor
ref={editorRef}
onChange={(txt: string) => {
setDraftInput(txt);
if (historyIndex != null) {
setHistoryIndex(null);
}
setInput(txt);
}}
key={editorState.key}
initialCursorOffset={editorState.initialCursorOffset}
initialText={input}
height={6}
focus={active}
onSubmit={(txt) => {
// If final token is an @path, replace with filesystem suggestion if available
const {
text: replacedText,
suggestion,
wasReplaced,
} = getFileSystemSuggestion(txt, true);
// If we replaced @path token with a directory, don't submit
if (wasReplaced && suggestion?.isDirectory) {
applyFsSuggestion(replacedText);
// Update suggestions for the new directory
updateFsSuggestions(replacedText, true);
return;
}
onSubmit(replacedText);
setEditorState((s) => ({ key: s.key + 1 }));
setInput("");
setHistoryIndex(null);
setDraftInput("");
}}
/>
</Box>
)}
</Box>
{/* Slash command autocomplete suggestions */}
{input.trim().startsWith("/") && (
<Box flexDirection="column" paddingX={2} marginBottom={1}>
{SLASH_COMMANDS.filter((cmd: SlashCommand) =>
cmd.command.startsWith(input.trim()),
).map((cmd: SlashCommand, idx: number) => (
<Box key={cmd.command}>
<Text
backgroundColor={
idx === selectedSlashSuggestion ? "blackBright" : undefined
}
>
<Text color="blueBright">{cmd.command}</Text>
<Text> {cmd.description}</Text>
</Text>
</Box>
))}
</Box>
)}
<Box paddingX={2} marginBottom={1}>
{isNew && !input ? (
<Text dimColor>
try:{" "}
{suggestions.map((m, key) => (
<Fragment key={key}>
{key !== 0 ? " | " : ""}
<Text
backgroundColor={
key + 1 === selectedSuggestion ? "blackBright" : ""
}
>
{m}
</Text>
</Fragment>
))}
</Text>
) : fsSuggestions.length > 0 ? (
<TextCompletions
completions={fsSuggestions.map((suggestion) => suggestion.path)}
selectedCompletion={selectedCompletion}
displayLimit={5}
/>
) : (
<Text dimColor>
ctrl+c to exit | "/" to see commands | enter to send
{contextLeftPercent > 25 && (
<>
{" — "}
<Text color={contextLeftPercent > 40 ? "green" : "yellow"}>
{Math.round(contextLeftPercent)}% context left
</Text>
</>
)}
{contextLeftPercent <= 25 && (
<>
{" — "}
<Text color="red">
{Math.round(contextLeftPercent)}% context left — send
"/compact" to condense context
</Text>
</>
)}
</Text>
)}
</Box>
</Box>
);
}
TerminalChatInputコンポーネントと、その子コンポーネントであるMultilineTextEditor内部のuseInput() hookが、ユーザープロンプトの入力ロジックを共同で定義しています。
前者は/コマンドやup、downによる入力履歴ナビゲーションなど、グローバルなショートカットキーの処理を担当し、後者は入力欄のテキストエディタ内でのカーソル表示など、より細かい入力イベントの処理を担当しています。
特に、入力欄にプロンプトを入力し、enterで送信する動作は、MultilineTextEditor内部のuseInputで定義されています。
//...

useInput(
    (input, key) => {
      if (!focus) {
        return;
      }

      // ...

      if (input === "\r") {
        // Plain Enter – submit (works on all basic terminals).
        if (onSubmit) {
          onSubmit(buffer.current.getText());
        }
        return;
      }

      // ...
    },
    { isActive: focus },
  );

//...
onSubmit()メソッドは、TerminalChatInputコンポーネント内で定義されています。
//...
const onSubmit = useCallback(
async (value: string) => {
const inputValue = value.trim();
// ...
const images: Array<string> = [];
let text = inputValue;
// markdown-style image syntax: 
text = text.replace(/!\[[^\]]*?\]\(([^)]+)\)/g, (_m, p1: string) => {
images.push(p1.startsWith("file://") ? fileURLToPath(p1) : p1);
return "";
});
// quoted file paths ending with common image extensions (e.g. '/path/to/img.png')
text = text.replace(
/['"]([^'"]+?\.(?:png|jpe?g|gif|bmp|webp|svg))['"]/gi,
(_m, p1: string) => {
images.push(p1.startsWith("file://") ? fileURLToPath(p1) : p1);
return "";
},
);
// bare file paths ending with common image extensions
text = text.replace(
// eslint-disable-next-line no-useless-escape
/\b(?:\.[\/\\]|[\/\\]|[A-Za-z]:[\/\\])?[\w-]+(?:[\/\\][\w-]+)*\.(?:png|jpe?g|gif|bmp|webp|svg)\b/gi,
(match: string) => {
images.push(
match.startsWith("file://") ? fileURLToPath(match) : match,
);
return "";
},
);
text = text.trim();
// Expand @file tokens into XML blocks for the model
const expandedText = await expandFileTags(text);
const inputItem = await createInputItem(expandedText, images);
submitInput([inputItem]);
// ...
},
// ...,
);
//...
onSubmit()メソッドは、生テキストの入力に対して前処理を行い、OpenAI APIが指定するpayload形式に整形されます。
具体的には、正規表現を使って入力テキスト中の画像パスを検索し、images配列に格納します。また、expandFileTags()を利用してテキスト中のファイルパスを、その内容を表すXML形式に変換し、expandedTextに格納します。
これらの情報をさらにcreateInputItem()メソッドに渡し、OpenAI APIが要求するpayload形式であるResponseInputItem.Messageに加工します。最後に、submitInput()メソッドで送信します。
該当コード:createInputItem()
createInputItem()メソッドは、元のstring型のプロンプトテキストtextと、Array<string>型の画像パス配列imagesを引数として受け取り、それらをOpenAI APIのresponses.create()メソッドで指定された形式の入力配列に変換します。
export async function createInputItem(
  text: string,
  images: Array<string>,
): Promise<ResponseInputItem.Message> {
  const inputItem: ResponseInputItem.Message = {
    role: "user",
    content: [{ type: "input_text", text }],
    type: "message",
  };

  for (const filePath of images) {
    try {
      /* eslint-disable no-await-in-loop */
      const binary = await fs.readFile(filePath);
      const kind = await fileTypeFromBuffer(binary);
      /* eslint-enable no-await-in-loop */
      const encoded = binary.toString("base64");
      const mime = kind?.mime ?? "application/octet-stream";
      inputItem.content.push({
        type: "input_image",
        detail: "auto",
        image_url: `data:${mime};base64,${encoded}`,
      });
    } catch (err) {
      inputItem.content.push({
        type: "input_text",
        text: `[missing image: ${path.basename(filePath)}]`,
      });
    }
  }

  return inputItem;
}
また、submitInput()メソッドはTerminalChatコンポーネント内で定義されており、AgentLoopクラスのrun()メソッドを呼び出してレスポンスを生成します。
//...
submitInput={(inputs) => {
              agent.run(inputs, lastResponseId || "");
              return {};
            }
//...
イメージ
codexを入力すると、App->TerminalChat->TerminalChatInputコンポーネントがレンダリングされ、下のようなUIを表示します。

また、TerminalChatInputコンポーネントと、その子コンポーネントであるMultilineTextEditor内部のuseInput()hookにより、入力欄からプロンプトを送信することができます。
エージェントループ
agent-loop.ts 内で定義されているAgentLoopクラスは、ユーザーとAIモデルのインタラクティブの方法を定義しており、Codex-CLIの中核となるクラスです。ここでは、このクラスについて説明します。
Main Property
AgentLoopクラスには、主に以下のプロパティがあります。
| name of porperty | type | explanation |
|---|---|---|
model |
string | モデル名(e.g., o3) |
instructions |
string | カスタム指示 |
approvalPolicy |
"suggest", "auto-edit", "full-auto" | 承諾モード |
config |
- | APIキーなどを含む設定情報 |
lastResponseId |
string | 前回のモデルレスポンスのcall id |
oai |
- | 実例化されたOpenAIモデル |
| ... | ... | ... |
Main Method
constructor()
クラスで作成されるオブジェクトインスタンスの生成と初期化を行うためのメソッド。
該当コード:constructor()
constructor({
    model,
    instructions,
    approvalPolicy,
    config,
    onItem,
    onLoading,
    getCommandConfirmation,
    onLastResponseId,
  }: AgentLoopParams & { config?: AppConfig }) {
    this.model = model;
    this.instructions = instructions;
    this.approvalPolicy = approvalPolicy;
    this.config =
      config ??
      ({
        model,
        instructions: instructions ?? "",
      } as AppConfig);
    this.onItem = onItem;
    this.onLoading = onLoading;
    this.getCommandConfirmation = getCommandConfirmation;
    this.onLastResponseId = onLastResponseId;
    this.sessionId = getSessionId() || randomUUID().replaceAll("-", "");
    const timeoutMs = OPENAI_TIMEOUT_MS;
    const apiKey = this.config.apiKey ?? process.env["OPENAI_API_KEY"] ?? "";
    this.oai = new OpenAI({
      ...(apiKey ? { apiKey } : {}),
      baseURL: OPENAI_BASE_URL,
      defaultHeaders: {
        originator: ORIGIN,
        version: CLI_VERSION,
        session_id: this.sessionId,
      },
      ...(timeoutMs !== undefined ? { timeout: timeoutMs } : {}),
    });

    //...
  }
特に、このメソッドでは下記のようにOpenAI APIを経由でOpenAIモデルのインスタンスを作成します。
this.oai = new OpenAI({
      ...(apiKey ? { apiKey } : {}),
      //...,
      },
handleFunctionCall()
handleFunctionCall()メソッドは、OpenAIモデルのインスタンスから返されるタイプがfunction_callのレスポンスを引数として受け取り、指定されたツールを呼び出して実行し、その結果を返します。
該当コード:handleFunctionCall()
private async handleFunctionCall(
    item: ResponseFunctionToolCall,
): Promise<Array<ResponseInputItem>> {
    if (this.canceled) {
      return [];
    }
    const isChatStyle =
      // eslint-disable-next-line @typescript-eslint/no-explicit-any
      (item as any).function != null;
    const name: string | undefined = isChatStyle
      ? // eslint-disable-next-line @typescript-eslint/no-explicit-any
        (item as any).function?.name
      : // eslint-disable-next-line @typescript-eslint/no-explicit-any
        (item as any).name;
    const rawArguments: string | undefined = isChatStyle
      ? // eslint-disable-next-line @typescript-eslint/no-explicit-any
        (item as any).function?.arguments
      : // eslint-disable-next-line @typescript-eslint/no-explicit-any
        (item as any).arguments;
    // eslint-disable-next-line @typescript-eslint/no-explicit-any
    const callId: string = (item as any).call_id ?? (item as any).id;
    const args = parseToolCallArguments(rawArguments ?? "{}");

    if (args == null) {
      const outputItem: ResponseInputItem.FunctionCallOutput = {
        type: "function_call_output",
        call_id: item.call_id,
        output: `invalid arguments: ${rawArguments}`,
      };
      return [outputItem];
    }
    const outputItem: ResponseInputItem.FunctionCallOutput = {
      type: "function_call_output",
      call_id: callId,
      output: "no function found",
    };
    const additionalItems: Array<ResponseInputItem> = [];
    if (name === "container.exec" || name === "shell") {
      const {
        outputText,
        metadata,
        additionalItems: additionalItemsFromExec,
      } = await handleExecCommand(
        args,
        this.config,
        this.approvalPolicy,
        this.getCommandConfirmation,
        this.execAbortController?.signal,
      );
      outputItem.output = JSON.stringify({ output: outputText, metadata });
      if (additionalItemsFromExec) {
        additionalItems.push(...additionalItemsFromExec);
      }
    }
    return [outputItem, ...additionalItems];
  }
具体的には、itemのプロパティから呼び出すツールの名前と引数を取得します。ツール名が利用可能なツールに含まれており、かつ引数が空でない場合は、handleExecCommand()メソッドを使ってツールを呼び出し、実行してその結果を返します。そうでない場合は、呼び出し失敗の情報を結果として返します。
handleExecCommand()メソッドの詳細については、「コマンド実行」で説明します。
run()
AgentLoopクラスのrun()メソッドは、OpenAIモデルインスタンスがユーザーからの1回の入力プロンプトを受け取り、ツールを呼び出してコマンドを実行したり、出力を返したりするという一連の動作を定義しています。このメソッドは本クラスの中核となるため、この部分のコードについて重点的に説明します。
引数部分について、このメソッドはinputとpreviousResponseIdの2つの引数を受け取ります。inputはユーザーの入力、つまりプロンプトであり、previousResponseIdは前回のOpenAIモデルとの会話履歴を特定するためのidです。OpenAI APIはこのidを使ってユーザーのこれまでの会話履歴を取得し、記憶を持った会話を実現しています。
// ...
public async run(
  input: Array<ResponseInputItem>,
  previousResponseId: string = "",
): Promise<void> {
  // ...
}
//...
実装部分について、理想的な状況下では、一回のrun()実行全体は以下のようなループになっています。
- ユーザーの入力シーケンスを前処理し、実際の入力シーケンスを得る
- OpenAIモデルインスタンスが入力シーケンスを受け取り、出力シーケンスを生成する
- モデルインスタンスのレスポンスのタイプ(
messageかfunction_call)に応じて異なる処理を行います。特に、function_callの場合は、対応するツールを呼び出して実行しその結果を取得します。 - 取得したツールの実行結果を新たな入力シーケンスとして、ステップ2と3を
function_callタイプのレスポンスが生成されなくなるまで繰り返す
これから、ステップバイステップで上述のプロセスを説明します。
ステップ1
CLIツールとして、中止(たとえばctrl+c)が発生する可能性を考慮する必要があります。ステップ1では、そのための前処理を行います。
1-4のループでrun()メソッドを複数回実行するシーンを想定します。もし前回のrun()がステップ2(モデルがレスポンスを生成した)の段階で割り込まれ、ステップ3と4(レスポンスに応じてツールを呼び出して実行し、その結果をモデルに返すこと)が実行されずに新しいrun()が始まると、OpenAI APIはエラーを返します(会話履歴にfunction_callが残ったまま、その実行結果が存在しないためです)。
このようなエラーを防ぐため、割り込まれて未実行となったfunction_callについては、手動で関数の実行結果(abortOutputs)を編集し、ユーザー入力の前に挿入する必要があります。
そのため、まずユーザーの入力シーケンスを前処理し、記録に未処理のfunction_callを補完します。
//...
const abortOutputs: Array<ResponseInputItem> = [];
if (this.pendingAborts.size > 0) {
  for (const id of this.pendingAborts) {
    abortOutputs.push({
      type: "function_call_output",
      call_id: id,
      output: JSON.stringify({
        output: "aborted",
        metadata: { exit_code: 1, duration_seconds: 0 },
      }),
    } as ResponseInputItem.FunctionCallOutput);
  }
  this.pendingAborts.clear();
}
//...

let turnInput = [...abortOutputs, ...input];
//...
this.pendingAbortsには、モデルが返した未処理のfunction_callのidが保存されています。
ステップ2
前処理済みの入力シーケンス(および必要な引数)をOpenAIモデルインスタンスoaiに渡して、モデルのレスポンスを取得します。
// ...
// eslint-disable-next-line no-await-in-loop
stream = await this.oai.responses.create({
  model: this.model,
  instructions: mergedInstructions,
  previous_response_id: lastResponseId || undefined,
  input: turnInput,
  stream: true,
  parallel_tool_calls: false,
  reasoning,
  tools: [
    {
      type: "function",
      name: "shell",
      description: "Runs a shell command, and returns its output.",
      strict: false,
      parameters: {
        type: "object",
        properties: {
          command: { type: "array", items: { type: "string" } },
          workdir: {
            type: "string",
            description: "The working directory for the command.",
          },
          timeout: {
            type: "number",
            description:
              "The maximum time to wait for the command to complete in milliseconds.",
          },
        },
        required: ["command"],
        additionalProperties: false,
      },
    },
  ],
});
turnInput = []
//...
特にresponse.create()メソッドにはreasoningという引数があります。これは、OpenAI社が新たに公開した推論モデルであるo3やo4-miniが、従来のチャットモデルと異なる特徴の一つです。Codex-CLIでは、このパラメータに対して以下のような設定が行われています
引数reasoning
従来のOpenAIチャットモデル(例:4o)とは異なり、新たに公開されたo3やo4-miniといった推論モデルは、通常の出力(output-text)に加えて、暗黙的にreasoningタイプの中間推論テキストも生成します。reasoning引数をhighに指定することで、より長く高品質な中間推論プロセスを生成できますが、その分トークン数が増え、コストも高くなります。
let reasoning: Reasoning | undefined;
if (this.model.startsWith("o")) {
  reasoning = { effort: "high" };
  if (this.model === "o3" || this.model === "o4-mini") {
    // @ts-expect-error waiting for API type update
    reasoning.summary = "auto";
  }
}
また、instructions引数はシステムプロンプトを表しており、その設定は以下の通りです。
引数instructions
const mergedInstructions = [prefix, this.instructions]
  .filter(Boolean)
  .join("\n");
if (isLoggingEnabled()) {
  // ...,
  );
}
instructionsは2つの部分で構成されています。this.instructionはクラスのプロパティであり、ユーザーが自由に定義できるカスタム指示です。一方、prefixはモデルにとって本質的なシステムプロンプトであり、Codex-CLIとしての役割や、どのようなことができるかをモデルに伝える内容となっています。具体的な内容は以下の通りです。
const prefix = `You are operating as and within the Codex CLI, a terminal-based agentic coding assistant built by OpenAI. It wraps OpenAI models to enable natural language interaction with a local codebase. You are expected to be precise, safe, and helpful.

You can:
- Receive user prompts, project context, and files.
- Stream responses and emit function calls (e.g., shell commands, code edits).
- Apply patches, run commands, and manage user approvals based on policy.
- Work inside a sandboxed, git-backed workspace with rollback support.
- Log telemetry so sessions can be replayed or inspected later.
- More details on your functionality are available at \`codex --help\`

The Codex CLI is open-sourced. Don't confuse yourself with the old Codex language model built by OpenAI many moons ago (this is understandably top of mind for you!). Within this context, Codex refers to the open-source agentic coding interface.

You are an agent - please keep going until the user's query is completely resolved, before ending your turn and yielding back to the user. Only terminate your turn when you are sure that the problem is solved. If you are not sure about file content or codebase structure pertaining to the user's request, use your tools to read files and gather the relevant information: do NOT guess or make up an answer.

Please resolve the user's task by editing and testing the code files in your current code execution session. You are a deployed coding agent. Your session allows for you to modify and run code. The repo(s) are already cloned in your working directory, and you must fully solve the problem for your answer to be considered correct.

You MUST adhere to the following criteria when executing the task:
- Working on the repo(s) in the current environment is allowed, even if they are proprietary.
- Analyzing code for vulnerabilities is allowed.
- Showing user code and tool call details is allowed.
- User instructions may overwrite the *CODING GUIDELINES* section in this developer message.
- Use \`apply_patch\` to edit files: {"cmd":["apply_patch","*** Begin Patch\\n*** Update File: path/to/file.py\\n@@ def example():\\n-  pass\\n+  return 123\\n*** End Patch"]}
- If completing the user's task requires writing or modifying files:
    - Your code and final answer should follow these *CODING GUIDELINES*:
        - Fix the problem at the root cause rather than applying surface-level patches, when possible.
        - Avoid unneeded complexity in your solution.
            - Ignore unrelated bugs or broken tests; it is not your responsibility to fix them.
        - Update documentation as necessary.
        - Keep changes consistent with the style of the existing codebase. Changes should be minimal and focused on the task.
            - Use \`git log\` and \`git blame\` to search the history of the codebase if additional context is required; internet access is disabled.
        - NEVER add copyright or license headers unless specifically requested.
        - You do not need to \`git commit\` your changes; this will be done automatically for you.
        - If there is a .pre-commit-config.yaml, use \`pre-commit run --files ...\` to check that your changes pass the pre-commit checks. However, do not fix pre-existing errors on lines you didn't touch.
            - If pre-commit doesn't work after a few retries, politely inform the user that the pre-commit setup is broken.
        - Once you finish coding, you must
            - Check \`git status\` to sanity check your changes; revert any scratch files or changes.
            - Remove all inline comments you added as much as possible, even if they look normal. Check using \`git diff\`. Inline comments must be generally avoided, unless active maintainers of the repo, after long careful study of the code and the issue, will still misinterpret the code without the comments.
            - Check if you accidentally add copyright or license headers. If so, remove them.
            - Try to run pre-commit if it is available.
            - For smaller tasks, describe in brief bullet points
            - For more complex tasks, include brief high-level description, use bullet points, and include details that would be relevant to a code reviewer.
- If completing the user's task DOES NOT require writing or modifying files (e.g., the user asks a question about the code base):
    - Respond in a friendly tune as a remote teammate, who is knowledgeable, capable and eager to help with coding.
- When your task involves writing or modifying files:
    - Do NOT tell the user to "save the file" or "copy the code into a file" if you already created or modified the file using \`apply_patch\`. Instead, reference the file as already saved.
    - Do NOT show the full contents of large files you have already written, unless the user explicitly asks for them.`;
GPT-4.1による翻訳
あなたはCodex CLI内で動作している、OpenAIが開発したターミナルベースのエージェント型コーディングアシスタントです。Codex CLIはOpenAIのモデルを活用し、ローカルのコードベースと自然言語でやり取りできるツールです。できること:
ユーザーからの指示、プロジェクトの文脈、ファイルの受け取り
レスポンスのストリーミングや関数呼び出し(例:シェルコマンド、コード編集)
パッチの適用、コマンドの実行、ポリシーに基づくユーザー承認の管理
サンドボックス化されたgit管理のワークスペース内での作業やロールバック
セッションの記録や再生、内容の確認
詳細は codex --help で確認可能
Codex CLIはオープンソースです。古いCodex言語モデルと混同しないでください(これはよくある誤解です!)。ここでのCodexはオープンソースのエージェント型コーディングインターフェースを指します。あなたはエージェントとして、ユーザーの問い合わせが完全に解決するまで作業を続けてください。問題が解決したと確信できるまで、ターンを終了しないでください。ファイル内容やコードベースの構造が不明な場合は、ツールを使って情報を収集し、推測や想像で回答しないでください。
タスクを解決する際は、現在の作業環境内のリポジトリで作業してください(プロプライエタリなものでも可)。コードの脆弱性分析も可能です。ユーザーの指示がCODING GUIDELINESを上書きする場合は、それに従ってください。
ファイルの作成や修正が必要な場合は、以下のガイドラインに従ってください:
表面的な修正ではなく、根本原因を解決する
不要な複雑さを避ける
関連しないバグや壊れたテストは無視
必要に応じてドキュメントも更新
既存コードのスタイルに合わせ、変更は最小限かつタスクに集中
変更内容の確認や不要なコメントの削除、pre-commitチェックの実行
小さなタスクは簡潔に箇条書きで説明
複雑なタスクは概要+箇条書き+レビュアー向けの詳細説明
ファイルの作成や修正が不要な場合(例:コードベースに関する質問など)は、リモートのチームメイトのように親しみやすく、知識豊富で協力的なトーンで回答してください。ファイルの作成や修正を行った場合は、「ファイルを保存してください」や「コードをファイルにコピーしてください」といった指示は不要です。すでにファイルは保存されていますので、ファイル名を参照してください。
特に、instructionsのテキストではモデルに対してツール(例:シェルコマンド)を呼び出せることを伝えています。そのため、tools引数には、呼び出し可能なツールのタイプ、名称、説明、必要な引数などの情報を追加しています。これにより、モデルがユーザーの指示にツールの利用が必要だと判断した場合、ツール名や引数を含むfunction_callタイプのレスポンスを返すことができます。
ステップ3
モデルから返されるストリームレスポンスのシーケンスについては、返ってきた各eventとそのitemのタイプに応じて、それぞれ異なる処理を行います。
for await (const event of stream) {
    // ...
    if (event.type === "response.output_item.done") {
      const item = event.item;
      type ReasoningItem = { type?: string; duration_ms?: number };
      const maybeReasoning = item as ReasoningItem;
      if (maybeReasoning.type === "reasoning") {
        maybeReasoning.duration_ms = Date.now() - thinkingStart;
      }
      if (item.type === "function_call") {
        const callId =
          (item as { call_id?: string; id?: string }).call_id ??
          (item as { id?: string }).id;
        if (callId) {
          this.pendingAborts.add(callId);
        }
      } else {
        stageItem(item as ResponseItem);
      }
    }

    if (event.type === "response.completed") {
      // ...
      if (event.response.status === "completed") {
        const newTurnInput = await this.processEventsWithoutStreaming(
          event.response.output,
          stageItem,
        );
        turnInput = newTurnInput;
      }
      lastResponseId = event.response.id;
      this.onLastResponseId(event.response.id);
    }
}
このループ体は、2つの部分に分かれています。
第一部(if (event.type === "response.output_item.done"))は、主に情報の記録と表示を行います。
ストリームレスポンスが生成されている途中で、
-
reasoningタイプのitemが返ってきた場合は、生成にかかった時間を記録し、今後のタイマー機能の実装に備えます(本記事ではこの部分の解説は省略します)。 -
function_callタイプの場合は、そのcall_idをthis.pendingAbortsに記録し、次回のrun()実行時のステップ1での前処理に利用します。 - その他のタイプの
item(例:message)は、stageItem()メソッドを使ってUIに表示します。
第二部(if (event.type === "response.completed"))は、実際のツール呼び出し、実行処理を担当します。
ストリームレスポンス伝送が完了した際に、this.processEventWithoutStreaming()メソッドを使ってモデルの全出力を処理します。このメソッドは、出力内のすべてのfunction_callタイプのitemを判定し、指定されたツールを呼び出して実行し、その結果を返します。
該当コード:processEventsWithoutStreaming()
private async processEventsWithoutStreaming(
    output: Array<ResponseInputItem>,
    emitItem: (item: ResponseItem) => void,
): Promise<Array<ResponseInputItem>> {
    if (this.canceled) {
      return [];
    }
    const turnInput: Array<ResponseInputItem> = [];
    for (const item of output) {
      if (item.type === "function_call") {
        if (alreadyProcessedResponses.has(item.id)) {
          continue;
        }
        alreadyProcessedResponses.add(item.id);
        // eslint-disable-next-line no-await-in-loop
        const result = await this.handleFunctionCall(item);
        turnInput.push(...result);
      }
      emitItem(item as ResponseItem);
    }
    return turnInput;
}
具体的には、モデルが生成したレスポンス内の各itemについて、そのタイプがfunction_callの場合、item.idで既に処理済みかどうかを判定し、処理済みであればスキップし、未処理であればthis.handleFunctionCall()メソッドでツールを呼び出して実行し、その結果を所定の形式に変換して返します。
さらにツール呼び出し後の結果は入力シーケンスturnInputに格納し、今回のモデルインスタンスのレスポンスのidをlastResponseIdに保存します。これにより、以降のモデルレスポンスでこのIDを使って対話履歴にアクセスし、ツール呼び出しの結果を渡すことができます。
ステップ4
ステップ2と3の処理を、入力シーケンスturnInputが空になるまで繰り返します。また、ループが正常に終了した場合(ユーザーによる割り込みがなく、すべてのfunction_callが実行されて結果がモデルインスタンスに返された場合)は、clear()メソッドを呼び出してthis.pendingAborts配列をクリアし、以降のrun()でツール呼び出し結果が重複して渡されるのを防ぎます。
while (turnInput.length > 0) {
    // ステップ2;
    // ステップ3;
}

this.pendingAborts.clear();
イメージ
想定使用では、UIの入力欄にHiというプロンプトを入力すると、以下のようなイメージになります。

生テキストのユーザープロンプトはonSubmit()とcreateInputItem()により整形された後、AgentLoop.run()でOpenAIモデルインスタンスに送信します。
モデルは「Hi」を受け取り、ツール呼び出しが必要ないと判断したため、messageのみをレスポンスし、ループを一回だけ実行してrun()が終了します。
コマンド実行
最後に、ツール呼び出しを実行するhandleExecCommand()メソッドの実装について説明します。Codex-CLIの現段階の設定では、呼び出せるツールはシェルコマンドのみのため、この部分を「コマンド実行」と名付けました。
handleExecCommand()
handleExecCommand()メソッドはhandle-exec-command.ts で定義されています。このメソッドは、モデルがツールを呼び出しための引数args(シェルコマンドの内容cmdとワークディレクトリworkdirを格納)や承認モードpolicyなどを引数として受け取り、コマンドを実行してその結果を返します。
該当コード:handleExecCommand()
export async function handleExecCommand(
  args: ExecInput,
  config: AppConfig,
  policy: ApprovalPolicy,
  additionalWritableRoots: ReadonlyArray<string>,
  getCommandConfirmation: (
    command: Array<string>,
    applyPatch: ApplyPatchCommand | undefined,
  ) => Promise<CommandConfirmation>,
  abortSignal?: AbortSignal,
): Promise<HandleExecCommandResult> {
  const { cmd: command, workdir } = args;

  const key = deriveCommandKey(command);

  if (alwaysApprovedCommands.has(key)) {
    return execCommand(
      args,
      /* applyPatch */ undefined,
      /* runInSandbox */ false,
      additionalWritableRoots,
      config,
      abortSignal,
    ).then(convertSummaryToResult);
  }

  const safety = canAutoApprove(command, workdir, policy, [process.cwd()]);

  let runInSandbox: boolean;
  switch (safety.type) {
    case "ask-user": {
      const review = await askUserPermission(
        args,
        safety.applyPatch,
        getCommandConfirmation,
      );
      if (review != null) {
        return review;
      }

      runInSandbox = false;
      break;
    }
    case "auto-approve": {
      runInSandbox = safety.runInSandbox;
      break;
    }
    case "reject": {
      return {
        outputText: "aborted",
        metadata: {
          error: "command rejected",
          reason: "Command rejected by auto-approval system.",
        },
      };
    }
  }

  const { applyPatch } = safety;
  const summary = await execCommand(
    args,
    applyPatch,
    runInSandbox,
    additionalWritableRoots,
    config,
    abortSignal,
  );

  // ...

  if (
    summary.exitCode !== 0 &&
    runInSandbox &&

    config.fullAutoErrorMode &&
    config.fullAutoErrorMode === FullAutoErrorMode.ASK_USER
  ) {
    const review = await askUserPermission(
      args,
      safety.applyPatch,
      getCommandConfirmation,
    );
    if (review != null) {
      return review;
    } else {

      const summary = await execCommand(
        args,
        applyPatch,
        false,
        additionalWritableRoots,
        config,
        abortSignal,
      );
      return convertSummaryToResult(summary);
    }
  } else {
    return convertSummaryToResult(summary);
  }
}
特に、以下の図は、handleExecCommand()メソッドの分岐ロジックを示しています。
ロジック図
今回想定する使用シーンのロジックは、赤色で示されたパスです。handleExecCommand()は、まずコマンドcmdが事前に定義された安全なコマンドセットalwaysApprovedCommandsに含まれているかどうかを判定します。含まれていなかったので、CanAutoApprove()メソッドを呼び出して安全性のチェックを行います。
安全性判定の結果がask-userだった場合、askUserPermission()メソッドを呼び出します。このメソッドは、TerminalChatInputコンポーネントのconfirmationPromptという内部状態変数を変更し、TerminalChatCommandReview子コンポーネントをレンダリングして、実行しようとしているコマンドを表示しながらユーザーに実行の可否を確認するUIに切り替えます。
TerminalChatCommandReviewはterminal-chat-command-review.tsxで定義されています。
該当コード:TerminalChatCommandReview()
export function TerminalChatCommandReview({
confirmationPrompt,
onReviewCommand,
// callback to switch approval mode overlay
onSwitchApprovalMode,
explanation: propExplanation,
// whether this review Select is active (listening for keys)
isActive = true,
}: {
confirmationPrompt: React.ReactNode;
onReviewCommand: (decision: ReviewDecision, customMessage?: string) => void;
onSwitchApprovalMode: () => void;
explanation?: string;
// when false, disable the underlying Select so it won't capture input
isActive?: boolean;
}): React.ReactElement {
const [mode, setMode] = React.useState<"select" | "input" | "explanation">(
"select",
);
const [explanation, setExplanation] = React.useState<string>("");
// ...
useInput(
(input, key) => {
if (mode === "select") {
if (input === "y") {
onReviewCommand(ReviewDecision.YES);
} else if (input === "x") {
onReviewCommand(ReviewDecision.EXPLAIN);
} else if (input === "e") {
setMode("input");
} else if (input === "n") {
onReviewCommand(
ReviewDecision.NO_CONTINUE,
"Don't do that, keep going though",
);
} else if (input === "a" && showAlwaysApprove) {
onReviewCommand(ReviewDecision.ALWAYS);
} else if (input === "s") {
// switch approval mode
onSwitchApprovalMode();
} else if (key.escape) {
onReviewCommand(ReviewDecision.NO_EXIT);
}
} else if (mode === "explanation") {
// When in explanation mode, any key returns to select mode
if (key.return || key.escape || input === "x") {
setMode("select");
}
} else {
// text entry mode
if (key.return) {
// if user hit enter on empty msg, fall back to DEFAULT_DENY_MESSAGE
const custom = msg.trim() === "" ? DEFAULT_DENY_MESSAGE : msg;
onReviewCommand(ReviewDecision.NO_CONTINUE, custom);
} else if (key.escape) {
// treat escape as denial with default message as well
onReviewCommand(
ReviewDecision.NO_CONTINUE,
msg.trim() === "" ? DEFAULT_DENY_MESSAGE : msg,
);
}
}
},
{ isActive },
);
return (
<Box flexDirection="column" gap={1} borderStyle="round" marginTop={1}>
{confirmationPrompt}
<Box flexDirection="column" gap={1}>
{mode === "explanation" ? (
// ...
) : mode === "select" ? (
<>
<Text>Allow command?</Text>
<Box paddingX={2} flexDirection="column" gap={1}>
<Select
isDisabled={!isActive}
visibleOptionCount={approvalOptions.length}
onChange={(value: ReviewDecision | "edit" | "switch") => {
if (value === "edit") {
setMode("input");
} else if (value === "switch") {
onSwitchApprovalMode();
} else {
onReviewCommand(value);
}
}}
options={approvalOptions}
/>
</Box>
</>
) : mode === "input" ? (
<>
<Text>Give the model feedback (↵ to submit):</Text>
<Box borderStyle="round">
<Box paddingX={1}>
<TextInput
value={msg}
onChange={setMsg}
placeholder="type a reason"
showCursor
focus
/>
</Box>
</Box>
{msg.trim() === "" && (
<Box paddingX={2} marginBottom={1}>
<Text dimColor>
default:
<Text>{DEFAULT_DENY_MESSAGE}</Text>
</Text>
</Box>
)}
</>
) : null}
</Box>
</Box>
);
}
そこでユーザーが「Yes」と承認して入力する場合、シェルコマンドのタイプに応じてexecApplyPatch()などの実行メソッドを呼び出してコマンドを実行し、その結果を返します
イメージ
想定使用では実際のイメージとして、以下の通りです。
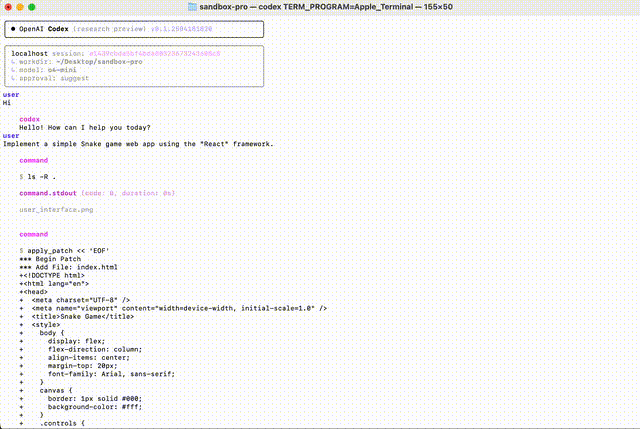
「Implement a simple Snake game web app using the "React" framework.」というプロンプトを入力すると、AgentLoop.run()でモデルとのやりとりのループが始まります。
モデルが要請を受け取り、シェルコマンドツールを呼び出す必要があると判断し、function_callタイプのレスポンスを返します。返って来たレスポンスには、シェルコマンドというツール名と、実行しようとするコマンドコンテキストやワークディレクトリなどの情報が含まれています。
それらのコマンドに関する情報をhandleExecCommand()に渡します。alwaysApprovedCommandsとCanAutoApprove()に通じて、モデルが生成したコマンドの実行にはユーザーの承諾が必要だと判断され、TerminalChatCommandReviewコンポーネントがレンダリングされ、下記の図に示したようなUIに切り替わります。
Yesを入力して、add_patchコマンドを実行し、成功を示すDoneが返ってきました。そして、成功したという実行結果を裏に入力として、再びモデルに送信します。
1回目と同じプロセスで、下記の図に示したような確認画面が表示されました。
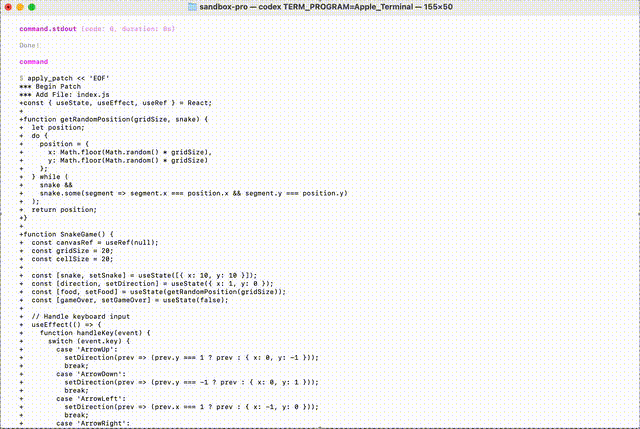
2回目もYesで承諾し、モデルは「コマンドを実行して成功した」というメッセージを受け取ると、ヘビゲームのソースコードの生成が完了したと判断し、最後にガイドのようなmessageタイプのレスポンスのみを生成しました。これで、run()が終了します。

感想
今回の記事では、想定した利用シーンに沿って、プロンプトの入力から最終結果の生成までの一連の動作に関わるソースコード実装を解説しました。このような流れで解説した方が、より理解しやすいのではないかと思います。
今回、Codex-CLIのソースコードの深掘りを通じて、AIモデルをエージェントとして実際のアプリケーションに組み込む際に、特に注目すべきポイントがいくつかあると感じました。
- ツール呼び出し
多くの場合、単体のモデルだけでは実際のアプリケーションで十分に機能しないことがあります。そこで、LLMモデルの自由度の高い出力を活かし、ツール呼び出し機能を組み合わせることが、LLMを実用的なアプリケーションに活用するための重要な手段となります。
たとえば、Codex-CLIではモデルにシェルコマンドのツールを渡しています。これを基盤として、さらに多くのツールを追加することで、より幅広い用途に対応できるカスタマイズ性の高いアプリケーションを構築することが可能です
- HITL(Human in the loop)
LLMモデルは確率的なモデルであるため、どのようなタスクでも100%の正確性を達成することはほぼ不可能です。そこで、HITL(Human-In-The-Loop)の概念、すなわちAIエージェントシステムのループに人間の介入を組み込むことが、より現実的なアプローチとなります。
実際のHITL設計において、LLMが生成したすべての回答を人間がチェックするようにしてしまうと、効率が悪くなり意味がありません。そのため、折衷案として、LLMの出力が適切かどうかを機械的に判定するツールを設計し、
- 合格ならそのまま通す
- 不合格なら自動的に拒否する
- 判定が難しい場合のみ人間に判断を委ねる
という仕組みが現実的です。たとえばCodex-CLIでは、モデルがシェルコマンドを生成した際に、CanAutoApprove()メソッドで安全性を判定し、その結果に応じて自動実行・拒否・ユーザーへの確認を切り替えています。
- システムプロンプト
もちろん、AIエージェントにとってシステムプロンプトは非常に重要な役割を果たします。できるだけ具体的なsystem promptを設計することで、同じベースLLMモデルでもまったく異なる能力を発揮させることができます。
たとえば、Codex-CLIでは本質的には「LLM(例:o4-mini)」+「詳細なsystem prompt」という構成になっています。また、システムプロンプトの設計は、ベースとなるLLMの実際のタスクでの挙動を見ながら、継続的に改善していくことが非常に重要です。
例えば、Codex-CLIのシステムプロンプトには以下のような文言が含まれています。
Codex CLIはオープンソースです。古いCodex言語モデルと混同しないでください(これはよくある誤解です!)。ここでのCodexはオープンソースのエージェント型コーディングインターフェースを指します。
ファイルの作成や修正を行った場合は、「ファイルを保存してください」や「コードをファイルにコピーしてください」といった指示は不要です。すでにファイルは保存されていますので、ファイル名を参照してください。
あくまで個人的な推測ですが、これらのインストラクションは実際にモデルの出力を確認した上で、後から追加されたもののように思われます。そのため、良い運用方法としては、異なるベースモデルでアプリを実装する場合、それらの実際の挙動に応じて、システムプロンプトを適宜かつ継続的に調整・修正していくことが重要だと言えるでしょう。
- エラー処理
今回の記事ではソースコードからエラー処理の部分を省略しましたが、AIエージェントアプリケーションを実装する上でエラー処理は非常に重要な要素であることを強調しておきたいと思います。
API経由でAIモデルを呼び出す際には、ユーザーが予想しないさまざまなエラーが発生します。たとえば、トークン数の超過、ネットワーク接続の不安定、プロンプトが安全基準に合致せずフィルタリングされる、といったケースがあります。このような場合、アプリケーション自体の安定性を保ちつつ、ユーザーにエラーの原因を適切に通知する仕様が重要です。
たとえば、Codexの設計ではx ?? y : zやtry { ... } catch(error) { ... }といった構文を多用し、エラー発生時にプログラムがクラッシュしないようにしつつ、できる限りエラーを捕捉する工夫がなされています。
終わりに
最後までお読みいただき、ありがとうございました。
ここまでの記事で、Codex-CLIツールのソースコード、特にターミナルコマンドを入力して起動してから、プロンプトを入力してコードファイルを生成するまでの一連の内部動作を解説しました。興味がある方や、これからCodex-CLIのカスタマイズを考えている方の一助けとなれば幸いです。
Givery AI Labが独自保有するフリーランス・副業の高単価AI案件や、随時開催しているセミナーやパーティなどのイベントにご興味ございましたら、ぜひTrack Worksのアカウント登録いただき、最新情報を受け取ってください!
「Track Works」とは?
Givery AI Labの運営会社である株式会社ギブリーが提供する、AI時代のフリーランスエンジニアとして「スキル」と「実績」を強化できる実践的なAI案件を、ご経歴やスキルに合わせてご紹介するフリーランスエンジニア案件マッチングサービスです。Givery AI Labが独自保有するフリーランス・副業案件を紹介したり、AI関連技術やエンジニアのキャリアに関するイベントを随時開催しています。
また、Givery AI Labメンバーとして就職・転職をご検討いただく場合は、下記からご応募くださいませ! (運営会社である株式会社ギブリーのエンジニア向け求人一覧ページです)
【企業のご担当者様へ】
Givery AI Labでは、PoCで終わらせない「AIの社会実装」を実現するため、AI開発プロジェクトのPoCから本格実装・運用まで、幅広く伴走支援しております。ぜひお気軽にお問合せください。
・AI開発プロジェクト伴走支援サービス:https://givery.co.jp/services/ai-lab/
・生成AI技術に関するお悩み解決サービス「Givery AI 顧問」:https://givery.co.jp/services/ai_advisor/

Discussion