💨
Pythonで地図上のスタートからゴールまでの経路を自動で出す
はじめに
複雑な地図の中で、任意のスタートから任意のゴールへの最短経路を出すといったことを私用でやりたかったため、Pythonにやってもらいました。
目的
地図、スタート、ゴールから最短経路を自動で算出し可視化します。
インプット
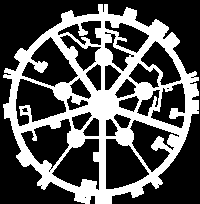
障害物を0、道を1以上の数値で二値化した地図画像をインプットにします。
前提として画像処理は完了しているものとします。
例としてポケモンのミアレシティのマップを画像処理して用意しました。
障害物は黒(=0)、道は白(=255)に対応します。
アウトプット
- 画面上にスタートからゴールまでの経路を可視化
- 「↗↗↗↗→↑」といったスタートからのナビ
コード
AStarAlgorizm.py
インポート
import heapq
import math
from typing import List, Tuple
import numpy as np
進行方向の定義
(y軸の移動量, x軸の移動量, 移動コスト, 出力時の文字列)のリストです。
移動方向については画像なので、下, 右に向かってプラスになります。
directions = [
     # 縦横移動
    (0, 1, 1, "→"), (1, 0, 1, "↓"), (0, -1, 1, "←"), (-1, 0, 1, "↑"),
     # 斜め移動
    (1, 1, math.sqrt(2), "↘"), (1, -1, math.sqrt(2), "↙"),
    (-1, 1, math.sqrt(2), "↗"), (-1, -1, math.sqrt(2), "↖")
]
A*アルゴリズム用のマンハッタン距離導出関数
def heuristic(start: Tuple[int, int], goal: Tuple[int, int]) -> float:
    """
    マンハッタン距離を計算するヒューリスティック関数。
    """
    return abs(start[0] - goal[0]) + abs(start[1] - goal[1])
A*アルゴリズム本処理
スタート、ゴール、地図をインプットして、経路をアウトプットします。
def find_path(start: Tuple[int, int], goal: Tuple[int, int], grid: np.ndarray) -> List[Tuple[int, int]]:
    """
    A* アルゴリズムを使用して、スタートからゴールへの最短経路を探索する。
    - start: 開始地点の座標
    - goal: ゴール地点の座標
    - grid: 障害物配置を示す2次元配列
    """
    rows, cols = grid.shape

    open_list = [(0, start)]
    came_from, g_score = {start: None}, {start: 0}
    f_score = {start: heuristic(start, goal)}

    while open_list:
        _, current = heapq.heappop(open_list)
        if current == goal:
            # ゴールに到達した場合、経路を再構築して返す
            path = []
            while current:
                path.append(current)
                current = came_from[current]
            path = path[::-1]
            return path

        for dx, dy, cost, _ in directions:
            neighbor = (current[0] + dx, current[1] + dy)
            # グリッド内にあり、かつ移動可能なセルに対して処理を行う
            if 0 <= neighbor[0] < rows and 0 <= neighbor[1] < cols and grid[neighbor[0]][neighbor[1]] != 0:
                # 斜め移動の際、隣接する縦横のセルが壁でないかチェック
                if dx != 0 and dy != 0:  # 斜め移動の場合
                    adjacent_1 = (current[0] + dx, current[1])
                    adjacent_2 = (current[0], current[1] + dy)
                    if grid[adjacent_1[0]][adjacent_1[1]] == 0 or grid[adjacent_2[0]][adjacent_2[1]] == 0:
                        continue

                tentative_g_score = g_score[current] + cost
                if tentative_g_score < g_score.get(neighbor, float('inf')):
                    came_from[neighbor], g_score[neighbor] = current, tentative_g_score
                    f_score[neighbor] = tentative_g_score + heuristic(neighbor, goal)
                    heapq.heappush(open_list, (f_score[neighbor], neighbor))
    return None  # ゴールまでの経路がない場合
出力文字列用
経路が取れたら以下関数で出力用の文字列も得るようにします。
def output_direction(path: List[Tuple[int,int]]) -> List[str]:
    """
    # パスから進行方向の順序を出力
    """
    directions_list = []
    for i in range(1, len(path)):
        delta = (path[i][0] - path[i - 1][0], path[i][1] - path[i - 1][1])
        for dx, dy, _, symbol in directions:
            if (dx, dy) == delta:
                directions_list.append(symbol)
                break
    return directions_list
使い方
import numpy as np

start = (0, 0)
goal = (5, 5)
grid = np.array([
        [1, 1, 1, 1, 1, 1],
        [1, 0, 0, 0, 0, 1],
        [1, 1, 1, 1, 1, 1],
        [1, 0, 0, 0, 0, 1],
        [1, 1, 1, 1, 1, 1],
        [1, 1, 1, 1, 1, 1],
    ])

# 経路探索
path = find_path(start, goal, grid)
if path:
    print("Path:", path)
    print("Directions:", "".join(output_direction(path)))
else:
    print("経路が見つかりませんでした。")
出力
Path: [(0, 0), (0, 1), (0, 2), (0, 3), (0, 4), (1, 5), (2, 5), (3, 5), (4, 5), (5, 5)]
Directions: →→→→↘↓↓↓↓
GUI
さらにスタートとゴールをGUIで受け取れるようにします。
AstarGui.py
import tkinter as tk
import AStarAlgorizm
from typing import Union
import cv2
from pathlib import Path
import numpy as np

def generate_grid(img_path: Path) -> np.ndarray:
    img = cv2.imread(img_path, 0)
    # 二値化(閾値0を超えた画素を255にする。)
    _, img = cv2.threshold(img, 0, 255, cv2.THRESH_BINARY)
    return img

class AStarGUI:
    """
    A* アルゴリズムを視覚化するための Tkinter GUI クラス。
    左クリックでスタート地点、右クリックでゴール地点を設定する。
    """
    def __init__(self, master: Union[tk.Tk, tk.Toplevel], grid: np.ndarray, view_cell_size: int = 5):
        # GUIの初期化、キャンバスのセットアップ、マップの生成
        self.master = master
        self.grid = grid
        self.cell_size = view_cell_size
        self.start, self.goal = None, None
        self.rows, self.cols = self.grid.shape
        self.canvas = tk.Canvas(master, width=self.cols * self.cell_size, height=self.rows * self.cell_size, bg="white")
        self.canvas.pack()
        self.canvas.bind("<Button-1>", self.set_start)
        self.canvas.bind("<Button-3>", self.set_goal)
        tk.Button(master, text="経路計算", command=self.draw_path).pack(pady=5)
        tk.Button(master, text="リセット", command=self.reset).pack(pady=5)

        self.draw_grid()

    def draw_grid(self) -> None:
        """
        マップのグリッドを描画する。障害物は黒、道は白で表示する。
        """
        for row in range(self.rows):
            for col in range(self.cols):
                x1, y1 = col * self.cell_size, row * self.cell_size
                x2, y2 = x1 + self.cell_size, y1 + self.cell_size
                color = "black" if self.grid[row][col] == 0 else "white"
                self.canvas.create_rectangle(x1, y1, x2, y2, fill=color, outline="black")

    def set_start(self, event: tk.Event) -> None:
        """
        左クリックされたセルをスタート地点に設定し、青で表示する。
        """
        self.start = self._set_point(event, "blue", "スタート地点を設定")

    def set_goal(self, event: tk.Event) -> None:
        """
        右クリックされたセルをゴール地点に設定し、赤で表示する。
        """
        self.goal = self._set_point(event, "red", "ゴール地点を設定")

    def _set_point(self, event: tk.Event, color: str, label: str) -> None:
        """
        任意の地点をスタートまたはゴールとして設定する補助関数。
        - event: クリックイベント
        - color: 表示色
        - label: 出力ラベル
        """
        row, col = event.y // self.cell_size, event.x // self.cell_size
        if self.grid[row][col] == 0:
            print("障害物上には設定できません。")
            return None
        self.canvas.create_rectangle(col * self.cell_size, row * self.cell_size, (col + 1) * self.cell_size,
                                     (row + 1) * self.cell_size, fill=color, outline="black")
        print(f"{label}: {(row, col)}")
        return (row, col)

    def draw_path(self) -> None:
        """
        スタートからゴールまでの最短経路を A* アルゴリズムで計算し、経路を赤で表示する。
        """
        if self.start is None or self.goal is None:
            print("スタート地点またはゴール地点が設定されていません。")
            return
        path = AStarAlgorizm.find_path(self.start, self.goal, self.grid)
        print(path)
        if path:
            print("Directions:", "".join(AStarAlgorizm.output_direction(path))) # 経路順を表示
            for (row, col) in path:
                self.canvas.create_rectangle(col * self.cell_size, row * self.cell_size,
                                             (col + 1) * self.cell_size, (row + 1) * self.cell_size,
                                             fill="green", outline="black")
            print("経路を描画しました。")
        else:
            print("経路が見つかりませんでした。")

    def reset(self) -> None:
        """
        スタート・ゴールの設定をリセットし、グリッドを再描画する。
        """
        self.start, self.goal = None, None
        self.canvas.delete("all")
        self.draw_grid()
        print("リセットしました。")

if __name__ == "__main__":
    root = tk.Tk()
    grid = generate_grid(Path("miare/miare_map_binary.png")) # 画像から地図取得
    app = AStarGUI(root, grid, 5)
    root.mainloop()
動作確認
実行後、以下のようなウィンドウが表示されます。
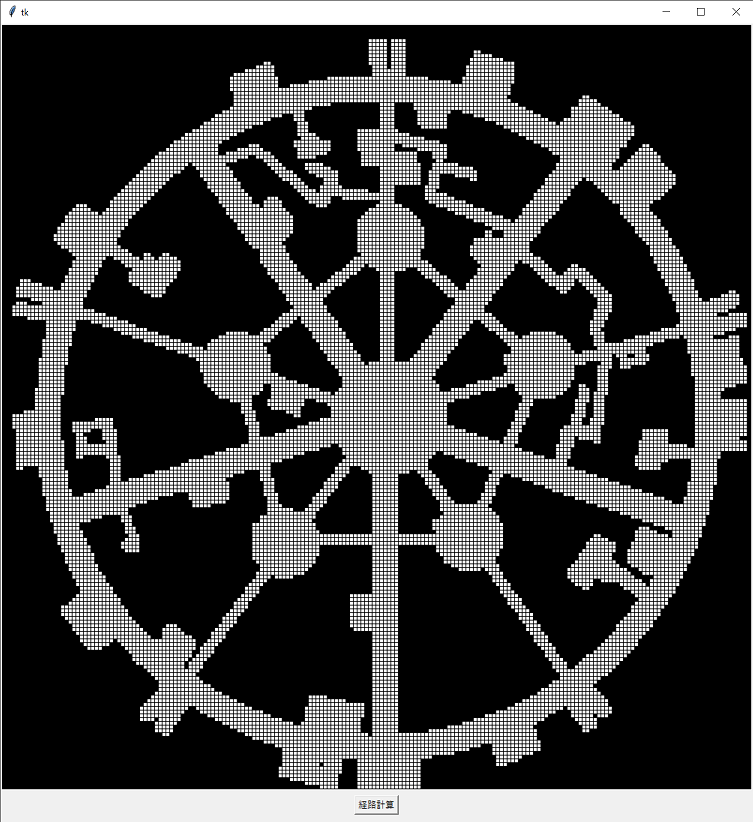
左クリックでスタートを打ち込み、右クリックでゴールを打ち込みます。
試しに以下のようにスタート(青)とゴール(赤)を打ち込みます。
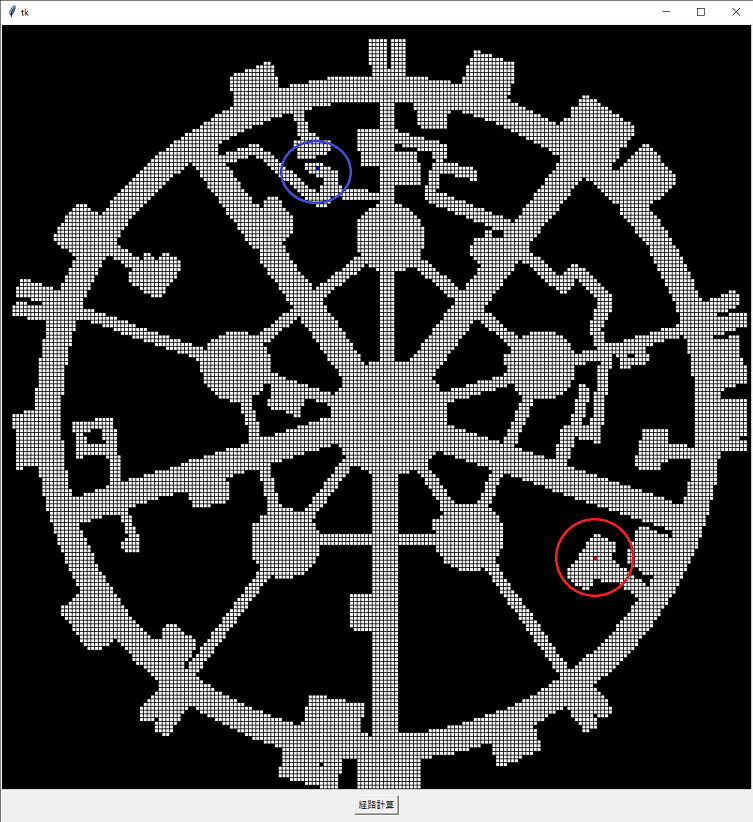
画面下の「経路計算」を押下し、経路を出します。
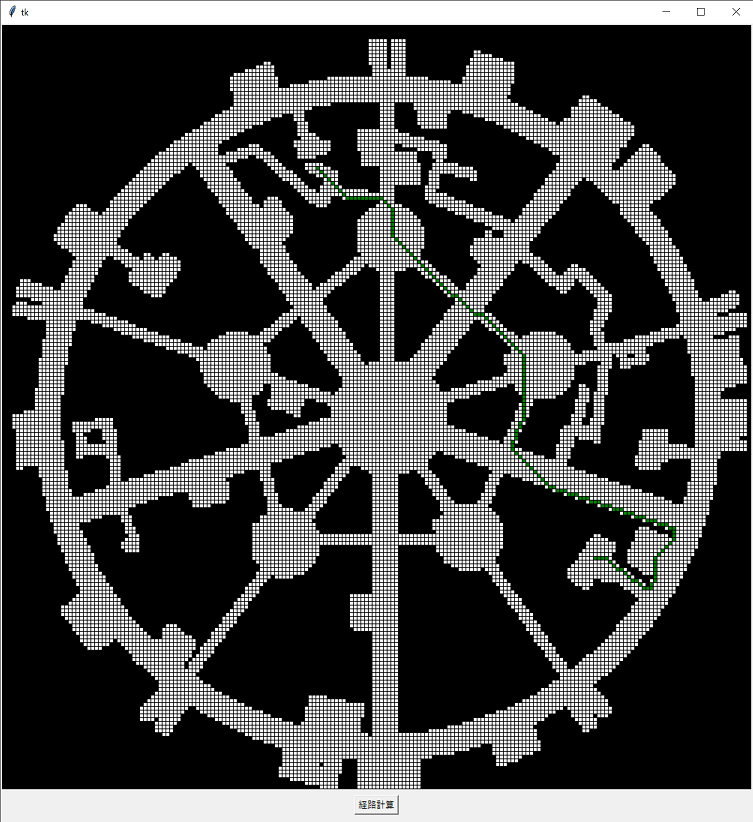
標準出力には以下のようにスタートからのナビも出ます。
Directions: ↘↘↘↘↘↘↘↘→→→→→→→→→↘↘↘↓↓↓↓↓↓↓↘↘↘↘↘↘↘↘↘↘↘↘↘↘↘↘→↘↘↘↘↘→→↘↘↘↘↘↘↘↘↘↘↘↓↓↓↓↓↓↓↓↓↓↓↓↓↓↓↓↓↙↓↙↓↓↙↓↓↘↘↘↘↘↘↘↘↘↘→↘→→↘→→↘→→↘→→↘→→↘→→↘→→↘→→↘→→↘→→↘→↓↓↓↙↙↙↙↙↓↓↓↓↓↓↙↓←←↖↖←↖↖↖←↖↖↖←←←
おまけ
いっぱい経路計算してみます。
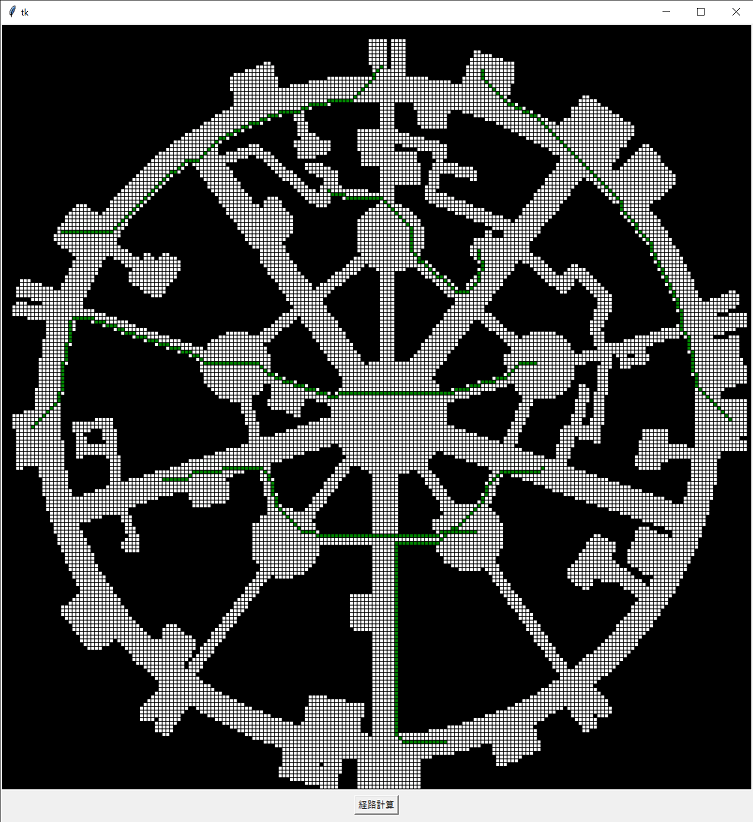
それっぽい経路が算出できました。
課題
壁際スレスレで移動しているのが気になるので、道の中央を通るようにしたいです。
インプットの地図を細線化すれば多分中央の道ができるので、それでいけると予想。
おわりに
地図と現在地と目的地をインプットに経路を出すプログラムを作成しました。
私用で使います。
Discussion