Spring Security&LINE FIDO2 Serverでパスキー認証を実装する #1
Spring Securiy で2要素認証でパスキー(WebAuthn)でログインするサンプルアプリを作ってみたいと思います。
FIDO認証のフロントはWebAuthn、サーバーはLINEがOSSで公開しているFIDO2 Serverを使ってみます。
ちゃんと検証していないので間違っているかもです。
何を作るか

どんな認証方法か
⭕ 2段階2要素認証 : ID / パスワード入力(記憶) → セキュリティキー(所持)
❌ 2段階2要素パスワードレス認証 : ID入力 → セキュリティキー(所持) / PIN(記憶)
❌ 1段階2要素パスワードレス認証 : セキュリティキー(所持) / PIN(記憶)
環境
- macOS でやります。
- IDEは IntelliJ IDEA (2021.2.1) を使います。
- FIDO2サーバーはコンテナで動かします。DockerDesktop(4.3.2)
- FIDO2セキュリティキーは mac のタッチID と Yubikey を使います。
- ブラウザは Chrome です。
LINE-FIDO2-Server
FIDO2サーバーは LINEさんがOSSで公開しているものを使います。
GitHubからRespositoryをCloneしてDockerで起動します。
docker-compose up build fido2
ちゃんと起動してんのかなって確認する場合は healthコマンド で起動確認をしてみます。
$ curl -I localhost:8081/health

HTTP/1.1 200
Content-Type: text/plain;charset=UTF-8
Content-Length: 2
Date: Wed, 29 Dec 2021 22:24:03 GMT
オッケー
LINE-FIDO2-Serverは起動するとH2のインメモリDBを展開します。初期状態は空で、クレデンシャルを登録するとDBにINSERTされますがインメモリなんで再起動すると全て消えてしまいます。設定を変えてデータを永続化することもできますが今回はインメモリのままで使います。
FIDO2 ログイン サンプルアプリ(sample-app)
sample-app ↓ をベースに作っていきます。
sample-appはSpring Bootアプリです。
spring initializr で以下の設定で作ったプロジェクトです。
- Kotlin(Java 11)
- Spring Web
- Spring Security
- Thymeleaf
- H2 Database
- Spring Data JPA
IDとパスワードでログインするだけのシンプルなものです。

デフォルトで以下の3つのアカウントが登録されています。
- user1/password1
- user2/password2
- user3/password3
アカウントデータは永続化したH2データベースに持っているんでアプリを再起動しても消えることはありません。sample-appのDB接続情報は application.properties を参照。
このsample-app(1要素認証)にFIDO2の認証を追加して2要素認証にします。
LINE-FIDO2−Server の rpserver プロジェクトを参考にしています。
登録機能の実装
早速認証を実装をしたいところなんですが、まずは登録するところを作ります。
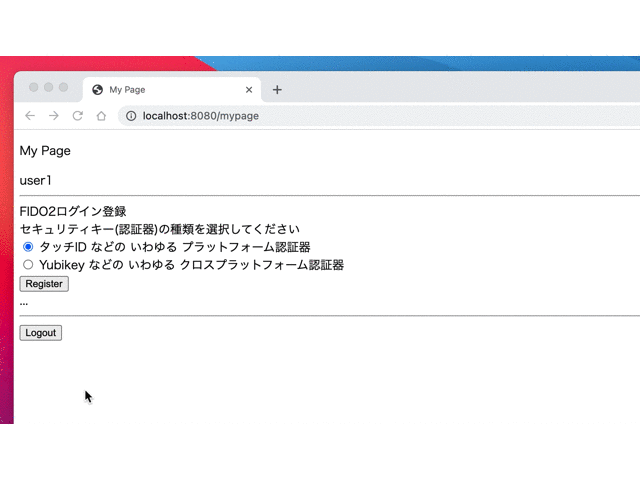
ログイン後に表示するMy Pageフォームにボタンを追加してFIDOクレデンシャルを登録できるようにします。

FIDOクレデンシャルの登録には LINE-FIDO2-Server の以下のAPIを使います。
フロントは WebAuthn を使います。WebAuthnはオプション指定が難解なんですが、Get Reg Challenge で取得したオブジェクトをそのまま使えばいいだけです。
フロー図
登録のフローはこんな感じになります。

実装のポイントを見ていきます。
0. LINE-FIDO-Server commonライブラリのインポート
common をビルドしてできる common-1.1.1-SNAPSHOT.jar をサンプルアプリにインポートします。
-
libディレクトリを作ってそこに common-1.1.1-SNAPSHOT.jar を置いてbuild.gradle.ktsに依存関係を追加します。
dependencies {
	// 依存関係を追加
	implementation(fileTree("lib/common-1.1.1-SNAPSHOT.jar"))
	...
}
- intellijのGradleウィンドウで Reload All Gradle Projects を実行して依存関係を更新します←忘れがち
これでSample-Appで com.linecorp.line.auth.fido.fido2.common が使えるようになります。
1. Get Reg Challenge
まずはWebAuthnに渡すChallenge(オプション情報)を作成する作業です。
MyPage画面でセキュリティキーの種類を選択して Register ボタンをクリックすると
Sample-App のFido2RestController.registerOption()
→ LineFido2ServerServiceImpl.getRegisterOption()
から Get Reg Challenge をコールします。
Get Reg Challenge には RegOptionRequest を指定して RegOptionResponse を受け取ります。
RegOptionRequest に指定するパラメータは以下の通り
-
PublicKeyCredentialRpEntity: localhost
- 通常はRPのドメイン名を指定します。
sample.gebogebo.comなど指定したいところですが、ドメイン名を指定するとHTTPS以外受け付けなくなるWebAuthnの制約があります(厳しい...)。その代わり、 localhost であれば httpでもWebAuthnが実行できるんでここでは localhost にします。
- 通常はRPのドメイン名を指定します。
-
ServerPublicKeyCredentialUserEntity: 登録するユーザー情報
- ログインしてるユーザー情報から作成します。
- おまじない
SecurityContextHolder.getContext().authentication.principalでGETできます。
-
AuthenticatorSelectionCriteria
- AuthenticatorAttachment: 登録するセキュリティキーの種類
- フォームで選択された PLATFORM / CROSS_PLATFORM のいずれかを指定します。
- isRequireResidentKey: false
-
パスワードと併用する2段階認証ではなく、パスワードレス認証にしたい場合は true にします。今回は2段階認証にするのでfalseにします。 -
IDを入力する手順を省略する認証フローを実装する場合はtrueにします。今回はIDを手入力する2段階認証にするのでfalseにします。
Resident Key(Discoverable credentials) は 予めセキュリティキーの中にIDを書き込んでおき 認証時にそれを取り出し参照することで認証時にIDを手入力する操作を省略するようなフローを想定した機能です。
-
- UserVerificationRequirement: REQUIRED
- ユーザー認証レベルを指定します。
- このサンプルでは REQUIRED(PIN または 指紋による認証を必須)にしています。
- AuthenticatorAttachment: 登録するセキュリティキーの種類
-
それ以外の設定はダミー値だったり空オブジェクトだったりです。
RegOptionResponse は ServerPublicKeyCredentialCreationOptionsResponse に入れ直してフロントに返却します。
また、Get Reg Challengeによって独自のセッションIDが割り当てられるので fido2-session-id としてCookieにセットします
(fido2-session-idはこの次の Send Reg Response で使います)。
Fido2RestController.registerOption() *↓ソースは抜粋です、←のリンク先で完全なソースが見れます。
@PostMapping("/register/option")
fun registerOption(
  @RequestBody optionsRequest: ServerPublicKeyCredentialCreationOptionsRequest,
  httpServletResponse: HttpServletResponse
): ServerPublicKeyCredentialCreationOptionsResponse {
  return try {
    val principal = SecurityContextHolder.getContext().authentication.principal
    val username = if (principal is UserDetails) {
      principal.username
    } else {
      throw UsernameNotFoundException("userId is null or empty")
    }

    val (serverResponse, sessionId) = lineFido2ServerService.getRegisterOption(
      username,
      optionsRequest.authenticatorAttachment
    )

    LineFido2Util.setFido2SessionId(sessionId, httpServletResponse)
    serverResponse
  } catch (e: Exception) {
    ServerPublicKeyCredentialCreationOptionsResponse(Status.FAILED, e.message ?: "")
  }
}
LineFido2ServerServiceImpl.getRegisterOption()
override fun getRegisterOption(
  userName: String,
  authenticatorAttachment: AuthenticatorAttachment?,
): Pair<ServerPublicKeyCredentialCreationOptionsResponse, String> {
  val rp = PublicKeyCredentialRpEntity()
  rp.id = RP_ID
  rp.name = RP_NAME

  val user = ServerPublicKeyCredentialUserEntity()
  user.name = userName
  user.id = createUserId(userName)
  user.displayName = userName

  val authenticatorSelection = AuthenticatorSelectionCriteria()
  authenticatorSelection.authenticatorAttachment = authenticatorAttachment
  authenticatorSelection.isRequireResidentKey = false
  authenticatorSelection.userVerification = UserVerificationRequirement.REQUIRED

  val regOptionRequest = RegOptionRequest
  .builder()
  .rp(rp)
  .user(user)
  .authenticatorSelection(authenticatorSelection)
  .attestation(AttestationConveyancePreference.none)
  .credProtect(CredProtect())
  .build()

  val request = HttpEntity(regOptionRequest, HttpHeaders())
  val response = restTemplate.postForObject(
    REG_CHALLENGE_URI,
    request,
    RegOptionResponse::class.java
  )

  return ServerPublicKeyCredentialCreationOptionsResponse(response!!) to response.sessionId
}
2. WebAuthn
フロントのJava Scriptでユーザー認証をします。WebAuthnを使います。
Sample-Appから返ってきた ServerPublicKeyCredentialCreationOptionsResponse をそのまま WebAuthn navigator.credentials.create() に引き渡します。
WebAuthnでユーザー認証が完了すると Attestationオブジェクト をもらって返ってくるので BASE64エンコードして Sample-Appの /register/verify に引き渡します。
function createCredential(options) {
    return navigator.credentials.create({publicKey: options, signal: abortSignal})
        .then(rawAttestation => {
            let attestation = {
                rawId: base64UrlEncode(rawAttestation.rawId),
                id: base64UrlEncode(rawAttestation.rawId),
                response : {
                    clientDataJSON: base64UrlEncode(rawAttestation.response.clientDataJSON),
                    attestationObject: base64UrlEncode(rawAttestation.response.attestationObject)
                },
                type: rawAttestation.type,
            };

            if (rawAttestation.getClientExtensionResults) {
                attestation.extensions = rawAttestation.getClientExtensionResults();
            }

            // set transports if it is available
            if (typeof rawAttestation.response.getTransports === "function") {
                attestation.response.transports = rawAttestation.response.getTransports();
            }

            return rest_post("/register/verify", attestation);
        })
        .catch(function(error) {
            logVariable("create credential error", error);
            if (error == "AbortError") {
                console.info("Aborted by user");
            }
            return Promise.reject(error);
        })
        .then(response => {
            if (response.status !== 'ok') {
                return Promise.reject(response.errorMessage);
            } else {
                return Promise.resolve(response);
            }
        });
}
3. Send Reg Response
WebAuthnの実行結果 Attestation を検証する作業です。基本 LINE-FIDO2-Server がやってくれるんでSample-Appは Attestationオブジェクト を引き渡すだけです。
Sample-App のFido2RestController.registerVerify()
→ LineFido2ServerServiceImpl.verifyRegisterAttestation
から Send Reg Response をコールします。
Send Reg Response には RegisterCredential を指定して RegisterCredentialResult を受け取ります。
Attestationの検証が成功するとLINE-FIDO2-ServerのDBにクレデンシャルが保存されます。検証が失敗するとExceptionが発生するので RegisterCredentialResult の中身をチェックしたりする必要はなく、正常終了すればオッケーなようです。
Fido2RestController.registerVerify()
@PostMapping("/register/verify")
fun registerVerify(
  @RequestBody clientResponse: Attestation,
  httpServletRequest: HttpServletRequest
): AdapterServerResponse {
  val sessionId = LineFido2Util.getFido2SessionId(httpServletRequest)
  if (sessionId.isNullOrEmpty()) {
    return AdapterServerResponse(Status.FAILED, "Cookie not found")
  }

  return try {
    lineFido2ServerService.verifyRegisterAttestation(
      sessionId,
      clientResponse
    )
  } catch (e: Exception) {
    AdapterServerResponse(Status.FAILED, e.message ?: "")
  }
}
LineFido2ServerServiceImpl.verifyRegisterAttestation()
override fun verifyRegisterAttestation(
  sessionId: String,
  clientResponse: Attestation,
): AdapterServerResponse {
  val serverRegPublicKeyCredential = ServerRegPublicKeyCredential()
  serverRegPublicKeyCredential.id = clientResponse.id
  serverRegPublicKeyCredential.type = clientResponse.type
  serverRegPublicKeyCredential.response = clientResponse.response
  serverRegPublicKeyCredential.extensions = clientResponse.extensions

  val registerCredential = RegisterCredential()
  registerCredential.serverPublicKeyCredential = serverRegPublicKeyCredential
  registerCredential.rpId = RP_ID
  registerCredential.sessionId = sessionId
  registerCredential.origin = ORIGIN

  val request = HttpEntity(registerCredential, HttpHeaders())
  restTemplate.postForObject(REG_RESPONSE_URI, request, RegisterCredentialResult::class.java)

  return AdapterServerResponse(Status.OK, "")
}
動作確認
動作確認してみます。
macのタッチIDで登録する

Yubikeyで登録する
まとめ
ここまでのまとめ
-
LINE FIDO2 Server と連携するのは common-〜.jar を使えば簡単
-
Get Reg Challenge でユーザーIDを指定して、登録用のオプションを取得する
-
フロントエンドは WebAuthn を使ってFIDO認証する
-
Send Reg Response でWebAuthn結果のVerifyをしてDBに保存する
-
FIDOクレデンシャルは LINE FIDO2 Server が管理するDBに勝手に保存されるので サンプルアプリ側は気にしなくてもいい。
-
ここまでのソースは こちら
おまけ 〜 LINE-FIDO2-Server のDBを見てみる
LINE-FIDO2-ServerはDBにクレデンシャルを保存していくのですが、どんな構造になっているのでしょうか。見てみたいと思います。
LINE-FIDO2-Serverをローカルで起動します。
cd server
./gradlew bootRun
めっちゃログが出るんですけど、起動ログにDBへの接続URLが出てくるのでそれをメモっておきます。
この例の場合は jdbc:h2:mem:8d2b0489-b09b-465f-b191-5f5b27c10452
2021-12-31 08:46:41.459 INFO 62828 --- [ restartedMain] o.s.b.a.h2.H2ConsoleAutoConfiguration : H2 console available at '/h2-console'. Database available at 'jdbc:h2:mem:8d2b0489-b09b-465f-b191-5f5b27c10452'
ブラウザから http://localhost:8081/h2-console/ にアクセスします。
JDBC URL に先程メモった接続URLを入力してConnectします

接続すると以下のようなテーブルがあるのが見えます

セキュリティキーを登録すると、AUTHENTICATOR_TRANSPORT、USER_KEYにレコードが追加されます。こんな感じでデータを持っているようです。
謎エラーでDBに接続できない
h2-console で connect したときに
No suitable driver found for 08001/0
とエラーになって接続できない現象に遭遇した場合は プロジェクトの依存関係から logbook-spring-boot-starter をコメントアウトしましょう。
ネットで見つけた情報です、何が問題でなぜこうすれば解消するのかよくわかりません、なんなんでしょう。
build.gradle
dependencies {
  ...
  ↓この行をコメントアウトする
  implementation('org.zalando:logbook-spring-boot-starter:1.8.1')
  ...
}
ちなみにこのエラーは h2-console で接続できないだけでDBとしては正常に機能しているようです。
おつかれさまでした
このあと認証処理を実装します。
Discussion
これって例えばY!Jの実装のようにユーザー識別して対象のクレデンシャルのルックアップをするってのを省略(できるようにAuthenticatorに持たせるのを)したいかどうかなので、パスワードレスのためのオプションじゃないですよね?
コメントありがとうございます!
ご指摘の点、確かにそうですね。修正したいと思います。