Spring Security 6.4.0-RC1 でパスキー認証を実装してみる
はじめに
Spring Security 6.4.0-RC1 で パスキー対応したということで、どんなものか使ってみたメモです。
環境
- macOS Sonoma 14.6
- Chrome 130
- Spring Boot 3.4.0
- Spring Security 6.4.0 RC1
- Kotlin, Java, Java Script
サンプルアプリ
サンプルアプリはSpring Bootアプリです。
spring initializr で以下の設定で作ったプロジェクトです。
Project: Gradle-Kotlin
Language: Kotlin
Spring Boot: 3.4.0(SNAPSHOT)
Packaging: Jar
Java: 17
Dependencies
- Spring Web
- Thymeleaf
- Spring Security
- Spring Data JPA
- H2 Database
- Spring Boot DevTools
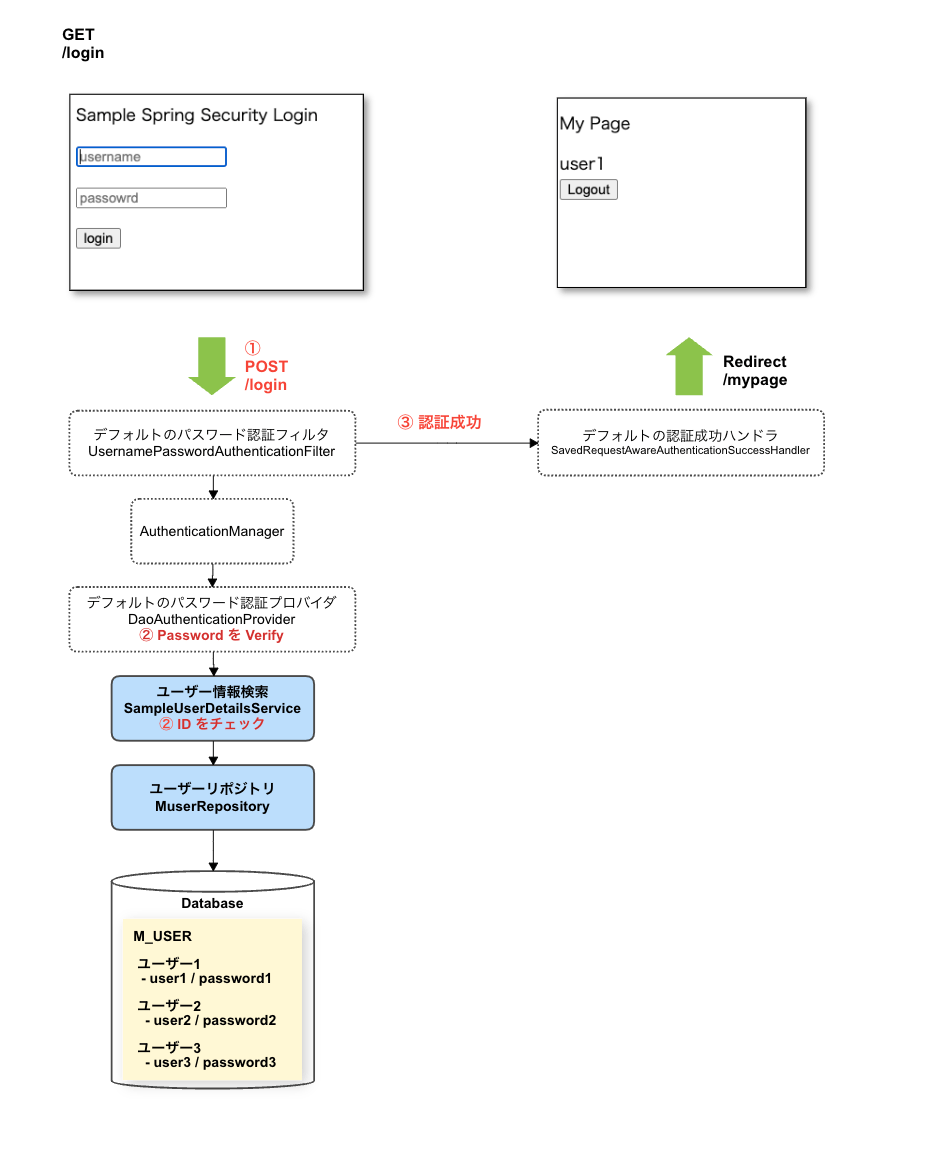
実装前
-
IDとパスワードでログインするだけのシンプルなものです。
- user1/password1
- user2/password2
- user3/password3
-
アカウントデータは永続化したH2データベースに持っているんでアプリを再起動しても消えることはありません。DB接続情報は application.properties を参照してください。
このサンプルアプリにパスキー認証を追加します。

パスキー認証実装の概要
最初に超ざっくりまとめるとこんな感じです。
- 依存関係、Configuration、テーブル追加する
- フロントのJavaScriptは SimpleWebAuthn ライブラリを使う
- サーバーサイドのSpring Securityは
- PublicKeyCredentialUserEntityRepository インタフェースを実装したBeanを作成する
- UserCredentialRepository インタフェースを実装したBeanを作成する
- パスキー作成のエンドポイントとFilter
-
POST /webauthn/register/options→PublicKeyCredentialCreationOptionsFilter -
POST /webauthn/register→WebAuthnRegistrationFilter
-
- パスキー認証のエンドポイントとFilter
-
POST /webauthn/authenticate/options→PublicKeyCredentialRequestOptionsFilter -
POST /login/webauthn→WebAuthnAuthenticationFilter
-
実装1 - 基本設定的なこと
依存関係
依存関係に webauthn4j-core を追加する必要があります。
dependencies {
	implementation("org.springframework.boot:spring-boot-starter-data-jpa")
	implementation("org.springframework.boot:spring-boot-starter-security")
	implementation("org.springframework.boot:spring-boot-starter-thymeleaf")
	implementation("org.springframework.boot:spring-boot-starter-web")
	implementation("com.fasterxml.jackson.module:jackson-module-kotlin")
	implementation("org.jetbrains.kotlin:kotlin-reflect")
	implementation("org.thymeleaf.extras:thymeleaf-extras-springsecurity6")
	implementation("com.webauthn4j:webauthn4j-core:0.27.0.RELEASE") ← これを追加
	developmentOnly("org.springframework.boot:spring-boot-devtools")
	runtimeOnly("com.h2database:h2")
	testImplementation("org.springframework.boot:spring-boot-starter-test")
	testImplementation("org.jetbrains.kotlin:kotlin-test-junit5")
	testImplementation("org.springframework.security:spring-security-test")
	testRuntimeOnly("org.junit.platform:junit-platform-launcher")
}
Configuration
HttpSecurity の設定に webAuthn を追加します。
- rpName: サービス名です。任意の文字列でいいと思います。
-
rpId: サービスのドメインを指定します。今回はローカルで実行するサンプルなので
localhostにします。 - allowedOrigins: パスキーが有効なドメインを指定します。
テーブル追加
パスキーを保存するテーブルを作成します。
create table M_PASSKEY_CREDENTIAL (
    ID int default 0 not null auto_increment primary key,
    CREDENTIAL_ID varbinary not null unique,
    USER_INTERNAL_ID varchar not null,
    PUBLIC_KEY varbinary,
    ATTESTED_CREDENTIAL_DATA_JSON varbinary,
    ATTESTATION_OBJECT varbinary
);
実装2 - パスキー作成
パスキー作成画面
Create a passkey ボタンを追加します。

パスキー作成処理
Create a passkey ボタンクリックしたらパスキー作成をします。
パスキー作成のオプション取得(JavaScript)
パスキー作成のオプション取得(Spring Security)
ここで、実装が必要になります。パスキーを作成するオプションには以下の情報が必要です。
- rp: Configuration で設定したものが利用されます。
- user: パスキーを作成するユーザーを指定します。
- excludeCredentials: 対象のユーザーで作成済みのパスキー情報を指定します。
- それ以外のいろんなオプションは Spring Security が自動で作ってくれます。
オプションデータはたくさんあるんですが、ほとんどはSpring Security が自動で作ってくれます。ここでは user, excludeCredentials に設定するデータを作る必要があります。
user: パスキーを作成するアカウントを求める
PublicKeyCredentialUserEntityRepository インタフェースを実装したBeanを作って対応する必要があります。
findByUsername() を実装します。引数にユーザーが指定されるので、アカウントマスタから PublicKeyCredentialUserEntity を生成して返却します。
excludeCredentials: 対象のユーザーで作成済みのパスキー情報を求める
UserCredentialRepository インタフェースを実装したBeanを作って対応する必要があります。
findByUserId() を実装します。引数にUserEntity の idが指定されてくるので、パスキークレデンシャルマスタから PublicKeyCredentialUserEntity を生成して返却します。
パスキー作成(JavaScript)
SimpleWebAuthn の SimpleWebAuthnBrowser.startRegistration を使います。
パスキー保存(JavaScript)
保存が正常終了すると以下のJSONが帰ってきます。
HTTP/1.1 200 OK

{
  "success": true
}
パスキー保存(Spring Security)
ここで、実装が必要になります。
- 未登録のパスキークレデンシャルかどうか確認する
- DBにパスキークレデンシャルを保存する
未登録のパスキークレデンシャルかどうか確認する
UserCredentialRepository インタフェースを実装したBeanで対応します。
findByCredentialId() を実装します。引数に credentialId が指定されてくるので、自アプリのパスキークレデンシャルマスタに未登録かどうか確認します。
DBにパスキークレデンシャルを保存する
こちらも、UserCredentialRepository インタフェースを実装したBeanで対応します。
save() を実装します。引数で指定された CredentialRecord をDBに保存しましょう。
実装3 - パスキー認証
ログイン画面
Signin with Passkey ボタンを追加します。

パスキー認証処理
Signin with Passkey ボタンクリックしたらパスキー認証をします。
パスキー認証のオプション取得(JavaScript)
パスキー認証のオプション取得(Spring Security)
ここでは先程実装した PublicKeyCredentialUserEntityRepository#findByUsername がコールされますが、認証前のため、usernameが anonymousUser となり、空の UserEntity が返却され、正常終了します。
あとは自動で Spring Security が処理してくれます。
パスキー認証(JavaScript)
SimpleWebAuthn の SimpleWebAuthnBrowser.startAuthentication を使います。
ユーザーVerify(JavaScript)
Verifyが正常終了すると以下のJSONが帰ってきます。redirectUrl にリダイレクトしましょう。
HTTP/1.1 200 OK

{
  "redirectUrl": "/",
  "authenticated": true
}
ユーザーVeirfy(Spring Security)
ここでは以下の順に処理が実行されます。
-
UserCredentialRepository#findByCredentialId
- クレデンシャルIDに紐づくクレデンシャルデータ(公開鍵など)を返却します。
-
Verify
-
Spring Securityによって実施される認証の処理です。
-
Verifyが成功したら以降の処理を実施します。
-
-
UserCredentialRepository#save
-
Verifyが成功したらコールされます。
-
CredentialRecordの以下情報が更新される場合があるので、本当はDBに保存したほうがいいんですけど、このサンプルアプリでは保存していません。signatureCountbackupEligiblelastUsed
-
-
PublicKeyCredentialUserEntityRepository#findById
- ログインするユーザーアカウント情報を求めます。
ログインするユーザーアカウント情報を求める
ここで返却されるユーザー情報が Spring Securityの SecurityContext にセットされます。
ログインが完了した後は、以下のようにしてログインユーザーをGetしてます。
まとめ
ソースコードは こちら です。
かなり簡単にパスキー認証のサーバーサイドが実装できる、と感じました。
が、aaguidが取得できないなど必要な改善点はある、と感じました。
細かくアレコレカスタマイズしたい場合は、本家の webauthn4j を使ったほうがいいかもしれません。
Discussion