【Rails】フォロー・フォロワー機能
本の投稿サイトにフォロー・フォロワー機能を追加します。
実装機能の要件
実装機能の要件は以下の通りです。
| コントローラー | アクション | 用途 |
|---|---|---|
| RelationshipsController | create | フォローを作成 |
| RelationshipsController | destroy | フォローを削除 |
※フォローする・外すボタンをクリックしたら元画面に遷移すること
| モデル | |
|---|---|
| Relationship | フォロー関係を管理するモデル |
| ビュー | |
|---|---|
| サイドバー | フォロー数・フォロワー数を表示 |
| マイページ以外のサイドバー | フォローする・外すボタンを追加 |
| ユーザー一覧画面 | フォロー数・フォロワー数・フォローする・外すボタンの設置 |
| フォロー・フォロワー一覧画面 | フォロー・フォロワーの一覧表示 |
実装手順
- 中間テーブルの作成
- Relationshipモデルの作成
- RelationshipモデルとUserモデルにリレーションの設定
- ルーティングの設定
- Relationshipsコントローラの作成
- Viewの編集
考え方
フォロー機能の場合、フォローする人もフォローされる人もユーザーであるため、ユーザー同士がお互いにフォローする関係です。そうすると以下のイメージが考えられます。
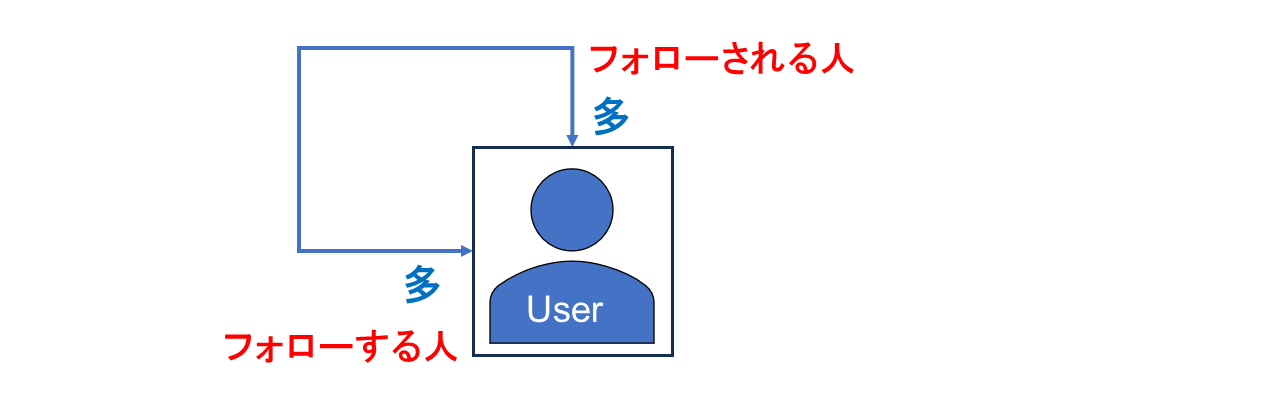
これではよくわからないですよね。
よって、中間テーブルにおいて「フォローする人(follower_id)」と「フォローされる人(followed_id)」を区別する必要があります。

このような「多対多」の関係を表現するために、中間テーブル(Relationship)を導入します。
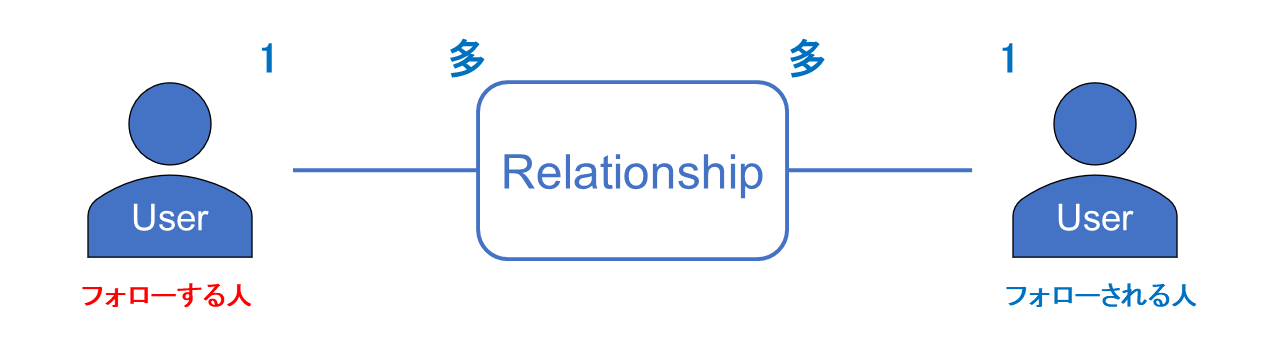
このように、中間テーブルを使用することで、「1対多」 の関係に変換することができます。ユーザーは複数のフォローを持つことができ、また複数のユーザーをフォローすることも可能です。
例として、下図のように関連付けができるようになります。
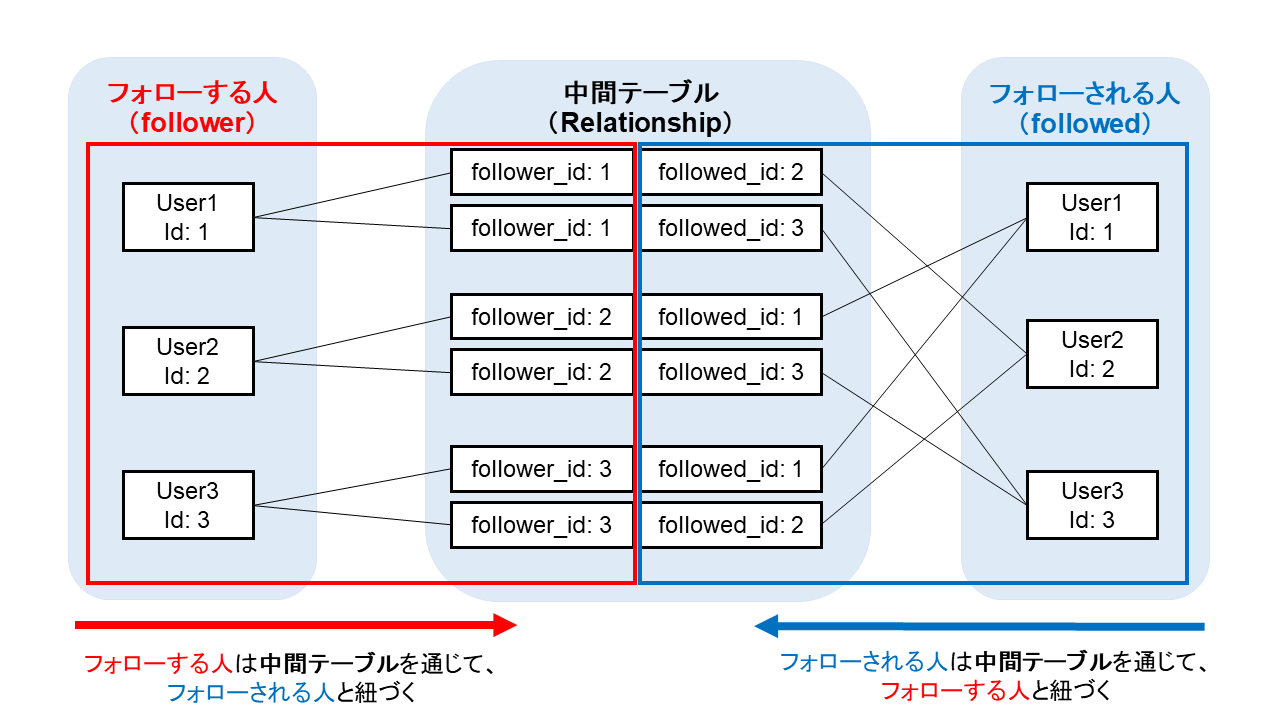
上記を表にすると以下の通りです。
| follower_id | followed_id | 詳細 |
|---|---|---|
| 1 | 2 | ユーザー1がユーザー2をフォロー |
| 1 | 2 | ユーザー1がユーザー3をフォロー |
| 2 | 1 | ユーザー2がユーザー1をフォロー |
| 2 | 3 | ユーザー2がユーザー3をフォロー |
| 3 | 1 | ユーザー3がユーザー1をフォロー |
| 3 | 2 | ユーザー3がユーザー2をフォロー |
以上が、フォロー機能における中間テーブルの役割と、1対多の関係に変換する理由です。
中間テーブル設計
今回は以下のような、テーブル設計にします。
| カラム名 | データ型 | カラムの説明 |
|---|---|---|
| id | (初期カラム) | 主キー(PK) ※マイグレーションファイルには記載不要 |
| follower_id | integer | フォローするユーザーのid |
| followed_id | integer | フォローされるユーザーのid |
Model作成
上述のテーブル設計に基づいてモデルを作成します。
ターミナルでの入力方法は以下の通りです。
-
Relationshipモデルの生成
rails g model Relationship follower_id:integer followed_id:integer
上記のコマンドを実行すると、db/migrateディレクトリにマイグレーションファイルが生成されます。
- データベースへのマイグレーション実行
rails db:migrate
上記のコマンドを実行することで、マイグレーションファイルに基づいてデータベースにテーブルが作成されます。
以上の手順により、Relationshipモデルが作成され、follower_idとfollowed_idのカラムが含まれるテーブルがデータベースに作成されます。
リレーションの実装
RelationshipモデルとUserモデルにリレーションの設定をしていきます。
- Relationshipモデル
class Relationship < ApplicationRecord
  belongs_to :follower, class_name: "User"
  belongs_to :followed, class_name: "User"
end
解説:
-
belongs_to :follower, class_name: "User"は、Relationshipモデルがfollowerという名前の関連付けを持ち、それがUserモデルと紐付いていることを示しています。class_name: "User"は、関連付ける対象のモデルがUserモデルであることを指定しています。 -
belongs_to :followed, class_name: "User"も同様に、Relationshipモデルがfollowedという名前の関連付けを持ち、Userモデルと紐付いていることを示しています。
- Userモデル
class User < ApplicationRecord
  # ...
  # フォローしている関連付け
  has_many :active_relationships, class_name: "Relationship", foreign_key: "follower_id", dependent: :destroy

  # フォローされている関連付け
  has_many :passive_relationships, class_name: "Relationship", foreign_key: "followed_id", dependent: :destroy

  # フォローしているユーザーを取得
  has_many :followings, through: :active_relationships, source: :followed

  # フォロワーを取得
  has_many :followers, through: :passive_relationships, source: :follower

  # 指定したユーザーをフォローする
  def follow(user)
    active_relationships.create(followed_id: user.id)
  end

  # 指定したユーザーのフォローを解除する
  def unfollow(user)
    active_relationships.find_by(followed_id: user.id).destroy
  end

  # 指定したユーザーをフォローしているかどうかを判定
  def following?(user)
    followings.include?(user)
  end
end
解説:
-
has_many :active_relationships, class_name: "Relationship", foreign_key: "follower_id", dependent: :destroy
この行は、ユーザーモデル(User)がフォローしている関連付けを定義しています。Relationshipモデルとの関連付けを行い、active_relationshipsという名前で参照します。外部キーとしてfollower_idカラムを使い、dependent: :destroyオプションで関連するデータが削除されるように設定しています。 -
has_many :passive_relationships, class_name: "Relationship", foreign_key: "followed_id", dependent: :destroy
この行は、ユーザーモデル(User)がフォローされている関連付けを定義しています。Relationshipモデルとの関連付けを行い、passive_relationshipsという名前で参照します。外部キーとしてfollowed_idカラムを使い、dependent: :destroyオプションで関連するデータが削除されるように設定しています。 -
has_many :followings, through: :active_relationships, source: :followed
この行は、ユーザーがフォローしているユーザーの一覧を取得するための関連付けを定義しています。Userモデルは、active_relationships経由でfollowings(フォローしているユーザー)と関連付けられます。source: :followedにより、active_relationshipsテーブルのfollowedカラムを参照します。 -
has_many :followers, through: :passive_relationships, source: :follower
この行は、ユーザーをフォローしているユーザー(フォロワー)の一覧を取得するための関連付けを定義しています。Userモデルは、passive_relationships経由でfollowers(フォロワー)と関連付けられます。source: :followerにより、passive_relationshipsテーブルのfollowerカラムを参照します。 -
def follow(user),def unfollow(user),def following?(user)
これらのメソッドは、ユーザーが他のユーザーをフォローしたり、フォローを解除したり、特定のユーザーをフォローしているかどうかを判定するためのメソッドです。followメソッドは、active_relationshipsを経由して指定したユーザーをフォローし、unfollowメソッドは、指定したユーザーのフォローを解除します。following?メソッドは、指定したユーザーをフォローしているかどうかを真偽値で返します。
Routing
以下の通りルーティングの設定をします。
  :
  resources :users, only: [:index, :show, :edit, :update] do
    resource :relationships, only: [:create, :destroy]
  	get "followings" => "relationships#followings", as: "followings"
  	get "followers" => "relationships#followers", as: "followers"
  end
解説:
users内にさらにrelationshipsをネストします。これにより、特定のユーザーに関連するフォロー情報を管理することができます。例えば、/users/1/followingsというURLで、ユーザーIDが1のユーザーがフォローしているユーザー一覧にアクセスできます。
また、followingsとfollowersアクションに対して、以下のURLを作成します。
-
followingsアクションのURL:/users/:user_id/followings -
followersアクションのURL:/users/:user_id/followers
Controller作成
ターミナルで以下のコマンドを実行してコントローラを作成します。
rails g controller relationships
Relationshipsコントローラへの記述
以下の通り記述します。
class RelationshipsController < ApplicationController
  before_action :authenticate_user!
  def create
    user = User.find(params[:user_id])
    current_user.follow(user)
    redirect_to request.referer
  end

  def destroy
    user = User.find(params[:user_id])
    current_user.unfollow(user)
    redirect_to  request.referer
  end

  def followings
    user = User.find(params[:user_id])
    @users = user.followings
  end

  def followers
    user = User.find(params[:user_id])
    @users = user.followers
  end
end
解説:
-
createアクション: ユーザーをフォローするためのアクションです。params[:user_id]からフォロー対象のユーザーを特定し、current_user(現在のログインユーザー)がそのユーザーをフォローします。その後、リダイレクト先を元のページに戻します。 -
destroyアクション: ユーザーのフォローを解除するためのアクションです。params[:user_id]からフォロー解除対象のユーザーを特定し、current_userがそのユーザーのフォローを解除します。その後、リダイレクト先を元のページに戻します。 -
followingsアクション: 特定のユーザーがフォローしているユーザーの一覧を表示するためのアクションです。params[:user_id]から対象のユーザーを特定し、そのユーザーがフォローしているユーザー(user.followings)を@usersに代入します。 -
followersアクション: 特定のユーザーをフォローしているユーザーの一覧を表示するためのアクションです。params[:user_id]から対象のユーザーを特定し、そのユーザーをフォローしているユーザー(user.followers)を@usersに代入します。
Viewページ
以下を作成します。
- サイドバーにフォロー数・フォロワー数・フォローする・外すボタンの設置
- ユーザー一覧画面にフォロー数・フォロワー数・フォローする・外すボタンの設置
- フォロー・フォロワー一覧画面
1. サイドバーにフォロー数・フォロワー数・フォローする・外すボタンの設置
-
フォローボタン
複数ページでフォローボタンを使用したいので、フォローボタンを部分テンプレートにします。
<% if current_user != user %>
  <% if current_user.following?(user) %>
    <%= link_to "フォロー外す", user_relationships_path(user.id), method: :delete, class: options[:class].presence || "btn btn-info" %>
  <% else %>
    <%= link_to "フォローする", user_relationships_path(user.id), method: :post, class: options[:class].presence || "btn btn-success" %>
  <% end %>
<% end %>
解説:
-
current_user != user
現在のユーザーと表示対象のユーザーが異なるかをチェックしています。自分自身をフォローすることはできないため、自分自身の場合はフォローボタンを表示しません。 -
current_user.following?(user)
現在のユーザーが表示対象のユーザーを既にフォローしているかどうかをチェックしています。フォローしている場合は「フォロー外す」ボタンを表示し、フォローしていない場合は「フォローする」ボタンを表示します。 -
class: options[:class].presence || "btn btn-info"
ボタンのクラスを呼び出し場所によって変えるようにします。
options[:class].presenceは、options[:class]の値が存在する場合はその値を返し、存在しない(空の文字列である)場合はnilを返すメソッドです。
||演算子を使用して、options[:class]が指定されている場合はその値が使用され、指定されていない場合はデフォルトのクラス"btn btn-info"が適用されます。
例えば、options[:class] に "follow-link" という値を指定している場合、class: options[:class].presence || "btn btn-info" の結果は "follow-link" です。
- サイドバーへのフォロー数・フォロワー数の表示とフォローボタンの呼び出し
 <table class="table">
   <tr><%= image_tag user.get_profile_image, size:'100x100' %></tr>
   <tr>
     <th>name</th>
     <th><%= user.name %></th>
   </tr>
   <tr>
     <th>introduction</th>
     <th><%= user.introduction %></th>
   </tr>
+  <tr>
+    <th>follows</th>
+    <th><%= link_to user.followings.count, user_followings_path(user) %></th>
+  </tr>
+  <tr>
+    <th>followers</th>
+    <th><%= link_to user.followers.count, user_followers_path(user) %></th>
+  </tr>
 </table>

+<div class="row">
+  <% if current_user != user %>
+    <td><%= render "relationships/btn", user: user, options: { class: ""} %></td>
+  <% else %>
+    <%= link_to edit_user_path(user), class: "btn btn-outline-secondary btn-block" do %>
+      <i class="fas fa-user-cog"></i>
+    <% end %>
+  <% end %>
+</div>
解説:
このコードは、現在のユーザーと表示対象のユーザーが異なる場合にフォローボタンを表示し、同じ場合はユーザーのプロフィール編集ボタンを表示するためのものです。
<% if current_user != user %> の条件式は、現在のユーザーと表示対象のユーザーが異なる場合に true となります。その場合、フォローボタンが表示されます。
フォローボタンは空のクラス(options: { class: ""})を指定してるため、デフォルトのクラスが適用されます。
2. ユーザー一覧画面にフォロー数・フォロワー数・フォローする・外すボタンの設置
 <table class="table">
   <thead>
     <tr>
       <th>image</th>
       <th>name</th>
       <th colspan="3"></th>
     </tr>
   </thead>
   <tbody>
     <% users.each do |user| %>
       <tr>
         <td><%= image_tag user.get_profile_image, size: '50x50' %></td>
         <td><%= user.name %></td>
+        <td>フォロー数: <%= user.followings.count %></td>
+        <td>フォロワー数: <%= user.followers.count %></td>
+        <td><%= render "relationships/btn", user: user, options: { class: "follow-link" } %></td>
         <td><%= link_to "Show", user %></td>
       </tr>
     <% end %>
   </tbody>
 </table>
3. フォロー・フォロワー一覧画面
- フォローの一覧画面
<h2>Follow Users</h2>
<% if @users.exists? %>
  <%= render "/users/index", users: @users %>
<% else %>
  <p>ユーザーはいません</p>
<% end %>
- フォロワーの一覧画面
<h2>Follower Users</h2>
<% if @users.exists? %>
  <%= render "/users/index", users: @users %>
<% else %>
  <p>ユーザーはいません</p>
<% end %>
解説:
フォロー、フォロワーユーザーの一覧を表示するためのViewです。フォロー/フォロワーユーザーがいれば一覧を表示し、いなければメッセージを表示しています。
参照
以下参考にさせてもらった記事です。
皆さんとてもわかりやすくお手本にさせてもらいました。
ありがとうございました♪
中間テーブルに苦戦しましたが、色々な方のページを参考に理解していくことができました☆
記事の書き方の勉強にもなるし、皆さんのページが本当にありがたい!
続きはこちら。
Discussion