【Rails & JavaScript】通報機能
通報機能を作ります!
通報機能の概要
不適切なユーザー、コンテンツや行動を管理者に通知するための機能。通報機能を実装することで、安全かつ秩序ある場所にできるようにする。
今回のポートフォリオにはコメント機能に対してのみ通報機能を持たせました!他のコンテンツ(投稿など)にも拡張できるようなテーブル設計にしておきます。
イメージ
YouTubeの報告機能をイメージしました。
3点リーダーをクリックすると報告フォームがモーダルウィンドウで開きます。
報告が完了する or モーダルウィンドウの外をクリックするとモーダルウィンドウが閉じます。
エラーが発生すると、エラーメッセージが表示されモーダルウィンドウは開いたままになります。
流れ
- モデル作成
- enumの日本語化
- ルーティング作成
- コントローラ作成
- ビュー作成
ER図
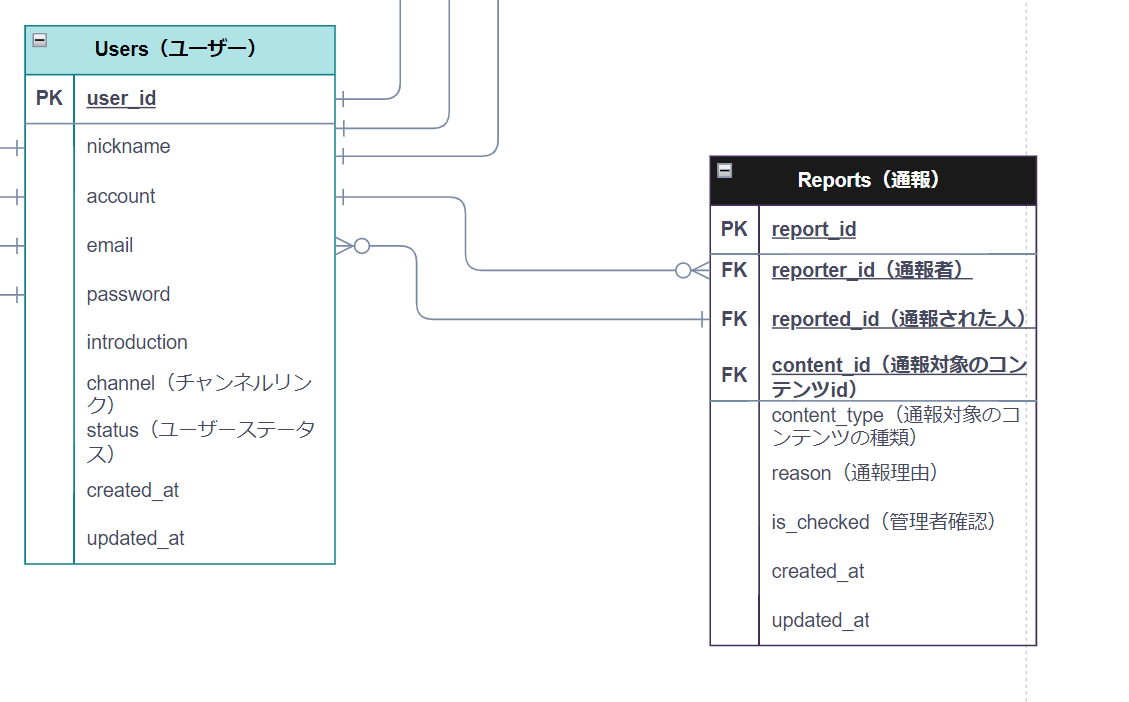
通報機能では、通報者(ユーザーA)が複数の通報を行うことがあり、また通報対象(ユーザーB)も複数の通報を受ける可能性があります。
そのため、通報者と通報対象ユーザーは多対多の関係になるので、中間テーブルを作成する必要があります。
テーブル設計
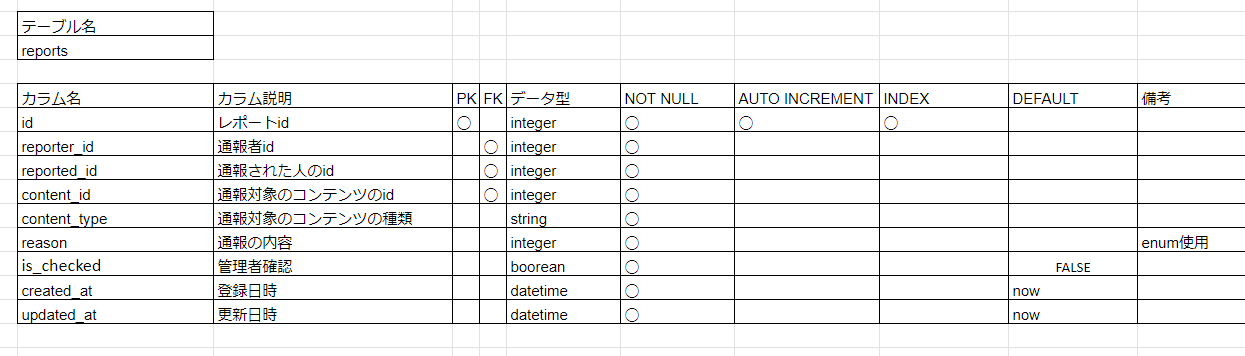
通報機能では、次のような情報が必要です。
-
通報を行ったユーザー (通報者)
誰が通報を行ったのかを記録する必要があります。この情報はuserテーブルに格納されています。 -
通報されたユーザー (通報対象)
誰が通報されたのかを記録する必要があります。これもuserテーブルに格納されています。 -
通報の詳細 (理由など)
通報の内容や理由を記録する必要があります。
reportsテーブルの役割:
-
reporter_id
通報を行ったユーザー(通報者)のユーザーIDを格納します。userテーブルのユーザーIDと関連付けます。 -
reported_id
通報されたユーザー(通報対象)のユーザーIDを格納します。これもuserテーブルのユーザーIDと関連付けます。 -
content_idとcontent_type
通報の対象となるコンテンツ(例: ユーザーの投稿、コメント、画像など)に関する情報を格納します。これにより、どのコンテンツが通報されたのかを識別できます。通報対象の種類(content_type)に応じて、異なるテーブルに関連付けることができます。 -
reason
通報の理由を格納します。 -
is_checked
管理者による確認が行えるようにします。
モデル作成
Reportモデル
class Report < ApplicationRecord
  # 通報者を示す関連付け
  belongs_to :reporter, class_name: "User", foreign_key: "reporter_id"

  # 通報対象を示す関連付け
  belongs_to :reported, class_name: "User", foreign_key: "reported_id"

  # 通報対象のコンテンツを示す多様性(Polymorphic)関連付け
  belongs_to :content, polymorphic: true

  # 通報理由の列挙型(Enum)
  enum reason: {
    malicious_expression: 0,      # 悪意のある表現
    inappropriate_content: 1,     # 不適切なコンテンツ
    misinformation: 2,            # 誤った情報
    commercial_purposes: 3,       # 商業目的
    spam: 4,                      # スパム
    other: 5                      # その他
  }
end
以下の設定をすることで、通報対象のコンテンツが、PostやCommentなど、異なる種類のコンテンツに対しても適用できます。
# 通報対象のコンテンツを示す多様性(Polymorphic)関連付け
belongs_to :content, polymorphic: true
例えば、通報されたコンテンツが投稿(Post)であれば、content_type カラムには "Post" という値が格納され、content_id カラムにはその投稿のIDが格納されます。同様に、通報されたコンテンツがコメント(Comment)であれば、content_type カラムには "Comment" という値が格納され、対応するコメントのIDが content_id カラムに格納されます。
Polymorphic関連付けは以下の記事も参考にしてくださいね。
Userモデル
class User < ApplicationRecord
   # 通報
  has_many :reporter, class_name: "Report", foreign_key: "reporter_id", dependent: :destroy
  has_many :reported, class_name: "Report", foreign_key: "reported_id", dependent: :destroy
:
jaファイルの追記
enumを日本語に変換します。やり方は以下の記事を参照のこと。
ja:
  enums:
    report:
      reason:
        malicious_expression: 悪意のある表現
        inappropriate_content: 不適切な表現
        misinformation: 誤った情報
        commercial_purposes: 商業目的
        spam: スパム
        other: その他
ルーティング作成
  scope module: :public do
    resources :reports, only: [:new, :create]
  end
コントローラ作成
class Public::ReportsController < ApplicationController
  before_action :authenticate_user!

  # ユーザーが新しい報告を作成するページへアクセスするためのアクション
  def new
    @report = Report.new
    render :layout => false
  end

  # ユーザーからの報告を作成するアクション
  def create
    # ユーザーが報告する対象の種類とIDを取得
    content_type = params[:report][:content_type]
    content_id = params[:report][:content_id]

    # 対象のコンテンツをデータベースから取得
    @content = content_type.constantize.find(content_id)

    # 対象のコンテンツが存在する場合
    if @content
      # 新しい報告オブジェクトを作成
      @report = Report.new(report_params)

      # 報告者と報告対象を設定
      @report.reporter = current_user
      @report.reported = @content.user

      # 報告をデータベースに保存
      if @report.save
        respond_to do |format|
          format.js { render "create_success" } # 成功時のレスポンスを返す
        end
      else
        respond_to do |format|
          format.js { render "create_failure" } # 失敗時のレスポンスを返す
        end
      end
    end

  rescue ActiveRecord::NotNullViolation => e
    # NOT NULL 制約違反が発生した場合もエラー処理
    respond_to do |format|
      format.js { render "create_failure", status: :unprocessable_entity } # エラーレスポンスを返す
    end
  end

  private

  # コンテンツをデータベースから取得するメソッド
  def find_content(content_type, content_id)
    content_class = content_type.classify.constantize
    content_class.find_by(id: content_id)
  end

  # 報告のパラメーターを安全に受け取るためのメソッド
  def report_params
    params.require(:report).permit(:content_type, :content_id, :reason)
  end
end
解説:
def new
  @report = Report.new
  render :layout => false
end
render :layout => false は、ページのレイアウトを無効にして、単なるフォームを表示します。これをいれないとapplication.html.erbを2重で読み込んでしまい、JavaScriptのエラーが発生します。
今回はnewアクションをいれていますが、createアクションのみでも実装可能です。その場合は部分テンプレートで呼び出すようにすれば、この表記は不要です。
def create
  content_type = params[:report][:content_type]
  content_id = params[:report][:content_id]
  @content = content_type.constantize.find(content_id)

  if @content
    @report = Report.new(report_params)
    @report.reporter = current_user
    @report.reported = @content.user

    if @report.save
      respond_to do |format|
        format.js { render "create_success" }
      end
    else
      respond_to do |format|
        format.js { render "create_failure" }
      end
    end
  end
rescue ActiveRecord::NotNullViolation => e
  # NOT NULL 制約違反が発生した場合もエラー処理
  respond_to do |format|
    format.js { render "create_failure", status: :unprocessable_entity }
  end
end
以下のステップで説明します:
-
ユーザーからの情報を受け取ります。
content_typeとcontent_idは、報告対象の種類とIDを示します。 -
@content変数に、データベースから報告対象のコンテンツを取得します。例えば、ユーザーが記事やコメントを報告している場合、それらの情報を取得します。 -
もし
@contentが存在すれば、新しい報告オブジェクト@reportを作成し、関連する情報を設定します。@report.reporterには報告者の情報(ログインしているユーザー)が、@report.reportedには報告対象のユーザーが設定されます。 -
@report.saveを使用して報告をデータベースに保存し、成功した場合と失敗した場合に異なる応答を返します。例えば、成功時には "create_success" ビューを表示し、失敗時には "create_failure" ビューを表示します。 -
万が一、NOT NULL 制約違反が発生した場合、エラーレスポンスを返します。この場合、フォームに必要な情報が提供されていないということです。
private

def find_content(content_type, content_id)
  content_class = content_type.classify.constantize
  content_class.find_by(id: content_id)
end
これは find_content というプライベートメソッドです。このメソッドは、特定のコンテンツをデータベースから取得するために使用されます。例えば、報告対象が記事である場合、記事の情報を取得します。
ビュー作成
報告ボタン追記
今回はコメント欄に以下を追記します。
<div class="report-btn text-right ml-2" id="report-btn-<%= comment.id %>">
 <%= render "public/reports/report_btn", comment: comment %>
</div>
モーダルウィンドウのトリガーを作成
 <!-- モーダルウィンドウのトリガーボタンを追加 -->
<i class="fas fa-ellipsis-v open-report-modal-button" data-comment-id="<%= comment.id %>" data-content-id="<%= comment.id %>" data-content-type="Comment" data-report-success="true"  style="cursor: pointer;"></i>

<div id="report-modal" class="modal">
  <div class="common-modal-content"></div>
</div>

<script>
$(document).ready(function() {
  // モーダルウィンドウを開くボタンがクリックされたときの処理
  $('.open-report-modal-button').click(function() {
    const commentId = $(this).data("comment-id");

    // Ajaxリクエストを送信して報告フォームを取得
    $.ajax({
      url: '<%= new_report_path %>',
      type: 'GET',
      data: { content_id: commentId, content_type: "Comment" },
      success: function(response) {
        // 取得した報告フォームをモーダル内に表示
        $('#report-modal .common-modal-content').html(response);
        $('#report-modal').addClass('fade-in').show();
      }
    });
  });

  // モーダルウィンドウの背景部分がクリックされたときの処理
  $('#report-modal').on('click', function(event) {
    if (event.target === this) {
      // モーダルを非表示にするアニメーション
      $(this).addClass('fade-out');
      setTimeout(() => {
        $(this).hide().removeClass('fade-out');
      }, 300);
    }
  });
});
</script>
以下でモーダルウィンドウを整えます。bootstrapのモーダルウィンドウを入れた方が容易なのでおすすめです。
/* モーダルの背景 */
.modal {
  display: none;
  position: fixed;
  z-index: 1000;
  left: 0;
  top: 0;
  width: 100%;
  height: 100%;
  background-color: rgba(0, 0, 0, 0.5);
}

/* モーダルコンテンツ */
.common-modal-content {
  position: absolute;
  top: 50%;
  left: 50%;
  transform: translate(-50%, -50%);
  background-color: white;
  padding: 20px;
  border-radius: 5px;
  box-shadow: 0 2px 10px rgba(0, 0, 0, 0.1);
  max-width: 80%;
  width: 500px;
  overflow-y: auto;
  max-height: 600px;
}

/* モーダルのアニメーション */
.modal.fade-in {
  animation: fadeIn 0.3s ease-in;
}

.modal.fade-out {
  animation: fadeOut 0.3s ease-out;
}

@keyframes fadeIn {
  from { opacity: 0; }
  to { opacity: 1; }
}

@keyframes fadeOut {
  from { opacity: 1; }
  to { opacity: 0; }
}
報告フォーム作成
<div class="error-message text-center"></div>
<div class="container">
  <div class="row">
    <div class="col-md-8 offset-md-2">
       <div class="report-title text-center">
          <h3>コメントの報告</h3>
        </div>
      <div class="d-flex justify-content-center">
        <div class="text-left">
          <%= render "report_form", report: @report %>
        </div>
      </div>
    </div>
  </div>
</div>
<%= simple_form_for report, remote: true do |f| %>
  <div class="form-check">
    <%= f.radio_button :reason, "malicious_expression" %>
    <%= f.label :reason_malicious_expression, I18n.t("enums.report.reason.malicious_expression"), class: "form-check-label" %>
  </div>
  <div class="form-check">
    <%= f.radio_button :reason, "inappropriate_content" %>
    <%= f.label :reason_inappropriate_content, I18n.t("enums.report.reason.inappropriate_content"), class: "form-check-label" %>
  </div>
  <div class="form-check">
    <%= f.radio_button :reason, "misinformation" %>
    <%= f.label :reason_misinformation, I18n.t("enums.report.reason.misinformation"), class: "form-check-label" %>
  </div>
  <div class="form-check">
    <%= f.radio_button :reason, "commercial_purposes" %>
    <%= f.label :reason_commercial_purposes, I18n.t("enums.report.reason.commercial_purposes"), class: "form-check-label" %>
  </div>
  <div class="form-check">
    <%= f.radio_button :reason, "spam" %>
    <%= f.label :reason_spam, I18n.t("enums.report.reason.spam"), class: "form-check-label" %>
  </div>
  <div class="form-check">
    <%= f.radio_button :reason, "other" %>
    <%= f.label :reason_other, I18n.t("enums.report.reason.other"), class: "form-check-label" %>
  </div>

  <%= f.hidden_field :content_id, value: params[:content_id] %>
  <%= f.hidden_field :content_type, value: params[:content_type] %>
  <%= f.submit "報告", class: "btn btn-dark" %>
<% end %>
以下の記事を読んで興味があったため、simple_formというgemを使って実装しました。
興味ある方はぜひ。
解説:
<%= f.hidden_field :content_id, value: params[:content_id] %>
フォーム内に非表示のフィールドを追加しています。ここで :content_id はフィールドの名前で、value: params[:content_id] はその値を設定しています。この :content_id フィールドには、ユーザーが報告するコンテンツのIDが格納されます。なぜこの情報が必要かというと、報告の対象となるコンテンツを識別するためです。ユーザーがどのコメントまたは投稿を報告しているのかをサーバーに伝えるために必要です。
<%= f.hidden_field :content_type, value: params[:content_type] %>
同様に、このコードも非表示のフィールドを追加しています。:content_type はフィールドの名前で、value: params[:content_type] はその値を設定しています。この :content_type フィールドには、ユーザーが報告するコンテンツの種類が格納されます。例えば、コメントを報告する場合は "Comment" という値が格納されます。これは、報告がどの種類のコンテンツに関連しているのかを識別するために必要です。
成功メッセージと失敗メッセージ
// 通報成功メッセージを表示
$('.success-message').text('通報が成功しました。');

// モーダルウィンドウを閉じる
$('#report-modal').addClass('fade-out');
setTimeout(() => {
  $('#report-modal').hide().removeClass('fade-out');
}, 300);
:
<main>
 <div class="success-message"></div>
:
success-messageはお好みの場所へ。
$(".error-message").text("通報に失敗しました。再度お試しください。");
error-messageは報告フォームの中に入れています。
これで完成!
記事が長くなってしまい、わかりにくい箇所もかなりあると思います。
JavaScriptのコードも勉強中のため変なところも多いです💦
不明点ありましたら気軽にコメントください!
Discussion