【Rails】モーダルで開く通知機能②(フォロー・いいね・コメント・コメントいいね) - コントローラ & ビュー作成 -
前回の続きからです。モデルにメソッドを作るところまで作成しましたね。
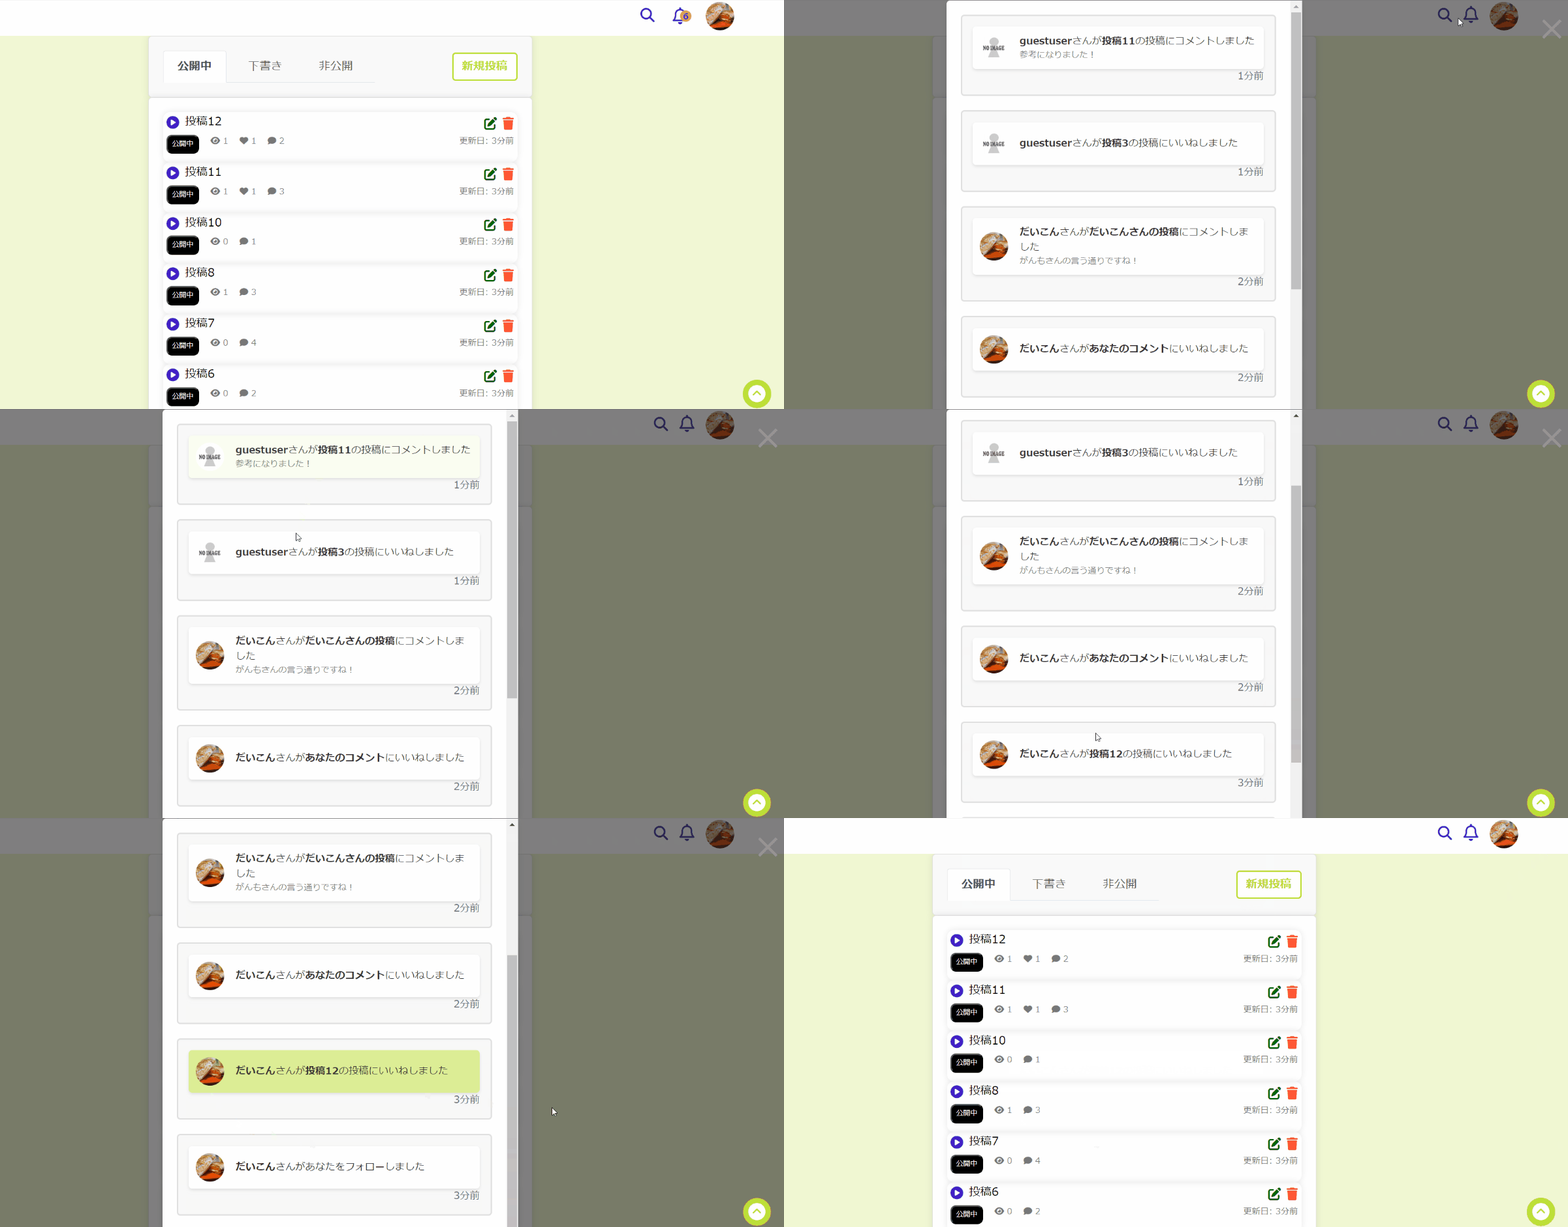
完成イメージ

流れ
- モデル作成と関連付け
- 各メソッドの作成
- コントローラ呼び出し
- 通知ページのルーティング設定
- 通知ページのコントローラ設定
- ビュー作成
この記事では4. 通知ページのルーティング設定から解説します。
ルーティング設定
 scope module: :public do
   resources :notifications, only: [:index] do
     post :update_checked, on: :collection
     end
   end
解説:
ここでは通知一覧画面を表示するindexアクションと、通知を一括で既読にするためのupdate_checkedアクションを定義しています。
updateは通知一覧全体に対する操作なので、collectionを使ってあげます。
コントローラ設定
class Public::NotificationsController < ApplicationController
  before_action :authenticate_user!

  def index
    @user = current_user
    @notices = current_user.passive_notifications.order(created_at: :desc)
    @unchecked_notifications = @notices.where(is_checked: false)

    # 確認済みの通知を取得
    @checked_notifications = @notices.where(is_checked: true).limit(20)

    # 通知を確認済みに更新
    current_user.passive_notifications.update_all(is_checked: true)
    render partial: "index"
  end

  def update_checked
    current_user.passive_notifications.update_all(is_checked: true)
    head :no_content
  end
end
解説:
-
indexアクション
俺の場合は確認済みの通知も表示したかったので、確認済みの通知表示はlimitを使い20件までとしました。 -
update_checkedアクション
通知を一括して確認済みに更新するためのものです。
head :no_contentはHTTPステータスコード204を返します。このコードはブラウザに「通知を確認しました」という情報を送るもので、新しいページやデータが必要ない場合に使います。
ビューの設定
通知画面の作成
<% notifications = unchecked_notifications.where.not(visitor_id: current_user.id) %>

<!--未確認通知を表示-->
<% if @unchecked_notifications.any? %>
  <%= render "notification", notifications: @unchecked_notifications %>
<% end %>

 <!--確認済み通知を表示-->
  <% if @checked_notifications.any? %>
    <%= render "notification", notifications: @checked_notifications %>
  <% end %>

 <!--通知が一つもない場合の表示-->
<% if @unchecked_notifications.empty? && @checked_notifications.empty? %>
  <p>通知はありません</p>
<% end %>
通知詳細の作成
<% notifications.each do |notification| %>
  <% visitor = notification.visitor %>
  <% visited = notification.visited %>
  <div class="col-md-12 mx-auto notification-container">
    <div class="notification-box d-flex align-items-center">
      <div class="notification-icon">
        <%= link_to user_path(visitor.account), data: { turbolinks: false } do %>
          <%= user_icon_or_youtube(visitor, size: '40x40', class: 'rounded-circle mr-3') %>
        <% end %>
      </div>

      <!-- 通知の種類に応じて表示内容を切り替え -->
      <% case notification.action %>
      <!-- フォロー通知の場合 -->
      <% when 'follow' then %>
        <strong><%= visitor.nickname %></strong>さんがあなたをフォローしました

      <!-- 投稿がいいねされた通知の場合 -->
      <% when 'favorite_post' then %>
        <%= link_to post_path(notification.post) do %>
          <strong><%= visitor.nickname %></strong>さんが<strong><%= truncate(notification.post.title, length: 10) %></strong>の投稿にいいねしました
        <% end %>

      <!-- コメントがいいねされた通知の場合 -->
      <% when 'favorite_comment' then %>
        <%= link_to post_path(notification.comment.post) do %>
          <strong><%= visitor.nickname %></strong>さんが<strong>あなたのコメント</strong>にいいねしました
        <% end %>

      <!-- コメントが投稿された通知の場合 -->
      <% when 'comment' then %>
        <!-- 自分自身の投稿へのコメントの場合 -->
        <% if notification.post.user_id == visited.id %>
          <%= link_to post_path(notification.post) do %>
            <strong><%= visitor.nickname %></strong>さんが<strong><%= truncate(notification.post.title, length: 10) %></strong>の投稿にコメントしました
            <% comment = Comment.find_by(id: notification.comment_id) %>
            <div class="notification-comment">
              <%= truncate(comment&.comment, length: 30) %>
            </div>
          <% end %>

        <!-- 投稿者が異なり自身がコメントした投稿に他のユーザーがコメントした場合 -->
        <% else %>
          <span>
            <%= link_to post_path(notification.post) do %>
              <strong><%= visitor.nickname %></strong>さんが<strong><%= notification.post.user.nickname + 'さんの投稿' %></strong>にコメントしました
              <% comment = Comment.find_by(id: notification.comment_id) %>
              <div class="notification-comment">
                <%= truncate(comment&.comment, length: 30) %>
              </div>
            <% end %>
          </span>
        <% end %>
      <% end %>

    </div>
    <div class="small text-muted text-right">
      <%= time_ago_in_words(notification.created_at).upcase %>前
    </div>
  </div>
<% end %>
解説:
どこをクリックしたらページ遷移させるかはアレンジして実施してくださいね♪
俺の場合は以下の通りにしています。
・アイコンをクリックしたらユーザーの詳細ページに飛ぶ。
・通知文章をクリックしたら投稿の詳細ページに飛ぶ。
詳細は以下の通りです。
-
フォロー通知の場合

投稿は関係ないので、リンクはアイコンのみです。 -
投稿がいいねされた通知の場合

-
コメントがいいねされた通知の場合

-
コメントが投稿された通知の場合
- 自分自身の投稿へのコメントの場合

- 投稿者が異なり自身がコメントした投稿に他のユーザーのコメントした場合

- 自分自身の投稿へのコメントの場合
-
truncateは指定した文字数を超えたテキストを短縮するために使っています。 -
comment&.commentで投稿されたコメントを呼び出しています。&.を使うことでcommentがnilかどうかをチェックします。- もしcommentがnil出ない場合は、それに対してcommentを呼び出します。
- もしcommentがnilである場合は、エラーを起こさずnilを返します。
通知アイコンの作成
    <% if user_signed_in? %>
      <div class="mypage-nav d-flex align-items-center">
        <div class="bell-container mr-3">
          <a href="javascript:void(0)" id="notifications-link">
            <% if unchecked_notifications.any? %>
              <span class="fa-stack" style="vertical-align: middle;">
                <i class="far fa-bell fa-lg fa-stack-1x" style="font-size: 1.5em;"></i>
                  <i class="fas fa-circle n-circle fa-stack-1x">
                    <span class="notification-count"><%= unchecked_notifications.count %></span>
                  </i>
              </span>
            <% else %>
              <i class="far fa-bell fa-lg" style="font-size: 1.5em;"></i>
            <% end %>
          </a>
        </div>
解説:

Font Awesomeを使ってアイコンを入れます。俺の場合はヘッダーに作りました。
このコードは、ユーザーがサインインしている場合に、通知アイコン(ベルのアイコン)を表示するためのものです。
-
<a href="javascript:void(0)" id="notifications-link">:
通知アイコンがクリックされたときに通知の表示を切り替えるためのリンクです。 -
<% if unchecked_notifications.any? %>:
未読の通知が存在する場合、通知アイコンに未読通知の数を表示します。 -
<i class="far fa-bell fa-lg fa-stack-1x" style="font-size: 1.5em;"></i>:
通知アイコン自体です。fa-stack-1xはアイコンの重なり順を調整するためのもの。 -
<i class="fas fa-circle n-circle fa-stack-1x">:
未読通知の数を示す円のアイコンです。 -
<i class="far fa-bell fa-lg" style="font-size: 1.5em;"></i>:
未読通知がない場合に表示される、通常のベルアイコンです。
/* ベルのアイコンの色 */
i.far.fa-bell.fa-lg {
  color: #4220C7;
  transition: color 0.3s;
}

/* ホバー時のベルのアイコンの色 */
i.far.fa-bell.fa-lg:hover  {
  color: #655DFC;
}

/* 通知件数 */
.notification-count {
  position: absolute;
  top: 54%;
  left: 70%;
  transform: translate(-50%, -50%);
  color: #4220C7;
  font-size: 12px;
  transition: color 0.3s;
}

/* ホバー時の通知件数 */
.notification-count:hover {
  color: #655DFC;
}

/* 円マーク */
.n-circle {
  position: absolute;
  padding-left: 1rem;
  padding-top: 0rem;
  color: #efa04c;
  transition: color 0.3s;
  &.orange {
    color: #efa04c;
  }
}

/* 円マークのホバー時 */
.n-circle:hover {
  color: #f4c986;
}
cssは調整していただければと思います。
ヘルパーの作成
以下のように、notifications_helperを利用して、「未確認通知のデータを取得するメソッド」を記載します。
module Public::NotificationsHelper
  def unchecked_notifications
    @notifications = current_user.passive_notifications.where(is_checked: false)
  end
end
モーダルウィンドウ作成
:
<!-- 通知一覧を表示するモーダルウィンドウ -->
  <div id="notifications-modal" class="modal">
    <div class="common-modal-content"></div>
  </div>
</header>

<script>
  $(document).ready(function() {
    $('#notifications-link').click(function() {
      // 通知を確認済みに更新するアクションを呼び出す
      $.ajax({
        url: '<%= update_checked_notifications_path %>',
        type: 'POST',
        success: function() {
          $('.n-circle').removeClass('orange');
          $('#notifications-link').html('<i class="far fa-bell fa-lg" style="font-size: 1.5em;"></i>');

          // 通知モーダルを表示する処理
          $.ajax({
            url: '<%= notifications_path(@user) %>',
            type: 'GET',
            success: function(response) {
              $('#notifications-modal .common-modal-content').html(response);
              $('#notifications-modal').addClass('fade-in').show();
            }
          });
        }
      });
    });

  // モーダル内のクリックイベントを停止
  $('#notifications-modal .modal-content').on('click', function(event) {
    event.stopPropagation(); // イベントの伝播を停止
  });

  // モーダル外(背景)をクリックしたときにモーダルを閉じる
  $('#notifications-modal').on('click', function() {
    $(this).addClass('fade-out');
    setTimeout(() => {
      $(this).hide().removeClass('fade-out');
    }, 300);
  });
});
</script>
解説:
通知ベルアイコンをクリックしたときに、サーバーに通知の確認を更新するリクエストを送信して、ベルのアイコン表示を変更しています。
/* モーダルの背景 */
.modal {
  display: none;
  position: fixed;
  z-index: 1000;
  left: 0;
  top: 0;
  width: 100%;
  height: 100%;
  background-color: rgba(0, 0, 0, 0.5);
}

/* モーダルコンテンツ */
.common-modal-content {
  position: absolute;
  top: 50%;
  left: 50%;
  transform: translate(-50%, -50%);
  background-color: white;
  padding: 20px;
  border-radius: 5px;
  box-shadow: 0 2px 10px rgba(0, 0, 0, 0.1);
  max-width: 80%;
  width: 500px;
  overflow-y: auto;
  max-height: 600px;
}

/* モーダルのアニメーション */
.modal.fade-in {
  animation: fadeIn 0.3s ease-in;
}

.modal.fade-out {
  animation: fadeOut 0.3s ease-out;
}

@keyframes fadeIn {
  from { opacity: 0; }
  to { opacity: 1; }
}

@keyframes fadeOut {
  from { opacity: 1; }
  to { opacity: 0; }
}
最後までお読みいただきありがとうございました。
抜けや違い等あれば気軽にご指摘くださいね。
皆さん思い思いの通知機能が実装できますように!
今日でDWC卒業です。
6月生の皆さんと一緒に勉強できてよかったです。
本当にありがとうございました!
Discussion