GitHub Actions から Google Cloud リソースにアクセスする Workload Identity 連携の仕組みを追う
はじめに
お仕事において GitHub Actions ならびに Workload Identity が使用されている場面がありました。
そのときに GitHub Actions と Workload Identity がどのように通信しているか気になったため調べてみました。
Workload Identity 連携とは
Workload Identity 連携とは、外部クラウドプロバイダから 一時的に Google のリソースへのアクセス権を付与する仕組みです。
Service Account の JSON シークレットキーを使う場合、該当のシークレットキーが盗まれてしまうと第三者に自由に操作されてしまいます。
しかし、 Workload Identity の場合は一時的なアクセストークンを発行するだけであるため、そのアクセストークンが盗まれてもリスクが抑えられます。
この記事で取り扱うこと
この記事では GitHub Actions の OIDC トークンの仕組みによって、どのように Google Cloud へのリソースアクセスが可能になっているかの仕組みを追ってみます。
なお、筆者は OIDC に詳しいわけではないため誤りが含まれている可能性があり、通信の流れと仕組みの理解を優先していることにご注意ください。
なお、 Direct Workload Identity Federation による連携をこの記事では前提にしています。
つまり、Workload Identity Pool に直接 IAM を設定する方法を採用しています。
非推奨となったサービスアカウントを新たに作成して Workload Identity Pool と連携させる方法は前提にしていません。
この記事で取り扱わないこと
下記については他の記事を参考ください。
- Workload Identity の概要
- GCP においてどのように Workload Identity を設定するのか
- Workload Identity Pool
- Workload Identity Provider
参考リンク
コード
Workload Identity 連携を GitHub Actions で可能とする google-github-actions/auth のコードです。
この中身を追っていきます。
公式
GitHub OIDC を説明したドキュメントであり、 JWT の各項目の説明があってわかりやすいです。
GitHub Actions OIDC がリリースされたことによって Google Cloud Workload Identity と連携できるようになったことを説明した公式のブログです。
Security Token Service API の Reference です。
Workload Identity について GitHub Actions の設定方法を説明しているドキュメントです。
ブログ
GitHub OIDC 連携と Google Cloud 間の通信の流れが説明されており、こちらを一番参考にさせていただきました。
GitHub Actions OIDC を利用した Direct Workload Identity Federation がわかりやすく説明されています。
Workload Identity と GitHub Actions の設定を行う
仕組みを追うために Workload Identity と GitHub Actions を設定します。
詳しい設定方法については下記の記事などを参考ください。
注意点として GitHub Actions から Google Cloud リソースにアクセスすることを確認するために Cloud Secret Manager を利用しています。
my-gha-sample-secret というシークレットのみについて Workload Identity Pool がアクセスすることを許容しています。
################################
# Pool + Pool Provider の設定
################################
# ご自身の project_id, pool_id, github_org に修正ください
export PROJECT_ID="ganyariya"

export POOL_ID="ganyariya-gha-pool"
export POOL_PROVIDER_ID="ganyariya-gha-pool-provider"

export GITHUB_ORG="ganyariya"

# Workload Identity Pool を作成する
gcloud iam workload-identity-pools create $POOL_ID \
  --project="${PROJECT_ID}" \
  --location="global" \
  --display-name="ganyariya gha pool"

# Workload Identity Pool の情報を確認する
gcloud iam workload-identity-pools describe "${POOL_ID}" \
  --project="${PROJECT_ID}" \
  --location="global"

# Workload Identity Pool の FullID Name を取得する
# ex: projects/xxxxxxxxxxx/locations/global/workloadIdentityPools/ganyariya-gha-pool
export WORKLOAD_POOL_FULL_NAME=$(gcloud iam workload-identity-pools describe "${POOL_ID}" \
  --project="${PROJECT_ID}" \
  --location="global" \
  --format="value(name)"
)

# Workload Identity Provider (Github Actions) を作成する
# GITHUB_ORG からの通信のみを許容する(セキュリティ向上のため)
gcloud iam workload-identity-pools providers create-oidc $POOL_PROVIDER_ID \
  --project="${PROJECT_ID}" \
  --location="global" \
  --workload-identity-pool="${POOL_ID}" \
  --display-name="ganyariya gha pool provider" \
  --attribute-mapping="google.subject=assertion.sub,attribute.actor=assertion.actor,attribute.repository=assertion.repository,attribute.repository_owner=assertion.repository_owner" \
  --attribute-condition="assertion.repository_owner=='${GITHUB_ORG}'" \
  --issuer-uri="https://token.actions.githubusercontent.com"

# Workload Identity Provider の情報を確認する
gcloud iam workload-identity-pools providers describe $POOL_PROVIDER_ID \
  --project="${PROJECT_ID}" \
  --location="global" \
  --workload-identity-pool="${POOL_ID}"

# Workload Identity Pool Provider の FullID Name を取得する
# ex: projects/xxxxxxxxxxx/locations/global/workloadIdentityPools/ganyariya-gha-pool/providers/ganyariya-gha-pool-provider
# ex: projects/xxxxxxxxxxx/locations/global/workloadIdentityPools/{pool-id}/providers/{pool-provider-id}
export WORKLOAD_POOL_PROVIDER_FULL_NAME=$(gcloud iam workload-identity-pools providers describe $POOL_PROVIDER_ID \
  --project="${PROJECT_ID}" \
  --location="global" \
  --workload-identity-pool="${POOL_ID}" \
  --format="value(name)")

################################
# GitHub Actions で動作確認をするために
# - Cloud Secret Manager でシークレットを作成する
# - そのうえで Pool Principal がシークレットにアクセスできるようにする
################################

export SECRET_NAME="my-gha-sample-secret"
# Your Repository
export REPOSITORY_NAME="ganyariya/gcp-workload-identity-sample"

# my-gha-sample-secret というシークレットをつくる
echo "my-gha-sample-secret-value hello, world" | gcloud secrets create $SECRET_NAME --project="${PROJECT_ID}" --replication-policy="automatic" --data-file=-

# principalSet://iam.googleapis.com/projects/xxxxxxxxxxx/locations/global/workloadIdentityPools/ganyariya-gha-pool/attribute.repository/playground
# playground repository から ganyariya-gha-pool プールに対する権限のリクエストを許可する
export TARGET_MEMBER="principalSet://iam.googleapis.com/${WORKLOAD_POOL_FULL_NAME}/attribute.repository/${REPOSITORY_NAME}"
echo $TARGET_MEMBER

# my-gha-sample-secret リソースにおいて,  $TARGET_MEMBER が `roles/secretmanager.secretAccessor` ロール権限をもつ
# = $TARGET_MEMBER が my-gha-sample-secret にアクセスできる
gcloud secrets add-iam-policy-binding $SECRET_NAME \
  --project="${PROJECT_ID}" \
  --role="roles/secretmanager.secretAccessor" \
  --member="${TARGET_MEMBER}"
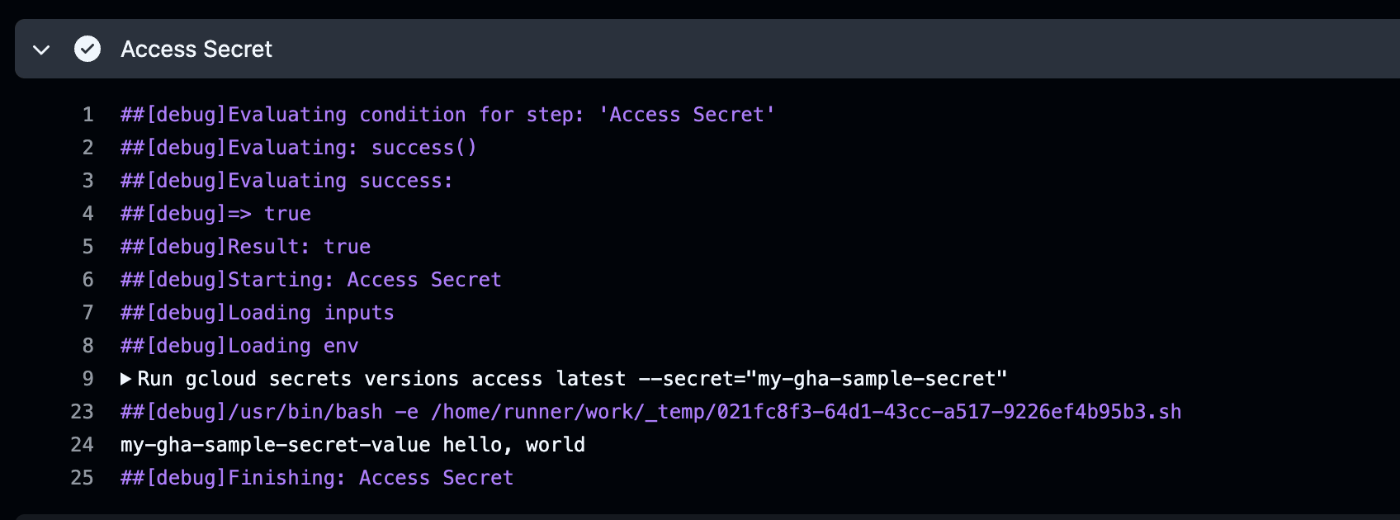
REPOSITORY_NAME="ganyariya/gcp-workload-identity-sample" で指定したリポジトリで下記の actions yaml を設定してください。
コンソールにシークレットの値が表示されていれば Actions から Cloud Secret にアクセスできています。

name: 'Gcp Workload Identity Sample'
on:
  push:
    branches:
      - 'main'
  pull_request:
    branches:
      - 'main'

jobs:
  secret-access-job:
    name: 'Get Secret From Secret Manager Sample'

    permissions:
      id-token: 'write'
      contents: 'read'

    runs-on: ubuntu-latest

    steps:
      - uses: 'actions/checkout@v4'

      - name: Display GitHub OIDC Token
        run: |
          echo "$ACTIONS_ID_TOKEN_REQUEST_URL"
          echo "$ACTIONS_ID_TOKEN_REQUEST_TOKEN"
          curl -s -H "Authorization: bearer ${ACTIONS_ID_TOKEN_REQUEST_TOKEN}" "${ACTIONS_ID_TOKEN_REQUEST_URL}" | jq '.value | split(".") | .[0],.[1] | @base64d | fromjson'

      - id: 'auth'
        uses: 'google-github-actions/auth@v2'
        with:
          # ご自身の project_id & workload_identity_provider に修正ください
          project_id: 'ganyariya'
          workload_identity_provider: 'projects/358062825971/locations/global/workloadIdentityPools/ganyariya-gha-pool/providers/ganyariya-gha-pool-provider'

      - name: 'check GOOGLE_APPLICATION_CREDENTIALS'
        run: |
          echo $GOOGLE_APPLICATION_CREDENTIALS
          cat $GOOGLE_APPLICATION_CREDENTIALS

      - uses: 'google-github-actions/setup-gcloud@v2'

      - name: 'Access Secret'
        run: |
          gcloud secrets versions access latest --secret="my-gha-sample-secret"
GitHub Actions における Workload Identity OIDC 連携の仕組みについて
.github/workflows/gcp-workload-identity-sample.yaml を参照いただくと 'google-github-actions/auth@v2' があります。
この auth action が GitHub Action OIDC 認証ならびに Google STS API へ認証しています。
そのため、この auth action のコードを追うことで OIDC 連携について理解していきます。
通信の流れ
公式リポジトリの説明
auth リポジトリの下記リンクで紹介されている説明文と画像がもっとも簡潔にわかりやすく通信の流れを説明しています。
1 はじめに 'Gcp Workload Identity Sample' ワークフローの auth step が GitHub OIDC プロバイダに認証リクエストを送ります。
図における OIDC Service です。
リクエストを受け取った GitHub OIDC プロバイダは本当に「ganyariya/gcp-workload-identity-sample のワークフローか」を検証します。
検証に成功すれば不正な第三者からの通信ではない、つまりワークフロー自身からの認証リクエストだったことがわかります。
その場合はレスポンスとして GitHub OIDC トークンを auth step に返します。
これによって、 GitHub OIDC プロバイダは auth step が不正な第三者ではなく ganyariya 自身であることを認証します。
2 続いて auth step が GitHub OIDC トークンを Google の Security Token Service API に送ります。
このとき、おそらく Security Token Service API と GitHub OIDC プロバイダが裏で通信して GitHub OIDC トークンが本物か確認しています。
3 問題なければ Security Token Service API は Google OAuth 2.0 アクセストークンを auth step に返します。
図における Federated Token です。
4 Google Cloud の REST API を実行するときに Google OAuth 2.0 アクセストークンをヘッダーに付与することで Google Cloud のリソースを変更できます。
今回の例でいえば、 Cloud Secret Manager のシークレットの値を取得しています。
ただし、何でもかんでも操作できるわけではありません。
Workload Identity Pool PrincipalSets が IAM によって許可されているリソースにのみアクセスできます。
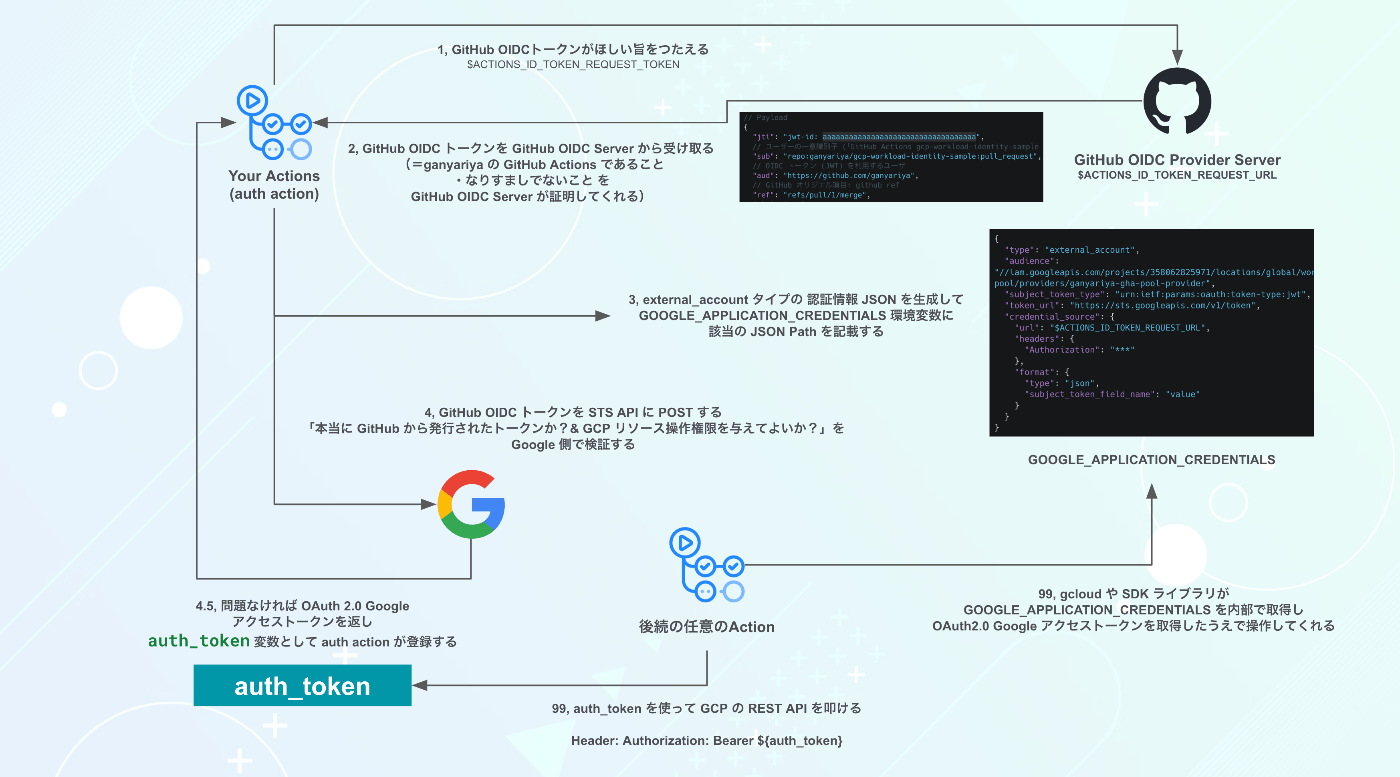
ganyariya がコードを読んだうえで解釈した通信の流れ(詳細)
今回 ganyariya がコードを読んだうえで通信の流れを解釈したところ下記の画像のようになりました。
この流れに沿って順にコードを追っていこうと思います。

GitHub OIDC トークンを取得する
はじめに auth step が GitHub OIDC Provider Server へ OIDC トークンがほしい旨を伝えます。
ここで、GitHub OIDC Provider Server の URL は $ACTIONS_ID_TOKEN_REQUEST_TOKEN で設定されています。
また、実行されるワークフローごとに $ACTIONS_ID_TOKEN_REQUEST_TOKEN リクエストトークンが設定されています。
このリクエストトークンを GitHub OIDC プロバイダに送ることで「本物のワークフローですよ」を伝えています。
$ACTIONS_ID_TOKEN_REQUEST_TOKEN がわからないため、不正な第三者がなりかわれません。
リクエストトークンを GitHub OIDC プロバイダに送って、レスポンスとして OIDC トークンを受け取る挙動は GitHub Actions 上で実際に試せます。
      - name: Display GitHub OIDC Token
        run: |
          # https://pipelinesghubeus23.actions.githubusercontent.com/aaaaaaaaaaaaaaaaaaaa/00000000-0000-0000-0000-000000000000/_apis/distributedtask/hubs/Actions/plans/aaaaaaaaaaaaaaaaaaaaaaaaaaa/jobs/aaaaaaaaaaaaaaaaaaaaaaaaaaa/idtoken?api-version=2.0
          echo "$ACTIONS_ID_TOKEN_REQUEST_URL"
          echo "$ACTIONS_ID_TOKEN_REQUEST_TOKEN"
          curl -s -H "Authorization: bearer ${ACTIONS_ID_TOKEN_REQUEST_TOKEN}" "${ACTIONS_ID_TOKEN_REQUEST_URL}" | jq '.value | split(".") | .[0],.[1] | @base64d | fromjson'
レスポンスとして得られる OIDC トークンは (Header).(Payload).(Signature) の JWT 形式になっています。
このうち、 Header, Payload は以下のようになっています (GitHub Actions のコンソールから確認できます)。
JWT でよく用いられる sub, aud, iss, exp などが確認できます。
くわえて、GitHub が独自に定義している repository, head_ref なども確認できます。
// Header
{
  "typ": "JWT",
  "alg": "RS256",
  "x5t": "X.509 証明書: aaaaaaaaaaaaaaaaaaaaaaaaaaaaaaaaaaa",
  "kid": "key-id: aaaaaaaaaaaaaaaaaaaaaaaaaaaaaaaaaaa"
}
// Payload
{
  // JWT token identifier
  "jti": "jwt-id: aaaaaaaaaaaaaaaaaaaaaaaaaaaaaaaaaaa",
  // ユーザーの一意識別子 (「GitHub Actions gcp-workload-identity-sample の PR」であることを認証している)
  "sub": "repo:ganyariya/gcp-workload-identity-sample:pull_request",
  // OIDC トークン (JWT) を利用するユーザ
  "aud": "https://github.com/ganyariya",
  // GitHub オリジナル項目: github ref
  "ref": "refs/pull/1/merge",
  "sha": "...",
  // GitHub オリジナル項目: repository, owner, ...
  "repository": "ganyariya/gcp-workload-identity-sample",
  "repository_owner": "ganyariya",
  "repository_owner_id": "25547158",
  "run_id": "12092671955",
  "run_number": "13",
  "run_attempt": "1",
  "repository_visibility": "private",
  "repository_id": "895050937",
  "actor_id": "25547158",
  "actor": "ganyariya",
  "workflow": "Gcp Workload Identity Sample",
  "head_ref": "feature/add-github-access-sample",
  "base_ref": "main",
  "event_name": "pull_request",
  "ref_protected": "false",
  "ref_type": "branch",
  "workflow_ref": "ganyariya/gcp-workload-identity-sample/.github/workflows/gcp-workload-identity-sample.yaml@refs/pull/1/merge",
  "workflow_sha": "aaaaaaaaaaaaaaaaaaaaaaaaaaaaaaaaaaa",
  "job_workflow_ref": "ganyariya/gcp-workload-identity-sample/.github/workflows/gcp-workload-identity-sample.yaml@refs/pull/1/merge",
  "job_workflow_sha": "aaaaaaaaaaaaaaaaaaaaaaaaaaaaaaaaaaa",
  "runner_environment": "github-hosted",
  // OIDC トークン発行元
  "iss": "https://token.actions.githubusercontent.com",
  // OIDC トークンが有効開始時間: 2024-11-30 10:58:35 から使えるようになる
  "nbf": 1732931915,
  // OIDC トークンの有効期限: 2024-11-30 11:13:35 まで使える
  "exp": 1732932815,
  // OIDC トークン発行時間: 2024-11-30 11:08:35  に作成された
  "iat": 1732932515
}
// Signature
// ここに Header + Payload を署名したバイナリテキストが入っている
OIDC IdP 構成 JSON ファイルを書き込む
続いて auth step は OIDC IdP 構成 JSON ファイル をワークフローが動いているホストマシン (ubuntu) に書き込みます。
ganyariya が実行したときは以下のパスに OIDC IdP 構成 JSON ファイルが書き込まれました。
/home/runner/work/gcp-workload-identity-sample/gcp-workload-identity-sample/gha-creds-d69e04761c16a369.json
その後 OIDC IdP 構成ファイルへのパスを GOOGLE_APPLICATION_CREDENTIALS や GOOGLE_GHA_CREDS_PATH 環境変数に設定します。
どう利用されるかについては 後続のワークフローステップで gcloud を実行する 節で説明します。
そのため、ここでは OIDC IdP 構成 JSON ファイル を GOOGLE_APPLICATION_CREDENTIALS で登録している、の理解で問題ありません。
Google OAuth 2.0 アクセストークンを取得する
続いて authToken Google OAuth2.0 アクセストークンを Security Token Serviced API とやりとりすることで取得します。
Security Token Service API エンドポイントを指定していること、ならびに GitHub OIDC トークンを設定していることがわかります。
    // security token service の endpoint
    const pth = `${this._endpoints.sts}/token`

    // GitHub OIDC トークンを設定している
    const body = {
      subjectToken: this.#githubOIDCToken,
    };
レスポンスとして access_token を const authToken = await client.getToken(); として受け取っています。
Security Token Service API エンドポイントの Reference をみると access_token は以下のように説明されています。
string
An OAuth 2.0 security token, issued by Google, in response to the token exchange request.
Tokens can vary in size, depending in part on the size of mapped claims, up to a maximum of 12288 bytes (12 KB). Google reserves the right to change the token size and the maximum length at any time.
そのため、 access_token (= authToken) を任意の Google REST API のヘッダに付与することで、Google リソースにアクセスできます。
最後に auth_token という変数で authToken を格納しており、後続のワークフローステップで参照できます。
(条件によって) id_token や access_token を取得する
auth step で設定する token_format によって、サービスアカウントに紐づく id_token や access_token を取得するようです。
ただし、ここでは Direct Workload Identity Federation を前提にしているためここについては追っていません。
ここまでで auth step の処理は終わりです。
後続のワークフローステップで gcloud を実行する
auth が終わったのちに、好きなステップで gcloud を実行できます。
gcloud の場合 auth で設定した OIDC IdP 構成ファイル ならびに GOOGLE_APPLICATION_CREDENTIALS を利用します。
OIDC IdP 構成ファイルは以下の形式になっています。
ここで .credential_source.url が GitHub の OIDC プロバイダの URL になっています。
{
  "type": "external_account",
  "audience": "//iam.googleapis.com/projects/358062825971/locations/global/workloadIdentityPools/ganyariya-gha-pool/providers/ganyariya-gha-pool-provider",
  "subject_token_type": "urn:ietf:params:oauth:token-type:jwt",
  "token_url": "https://sts.googleapis.com/v1/token",
  "credential_source": {
    "url": "https://pipelinesghubeus23.actions.githubusercontent.com/aaaaaaaaaaaaaaaaa/00000000-0000-0000-0000-000000000000/_apis/distributedtask/hubs/Actions/plans/aaaaaaaaaaaaaaaaa/jobs/aaaaaaaaaaaaaaaaa/idtoken?api-version=2.0&audience=https%3A%2F%2Fiam.googleapis.com%2Fprojects%2F358062825971%2Flocations%2Fglobal%2FworkloadIdentityPools%2Fganyariya-gha-pool%2Fproviders%2Fganyariya-gha-pool-provider",
    "headers": {
      "Authorization": "***"
    },
    "format": {
      "type": "json",
      "subject_token_field_name": "value"
    }
  }
}
そのため、 gcloud や公式クライアント SDK は GOOGLE_APPLICATION_CREDENTIALS を介して OIDC IdP 構成ファイル を取得します。
そのうえで GitHub OIDC プロバイダとやり取りし、かつ Security Token Service API も叩いてアクセストークンを自動で取得しているのだと思います。
よって、 gcloud は下記の OIDC IdP 構成ファイルをいい感じに内部で処理してアクセストークンを取得し、そのうえで REST API を叩いてリソースアクセスをしています。
後続のワークフローステップで REST API を実行する
auth が終わったのちに、好きなステップで REST API を実行できます。
auth_token という変数にはアクセストークンが入っているため、下記のようにヘッダにアクセストークンを入れることで REST API で Google リソースにアクセスできそうです。
Authorization: bearer ${auth_token}
ただ、 gcloud のほうが勝手に裏でアクセストークン取得まで行ってくれるため、 gcloud を利用できるのであればそれに越したことはなさそうです。
最後に
GitHub Actions OIDC 連携による Workload Identity について見てきました。
別の記事で「どうして Workload Identity は不正できないのか」も調べながら書こうかなと思います。

Discussion