前回
の続きです。
はじめに
NestJS に入門するはずが、データストアについては自分で決める必要があることが分かったので、ここ数日いろいろ調べて先人たちの経験を読み漁った結果 Prisma に入門します。その調査のまとめは別途書きたいと思いますが、今日はとりあえず触っていきましょう。
Getting started
Getting started にはいくつかメニューがあるのですが、普通の Rails エンジニアとしては Relational database を使った開発フローを知っておきたいので Start from scratch > Relational databases をやっていきます。
$ mkdir hello-prisma
$ cd hello-prisma
$ npm init -y
$ npm install prisma typescript ts-node @types/node --save-dev
$ code .
tsconfig.json を作ります。
{
  "compilerOptions": {
    "sourceMap": true,
    "outDir": "dist",
    "strict": true,
    "lib": ["esnext"],
    "esModuleInterop": true
  }
}
Prisma CLI
ドキュメントによると、Prisma CLI は npx で実行するようです。一度実行してみましょう。コマンドを指定せずに実行するとヘルプが見られますね。
$ npx prisma

◭  Prisma is a modern DB toolkit to query, migrate and model your database (https://prisma.io)

Usage

  $ prisma [command]

Commands

            init   Set up Prisma for your app
        generate   Generate artifacts (e.g. Prisma Client)
              db   Manage your database schema and lifecycle
         migrate   Migrate your database
          studio   Browse your data with Prisma Studio
          format   Format your schema

Flags

     --preview-feature   Run Preview Prisma commands

Examples

  Set up a new Prisma project
  $ prisma init

  Generate artifacts (e.g. Prisma Client)
  $ prisma generate

  Browse your data
  $ prisma studio

  Create migrations from your Prisma schema, apply them to the database, generate artifacts (e.g. Prisma Client)
  $ prisma migrate dev

  Pull the schema from an existing database, updating the Prisma schema
  $ prisma db pull

  Push the Prisma schema state to the database
  $ prisma db push
分かりやすいですね〜。
prisma init
Prisma をセットアップします。
$ npx prisma init

✔ Your Prisma schema was created at prisma/schema.prisma
  You can now open it in your favorite editor.

Next steps:
1. Set the DATABASE_URL in the .env file to point to your existing database. If your database has no tables yet, read https://pris.ly/d/getting-started
2. Set the provider of the datasource block in schema.prisma to match your database: postgresql, mysql, sqlite, sqlserver, mongodb or cockroachdb.
3. Run prisma db pull to turn your database schema into a Prisma schema.
4. Run prisma generate to generate the Prisma Client. You can then start querying your database.

More information in our documentation:
https://pris.ly/d/getting-started
-
prisma/schema.prismaに Prisma スキーマが作られました。ここにモデルなどを定義していくようです。楽しみ! -
.envファイルが作られました。DATABASE_URLなどを設定していくようです。
DB の設定
引き続き、次のページ Connect your database をやっていきます。
datasource db {
  provider = "postgresql"
  url      = env("DATABASE_URL")
}
見たままですが provider は postgresql url は env から取得するようになっています。ということで .env に DATABASE_URL を設定しましょう。
生成された .env では johndoe さんのサンプルになっているので、自身の環境に合わせたURLに変更します。私はローカルの開発環境では Homebrew でサクッと入れた PostgreSQL をデフォルト状態で使っているので、以下で接続できちゃいます。
DATABASE_URL="postgresql://gabu@localhost/hello_prisma"
DB の作成
Rails であればこの後 rails db:create で DB の作成をコマンドから行いますが、Prisma には同様のコマンドがなく、どうやら prisma migrate dev で DB がなければ自動的に CREATE してくれるようです。つまり、CREATE DATABASE だけを実行するコマンドがないだけのようです。
Prisma Migrate
引き続き、次のページ Using Prisma Migrate をやっていきます。
schema.prisma にモデルを追加します。
model Post {
  id        Int      @id @default(autoincrement())
  createdAt DateTime @default(now())
  updatedAt DateTime @updatedAt
  title     String   @db.VarChar(255)
  content   String?
  published Boolean  @default(false)
  author    User     @relation(fields: [authorId], references: [id])
  authorId  Int
}

model Profile {
  id     Int     @id @default(autoincrement())
  bio    String?
  user   User    @relation(fields: [userId], references: [id])
  userId Int     @unique
}

model User {
  id      Int      @id @default(autoincrement())
  email   String   @unique
  name    String?
  posts   Post[]
  profile Profile?
}
次に、ドキュメントにある prisma migrate dev を実行しますが、このコマンドは
- マイグレーションファイルの作成
- DBへの反映
を一気に行うようです。
さらに、自動的に prisma generate が実行され、 schema.prisma の generator client に prisma-client-js が設定されている場合は Prisma Client のコードが生成され、@prisma/client パッケージが見つからない場合は自動的にインストールされます。
$ npx prisma migrate dev --name init
Environment variables loaded from .env
Prisma schema loaded from prisma/schema.prisma
Datasource "db": PostgreSQL database "hello_prisma", schema "public" at "localhost:5432"

Applying migration `20220720022636_init`

The following migration(s) have been created and applied from new schema changes:

migrations/
  └─ 20220720022636_init/
    └─ migration.sql

Your database is now in sync with your schema.

Running generate... (Use --skip-generate to skip the generators)

added 2 packages, and audited 24 packages in 3s

found 0 vulnerabilities

✔ Generated Prisma Client (4.1.0 | library) to ./node_modules/@prisma/client in 50ms
Prisma Client が気になりますが、先に生成されたマイグレーションファイルを見てみましょう。
-- CreateTable
CREATE TABLE "Post" (
    "id" SERIAL NOT NULL,
    "createdAt" TIMESTAMP(3) NOT NULL DEFAULT CURRENT_TIMESTAMP,
    "updatedAt" TIMESTAMP(3) NOT NULL,
    "title" VARCHAR(255) NOT NULL,
    "content" TEXT,
    "published" BOOLEAN NOT NULL DEFAULT false,
    "authorId" INTEGER NOT NULL,

    CONSTRAINT "Post_pkey" PRIMARY KEY ("id")
);

-- CreateTable
CREATE TABLE "Profile" (
    "id" SERIAL NOT NULL,
    "bio" TEXT,
    "userId" INTEGER NOT NULL,

    CONSTRAINT "Profile_pkey" PRIMARY KEY ("id")
);

-- CreateTable
CREATE TABLE "User" (
    "id" SERIAL NOT NULL,
    "email" TEXT NOT NULL,
    "name" TEXT,

    CONSTRAINT "User_pkey" PRIMARY KEY ("id")
);

-- CreateIndex
CREATE UNIQUE INDEX "Profile_userId_key" ON "Profile"("userId");

-- CreateIndex
CREATE UNIQUE INDEX "User_email_key" ON "User"("email");

-- AddForeignKey
ALTER TABLE "Post" ADD CONSTRAINT "Post_authorId_fkey" FOREIGN KEY ("authorId") REFERENCES "User"("id") ON DELETE RESTRICT ON UPDATE CASCADE;

-- AddForeignKey
ALTER TABLE "Profile" ADD CONSTRAINT "Profile_userId_fkey" FOREIGN KEY ("userId") REFERENCES "User"("id") ON DELETE RESTRICT ON UPDATE CASCADE;
SQL を書かずに済むのは最高ですね!
テーブルができているかも見てみます。おっと、テーブル名はモデル名そのままになるんですね〜。
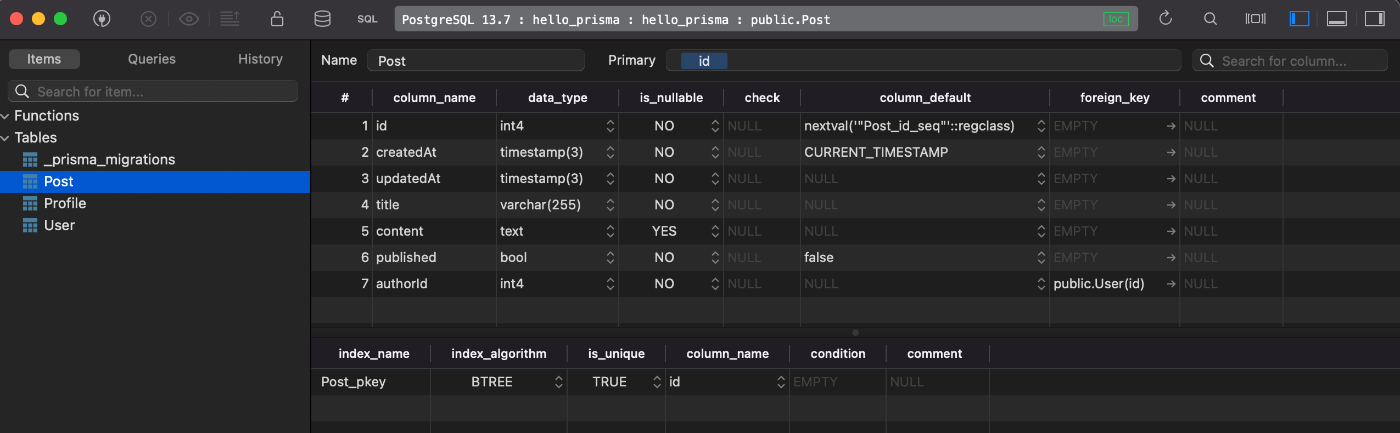
ちなみに私は TablePlus を愛用しています。GUI としての使い勝手も良いですし、SQL を書いてデータを確認したり、本番環境のデータのメンテナンスを行ったり(GUI で行った操作をコミットするまで溜めておける機能が最高です。もちろん SQL でメンテナンスすることも多いです)、Redash のクエリーを書く前の下書きをローカル環境でやったりと、大活躍です。
prisma generate
prisma generate コマンドはこのページの図が分かりやすいです。
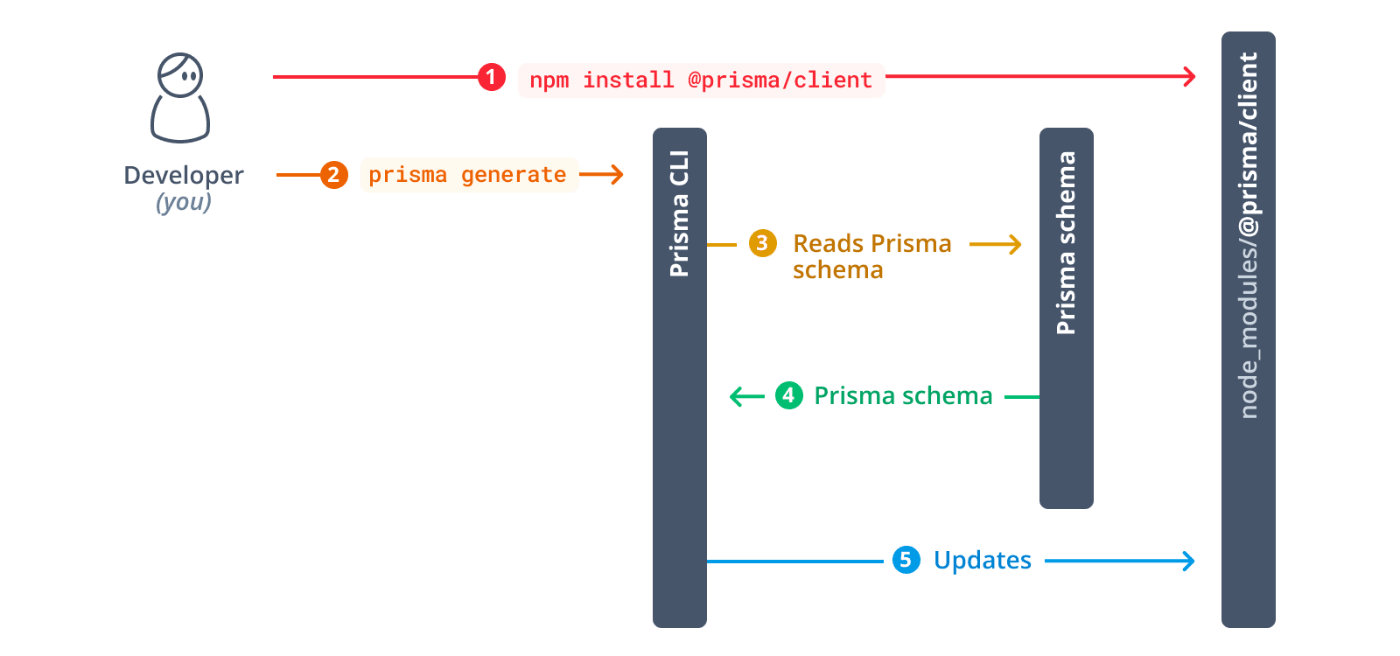
ここは理解するだけで特に作業はないので、やっていることが想像できたら次へ進みましょう。
Prisma Client
引き続き、次のページ Querying the database をやっていきます。
やっとコードを使ってDBの操作ができますね!!
プロジェクト直下に index.ts を作ります。
import { PrismaClient } from '@prisma/client'

const prisma = new PrismaClient()

async function main() {
  // ... you will write your Prisma Client queries here
}

main()
  .catch((e) => {
    throw e
  })
  .finally(async () => {
    await prisma.$disconnect()
  })
書いてあるとおりなので解説は公式ドキュメントに任せます!
そしたら、 main で全ユーザーを取得してコンソールに出力してみます。
async function main() {
  // ... you will write your Prisma Client queries here
+  const allUsers = await prisma.user.findMany()
+  console.log(allUsers)
}
ts-node で実行。
$ npx ts-node index.ts
[]
次に create ですね。リレーションのある posts と profile もせーので作れるようです。便利〜
  await prisma.user.create({
    data: {
      name: 'Alice',
      email: 'alice@prisma.io',
      posts: {
        create: { title: 'Hello World' },
      },
      profile: {
        create: { bio: 'I like turtles' },
      },
    },
  })
findMany でリレーションを include して取得することもできるようです。便利〜
  const allUsers = await prisma.user.findMany({
    include: {
      posts: true,
      profile: true,
    },
  })
main 全体はこんな感じで。
async function main() {
  await prisma.user.create({
    data: {
      name: 'Alice',
      email: 'alice@prisma.io',
      posts: {
        create: { title: 'Hello World' },
      },
      profile: {
        create: { bio: 'I like turtles' },
      },
    },
  })

  const allUsers = await prisma.user.findMany({
    include: {
      posts: true,
      profile: true,
    },
  })
  console.dir(allUsers, { depth: null })
}
もう一度実行してみます。
$ npx ts-node index.ts
[
  {
    id: 1,
    email: 'alice@prisma.io',
    name: 'Alice',
    posts: [
      {
        id: 1,
        createdAt: 2022-07-20T03:06:04.300Z,
        updatedAt: 2022-07-20T03:06:04.301Z,
        title: 'Hello World',
        content: null,
        published: false,
        authorId: 1
      }
    ],
    profile: { id: 1, bio: 'I like turtles', userId: 1 }
  }
]
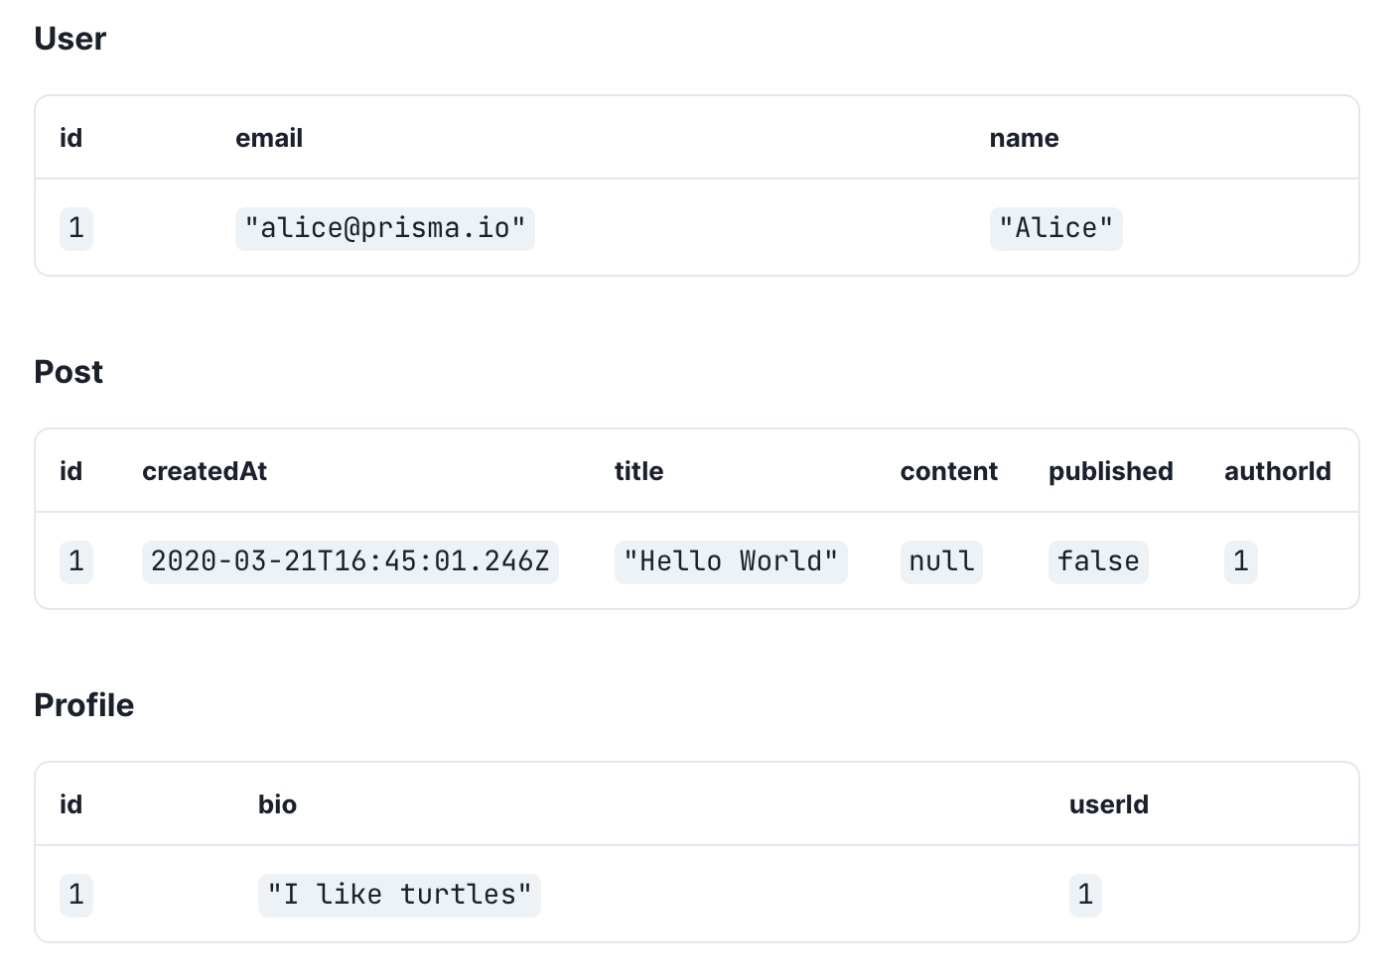
このサンプルコードで使った、リレーションを同時に書き込む Nested write と、リレーションフィールド Relation fields についてリンク先を読んでおくと良さそうです。
保存されたレコードはこんな感じで、Post.authorId と Profile.userId に User.id が入っていて、ActiveRecord の belongs_to と同じ考え方で良さそうです。逆向きに考えると has_many has_one なリレーションも同様ですね。
最後に update ですね。main を書き換えます。
async function main() {
  const post = await prisma.post.update({
    where: { id: 1 },
    data: { published: true },
  })
  console.log(post)
}
これまたコードに書いてあるとおりですが、where で指定された { id: 1 } なレコードを data で指定された { published: true } で更新するということですね。
$ npx ts-node index.ts
{
  id: 1,
  createdAt: 2022-07-20T03:06:04.300Z,
  updatedAt: 2022-07-20T03:18:57.294Z,
  title: 'Hello World',
  content: null,
  published: true,
  authorId: 1
}
published を true に更新できました!
これで create,read,update ができました。delete もまぁ普通にできるでしょう!長くなってきたので飛ばします。。
おわり
チュートリアルとしては以上でした。次は、Prisma Client を掘っていくでもいいですが、実装自体はリファレンスを見ながら何とでもできそうな気がしているので、実サービスのことを考えると先に Prisma Migrate の方を掘っていきたいと思います。Webサービスを運用する身としては、DBの運用は慎重に行いたいですしね。
とはいえ、
- ALTER系の作法
- 本番DBへの反映
ぐらいでしょうか。
それでは!

Discussion