laravel8¦GoogleCalendarAPIを使用してユーザーのカレンダーに予定を追加する
やりたいこと
googleカレンダーAPIを使用してユーザーのカレンダーに予定を追加していきます。
調べて実装しましたが2021年9月時点のことで、誤っている箇所がある可能性もありますので誤りを見つけた際はご指摘ください。
当初ドキュメントを読んだりしてもなかなか理解できなかったこと、解決したことについてまとめてます。次回また実装するときは楽をしたい…🦀
- Google OAuth 2.0認証をする
- 初回の認証
- 初回以降はリフレッシュトークンで認証
- Google Calendar APIでユーザーのカレンダーへ予定を追加する
- 予定の作成
- 予定の削除
- Googleアカウントを持つすべてのユーザーがアプリを利用できるようにしたいのでGoogleの検証を受ける
GoogleCloudPlatformの認証情報の「OAuthクライアントID」と「サービスアカウント」の違いについて💡
使用するAPIによって選択が変わると思いますが、CalendarAPIに関してはOAuthクライアントIDとサービスアカウントのどちらかになると思います。
違いは下記
- OAuthクライアントID
- 1個人のカレンダーに予定を追加する
- 作成した予定に誰かを招待したい
- Googleアカウントを持つすべてのユーザーがアプリを利用できるようにしたい場合はチェックを受ける必要あり
- サービスアカウント
- 共有しているカレンダーに予定を追加する
- 作成した予定に誰かを招待する場合、カレンダーを共有しているユーザーのみを追加(google workspaceのドメインの場合はgoogle workspaceの設定が必要)
🚨 OAuthクライアントIDで予定を作成し予定に誰かを追加する場合、招待された側の認証の都合で全くの第三者を追加した予定は作成できませんでしたが、問い合わせ用のアドレスなら追加できました。
環境
- laravel 8
- php 7.3
- google/apiclient 2.10
前提
laravel7.x¦リレーション先の条件も加味した複雑なwhere条件のデータを取得するの塾とか何か習いごとのクラスのシステムの設定で記載していきます。
仕様について
- teachers : 先生のテーブル
- students : 生徒のテーブル
- classes : 先生と生徒1on1のクラス
- group_class_infos(複雑になるので今回は登場しません)
- 複数の先生と生徒1人のクラス
- 先生が対象のグループクラスに参加/不参加/回答待ちのステータスも保存
今回は同じカレンダーを共有しているユーザー間ではないので、OAuth認証してユーザーの追加したいカレンダーに追加できるようにします。
また、今回のシステムは下記のようにします。
- ユーザー登録、ログインにGoogleアカウントを使用していない
- カレンダーへの予定の追加するタイミングで初めてGoogle OAuth認証→カレンダーへ予定の追加
- 初回認証以降はrefresh tokenを使用して何度もGoogle OAuth認証画面が出ないようにする
Google Cloud Platformの設定
- プロジェクトの作成
- APIとサービスをサイドメニューから選択
- ライブラリからcalendar APIを有効にする
✔️ ダッシュボード下部にあるAPIは不要なものは全て無効にして大丈夫そうです - OAuth同意画面
✔️ User Typeは外部
✔️ アプリ情報等を入力
✔️ 保存して次へを押していくと「テストユーザー」になるので、テスト中にリクエストを許可するメールアドレスを追加 - 認証情報 → +認証情報作成 → OAuth クライアントID
✔️ アプリケーション情報はウェブアプリケーション
✔️ 承認済みのリダイレクトURIでGoogle OAuth認証後にリダイレクトする先のURIを指定
✔️ 作成を押すとクライアントIDとクライアント シークレットが表示されるので.envにコピペ
DBの作成
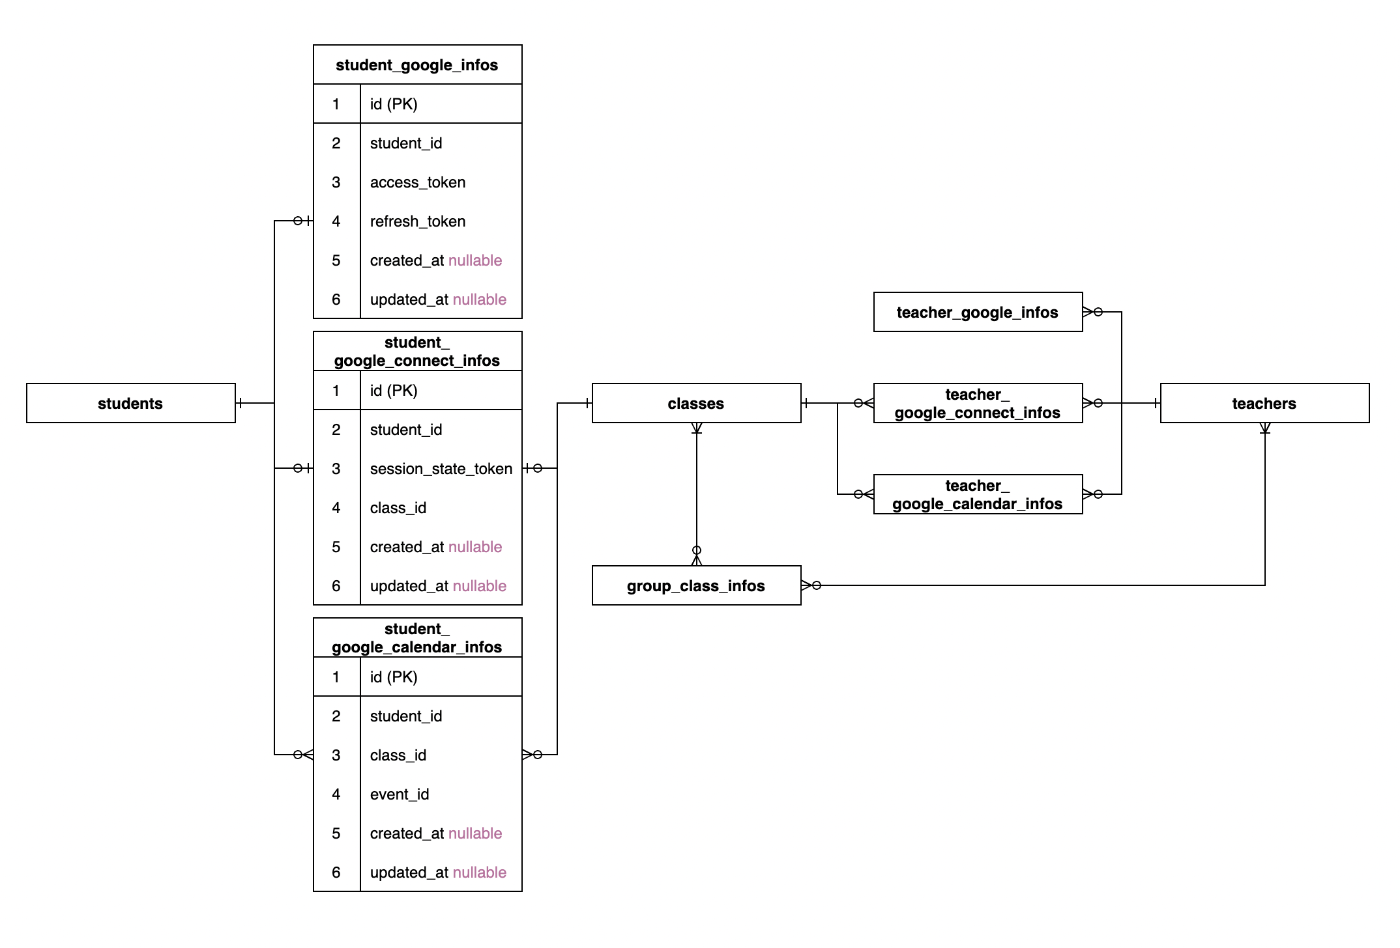
今回は先生も生徒も3つずつテーブルを作っていきます。
- google_infos : tokenなどの接続情報を保存しておくテーブル
- google_connect_infos : OAuth認証の時にsession_state_tokenを確認するためのテーブル。oauth認証が完了したらすぐにdeleteします。
- google_calendar_infos : カレンダーに登録した内容を保存するテーブル
temporarySignedRouteを使用してクラスの該当者でない場合はエラーにするためにgoogle_connect_infosにはclass_idも保存しています。

想像しやすいように図を作ってみたのですが、記法がもし間違っていたらごめんなさい😹
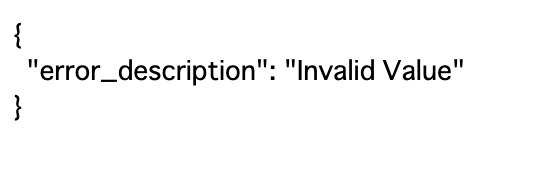
google_infosテーブルにaccess_tokenやrefresh_tokenを保存していますが、セキュリティ上必要なタイミングでrevokeToken()やdeleteして下さい
revokeToken()したtokenでアクセスしようとすると画像のようになります。

Google OAuth認証
Google APIs Client Library for PHPを使っていきます。
どっちみちカレンダーに登録する際にこのライブラリを使いますが、ライブラリを使用せずに認証したい場合はこのふたつの記事を参考にlaravelっぽく記述すれば認証できました。
今回はOAuth認証もGoogle APIs Client Library for PHPを使います。
✈︎ Google OAuth 2.0 認証を使ったログインの実装
✈︎ GoogleのOAuth2.0を使ってプロフィールを取得【PHP】
routeの作成
今回はクラスの予約をとってカレンダーにイベント登録可能な時間をtemporarySignedRouteで設定しています。
//google oauth画面へ遷移するためのroute
Route::get('/google_login/connect', 'GoogleCalendarConnectController@store')->name('student.google_calendar');
//google oauth画面からredirectされるroute
Route::get('/google_login/index', 'GoogleCalendarController@index')->name('student.google');
google OAuth画面へ遷移
ほぼドキュメントの通りですがOAuth画面からリダイレクトされた後にチェックするためにsession_state_tokenを設定しました。
googleのoauth認証で何らかの理由でエラーになった場合にrollbackがうまくできなかったのでgoogle_connect_infosに入れるデータはcreateでなくupdateOrCreateにしています。
public function store(Request $request)
{
    // temporarySignedRouteのチェックがあるが略
    $classId = intval($request->input('class_id'));
    $class = Class::find($classId);

    $sessionStateToken = bin2hex(random_bytes(\GoogleConnectInfoConst::LENGTH));
    $student->googleConnectInfo()
        ->updateOrCreate([
            'class_id' => $classId
        ], [
            'session_state_token' => $sessionStateToken
        ]);

    $client = (new GoogleClientStoreService())->execute(route('student.google')); // actionでもok
    $client->setState($sessionStateToken);

    return redirect()->away($client->createAuthUrl());
}
public function execute(string $redirectURL) : Google_Client
{
    $client = new Google_Client();
    $client->setApplicationName(config('app.name'));
    $client->setClientId(config('services.google.client_id'));
    $client->setClientSecret(config('services.google.client_secret'));
    $client->setRedirectUri($redirectURL);
    $client->setScopes([Google_Service_Calendar::CALENDAR_EVENTS]);
    $client->setAccessType('offline');
    $client->setPrompt('consent');

    return $client;
}
スコープについて 🔍
スコープはOAuth認証画面の表示される画像の赤枠内の部分になります。

スコープについてはGoogleAPIのOAuth2.0スコープから確認できます。
google/apiclientを使用する場合は定数で設定可能です。
取得したトークンが期限内かチェックしたい場合 🔍
トークンの有効期限は基本的に60分ですが、実装中に今のトークンがまだ有効かどうか確認したい時はhttps://www.googleapis.com/oauth2/v3/tokeninfo?access_token=ここにトークンを貼り付けるで確認できます。
期限が切れると画像の表示になります。

ログイン認証でつまづいている場合 🔍
ログイン認証でつまづいている時はOAuth 2.0 Playgroundで確認できます。
この時エラーが出ている場合は設定でつまづいている可能性があるのでGoogle Cloud Platformを確認してみてください。
google OAuth画面からのリダイレクト
public function index(Request $request)
{
    $params = $request->all();
    $student = \Auth::guard('student');
    $classId = $student->googleConnectInfo->class_id;

    $result = (new GoogleCalendarConnectCheckService())
        ->execute($student, $params, $classId, route('student.google'));

    if ($result['success'] === false) {
        return redirect('/student/dashboard')->with('appErrors', $result['message']);
    }

    $class = Class::find($classId);
    \DB::transaction(function () use ($result, $student, $class) {
        (new GoogleCalendarStoreService())->execute($result['client'], $student, $class, $result['token']);
    });

    return redirect('/student/dashboard')->with('message', 'googleカレンダーに予定を追加しました。');
}
/**
 * @param Student|Teacher $user
 */
public function execute(object $user, array $params, int $classId, string $redirectURL) : array
{
    $code = $params['code'];
    $sessionStateToken = $user->googleConnectInfo->session_state_token;
    $user->googleConnectInfo()->delete();

    if (isset($params['error']) && $params['error'] == 'access_denied' ||
        (isset($params['refresh_token']) && $params['state'] !== $sessionStateToken) ||
        !isset($code)) {
        return ['success' => false, 'message' => ['認証に失敗しました。']];
    }

    $client = (new GoogleClientStoreService())->execute($redirectURL);
    $client->authenticate($code);
    $token = $client->getAccessToken();

    if (empty($token)) {
        return ['success' => false, 'message' => ['認証に失敗しました。']];
    }

    if ($user->googleCalendarInfo()->where('class_id', $classId)->exists()) {
        return ['success' => false, 'message' => ['すでに予定は登録済みです。']];
    }

    return [
        'success' => true,
        'client' => $client,
        'token' => $token,
    ];
}
Google Calendar APIで予定の登録
public function execute(Google_Client $client, Student $student, Class $class, array $token) : void
{
    // googleInfoにtokenの内容をupdateOrCreateする。暗号化してDBに入れた方が良いと思うが略
    $client->setApprovalPrompt('consent');
    $client->setAccessToken($token);
    $service = new Google_Service_Calendar($client);

    $event = $this->createCalendarEvent($class);
    $event->setSource($this->createEventSource());
    $event->setDescription($this->createDescription($class));
    $event->setLocation('東京都渋谷区');

    $event = $service->events->insert('primary', $event);
    parse_str(parse_url($event->htmlLink, PHP_URL_QUERY), $eventId); // eventIdの取得

    $student->googleCalendarInfo()
        ->create([
            'class_id' => $class->id,
            'event_id' => $eventId['eid']
        ]);
}
refrsh_tokenを使用してイベント登録する際にもGoogleCalendarStoreServiceを使うので、ここに書いていますがGoogleCalendarConnectCheckService内で行ってもよさそう
$client->setApprovalPrompt('consent');
$client->setAccessToken($token);
CalendarEvent 🔍
日時はISO8601で渡すと渡した時間帯でgoogleカレンダーのイベントが作成されます。
private function createCalendarEvent(Class $class) : Google_Service_Calendar_Event
{
    return new Google_Service_Calendar_Event([
        'summary' => config('app.name') . $class->name,
        'start' => [
            'dateTime' => $this->createDateTime($class),
            'timeZone' => config('app.timezone'),
        ],
        'end' => [
            'dateTime' => $this->createDateTime($class),
            'timeZone' => config('app.timezone'),
        ],
        'guestsCanInviteOthers' => false,
    ]);
}
organizer 🔍
organizerは設定することができず、OAuth認証した場合は問答無用で認証したユーザーが主催者になります。
システムで予約したのに、OAuth認証したユーザーが主催者なの気になったので変更方法を調べたところイベントをmoveすると可能なようでした。
が、複雑な上に手間なので以下の方法でそれっぽくします。
- Google_Service_Calendar_EventSourceの設定
- Google_Service_Calendar_EventAttendeeを設定する場合、$organizerをつけない(書かなければ表示されませんでした)
private function createEventSource() : Google_Service_Calendar_EventSource
{
    return new Google_Service_Calendar_EventSource([
        'title' => config('app.name'),
        'url' => config('app.url')
    ]);
}
description 🔍
説明をつけることができます。改行は<br>で可能でした。
private function createDescription(Class $class) : string
{
    return 'クラスは'. $class->name .'です。<br>'.
            '内容は'. $class->info . '<br>';
}
insert 🔍
insertでgoogleカレンダーに予定を作成します。
条件によってはinsertでなくてもquickAddでもイベント作成できそうでした。(未チェックなのでできなかったらごめんなさい)
$event = $service->events->insert('primary', $event);
parse_str(parse_url($event->htmlLink, PHP_URL_QUERY), $eventId);
insertの戻り値で作成したイベントの情報が取得できます。
削除する時にカレンダーリストを取得して…というのが手間だったので、DBに$eventId['eid']を保存し、削除する際はDBのevent_idをdecodeして使用します。
リフレッシュトークンで認証
今までの内容と一部被っているので下記としました。
- 途中までは一緒なのでGoogleCalendarConnectController@storeを途中から分岐させる
- リフレッシュトークンで認証OKならGoogleCalendarStoreServiceでイベントを登録する
controller
public function store(Request $request)
{
    // 略
    $client = (new GoogleClientStoreService())->execute(route('student.google'));
    $client->setState($sessionStateToken);

    $googleInfo = $student->googleInfo()->first();
    if (isset($googleInfo)) {
        $result = (new GoogleCalendarStoreWithRefreshTokenCheckService())->execute($student, $client, $googleInfo, $class);

        if ($result['success'] === false) {
            return redirect('/student/dashboard')->with('appErrors', $result['message']);
        }

        \DB::transaction(function () use ($result, $student, $class) {
            (new GoogleCalendarStoreService())->execute($result['client'], $student, $class, $result['token']);
        });

        return redirect('/student/dashboard')
            ->with('message', 'googleカレンダーに予定を追加しました。');
    }

    return redirect()->away($client->createAuthUrl());
}
リフレッシュトークンのチェック
/**
 * @param Student|Teacher $user
 * @param StudentGoogleInfo|TeacherGoogleInfo $googleInfo
 */
public function execute(object $user, Google_Client $client, object $googleInfo, Class $class) : array
{
    $user->googleConnectInfo()->delete();
    // googleInfoテーブルに何らかの方法でencodeしていた場合はdecode
    $client->setAccessToken([
        'access_token' => $this->decode($googleInfo->access_token),
        'expires_in' => 3600,
        'created' => (new \Carbon($googleInfo->updated_at))->timestamp
    ]);
    $refreshToken = $this->decode($googleInfo->refresh_token);
    $token = $client->fetchAccessTokenWithRefreshToken($refreshToken);

    if ($client->isAccessTokenExpired() && empty($token)) {
        return ['success' => false, 'message' => ['認証に失敗しました。']];
    }

    if ($user->hasCalendarEvent($class->id)) {
        return ['success' => false, 'message' => ['すでに予定は登録済みです。']];
    }

    return ['success' => true, 'client' => $client, 'token' => $token];
}
削除
- google_calendar_infosテーブルからevent_idを取得
- event_idをデコード
- カレンダーに該当するevent_idがあるか、EventSourceを確認してシステムから登録したデータかを念のため確認
- 問題なければ削除
上記手順でいきます。
routeの作成
息をするようにrouteを追加
Route::delete('/google_login', 'GoogleCalendarConnectController@destroy')->name('student.google_calendar_destroy');
controller
public function destroy(Request $request)
{
    // temporarySignedRouteのチェックがあるが略
    $student = \Auth::guard('student')
    $class = Class::find(intval($request->input('class_id')));
    $client = (new GoogleClientStoreService())->execute(route('student.google_calendar_destroy'));
    $result = (new GoogleCalendarDeleteWithRefreshTokenCheckService())->execute($student, $client, $student->googleInfo()->first(), $class);

    if ($result['success'] === false) {
        return redirect('/student/dashboard')->with('appErrors', $result['message']);
    }

    $response = \DB::transaction(function () use ($student, $class, $result) {
        return (new GoogleCalendarDeleteService())->execute($student, $class, $result['service']);
    });

    if ($response) {
        return redirect('/student/dashboard')->with('message', 'googleカレンダーの予定を削除しました。');
    } else {
        return redirect('/student/dashboard')->with('appErrors', ['googleカレンダーの予定の削除に失敗しました。再度お試しください。']);
    }
}
リフレッシュトークンのチェック
リフレッシュトークンでイベントを作成する時とほぼ一緒でGoogleCalendarStoreWithRefreshTokenCheckServiceとの異なる点は
- googleInfosテーブルへのupdateをしている
- イベントが登録されていない場合はdashboardにエラー表示が出るようにしている(イベント作成時と逆)
-
$client->setApprovalPrompt('consent');をしている(イベント作成時はイベント作成直前にしていた) -
$client->setAccessToken($token);をしている(イベント作成時はイベント作成直前にしていた)
このあたりは実装の仕方や要件など色々な関係があると思うのでまとめられそうならまとめていいかと...?思います。
/**
 * @param Student|Teacher $user
 * @param StudentGoogleInfo|TeacherGoogleInfo $googleInfo
 */
public function execute(object $user, Google_Client $client, object $googleInfo, Class $class) : array
{
    $client->setApprovalPrompt('consent');
    $client->setAccessToken([
        'access_token' => $this->decode($googleInfo->access_token),
        'expires_in' => 3600,
        'created' => (new \Carbon($googleInfo->updated_at))->timestamp
    ]);
    $refreshToken = $this->decode($googleInfo->refresh_token);
    $token = $client->fetchAccessTokenWithRefreshToken($refreshToken);

    if ($client->isAccessTokenExpired() && empty($token)) {
        return ['success' => false, 'message' => ['認証に失敗しました。']];
    }

    $user->googleInfo()->update([
        'access_token' => $this->encode($token['access_token']),
        'refresh_token' => isset($token['refresh_token']) ? $this->encode($token['refresh_token']) : $googleInfo->refresh_token,
    ]);

    if (!$user->hasCalendarEvent($class->id)) {
        return ['success' => false, 'message' => ['予定が登録されていません。']];
    }

    $client->setAccessToken($token);
    return ['success' => true, 'service' => new Google_Service_Calendar($client)];
}
イベントの削除
eventIdでチェックするだけでも問題ないと思うのですが、念のためシステムで作成したイベントかどうかsourceもチェックするようにしました。
エラーの場合はtransactionで囲っているのでロールバックされます。
/**
 * @param Student|Teacher $user
 */
public function execute(object $user, Class $class, Google_Service_Calendar $service) : bool
{
    $calendarInfo = $user->googleCalendarInfo()
        ->where('class_id', $class->id)
        ->first();
    $eventId = explode(' ', base64_decode($calendarInfo->event_id))[0]; // eidはイベントID + スペース + カレンダーIDをbase64にしたもののため

    try {
        $event = $service->events->get('primary', $eventId);

        if ($event->getSource()->getTitle() === config('app.name')) {
            $service->events->delete('primary', $eventId);
            $calendarInfo->delete();
            return true;
        } else {
            return false;
        }
    } catch (\Exception $e) {
        \Log::error($e->getMessage());
        return false;
    }
}
googleの承認
100人までしか使用できないため、公開アプリでOAuth認証を使用する場合googleの承認を受けないといけないのですが、ドキュメントを確認しても指摘事項がわからず苦戦しました...
特に苦戦したのが下記
Enlarge the OAuth Consent Screen to show the URL including the Client ID (This is not required for native Android and iOS apps).
クライアントIDを含むURLを見せてという指摘。
デモ動画で「Client IDは〜秒に表示されています」と伝えurlを表示していたのですが度々指摘がありました( ´~` )
アドレスバーのClientIDの箇所をマウスで網掛けというのでしょうか?動画の途中で画像のようにしたら納得いただけました。

Your app's OAuth Consent Screen must show your app's name, "Display Name" ←OAuth同意画面で設定しているアプリ名
OAuth認証画面がGoogle Cloud Platform上のOAuth同意画面で設定しているアプリ名と一致していないという指摘。
設定していたしドキュメントにも記載が見当たらず、こちらのできる内容ではなさそうなので無視していたのですが(すみません)度々指摘がありました( ´~` )...?
私の場合はテスト環境と本番環境でプロジェクトを分けており、テスト環境ではGoogle Cloud Platform上のOAuth同意画面で設定しているアプリ名となっており理由が分からなかったため
テスト環境では再現されないことを画像付きで説明したら納得いただけたようでした。
🦢 🦢 🦢
終わりに
長..........!?
読みづらそうなところはちょこちょこ修正するかもしれません( ´~` )
イベントを特定の色で作成することはできたので
googleカレンダーで特定の文字(歯医者や結婚式など)を入れると背景が変わるのもできるかな!?と思ったのですが、できないぽいです(やり方を知っている方いたら教えてほしい)
なかなか大変だったのですがまとめるとあっけないような...もっと精進して簡単に実装できるようにがんばります🦀
Discussion