シンプルなMCPクライアント・サーバを実装してAnthropic SDKからファイル操作する
この記事ではMCP(Model Context Protocol)を実装し、Anthropic SDKからファイル操作をできるようにする方法を紹介します。
より具体的にいうと、コマンドを実行すると「data.txtにhello worldと書いたファイルを作成したい」とClaudeに伝わり、MCPサーバがローカルでファイルを作成して、hello worldと書かれたファイルに書き込まれるようにします。
「最近流行りのAIエージェントってやつ作ってみるか」って人に関連するAPIの勘所を伝える内容になっています。
MCPのSDKはPythonとTypeScriptでの実装が提供されています。
この記事ではTypeScriptでの実装を利用します。
MCPとは
Model Context Protocol の略で、アプリケーションがLLMにコンテキストを提供するためのプロトコルとして提案されています。
MCPは以下のようなコンポーネントで構成されています:
- MCP Host: Claude Desktop や IDE など、MCPを通じてデータにアクセスしたいプログラム
- MCP Client: サーバーと1:1の接続を維持するプロトコルクライアント
- MCP Server: 標準化されたModel Context Protocolを通じて特定の機能を提供する軽量なプログラム
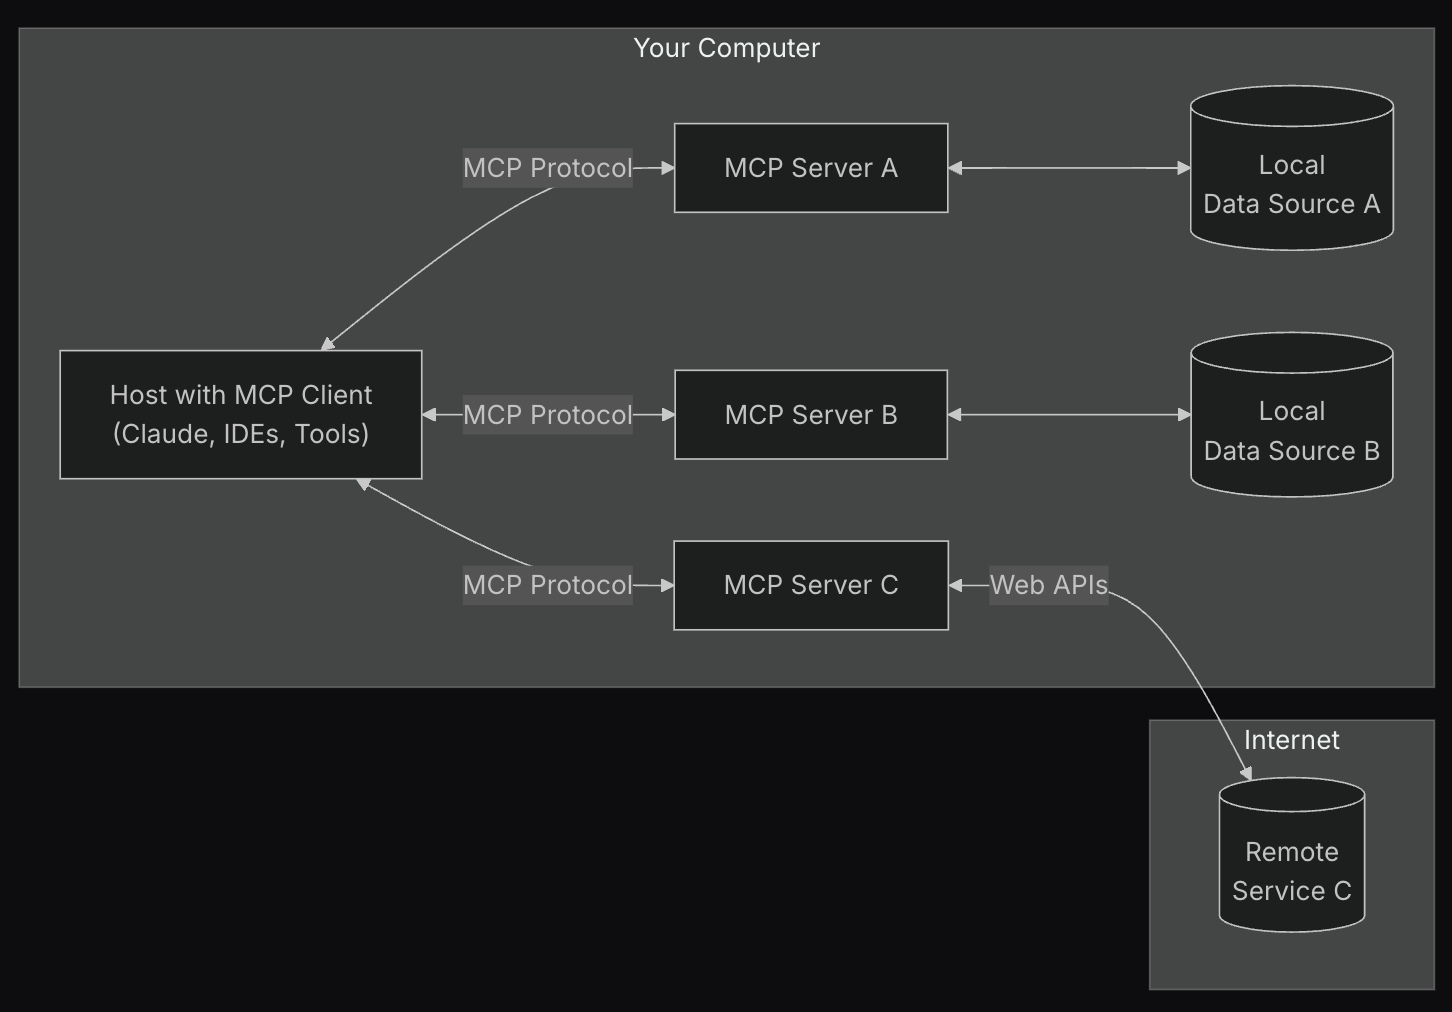
MCPサーバーは主に3つの機能を提供します:
- Tool: LLMが実行できる関数 ファイルの作成や外部APIの呼び出しなど、副作用を伴う処理
- Resource: LLMが読み取れるデータ APIのレスポンスやファイルの内容など、情報の参照に使用します
- Prompt: 特定のタスクの実行を支援するテンプレートです
詳しくはこの辺りを参照してください。
今回は MCP Server の Tool を実装して、Anthropic SDKを使ったコマンド(MCP Host)から呼び出せるようにします。
事前準備
最終的に動くものはこちらにあります。
このコードを動かす事前準備としては、 bun がインストールされている必要があります。
node などでも動くと思いますので、慣れているツールで適宜読み替えてください。
私は scratch-mcp というディレクトリを作って、その中で実装しました。
なのでコマンドなどでその名前がでてきますが、その辺は適宜読み替えてください。
全体像
粒度がまちまちなのですが、全体像を把握しておきましょう。
この記事では以下の流れでMCPとAnthropic SDKを連携させることを目指します。
- MCP Serverを起動する
- MCP Clientを作成する
- 標準入出力でMCP Serverと通信する
- Anthropic SDKにメッセージを送信する
- Anthropic SDK(claude-3-5-sonnet-latest)に使える Tool を渡す
- Anthropic SDK に「data.txtにhello worldと書いたファイルを作成したい」とメッセージを詰める
- Anthropic SDK から利用したい Tool が返ってくる
- Tool を実行できる MCP Client があれば、Clientを経由して MCP Server で Tool を実行する
- MCP Server が Tool の実行結果を返す
- Anthropic SDK が MCP Server から実行結果を受け取る
- Anthropic SDK が実行結果をユーザーに返す
MCPサーバ側の実装
Anthropic APIからMCPサーバへの接続だけを考えると、既存のMCPサーバを利用する手段も考えられますが、せっかくなのでシンプルなサーバを作ってみましょう。
MCP Serverは主に「Tool」「Resource」「Prompt」の3つの機能を提供します。
今回はtmpディレクトリにファイルを作成するToolのみを提供するサーバを作成します。
まずはプロジェクトの準備をします。
mkdir server
cd server
bun init
bun add @modelcontextprotocol/sdk
次に、サーバーの実装を行います。
tmpディレクトリにファイルを作成する関数
mkdir -p server/src/tools
touch server/src/tools/write-to-file.ts
server/src/tools/write-to-file.ts に以下のコードを追加します。
export const writeToFile = async (args: { path: string; content: string }) => {
    const safePath = path.basename(args.path);
    const fullPath = path.join(os.tmpdir(), safePath);

    console.error(`Writing to file: ${fullPath}`);

    try {
      await fs.writeFile(fullPath, args.content, 'utf-8');
      return {
        content: [{
          type: 'text' as const,
          text: `Successfully wrote content to ${fullPath}`,
        }],
      };
    } catch (error) {
      if (error instanceof Error) {
        console.error(`Error details: ${error.message}`);
      } else {
        console.error(`Unknown error: ${error}`);
      }
      return {
        content: [{
          type: 'text' as const,
          text: `Error writing to file: ${error}`,
        }],
      };
    }
};
server/src/index.ts に以下のコードを追加します。
import { McpServer, ResourceTemplate } from "@modelcontextprotocol/sdk/server/mcp.js";
import { StdioServerTransport } from '@modelcontextprotocol/sdk/server/stdio.js';
import { writeToFile } from "./tools/write-to-file.js";
import { z } from "zod";

const config = {
  server: {
    name: "simple-mcp-server",
    version: "0.1.0",
  },
};

const server = new McpServer(config.server);
server.tool(
  "write-to-file",
  {
    path: z.string(),
    content: z.string(),
  },
  async ({ path, content }) => {
    await writeToFile({ path, content });
    return {
      content: [
        {
          type: "text",
          text: "Successfully wrote content to file",
        },
      ],
    };
  }
);

const transport = new StdioServerTransport();
console.error("Starting MCP server...");
await server.connect(transport);
console.error("Server connected and ready to handle requests.");
サーバーのインスタンスを作成して、Toolを定義するだけの非常にシンプルなコードになっています。
Claude Desktop を利用しているユーザはこの段階で、~/Library/Application\ Support/Claude/claude_desktop_config.json に設定を追加して試すことができます。
{
  "mcpServers": {
    "simple-mcp-server": {
      "command": "/path/to/bun",
      "args": [
        "run",
        "/path/to/scratch-mcp/server/src/index.ts"
      ]
    }
  }
}
クライアント側の実装
次に、このサーバを呼び出すクライアントを実装します。
クライアントを実行する準備をします。
mkdir -p client
cd client
bun init
bun add @modelcontextprotocol/sdk
client/src/index.ts に以下のコードを追加します。
import { Client } from "@modelcontextprotocol/sdk/client/index.js";
import { StdioClientTransport } from "@modelcontextprotocol/sdk/client/stdio.js";

const transport = new StdioClientTransport({
  command: "/path/to/bun",
  args: [
    "run",
    "/path/to/scratch-mcp/server/src/index.ts",
  ],
});

const client = new Client({ name: "example-client", version: "1.0.0" });

await client.connect(transport);

console.log("MCP client connected");

const tools = await client.listTools();
console.dir(tools, { depth: null });

const result = await client.callTool({
  name: "write-to-file",
  arguments: {
    path: "sample.txt",
    content: "Hello, World!",
  },
});
console.dir(result, { depth: null });

await client.close();
transport を設定して client を通じて connect すると、MCPサーバが起動してMCPでのやりとりが可能になります。
このあたりの流れを読むと、クライアントの接続からMCPサーバの起動までの流れがわかります。
今回 client で利用しているメソッドは以下の通りです。
-
client.listTools()では、MCPサーバが提供しているToolの一覧を取得できます。 -
client.callTool()では、MCPサーバにToolを実行させることができます。 -
client.close()では、MCPサーバとの接続を切断します。起動時と同様にclose時にMCPサーバも終了します。
この snippet では MCP Server が提供している Tool の確認と、Tool の実行ができています。
AnthropicのSDKと連携
最後に、AnthropicのSDKからツールを呼び出せるようにします。
先ほど作成した client ディレクトリで作業します。
まず、AnthropicのSDKをインストールします。
bun add @anthropic-ai/sdk
client/src/index.ts を次のように変更します。
import { Client } from "@modelcontextprotocol/sdk/client/index.js";
import Anthropic from "@anthropic-ai/sdk";
import type { MessageParam } from "@anthropic-ai/sdk/src/resources/messages/index.js";
import { Client as MCPClient } from "@modelcontextprotocol/sdk/client/index.js";
import { StdioClientTransport } from "@modelcontextprotocol/sdk/client/stdio.js";

// MCPの準備
const transport = new StdioClientTransport({
  command: "/path/to/bun",
  args: [
    "run",
    "/path/to/scratch-mcp/server/src/index.ts",
  ],
});

const mcpClient = new MCPClient({ name: "example-client", version: "1.0.0" });
await mcpClient.connect(transport);

const tools = await mcpClient.listTools();

// Anthropicの準備
const anthropicClient = new Anthropic();

const messages: MessageParam[] = [
  {
    role: "user",
    content: "sample.txt に Hello, World! と書き込んでください。",
  },
];

const reply = await anthropicClient.messages.create({
  model: "claude-3-5-sonnet-latest",
  max_tokens: 1024,
  messages: messages,
  tools: tools.tools.map((tool) => ({
    name: tool.name,
    input_schema: tool.inputSchema,
    description: tool.description,
  })),
});
これ以降はClaudeから受け取ったメッセージの処理で冗長になるので一旦ここで切ります。
ここまでは
- MCP Clientを作成
- MCP Serverの起動と接続
- MCP ServerからToolの一覧を取得
- Anthropic SDKに使えるToolを渡す
という処理を記述しました。
ここからは reply の内容を処理して、MCPサーバにToolを実行させる部分を実装します。
for (const content of reply.content) {
  if (content.type === "text") {
    console.log("Assistant:", content.text);
  } else if (content.type === "tool_use") {
    console.log("Tool:", content.name);
    console.log("Tool Input:", content.input);
    if (content.name === "write-to-file") {
      const result = await mcpClient.callTool({
        name: content.name,
        arguments: content.input as { [key: string]: unknown },
      });
      console.log(`Tool(${content.name}) result:`, result);
    }
  }
}
anthropicClient.messages.create の tools に MCPサーバが提供しているToolを渡すことで、Toolを実行できるようになります。
一旦愚直に実装していますが、複数のClientを持つケースは容易に想像できると思います。
最初に content.name として渡される tool の名前をキーに、Clientを管理するようにすれば、複数のClientを持つケースも実装できると思います。
おわりに
これでシンプルなMCPの実装とAnthropic SDKの連携ができました。
ここまで読まれた方がMCP Serverをじゃかじゃか増やして、AIが勝手にいろんなことをやってくれる世界観を"創れる側になった"と感じていただけたら幸いです。
ここで紹介した実装例は https://github.com/funwarioisii/scratch-mcp にあります。是非参考にしてください。
MCP Serverの実装: https://github.com/funwarioisii/scratch-mcp/commit/cd69b0243016c57d1c579d2bf8242e831d6f3eab
MCP Clientの実装: https://github.com/funwarioisii/scratch-mcp/commit/211da05f0ea689d5df16c02579f9512f2a62f148
MCP と Anthropic SDK の連携: https://github.com/funwarioisii/scratch-mcp/commit/a4412222e681cebfc73416e095d8a6f814f9bbd8
Discussion