AzureFileSyncを試してみる その2
はじめに
Azure File SyncをTerraformで作るの2回目です。前回はこちら。今回はストレージ周りやAzure VM周りを書きたいと思います。
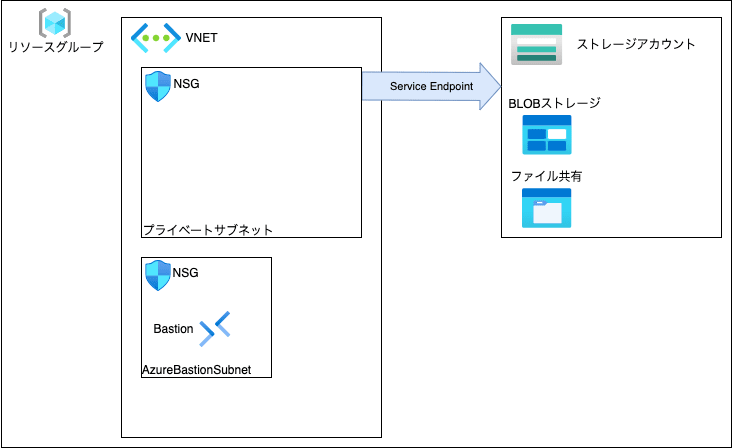
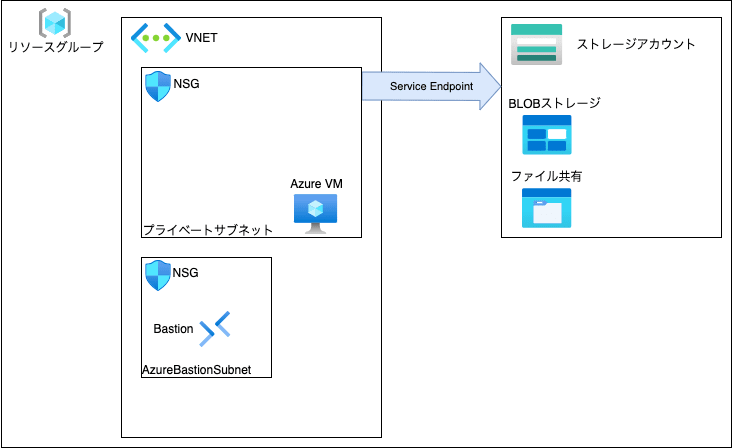
システム構成
1回目の再掲ですが、こんなイメージのものを作っていきたいと思います。以降、tfファイルごとにリソースの定義を説明してきます。

ストレージ周りの定義
Azureファイル共有を作るためにはストレージアカウントが必要となるため、まずはその定義をします。ストレージアカウントの名前はグローバルで一意の名前となるよう指定します。とりあえず試しなので可用性は一番低いものを選びました。そのストレージアカウント内に、Azure File Syncで同期先となるAzureファイル共有(st-share-dev)とBLOBストレージ(st-cont-dev)を定義してます。BLOBストレージにはローカル(tfファイルと同一フォルダ)にあるPowerShellスクリプト(init_storagesyncagent.ps1)をアップロードしてます。このスクリプトはAzure VM上で実行されることを目的に作成しました。最後にストレージアカウントのファイアウォールルールを定義してます。dev-subnet1と信頼されたAzureサービス以外の通信はNGとしてます。[1]
resource "azurerm_storage_account" "this" {
  name                     = "XXXXXXXXXXX"
  resource_group_name      = azurerm_resource_group.this.name
  location                 = azurerm_resource_group.this.location
  account_tier             = "Standard"
  account_replication_type = "LRS"
}

resource "azurerm_storage_share" "this" {
  name                 = "st-share-dev"
  storage_account_name = azurerm_storage_account.this.name
  quota                = 50
}

resource "azurerm_storage_container" "this" {
  name                  = "st-cont-dev"
  storage_account_name  = azurerm_storage_account.this.name
  container_access_type = "private"
}

resource "azurerm_storage_blob" "this" {
  name                   = "init_storagesyncagent.ps1"
  storage_account_name   = azurerm_storage_account.this.name
  storage_container_name = azurerm_storage_container.this.name
  type                   = "Block"
  source_content         = file("init_storagesyncagent.ps1")
}

resource "azurerm_storage_account_network_rules" "this" {
  storage_account_id = azurerm_storage_account.this.id

  default_action             = "Deny"
  virtual_network_subnet_ids = [azurerm_subnet.dev_subnet1.id]
  bypass                     = ["AzureServices"]
}
PowerShellスクリプトには、追加ディスクの初期化・フォーマット・ドライブレターの割り当てとIE ESCの無効化、Azure File Syncエージェントのインストール[2]を書いています。本環境ではディスク2をMBRでFドライブに割り当ててます。IE ESCの無効化はここにも書いてある通り、無効化しておかないとAzure File SyncエージェントをAzureにつなげるとき(サーバ登録するとき)にうまくいきません。
# 追加ディスクの初期化
Get-Disk -Number 2 |Initialize-Disk -PartitionStyle MBR -Passthru|New-Partition -UseMaximumSize -Driveletter F |Format-Volume -Filesystem NTFS -Force

# IE ESCの無効化
Set-ItemProperty -Path "HKLM:\SOFTWARE\Microsoft\Active Setup\Installed Components\{A509B1A7-37EF-4b3f-8CFC-4F3A74704073}" -Name "IsInstalled" -Value 0 -Force
Set-ItemProperty -Path "HKLM:\SOFTWARE\Microsoft\Active Setup\Installed Components\{A509B1A8-37EF-4b3f-8CFC-4F3A74704073}" -Name "IsInstalled" -Value 0 -Force

# Gather the OS version
$osver = [System.Environment]::OSVersion.Version

# Download the appropriate version of the Azure File Sync agent for your OS.
if ($osver.Equals([System.Version]::new(10, 0, 20348, 0))) {
    Invoke-WebRequest `
        -Uri https://aka.ms/afs/agent/Server2022 `
        -OutFile "StorageSyncAgent.msi"
} elseif ($osver.Equals([System.Version]::new(10, 0, 17763, 0))) {
    Invoke-WebRequest `
        -Uri https://aka.ms/afs/agent/Server2019 `
        -OutFile "StorageSyncAgent.msi"
} elseif ($osver.Equals([System.Version]::new(10, 0, 14393, 0))) {
    Invoke-WebRequest `
        -Uri https://aka.ms/afs/agent/Server2016 `
        -OutFile "StorageSyncAgent.msi"
} elseif ($osver.Equals([System.Version]::new(6, 3, 9600, 0))) {
    Invoke-WebRequest `
        -Uri https://aka.ms/afs/agent/Server2012R2 `
        -OutFile "StorageSyncAgent.msi"
} else {
    throw [System.PlatformNotSupportedException]::new("Azure File Sync is only supported on Windows Server 2012 R2, Windows Server 2016, and Windows Server 2019")
}

# Install the MSI. Start-Process is used to PowerShell blocks until the operation is complete.
# Note that the installer currently forces all PowerShell sessions closed - this is a known issue.
Start-Process -FilePath "StorageSyncAgent.msi" -ArgumentList "/quiet" -Wait

# Note that this cmdlet will need to be run in a new session based on the above comment.
# You may remove the temp folder containing the MSI and the EXE installer
Remove-Item -Path ".\StorageSyncAgent.msi" -Recurse -Force
ストレージの定義ができました。
Azure VM周りの定義
Azureファイル共有と接続するAzure VMを定義してきます。dev_subnet1にPIPをもたないNICを作成し、Azure VM(dev-win)に紐付けます。OSはWindows2022Datacenterにしました。また、このAzure VMはシステム割り当てマネージドIDを有効化してます。BLOBストレージ内のPowerShellスクリプトにアクセスする際に、このシステム割り当てマネージドIDを使います。なお、この定義だけではAzure VMからBLOBストレージにはまだアクセスできないので、あとでロールの割り当ても定義します。
VM拡張機能には、BLOBストレージにあるPowerShellスクリプト(init_storagesyncagent.ps1)を実行するということを定義しています。
resource "azurerm_network_interface" "this" {
  name                = "dev-nic"
  location            = azurerm_resource_group.this.location
  resource_group_name = azurerm_resource_group.this.name

  ip_configuration {
    name                          = "internal"
    subnet_id                     = azurerm_subnet.dev_subnet1.id
    private_ip_address_allocation = "Dynamic"
  }
}

resource "azurerm_windows_virtual_machine" "this" {
  name                = "dev-win"
  resource_group_name = azurerm_resource_group.this.name
  location            = azurerm_resource_group.this.location
  size                = "Standard_B2s"
  admin_username      = "adminuser"
  admin_password      = "XXXXXXXXX" //任意のパスワードを指定
  network_interface_ids = [
    azurerm_network_interface.this.id,
  ]

  os_disk {
    caching              = "ReadWrite"
    storage_account_type = "Standard_LRS"
  }

  source_image_reference {
    publisher = "MicrosoftWindowsServer"
    offer     = "WindowsServer"
    sku       = "2022-Datacenter"
    version   = "latest"
  }

  identity {
    type = "SystemAssigned"
  }

}

resource "azurerm_managed_disk" "this" {
  name                 = "dev-disk"
  resource_group_name  = azurerm_resource_group.this.name
  location             = azurerm_resource_group.this.location
  storage_account_type = "Standard_LRS"
  create_option        = "Empty"
  disk_size_gb         = "10"
}

resource "azurerm_virtual_machine_data_disk_attachment" "this" {
  managed_disk_id    = azurerm_managed_disk.this.id
  virtual_machine_id = azurerm_windows_virtual_machine.this.id
  lun                = "10"
  caching            = "ReadWrite"
}

resource "azurerm_virtual_machine_extension" "this" {
  name                       = "dev-vm-extension"
  virtual_machine_id         = azurerm_windows_virtual_machine.this.id
  publisher                  = "Microsoft.Compute"
  type                       = "CustomScriptExtension"
  type_handler_version       = "1.3"
  auto_upgrade_minor_version = true

  protected_settings = <<-SETTINGS
  {
    "fileUris": [
      "${azurerm_storage_blob.this.url}"
      ],
    "commandToExecute": "powershell.exe -ExecutionPolicy Unrestricted -File \"init_storagesyncagent.ps1\"",
    "managedIdentity" : {}
  }
  SETTINGS
}
Azure VMの定義ができました。
ロール割り当て周りの定義
Azure VM周りの定義でも触れましたが、VM拡張機能を使用してBLOBストレージにあるPowerShellスクリプトを実行したいので、ここではロールベースのアクセス許可を定義してます。Azure VM(dev-win)のマネージドIDに対し、BLOBストレージの読み取り許可のロールを定義してます。
次にTerraformからAzure File Syncのクラウドエンドポイントを作る際、権限が不足するので、その定義をしています。[3]
最後にここで定義しているAzureADアカウントは、Azure File SyncエージェントをAzureにつなげるとき(サーバ登録するとき)に指定することを目的としてます。[4]なお、サーバ登録するにはリソースグループに対して共同作成者の権限が必要なので、そのロールを割り当ててます。[5]
resource "azurerm_role_assignment" "dev-role-vm" {
  scope                = azurerm_storage_account.this.id
  role_definition_name = "Storage Blob Data Reader"
  principal_id         = azurerm_windows_virtual_machine.this.identity.0.principal_id
}

data "azuread_service_principal" "this" {
  display_name = "Microsoft.StorageSync"
}

resource "azurerm_role_assignment" "dev-role-storagesync" {
  scope                = azurerm_storage_account.this.id
  role_definition_name = "Reader and Data Access"
  principal_id         = data.azuread_service_principal.this.id
}

resource "azuread_user" "this" {
  user_principal_name = "XXXX@XXXX" //自テナントに所属するアカウント名を指定
  display_name        = "storagesync" //任意の名前を指定
  password            = "XXXXXXXXX" //任意のパスワードを指定
}

resource "azurerm_role_assignment" "dev-role-rg" {
  scope                = azurerm_resource_group.this.id
  role_definition_name = "Contributor"
  principal_id         = azuread_user.this.object_id
}
おわりに
今回はここまで。VM拡張機能でmanagedIdentityを使うにはprotected_settingsにしなければならないとか、ヒアドキュメントの中で変数使いたいけどどうやればよいんだっけとか、クラウドエンドポイントを作る際に権限が不足するけどどう付与するのかとか、結構ハマったところが多かったです。。次回はやっとAzure File Sync周りの部分を書きたいと思います。
-
作ったあとに、ローカルからterraform操作する場合、この設定だとローカルからストレージアカウントにアクセスできないので、ローカルのパブリックIPは別途許可してあげる必要があります。 ↩︎
-
Azure File Syncエージェントのインストールのコードはこのサイトに書いてあるものそのままです。https://learn.microsoft.com/ja-jp/azure/storage/file-sync/file-sync-deployment-guide?tabs=azure-powershell%2Cproactive-portal#install-the-azure-file-sync-agent ↩︎
-
一番上にあるNOTE参照。https://registry.terraform.io/providers/hashicorp/azurerm/latest/docs/resources/storage_sync_cloud_endpoint ↩︎
-
Azure File SyncエージェントをAzureにつなげるとき(サーバ登録するとき)にMicrosoftアカウントを指定すると失敗します。 ↩︎
-
ここら辺に書いてあります。今回はリソースグループに対しての権限を付与しましたが、もう少し絞れるのかもしれません。(リソースグループに対しても権限ないとダメだった記憶があるのですが、その記述は探しきれませんでした。)https://learn.microsoft.com/ja-jp/azure/storage/file-sync/file-sync-deployment-guide?tabs=azure-portal%2Cproactive-portal#register-windows-server-with-storage-sync-service ↩︎
Discussion