🔥
今からDockerを始める人へ!Docker Initがアツい!
Docker Init
5月11日、Dockerチームはdocker initという新たなコマンドラインインターフェース(CLI)コマンドを開発しました。
これはプロジェクトにDockerを追加するプロセスを簡素化する新機能で、ベータ版として導入されました!
コマンド1つで作成
Dockerを使いたいプロジェクトへ移動しdocker initを実行するだけでプロジェクトを検出しDockerで実行するために必要なファイルを自動で生成してくれます。
docker initコマンドを実行することで、既存のプロジェクトをすぐにコンテナ化することができます。
対応状況
現在のベータ版では
- Go
- Node.js
- Python
をサポートしており、開発は今後Java、 Rust、.NETを含む他の言語とフレームワークのサポートを拡大するとされています。
実際に使ってみた
Go
今回はGoのEchoというフレームワークの公式ドキュメントを参考に使用してみたいと思います。
- セットアップする
setup
go mod init myapp
# then
go get github.com/labstack/echo/v4
- ルートに
server.goを作成する
server.go
package main

import (
	"net/http"

	"github.com/labstack/echo/v4"
)

func main() {
	e := echo.New()
	e.GET("/", func(c echo.Context) error {
		return c.String(http.StatusOK, "Hello, World!")
	})
	e.Logger.Fatal(e.Start(":1323"))
}
-
docker initを実行し、いくつかの質問に答えます

作成されたファイル
Dockerfile
# syntax=docker/dockerfile:1

# Comments are provided throughout this file to help you get started.
# If you need more help, visit the Dockerfile reference guide at
# https://docs.docker.com/engine/reference/builder/

################################################################################
# Create a stage for building the application.
ARG GO_VERSION=1.20
FROM golang:${GO_VERSION} AS build
WORKDIR /src

# Download dependencies as a separate step to take advantage of Docker's caching.
# Leverage a cache mount to /go/pkg/mod/ to speed up subsequent builds.
# Leverage bind mounts to go.sum and go.mod to avoid having to copy them into
# the container.
RUN --mount=type=cache,target=/go/pkg/mod/ \
    --mount=type=bind,source=go.sum,target=go.sum \
    --mount=type=bind,source=go.mod,target=go.mod \
    go mod download -x

# Build the application.
# Leverage a cache mount to /go/pkg/mod/ to speed up subsequent builds.
# Leverage a bind mount to the current directory to avoid having to copy the
# source code into the container.
RUN --mount=type=cache,target=/go/pkg/mod/ \
    --mount=type=bind,target=. \
    CGO_ENABLED=0 go build -o /bin/server .

################################################################################
# Create a new stage for running the application that contains the minimal
# runtime dependencies for the application. This often uses a different base
# image from the build stage where the necessary files are copied from the build
# stage.
#
# The example below uses the alpine image as the foundation for running the app.
# By specifying the "latest" tag, it will also use whatever happens to be the
# most recent version of that image when you build your Dockerfile. If
# reproducability is important, consider using a versioned tag
# (e.g., alpine:3.17.2) or SHA (e.g., alpine:sha256:c41ab5c992deb4fe7e5da09f67a8804a46bd0592bfdf0b1847dde0e0889d2bff).
FROM alpine:latest AS final

# Install any runtime dependencies that are needed to run your application.
# Leverage a cache mount to /var/cache/apk/ to speed up subsequent builds.
RUN --mount=type=cache,target=/var/cache/apk \
    apk --update add \
        ca-certificates \
        tzdata \
        && \
        update-ca-certificates

# Create a non-privileged user that the app will run under.
# See https://docs.docker.com/develop/develop-images/dockerfile_best-practices/#user
ARG UID=10001
RUN adduser \
    --disabled-password \
    --gecos "" \
    --home "/nonexistent" \
    --shell "/sbin/nologin" \
    --no-create-home \
    --uid "${UID}" \
    appuser
USER appuser

# Copy the executable from the "build" stage.
COPY --from=build /bin/server /bin/

# Expose the port that the application listens on.
EXPOSE 1323

# What the container should run when it is started.
ENTRYPOINT [ "/bin/server" ]
compose.yml
# Comments are provided throughout this file to help you get started.
# If you need more help, visit the Docker compose reference guide at
# https://docs.docker.com/compose/compose-file/

# Here the instructions define your application as a service called "server".
# This service is built from the Dockerfile in the current directory.
# You can add other services your application may depend on here, such as a
# database or a cache. For examples, see the Awesome Compose repository:
# https://github.com/docker/awesome-compose
services:
  server:
    build:
      context: .
      target: final
    ports:
      - 1323:1323

# The commented out section below is an example of how to define a PostgreSQL
# database that your application can use. `depends_on` tells Docker Compose to
# start the database before your application. The `db-data` volume persists the
# database data between container restarts. The `db-password` secret is used
# to set the database password. You must create `db/password.txt` and add
# a password of your choosing to it before running `docker compose up`.
#     depends_on:
#       db:
#         condition: service_healthy
#   db:
#     image: postgres
#     restart: always
#     user: postgres
#     secrets:
#       - db-password
#     volumes:
#       - db-data:/var/lib/postgresql/data
#     environment:
#       - POSTGRES_DB=example
#       - POSTGRES_PASSWORD_FILE=/run/secrets/db-password
#     expose:
#       - 5432
#     healthcheck:
#       test: [ "CMD", "pg_isready" ]
#       interval: 10s
#       timeout: 5s
#       retries: 5
# volumes:
#   db-data:
# secrets:
#   db-password:
#     file: db/password.txt
.dockerignore
# Include any files or directories that you don't want to be copied to your
# container here (e.g., local build artifacts, temporary files, etc.).
#
# For more help, visit the .dockerignore file reference guide at
# https://docs.docker.com/engine/reference/builder/#dockerignore-file

**/.DS_Store
**/.classpath
**/.dockerignore
**/.env
**/.git
**/.gitignore
**/.project
**/.settings
**/.toolstarget
**/.vs
**/.vscode
**/*.*proj.user
**/*.dbmdl
**/*.jfm
**/bin
**/charts
**/docker-compose*
**/compose*
**/Dockerfile*
**/node_modules
**/npm-debug.log
**/obj
**/secrets.dev.yaml
**/values.dev.yaml
LICENSE
README.md
実行
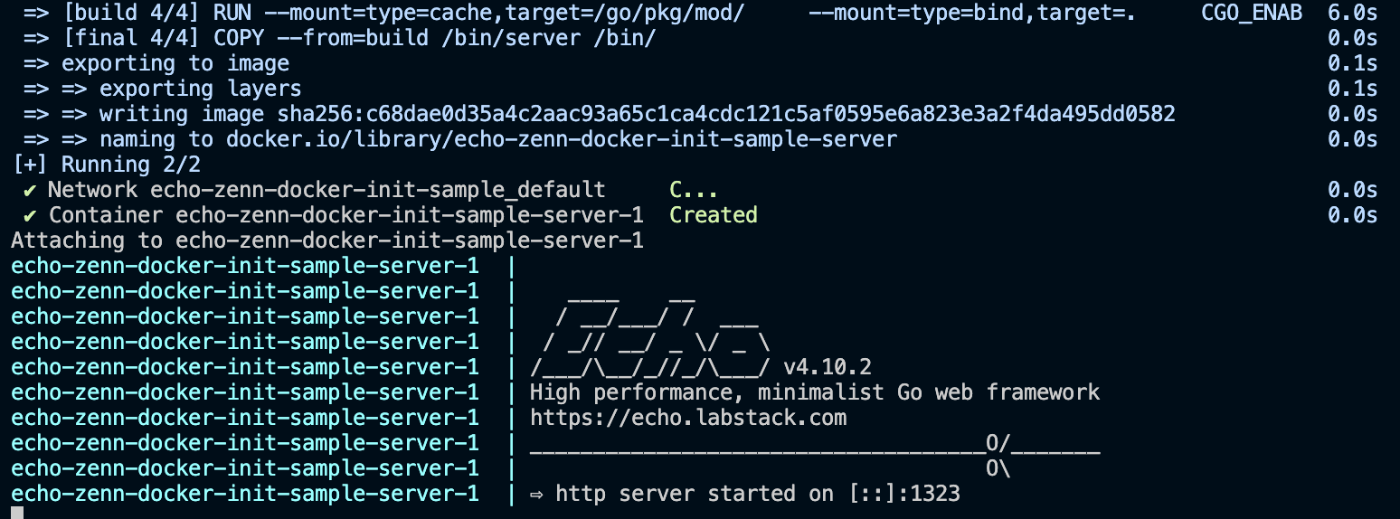
docker compose up --buildを実行してみます
これで無事サーバーを起動することができました🎉

curlでもきちんとレスポンスが返ってきています!

感想
昨今はChatGPTなどAIの勢いがすごいですが、公式からこのようなツールが出るのはとても嬉しいことですね。
ベースとなるDockerfileを書いてくれるのはとても良い体験だなと感じました。
今後はサクッとDockerfileを作成したいときにdocker initを使ってみるのはアリかなと思いました!
参考
Discussion