AWS Amplify + Next.js + TypeScript で作るCognitoユーザープールのアカウント管理アプリケーション
はじめに
旅行プラットフォーム部の武田です。
最近、AWS Amplifyを利用してNext.jsのアプリケーションをホスティングする機会があり、実際にアプリケーションを作りながら開発の流れについて紹介します。
Amplifyで楽をしつつ一部のAPIはNext.jsのAPI Routesを利用する、というやり方が比較的シンプルで良いと感じました。
AmplifyでAPIを構築する場合、Next.jsのAPI Routesを利用することも有力な選択肢になりそうです。
今回作るアプリケーションはCognitoユーザープールのユーザーをAWSの管理コンソール経由ではなく、Next.jsのアプリケーション経由でユーザーを管理するアプリになります。
- Cognitoユーザープールを利用してユーザーを管理したい
- アカウントの管理者にはAWSの管理コンソールではなく、専用のweb画面からユーザー管理してほしい
というケースを想定して作ったアプリです。
AWS Amplifyとは
AWS AmplifyはクラウドベースのWeb/モバイルアプリケーションを開発するためのライブラリやサービス、ツールセットです。
AWSの各種サービスを利用したバックエンドコンポーネントの構築もAmplifyに任せることができ、デプロイパイプラインも簡単に構築できます。
一方で、すべてが簡単に構築できるかというとそうではなく、裏側で動いているAWSのサービスをある程度把握しておかないといけないケースがあります。
Amazon Cognitoとは
Web/モバイルアプリの認証、承認、およびユーザー管理機能を提供するサービスです。
AWS Management Consoleからユーザー管理ができる他、管理用のAPI経由でユーザーの登録、更新、削除等の操作ができます。
システムイメージ
今回作成するアプリケーションのシステムイメージは以下のようになります。

アカウント管理アプリそのものを認証するためのアプリ用ユーザープールとは別のユーザープールを用意しています。
Amplifyで開発したNext.jsのアプリケーションからCognito user pools APIを利用して管理対象のユーザープールにユーザーの作成や更新、削除をする機能を用意します。
今回はNext.jsのAPI routesでこのユーザー管理用のAPIを用意しましたが、AmplifyのFunctionsを利用してLambdaで作るという選択肢もあります。
ただ、Amplifyの機能ですべてを作ろうとせず、API Routesを利用するとNext.jsユーザーとしては非常にわかりやすく構築できました。
今回開発するアカウント管理アプリケーションの注意点
Cognitoユーザープールをアカウント情報の箱として利用するため、「Cognitoユーザープールでできること」=「このアプリケーションでできること」に制約されます。
特にCognitoのクォータは事前に十分確認しておく必要があります。
またCognito user pools APIでできない操作は基本的にできないため、APIの仕様についても事前に把握しておく必要があります。
例えば、ユーザーの一覧を取得するListUsersというAPIは、1度に60件までしか取得できない、指定できる検索条件はひとつのみで絞り込みに利用できる属性も一部のみ、などの制約があります。
場合によっては、アカウント情報の箱としてCognito以外のものを選択した方が良いケースもあると思います。自分が作りたいものに合わせて選定しましょう。
完成後のアプリ
以下は完成後のアプリケーションのイメージです。ユーザーの一覧画面、ユーザー作成・更新画面、カスタム属性の管理画面を用意しています。


また実装後のソースコードはこちらで閲覧できます。
アプリ開発の流れ
詳細はソースコードを見ていただければと思いますが、ここからはざっくりとアプリ開発の流れを紹介します。
アプリの初期設定
基本的な流れは公式ドキュメントに沿ってやっていきます。
今回、TypeScriptで構築するため、以下のようにアプリケーションを用意しました。
$ npx create-next-app --ts --use-npm cognito-user-manager
$ cd cognito-user-manager
Amplifyの設定をします。Amplify CLIの導入がまだの場合はnpm install -g @aws-amplify/cliでインストールしてください。
以下でブラウザが開き、Amplifyを操作する権限を持ったIAMユーザーを作成できます。
$ amplify configure

Follow these steps to set up access to your AWS account:

Sign in to your AWS administrator account:
https://console.aws.amazon.com/
Press Enter to continue

Specify the AWS Region
? region:  ap-northeast-1
Specify the username of the new IAM user:
? user name:  {作成するIAMユーザー名}
Complete the user creation using the AWS console
https://console.aws.amazon.com/iam/home?region=ap-northeast-1#/users$new?step=final&accessKey&userNames={作成するIAMユーザー名}&permissionType=policies&policies=arn:aws:iam::aws:policy%2FAdministratorAccess-Amplify
Press Enter to continue

Enter the access key of the newly created user:
? accessKeyId:  ********************
? secretAccessKey:  ****************************************
This would update/create the AWS Profile in your local machine
? Profile Name:  {好きなprofile名}
続いてAmplifyアプリケーションを初期化します。公式ドキュメントに記載がありますが、Amplifyは自動でpackage.jsonの中を確認し、build scriptに next export が存在する場合はSSGモードでデプロイします。今回はAPI Routesを利用するため、next exportではない方式で進めます。
$ amplify init
Note: It is recommended to run this command from the root of your app directory
? Enter a name for the project {好きなプロジェクト名}

? Initialize the project with the above configuration? No
? Enter a name for the environment dev
? Choose your default editor: Vim (via Terminal, macOS only)
? Choose the type of app that you're building javascript
Please tell us about your project
? What javascript framework are you using react
? Source Directory Path:  src
? Distribution Directory Path: build
? Build Command:  npm run-script build
? Start Command: npm run-script start
Using default provider  awscloudformation
? Select the authentication method you want to use: AWS profile
アプリに認証を追加する
Amplifyは簡単に認証機能を追加できます。ひとまずデフォルトで用意しますが、ここで設定するサインインオプション関連の項目は基本的にユーザープール作成後に変更できないため注意が必要です。
$ amplify add auth
Using service: Cognito, provided by: awscloudformation

 The current configured provider is Amazon Cognito.

 Do you want to use the default authentication and security configuration? Default configuration
 Warning: you will not be able to edit these selections.
 How do you want users to be able to sign in? Username
 Do you want to configure advanced settings? No, I am done.
 Successfully added auth resource ... locally

$ amplify push
これでアプリ用ユーザープールが作成できました。
既に別でアプリ用のユーザープールを用意している場合はamplify import authコマンドでAmplifyアプリと繋ぐことができます。
アプリに認証画面を追加する
AmplifyではReact用のUIライブラリが用意されており、そちらを利用して認証を組み込みます。まずは必要なpackageをインストールします。
$ npm i aws-amplify @aws-amplify/ui-react
今回のアプリでは全画面認証されている必要があるため、_app.page.tsxに処理を書きます。また.page.tsxを拡張子として認識する設定を入れています。
import { Authenticator } from "@aws-amplify/ui-react";
import { Amplify } from "aws-amplify";
import { AppPropsWithLayout } from "../types";
import { MainLayout } from "../layouts/MainLayout";
import awsExports from "../src/aws-exports";

import "../styles/globals.css";
import "antd/dist/antd.dark.css";
import "@aws-amplify/ui-react/styles.css";

Amplify.configure({ ...awsExports, ssr: true });

const components = {
  Header() {
    return <div style={{ padding: "24px 0" }}>login header sample</div>;
  },
};

export default function App({ Component, pageProps }: AppPropsWithLayout) {
  const getLayout = Component.getLayout ?? MainLayout;
  return (
    <Authenticator.Provider>
      {getLayout(
        <Authenticator hideSignUp components={components}>
          <Component {...pageProps} />
        </Authenticator>,
      )}
    </Authenticator.Provider>
  );
}
これで認証の組み込みが完了です!AWSのCognitoの管理コンソールから amplify add auth した際に作成されたユーザープールにユーザーを作成するとそのユーザーでログインできます。
管理対象のCognitoユーザープールの作成
このアプリからユーザーを登録するユーザープールを用意します。今回はAWSのコンソール画面から用意しましたが、AWS CDKなどの構成管理ツールを利用すると便利です。
アプリ側のユーザープールを作成する際にも記載しましたが、サインインオプション関連など、ユーザープール作成時にしか指定できない項目があるため、こちらは慎重に決める必要があります。

また、今回はアカウント管理アプリを通してのみユーザーを登録する想定のため、セルフサインアップの設定はオフにしています。

Cognitoのカスタム属性を使う
Cognitoでは name, email といった標準の属性以外にカスタム属性を追加できます。
このカスタム属性を利用してそのユーザーがどういった操作ができるかをこのユーザープールを利用するアプリ側で制御する想定です。
カスタム属性は属性名にcustom:という接頭辞が付きます。
今回カスタム属性としてはひとまずsampleというのを用意しました。

custom:sampleというカスタム属性が作成できました。このカスタム属性に設定できる値をテキストボックスではなくドロップダウンメニューから選択させる形式で実装しました。
このとき選択できる項目については、AmplifyのGraphQL APIで作成してみました。
Amplify GraphQL APIの作成
AmplifyではGraphQL Schemaに @model ディレクティブを書くことでAmazon DynamoDBのテーブルを作成してくれます。
また、@authディレクティブを利用して認証時のみ実行できたり、特定のユーザーグループのみが操作できるよう制御が可能です。
その他、存在するディレクティブについてはドキュメントを参照してください。
では実際にAPIを作ってみます。
$ amplify add api
? Select from one of the below mentioned services: GraphQL
? Here is the GraphQL API that we will create. Select a setting to edit or continue Continue
? Choose a schema template: Blank Schema
- backend APIの作成
- DynamoDBのテーブル作成
- frontendからbackend APIを呼びだすコードの生成
といった作業をschema.graphqlを用意するだけで全てAmplifyがやってくれます。amplify/backend/api/cognitousermanager/schema.graphqlのファイルを以下のように編集します。
# This "input" configures a global authorization rule to enable public access to
# all models in this schema. Learn more about authorization rules here: https://docs.amplify.aws/cli/graphql/authorization-rules
input AMPLIFY {
  globalAuthRule: AuthRule = { allow: public }
} # FOR TESTING ONLY!
type CustomAttributeKey
  @model
  @auth(
    rules: [
      # admin user can access any operations.
      { allow: groups, groups: ["admin"] }
      # login user can read them.
      { allow: private, operations: [read] }
    ]
  ) {
  customAttributeKey: ID! @primaryKey
  description: String!
  displayOrder: Int
  customAttributeValues: [CustomAttributeValue] @hasMany
}

type CustomAttributeValue
  @model
  @auth(
    rules: [
      # admin user can access any operations.
      { allow: groups, groups: ["admin"] }
      # login user can read them.
      { allow: private, operations: [read] }
    ]
  ) {
  id: ID!
  customAttributeValue: ID!
  description: String
  displayOrder: Int
  customAtrributeKey: CustomAttributeKey @belongsTo
}
カスタム属性で指定できる属性名(custom:{この部分})としてCustomAttributeKey、およびそれに設定できる項目をCustomAttributeValueとして用意しています。
{ allow: groups, groups: ["admin"] } という設定で、adminグループに属するユーザーのみがすべての操作ができ、ログインユーザーは読み込みの操作のみできる設定をしています。
このあたりの権限制御も非常に簡単に設定ができるので便利です。
Cognitoユーザープールでadminグループを作成し、認証を組み込むところで作成したユーザーをadminグループに紐づければすべての操作ができるユーザーを用意できます。
グループの追加はAmplify CLI経由でできます。
$ amplify update auth
Please note that certain attributes may not be overwritten if you choose to use defaults settings.
Using service: Cognito, provided by: awscloudformation
What do you want to do? Create or update Cognito user pool groups
? Provide a name for your user pool group: admin
? Do you want to add another User Pool Group No
✔ Sort the user pool groups in order of preference · admin
✅ Successfully updated auth resource ... locally
ユーザープールに登録したユーザーをグループに追加するのはAWSのコンソール経由で実施しました。
アカウント管理アプリそのものを操作するユーザーについての権限設定になるため、amplify add authした際に作成されたユーザープールで実施する点に注意してください。

続いてbackendを作成します。
$ amplify push

...

Edit your schema at /home/takeda/work/cognito-user-manager/amplify/backend/api/cognitousermanager/schema.graphql or place .graphql files in a directory at /home/takeda/work/cognito-user-manager/amplify/backend/api/cognitousermanager/schema
? Do you want to generate code for your newly created GraphQL API Yes
? Choose the code generation language target typescript
? Enter the file name pattern of graphql queries, mutations and subscriptions src/graphql/**/*.ts
? Do you want to generate/update all possible GraphQL operations - queries, mutations and subscriptions Yes
? Enter maximum statement depth [increase from default if your schema is deeply nested] 4
? Enter the file name for the generated code src/API.ts
amplify push時にcodegen関連の設定をするプロンプトが表示されるので必要に応じて変更してください。
GraphQL APIをアプリから利用する
GraphQL APIを実行するコードはsrc/API.tsに自動生成されています。こちらには型定義含めて生成されています。
データフェッチングライブラリとして今回は@tanstack/queryを利用してみます。
_app.page.tsxにQueryClientProviderを追加します。
...
  const getLayout = Component.getLayout ?? MainLayout;
  const [queryClient] = React.useState(() => new QueryClient());
  return (
    <Authenticator.Provider>
      <QueryClientProvider client={queryClient}>
        {getLayout(
          <Authenticator hideSignUp components={components}>
            <Component {...pageProps} />
          </Authenticator>,
        )}
      </QueryClientProvider>
    </Authenticator.Provider>
  );
...
SSR等する場合はHydrationの設定等も必要です。適宜、設定を追加してください。
カスタム属性のキー情報を作成するカスタムフックを以下のように用意します。
import { GraphQLResult } from "@aws-amplify/api";
import { useMutation, useQueryClient } from "@tanstack/react-query";
import { message } from "antd";
import { API } from "aws-amplify";
import {
  CreateCustomAttributeKeyInput,
  CreateCustomAttributeKeyMutation,
} from "../../src/API";
import { createCustomAttributeKey } from "../../src/graphql/mutations";

export const useCreateCustomAttributeKey = () => {
  const queryClient = useQueryClient();
  const mutation = useMutation(
    (values: CreateCustomAttributeKeyInput) =>
      (
        API.graphql({
          query: createCustomAttributeKey,
          variables: { input: values },
          authMode: "AMAZON_COGNITO_USER_POOLS",
        }) as Promise<GraphQLResult<CreateCustomAttributeKeyMutation>>
      ).then((res) => res.data?.createCustomAttributeKey),
    {
      onSuccess: () => {
        message.success(`Create CustomAttributeKey successed!`);
        queryClient.invalidateQueries(["listCustomAttributeValues"]);
      },
      onError: (error: GraphQLResult) => {
        const errors = error?.errors?.map((e: any) => e.errorType);
        message.error(
          `Failed to create CustomAttributeKey (${errors?.join()})`,
        );
      },
    },
  );

  return {
    create: mutation.mutate,
    isLoading: mutation.isLoading,
    isSuccess: mutation.isSuccess,
    isError: mutation.isError,
  };
};
認証としてCognitoユーザープールを利用しているのでauthModeにはAMAZON_COGNITO_USER_POOLSを設定しています。
invalidateQueriesで"listCustomAttributeValues"としていますが、これは別で作成するCustomAttributeValueを取得するクエリ結果を再取得するために記載しています。
同様に、更新処理や削除処理などカスタムフックとして用意します。詳細はソースコードを参照していただければと思います。
管理対象のCognitoユーザープール用のアクセスキーを用意する
こちらがAmplifyの管理外になるため面倒な部分です。IAMで管理対象のCognitoユーザープールへのアクセス権を持つユーザーを追加します。
認証情報タイプはアクセスキー - プログラムによるアクセスを選択します。

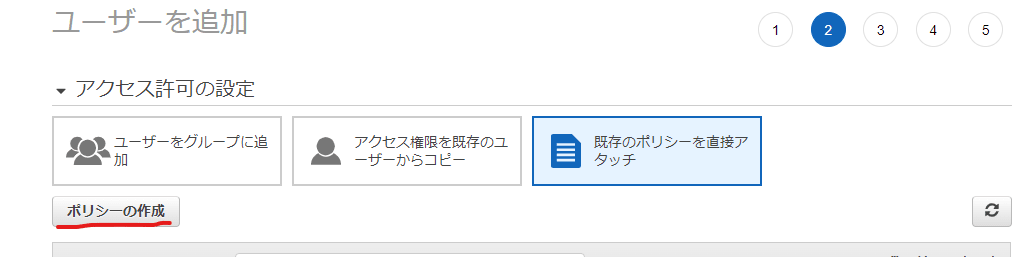
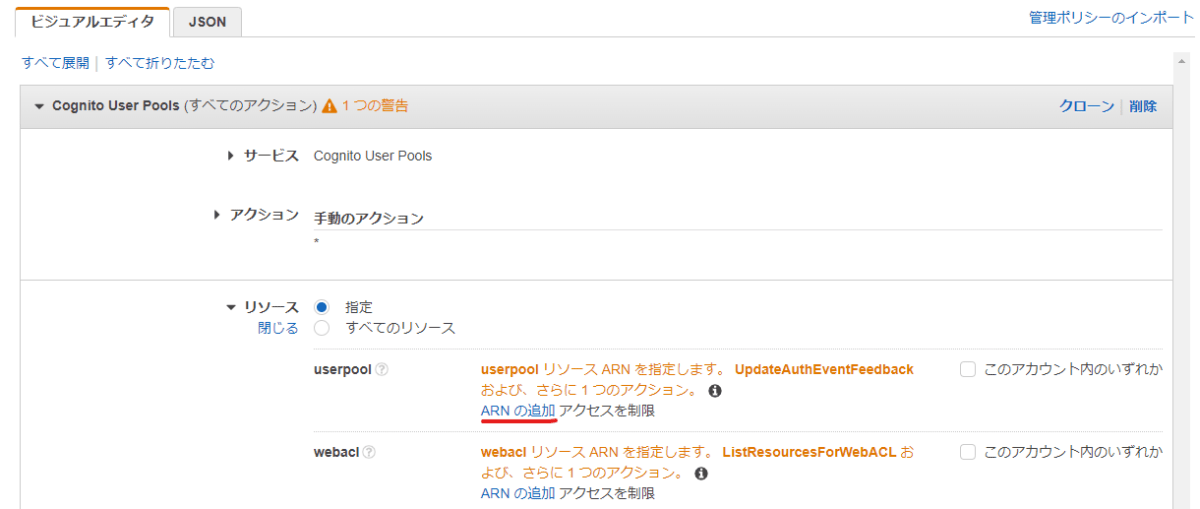
既存のポリシーを直接アタッチ → ポリシーの作成を選択して、管理対象のユーザープールのみ操作できるポリシーを作成します。
ここで作成したアクセスキーを環境変数として設定します。ローカルの開発環境であれば、.env.localに設定します。Amplifyでホスティングする際は管理コンソールから設定します。
環境変数を設定する際の注意点
アクセスキーはNext.jsであれば環境変数名にNEXT_PUBLIC_*という接頭辞を付けないよう注意してください。
NEXT_PUBLIC_という接頭辞を付けるとbuild時にインラインで展開され、ブラウザからも参照できてしまう可能性があるためです。
他のフロントエンドフレームワークにも同様の機能が用意されており、ReactであればREACT_APP、GatsbyであればGATBYといった接頭辞を付けないよう気をつける必要があります。
また、Next.jsではデフォルト設定として、.env, .env.developmentと.env.productionをリポジトリに入れるよう推奨されています。
しかし、Amplifyでホスティングする際に設定した環境変数が.envファイルの内容で上書きされてしまうということが起きました。.envはリポジトリに入れず、.env.sampleなど別のファイル名で参考値を設定すると良さそうです。
Next.jsのAPI routesを利用してユーザーを管理するAPIを作る
こちらはシンプルにREST APIとして作ってみます。先ほど作成したアクセスキーを利用してCognito APIを叩き、ユーザーを管理するAPIを作ります。
HTTP methodでのルーティングや認証等のミドルウェアを組み込む場合はnext-connectを利用すると便利です。
Cognito APIへのリクエストは@aws-sdk/client-cognito-identity-providerを利用します。
実装イメージは以下です。
// Amplify SSR configuration needs to be done within each API route
Amplify.configure({ ...config, ssr: true });

const router = createRouter<
  NextApiRequest,
  NextApiResponse<HttpResponse<{}>>
>();

router
  // 認証用のmiddlewareをはさむ
  .use(auth)
  .get(async (req, res) => {
    // ユーザー一覧の取得処理
  })
  .post(async (req, res) => {
    // ユーザー作成処理
  });

export default router.handler({
  onError() {
    // エラー処理
  },
  onNoMatch() {
    // ルーティングにマッチしない場合の処理
  }
});
ここで、可能であればAPI Routesでレスポンスする形式を各APIで統一できると利用する側でも扱いやすくなるので良いと考えています。
今回は以下のような形式で統一しています。
export type ErrResponse = {
  data: null;
  error: Err;
  status: HttpStatus;
};

export type DataResponse<T> = {
  data: T;
  error: null;
  status: HttpStatus;
};

export type HttpResponse<T> = DataResponse<T> | ErrResponse;
このあたりは必要に応じて、個別にAPIを実装していく前にアプリケーション内で統一された形式を事前に定義しておくと良さそうです。
APIに認証を組み込む
認証用のmiddlewareを以下のように用意しています。
import { withSSRContext } from "aws-amplify";
import { NextApiRequest, NextApiResponse } from "next";
import { RequestHandler } from "next-connect/dist/types/node";
import { Nextable } from "next-connect/dist/types/types";
import { UnauthorizedError } from "definitions/errors";

type HandleMiddleware = Nextable<
  RequestHandler<NextApiRequest, NextApiResponse>
>;

export const auth: HandleMiddleware = async (req, _res, next) => {
  const { Auth } = withSSRContext({ req });
  try {
    // 認証済みでない場合はrejectされる
    await Auth.currentAuthenticatedUser();
  } catch (e) {
    throw new UnauthorizedError();
  }
  await next();
};
withSSRContextを利用し、現在認証されているユーザーセッションを取得できます。
currentAuthenticatedUserメソッドは認証済みでないユーザーの場合、rejectされます。
認証済みでない場合はUnauthorizedErrorをthrowするよう実装しています。
APIをアプリから利用する
基本的にはGraphQLのAPIをアプリから利用した場合と同様です。以下のようなカスタムフックを用意しています。
export const useUsers = (condition: SearchCondition) => {
  const { isFetching, data, error } = useQuery<
    HttpResponse<ListUsersCommandOutput>
  >(["users"], async () => {
    const { data } = await fetcher(`/api/users`);
    return data;
  });

  const users = getFilteredUsers(data?.data?.Users, condition);
  return {
    isFetching,
    users,
    error,
  };
};
ここではfetcherというfetch APIを簡単にwrapした関数を用意しています。fetch APIは200番台以外のステータスコードが返却されてもrejectされないため、200番台以外でrejectするよう対応しています。上記のコードでは対応していませんが、200番台以外のステータスコードだった場合、onErrorの処理を書くことで適切にエラーハンドリングができます。
注意点として、今回はAPIのレスポンスをCognitoのListUsersCommandのレスポンスをそのまま返すようにしていますが、本来は必要な情報に絞りつつ、APIレスポンスのインタフェースを改めて定義した方が良いです。
ユーザーを格納する先としてCognitoではないものを利用したい、となった場合にフロントエンドのコードを書き換える必要なく、APIの修正のみで済ませられるためです。(Cognitoの形式に合わせて再実装すれば良いというのはありますが...)
まとめ
Next.jsをAmplifyでホスティングしてCognitoのユーザーを管理するアプリケーションを作りました。
色々と改善できそうなところはありますが、ユーザーの作成や削除等のシンプルな操作とカスタム属性で選択できる項目を制限できる仕組みを用意できました。
AmplifyがNext.jsのAPI RoutesやSSRをサポートしているため、思ったより柔軟にアプリ開発ができるなという印象を持ちました。
Middleware等のすべての機能を利用できるわけではありませんが、Next.jsをホスティングする際はAmplifyも選択肢に入れてみてはどうでしょうか。

Discussion